Luxurious doll furniture with your own hands: simple and clear master classes.
When a daughter appears in the house, mom relives her entire childhood: dolls, fairy-tale houses, amazing outfits and much more. And for needlewomen, this is a real fairy tale - after all, there is an opportunity to do so much with your own hands! In this article we will tell you how to create unique furniture for dolls from textiles and more. But most importantly, most of the materials most often lie idle among needlewomen! These include pieces of fabric, delightful remnants of lace and colorful laces, and much, much more!
The principle of working with materials and models
First, sketches are prepared, and then original patterns are formed in the full size of each frame detail. The simplest options for making a frame for different models of sofas:
- The base for a classic sofa should be made of a material that will hold its shape well. To simplify the task, it is better to prepare several separate parts, which are then connected: seat, back, handles. The seat is a rectangle with sufficient height; the back is the same rectangle, but with less thickness; two handles. If the base was made of foam rubber, then all the components can be connected using textile glue or thread. The foam is fixed exclusively with glue.
- The sofa will look best if the frame is made of cardboard. You can make a sofa for dolls from a box: use small cardboard shoe boxes or make them yourself and then put them together. The parts are fastened together using a stapler. Then each seam should be glued with tape.
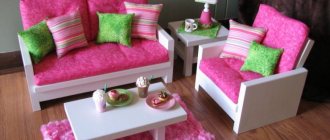
- A Turkish sofa can be completely soft. A rectangular bag is sewn from fabric and filled with cotton wool, pieces of foam rubber or finely chopped foam. The rest depends on the decor, which is formed from a large number of small pillows.
Step-by-step making of a simple sofa for Barbie
The simplest sofa can be made from cardboard from a box. If the sofa is being created for the first time, then it is recommended to first draw the drawing on paper, carefully measuring the dimensions of the furniture, then transfer it to the material. For easy creation, all parts are cut out separately and then glued together.
Calculation of the length of parts based on the size of the doll. For example, Barbie is 24 cm long and 6 cm wide, then:
- the length of the bed is – 20 + 2 = 24 cm;
- width of the bed – 6 + 2 = 8 cm;
- seat height – 24: 4 = 6 cm;
- The height of the backrest is 6 + 6 = 12 cm, and its width is 1.5 cm greater than the width of the seat - 24 + 1.5 = 25.5 cm.
- the height of the armrests is 6 * 1.5 = 9 cm, and the width is 0.5 cm less than the width of the sofa - 8 - 0.5 = 7.5 cm.
Step-by-step instruction:
- Prepare the necessary set of materials to create a sofa. It’s easier to concentrate when everything is already at hand and you don’t need to be distracted.
- Draw a drawing where all the lines of the back, handles, seat, as well as the places of cuts and folds will be marked.
- Transfer the drawing onto cardboard. Cut out the details. Attach the scraps with glue or a stapler to the bottom of the future sofa, so it will be more stable and dense.
- Fasten all the parts together using glue or a stapler.
- If you plan to make upholstered furniture for dolls, then you need to cover the outside of the cardboard with foam rubber on the sofa. It can be replaced with a dishwashing sponge or any other soft filler.
- Cut out the fabric that will become the upholstery of the sofa. Each piece of furniture is cut out of fabric separately and glued with glue. If the material does not hold, then use a needle and thread. It is recommended to close all seams inward so that the child cannot unravel the sofa upholstery by pulling the thread.
- The last stage is decoration. The furniture can be decorated as desired: decorate the fold lines with satin ribbons, sew pads from sponges, diversify the color scheme with fabrics.
You can also cut out corner furniture for a doll from cardboard with your own hands.
Dimensions
Furniture dimensions are determined in two ways. If you plan to furnish a house for a standard Barbie, you should use the proportions of 1:6 (reduce the parameters of ordinary cabinets, chests of drawers, beds and other products by 6 times). You can go a more complex and precise way:
- Measure the height of the doll and yours.
- Find out the similarity coefficient - the relationship between the obtained indicators.
- Measure the dimensions of the furniture in the house.
- Calculate them for the dollhouse by multiplying the similarity coefficient by the parameters from the previous paragraph.
Requirements for children's upholstered furniture, its typical dimensions Based on the proportions of 1:6, the standard height of furniture is:
- Table - from 13 cm (the dining table will be the same height, but may have a round shape).
- Chair - from 8 cm.
- Wardrobe - from 33 cm.
- Chest of drawers - from 11 cm.
Bed width - from 15 cm, length - from 32 cm. In addition to Barbie girls, dolls can be men, children or babies. Their traditional height:
- men - 15 cm;
- children - 7.5–10 cm;
- infants - 6.5–7.5 cm
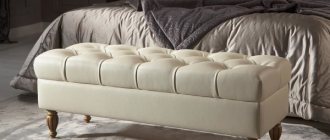
How to sew pillows and a mattress
Soft pillows will make any sofa more comfortable. For a folding sofa made of plywood, a good mattress would be a good idea.
Materials and tools:
- scraps of fabric (best with a small pattern);
- padding polyester or cotton wool;
- Ruler and pencil;
- pins;
- needle;
- threads;
- glue "Moment" (optional).
You can sew either by machine or by hand using a back stitch.
Instructions:
- Draw 2 squares for the pillow and 2 rectangles for the mattress on the wrong side. Important: the mattress should be slightly smaller than the seat.
- Cut out the pieces, leaving a small allowance. Along the marked line, fasten them with pins with the front side facing inward.
- Sew three sides and, after removing the pins, turn the products inside out.
- Stuff the pillow tightly with cotton wool. For a mattress, it is better to cut out a rectangle from thick padding polyester.
- Fold the edges of the fabric inward and sew the final seams by hand. For greater accuracy, they can be taped so that the stitches are not visible.
- The mattress can be sewn through at six points, making large decorative knots, and the pillow can be decorated with lace braid or tassels.
A small sofa will fit perfectly into a doll's living room. Now the dolls will be comfortable watching TV and talking in the evenings.
What you need
A sofa can be made from scrap materials - you don’t have to buy practically anything.
The main materials will be:
- tall candy boxes;
- plywood;
- pressed cardboard;
- padding polyester;
- matchboxes.
To assemble all the parts you need good transparent glue (glue gun).
You will also need the following tools:
- ruler;
- a simple pencil;
- clothespins;
- scissors;
- stationery knife;
- jigsaw
In order to decorate the craft, you will need colored paper and scraps of fabric. Acrylic paints, leftover wallpaper, beads and braid will come in handy.
Doll wardrobe
You will need: plywood 4 mm thick, white wood paint, cabinetry veneer, carbon paper, sheets of paper, pencil, ruler, jigsaw, jigsaw blade for straight and radial cuts, glue, sandpaper, brushes and sponges for painting, scissors, screwdriver, construction knife, 2 wooden sticks, furniture fittings (hanger hooks, 3 handles, self-tapping screws, 4 hinges).
Master Class
- Draw a sketch of the cabinet.
- Draw each detail on paper.
- Cabinet parts: 2 side walls and 2 rectangular parts for them, roof, bottom, back wall, partition, 2 shelves, drawer module, 2 doors and 2 patterned parts for them, 4 figured legs, upper horizon (shaped part), drawer (bottom, back, 2 sides, front panel and a rectangular part for it).
- Cabinet size: height 34 cm, width 22 cm, depth 9 cm.
- Transfer the cabinet parts onto the plywood using carbon paper.
- Use a jigsaw to cut out every detail of the future cabinet.
- Sand each piece of the cabinet with sandpaper.
- Glue the redwood veneer to the cabinet sides, drawer fronts and cabinet doors, then leave to dry.
- Paint the patterned pieces for the cabinet doors, the rectangle for the drawer and 2 rectangles for the side walls with white paint, then wait until dry and glue them on as decoration.
- Paint the 4 curly legs with white paint and leave to dry.
- Glue the 2 sides, the back wall of the cabinet and the legs as shown in the photo and leave to dry.
- Glue the box parts together.
- Glue the roof and the upper figured horizon.
- Glue the partition inside the cabinet, visually dividing it in half.
- Glue 2 shelves as shown in the image.
- Glue a wooden stick as a pipe for things.
- Make hangers from pieces of wood and hooks.
- Paint the inside of the cabinet, hangers, top horizon and inside of the drawer with white paint, then leave to dry.
- Attach handles to drawer and cabinet doors.
- Screw the hinges to the cabinet and attach the cabinet doors.
The plywood doll closet is ready!
Sofas for dolls: step-by-step instructions
Now it’s all about how to make a sofa for dolls with your own hands. Prepare a work corner and devote two to three hours of free time to making crafts.
Sofa out of the box
There is always a use for a good box in crafts.
You will need:
- tall candy box;
- a piece of thick cardboard;
- padding polyester;
- napkins or scraps of paper;
- ruler;
- a simple pencil or pen;
- scissors or stationery knife;
- clothespins;
- glue "Moment";
- fabric and braid for decoration.
This sofa is designed for dolls such as “Brothers” or “Monster High”. For other dolls, you need to select the sizes yourself.
Instructions:
- Mark the length of the box: measure 7 cm from one end and 9 cm from the other. Using a ruler, draw lines along the width and sides.
- Cut the box along the 9 cm line. You do not need to cut completely, but only along one side and the sides.
- Place the box on its entire side. Cut the 9 cm long part facing you in the center and open it. Make cuts in the corners of the whole part (see photo).
- Cut off the side and open side of the cut part. Bend the edges of the whole part inward along the intended line (it should look like the one in the bottom photo). The whole part is the future seat, the flat part is the back of the sofa.
- Bend the back and glue a piece of padding polyester to it. Stuff the sofa seat with scraps of paper and cover it with padding polyester to add volume.
- Cover the sofa with fabric. To ensure that the material sticks well, secure it with clothespins.
- Cut out the back back from cardboard and also glue it over. Glue the back and let the craft dry.
- Decorate the seat and back with braid. The sofa is ready.
Above in the photo is the correct cut box, below is the almost finished base of the sofa.
Folding sofa made of plywood
If the doll often has guests, this sofa will be very useful to her.
You will need:
- plywood;
- padding polyester;
- furniture nails;
- small awnings;
- jigsaw;
- glue;
- fabric and various decorative elements.
To make such a sofa, you need to understand how folding furniture works.
Instructions:
- Cut out the parts for the future sofa: the back, sides and three bases. One base is a seat, the other two will be folding.
- Connect the folding parts together using canopies. The rest can be fastened with nails.
- Add volume to the sofa using padding polyester. Now you can cover it with fabric and decorate it as you wish.
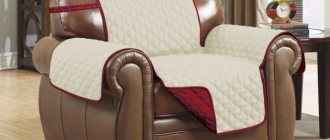
Sofa made of pressed cardboard
A strict sofa for a business doll.
You will need:
- pressed cardboard;
- padding polyester;
- artificial leather;
- stationery knife;
- glue "Moment".
This cardboard craft can also be covered with fabric.
Instructions:
- Cut out the base. To make it rigid, you need to glue several layers. The thinner the cardboard, the more layers will be needed.
- Cut out and glue the back and side parts to the base. To give it softness, you need to glue a thin layer of synthetic padding on the inside.
- The next stage of work is wrapping the sofa in leather. The length of the first piece of material: the height of the back + the height of the sofa and plus an allowance of 1 cm on each side. The length of the second segment is the perimeter from the joints of the back with the sides in a circle to the next joint.
- Mark the centers on the sofa and both segments. Lubricate the pieces of leather with glue and, aligning the centers, paste them over the craft (see photo below). Cover the visible cardboard with an additional strip of leather.
- For pillows, cut out 6 rectangles from cardboard. The length of each of them is equal to one third of the length of the seat. The width of the rectangles is equal to the depth of the sofa.
- Glue pieces of padding polyester to future pillows, and then wrap them in leather, as in the photo. Lay them on the back and seat.
- If desired, you can make small pillows for the armrests.
At the top is the base of the sofa, at the bottom is the making of the pillow.
Matchbox sofa
Girls often make furniture from matchboxes for their dolls. The easiest way is to make a sideboard with doors and shelves out of them, but with some effort, you can also make a cozy sofa.
You will need:
- 4 matchboxes;
- thick cardboard;
- scissors;
- glue;
- 2 beads;
- colored or wrapping paper.
Furniture made from boxes is only suitable for small dolls.
Instructions:
- Cover two solid boxes with colored paper - these will be the armrests. Glue the other two together with the sides and glue only on top, without touching the retractable parts.
- Glue the armrests to the base of the boxes. Glue beads to the retractable parts to create drawers with handles.
- Cut out the back of any shape from cardboard. Cover it with paper and attach it to the base.
- If desired, decorate the finished craft with appliqués. You can draw patterns with paints, imitating embroidery.
More complex products
A more complex model to manufacture is transformable furniture, namely a sofa bed for dolls. The instructions for the work are more complex, and the material used is completely different. This is necessary so that during the transformation process the product simply does not break.
It is better to make a folding sofa for dolls from plywood. Additionally, you will need a furniture stapler, furniture nails, small canopies, and a jigsaw. Only a dad can do this kind of work:
1. The parts for the future product are cut out with a jigsaw: the back, side arms and three bases, one of them for the seat, and the rest will be movable. It is better if the mechanism is an “accordion” or a book.
2. The moving parts are connected using small canopies. The remaining parts of the structure can be connected like puzzles or knocked together with nails.
3. When the body is ready, you can begin finishing the wood with fabric. It is better to put foam rubber under it. This will make the product safer and more realistic for the child.
Making a sofa from plywood
This sofa will become a real work of art. An analogue can be made from dishwashing sponges. Mom herself will make it. The main thing is to think about the method of transformation. It can be seen in models of real sofas.
You can also make other furniture elements to go with the sofa: poufs, armchairs. The principle of assembly and operation is the same as the main product. You can decorate an entire room for your baby doll.
Corner sofa for dolls (2 videos)
Sofa options (35 photos)
Matchbox chest of drawers
You will need: 8 matchboxes, scrapbooking paper, a sheet of white paper for drawing in A4 format, thick cardboard, ruler, scissors, felt, glue, a simple pencil, ink pads, brads (handles for drawers), decorative elements - flowers, buttons...
Master Class
- Cut 8 strips of scrap paper, the size of the smallest side of a matchbox.
- Tint the stripes if desired.
- Glue the stripes onto the boxes.
- Make small cuts and insert brads as drawer handles.
- Line the inside of each matchbox with felt.
- Glue together 2 matchbox covers.
- Lay out the matchboxes vertically and horizontally as shown in the image.
- Cut 2 squares of thick cardboard larger than the folded boxes. This will be the lid and bottom. They should protrude half a centimeter on each side of the boxes.
- Cover the lid and bottom with scrap paper and tint as desired. Set the lid aside.
- Glue the matchboxes tightly to the base and leave to dry.
- Glue a square of white paper to the top of the boxes.
- Cut a rectangle of white paper about half the size of the side piece. Cut out 4 such rectangles.
- Cover the rectangles with scrap paper and glue them onto the incendiary parts, as shown in the photo.
- Take a piece of sketching paper and redraw the diagram provided below. The area of the central square is equal to the area of the glued boxes, and the width of the sides is 4 cm.
- Fold along the marked lines, make cuts and glue the box.
- Cover the box with scrap paper.
- Take the lid that was set aside earlier and glue it onto 2 ribbons, as shown in the photo.
- Cover the inside of the box with felt.
- Glue the box on top of the matchboxes.
- Decorate the chest of drawers by gluing flowers and buttons.
The matchbox chest of drawers is ready!
Nightstand
You will need: 3 matchboxes, glue, cardboard, scissors, toothpicks, black paint, brush, drawer handles.
Master Class
- Pull out the inside of the matchboxes.
- Glue together the 3 outer parts of the matchboxes.
- Cut out the back, top and sides of the nightstand from cardboard, then glue them on. It is worth noting that the side parts should be slightly higher than 3 matchboxes.
- Prepare 18 toothpicks and try them on the lining of the drawers. Shorten the length of the toothpicks and glue 6 toothpicks onto each drawer.
- Glue the drawer handles.
- Remove and set aside the drawers.
- Paint the bedside table with black paint, wait until it dries and insert the drawers.
The nightstand is ready! I recommend watching this video!
Sofa for Monster High made of foam sponges
Graceful Monster High dolls will be able to sit comfortably on a soft sofa made of foam sponges. This material holds its shape well, and the hard side serves as a comfortable base for the piece of furniture.
Materials:
- foam sponges of different sizes;
- thick and thin needles for sewing;
- threads;
- thick fabric (satin or corduroy);
- scissors.
Instructions:
- We lay out the sofa of the desired shape from sponges, rounding some parts with scissors.
- Using a thick needle and thread, we intercept the frame in several places and secure the threads.
- We cut out the armrests separately.
- We cut out a rectangle from the fabric and place it on the base of the sofa and the back. We stretch the fabric, carefully grab it in several places and carefully sew it to the bottom of the base.
- We cut out the upholstery of the side parts and also tie it with threads.
- Using a thin needle we sew the armrests to the frame.
- We make decorative pillows from fabric and pieces of sponges. The sofa is ready.
Another suitable model for cute monsters is a sofa made from a cereal box.
Materials:
- cereal box;
- 2 viscose napkins (multi-colored);
- PVA glue;
- silicone glue;
- stationery knife;
- pencil;
- ruler;
- rhinestones.
Instructions:
- We cut the box lengthwise, based on the height of the future seat (about 3 cm).
- From the cut off part we form the armrests and backrest.
- We combine the parts and glue them.
- From a napkin we cut out rectangles equal to the width of the seat and backrest, and glue the parts.
- We cover the back of the back with a napkin of a different color, the same as the armrests.
- Carefully trim off the protruding excess upholstery.
- To make the sofa look soft, you can add a couple of layers of napkins to the seat and back.
- We decorate the finished furniture with rhinestones, gluing them with silicone glue. The sofa is ready.
Tags
Furniture Furniture Furniture and furniture from homemade furniture. any furniture. Furniture Make furniture with your own hands with your own hands with your own hands with your own hands with your own hands with your own hands and sofas and sofas Sofa and sofas the sofa itself and make a sofa from one sofa. The basics of the sofa are done on both sofas. The leather sofa will be your own. resting with your own hands resting with your own hands sofa with your own hands cardboard with your own with your own hands, DIY pallets, DIY alarm, DIY leather, DIY cardboard, like free flights
replycommentarticleinteriorchildren'sdecorinstructionsevencreationseatsanychairsclasswhatmodelhouseschairshowratingbackpatternsbackstylesintepon
Master class on making a plastic watch for a textile tilde doll
A watch is a classic accessory that will decorate the hand of any doll. The child will definitely love the watch for the tilde doll, made of plastic. Materials:
- plastic;
- toothpick;
- paints for plastic (acrylic);
- wire;
- strip of leather.
Following a simple master class, you can make a beautiful doll clock for the tilde with your own hands:
- Make a watch case from white or beige plastic. It can be a round or square clock. The design of the watch case can be seen on the Internet. Press the dial with a toothpick.
- Insert pieces of wire into the case on both sides in order to later attach a leather strap to them.
- Bake the body in the oven at 110 degrees for 25–30 minutes.
- Process the edges of the leather strip to make them as smooth as possible. The width of the strap should match the hole of the wire pieces that are in the case.
- Paint the clock with acrylic paints. To make the watch look like a real one, it is better to choose silver and gold colors.
- Thread the strap through the wire.
Step-by-step making of a sofa
For the first time, it is better to make a sofa from cardboard. A minimum of skills is required, the product will be the most reliable. To make a sofa for Barbie with your own hands, you need to follow the instructions:
1. Take a shoebox and cut it in half lengthwise. One of the halves will serve as a seat, that is, the upper body, and the second will serve as the lower part, which forms the height of the sofa.
2. One of the parts should be cut so that half of the bottom of the box fits into the other, and the side part will form the height of the sofa. This part needs to be cut to the required size.
3. From the scraps you need to make additional supports for the bottom of the sofa. They should be attached around the entire perimeter of the bottom using glue or a stapler. When the workpiece is fixed, you can cut out the shape of the back and side handles.
4. When the cardboard is dry from the glue, the next step is finishing with fabric. Each part is covered with fabric separately, so you need to take measurements. The fabric is glued to the cardboard and fastened with a stapler. Sometimes it is sewn on with thread, but this process is complex and long. All seams must be closed inward so that a child cannot tear the upholstery.
5. The next stage is decoration. You can sew mini pillows for the sofa or decorate the bottom of the sofa with tassels and pom-poms.
This product is manufactured within 1-2 hours. Decorative finishing will take approximately the same time. It is possible to make a realistic model using additional materials, such as cotton wool or foam rubber. It is initially placed under the fabric, which is secured using a stapler. Using this sample, you can make a doll sofa of any size and for any doll.
On video:
sofa for a doll from a cardboard box.
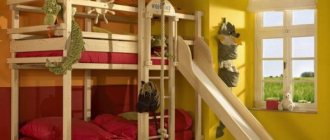
Methods for making a doll chair
Furniture with this functionality can be made from completely unexpected materials, such as elastic bands for weaving. All the girls who make their own bracelets from this material probably know how to weave a sofa out of rubber bands. First you need to choose a weaving pattern; you can find a suitable one on the Internet. Often, little ones themselves can turn an idea into reality.
The Internet will tell you how to make a chair for Monster High dolls from scrap materials. The principle of operation is the same as when creating a sofa from any material. The only difference is the parameters and the presence of legs.
The legs can be made from nails or screws if the seat is made of wood. Lollipop sticks are suitable for light materials: foam plastic, cardboard.
Originally posted 2018-03-19 07:14:36.