Hi all! Tell me, when you give your baby a toy, do you think about where it will live? Believe me, the baby is definitely thinking about this. And all because he projects his life onto them. He plays during the day, just like a toy, but evening comes and the little one has to go to bed. What about his ward? What to do with it? To give your child pleasure, continue playing and teach your little one to be orderly, let's find out today how to make a doll house out of a box with your own hands.
Features of material selection
The choice of materials for building a house with your own hands should coincide with financial capabilities, the amount of free time and the level of skill.
- Paper . Scrapbooking paper is suitable for these purposes: it is thick, does not fade, and has a wide selection of textures and prints. Ready-made diagrams can be printed on regular office paper.
- Cardboard . Ideal options would be binding, beer, corrugated three-layer. The latter is more difficult to cut, but more affordable (for example, household appliances or weighted candies are usually packaged in it). The rigidity of cardboard allows you to add more floors to the project.
- Boxes . Their characteristics do not differ from the previous material. One large or several medium-sized ones, always whole boxes, are suitable for work.
- Plywood . It is distinguished by its availability, ease of processing, the ability to implement complex projects, and its price-quality ratio. At the same time, it requires certain skills in working with sawing tools and precise design. The recommended plywood thickness is at least 6-7 mm. You should definitely pay attention to the E0 marking - its presence confirms the low formaldehyde content.
- Tree . The material is more expensive and difficult to work with, requiring expensive tools. Suitable for making large-sized multifunctional shelving houses.
Comparative characteristics of materials:
| Material | Price | Durability | Complexity |
| Paper house | Very cheap | Low | Very easy |
| Cardboard house | Cheap | Low | Easy but requires patience |
| House made of boxes | Very cheap | Low | Very easy |
| Plywood house | Moderately expensive | High | Medium difficulty, requires tool skills |
| Wooden house | More expensive than average, but cheaper than store bought | Very high | Complex, cutting on professional equipment is desirable |
Drafting
A house is the cherished dream of many girls. It provides an opportunity to have a good rest, play with friends, and make childhood wishes come true. The work on creating a product begins with the question of how to make a dollhouse with your own hands, what materials to use, and determining the size. For this purpose, a draft of the future structure is created. It consists of transferring the idea onto paper. Must meet certain requirements:
- Functionality. The building being constructed must be practical. Meet certain standards, have an attractive external and internal appearance. Be no worse than factory options.
- Simplicity of design. A handmade project should be done without unnecessary frills. Complex circuits require specific skills. To do this you will need to gain experience.
- Calculations. It is necessary to calculate the availability and quantity of required materials. Determine the necessary tools with which the upcoming work will be performed.
- Accurate drawings are the key to success. The appearance and neatness of the future structure depends on this. You can download ready-made models from the Internet, if you have the skills, make the drawing yourself, use special programs. A preliminary sketch can be drawn on a checkered sheet of paper.
Drawings and dimensions of a paper house
The dimensions of a paper house are limited only by the size and density of the material used. Large models made from thin paper will not hold their shape. In cases where the material is dense but small in size, the house is assembled from individual parts.
The peculiarity of the paper house drawing is that it is made up of a single canvas.
At the junctions of the walls, as well as on the roof slopes, additional narrow strips are provided for applying glue or double-sided tape. In the finished printouts, the houses are drawn in detail; all that remains is to cut them out and glue them together. Creating a sketch yourself leaves room for creativity and layering when decorating.
Paper house option:
- 4 open rooms separated by two sheets of paper.
- The basic drawing consists of 2 rectangular parts with transverse slots in the middle. The depth of the cuts is up to half the width of the elements.
- The dimensions of the blanks correspond to the height and double length of the future rooms.
Exterior design options
The facade has been built, the house is almost ready, there are a few stages left before handing it over to the baby. It is necessary to complete the exterior finishing of the structure and create a product design. Let's consider several design options:
- Imitation of brick walls, roof tiles. To do this, take ice cream sticks and cut them into four parts. Using rounded pieces, we lay out the roof starting from the bottom row, gradually moving upward. Each subsequent row overlaps the previous one. We cover the upper joint of the roof slopes with solid sticks, perpendicular to the tiles. Next we move on to the façade. We glue the cut rectangular sticks to the walls in the form of brickwork. The final stage will be painting the roof and facade with paints.
- Simple house painting. The most common and fastest option. We paint the roof pink and the walls white.
Paper house for dolls
To work you will need a drawing, scissors and glue.
With their help you need:
- Carefully cut the workpiece along the contour.
- Fold along the dotted lines, giving the model volume.
- Apply glue to the special valves provided in the drawing.
- Glue the house together.
- Decorate with textured printed paper.
Such models do not imply interior decoration and act as decoration around which the game takes place.
The disadvantage of the model is that it can be conventionally called a dollhouse, since the entire structure is very schematic. But this house provides a play space. The child has the opportunity to create an interior in each room and freely move the doll inside. At the same time, the design takes up little space and can be easily disassembled or folded for storage.
The work comes down to two steps:
- Cut both elements taking into account the windows, doors and central slots.
- Connect the parts with cuts facing each other.
Next, you should decorate each room as you wish. Based on this drawing, you can create more complex models. For example, if you lengthen one of the elements and make 2 slots instead of 1, inserting one base part into each of them, you will get a 6-room house.
Self-production
Here are a few arguments in favor of making your own dollhouse:
- Saving. Store-bought or custom-made dollhouses cost a lot of money. Doing it yourself will save you a certain amount.
- Individuality and uniqueness.
- The ability to create a house of the required size and shape.
- Develop design qualities and creativity by designing the interior decoration of rooms.
- Have a nice time with your child. After all, joint activities strengthen family relationships.
Drawings of a cardboard house
You can outline the details right away on cardboard, but it is much more convenient to have before your eyes the entire list of necessary elements, their quantity and sizes.
A schematic representation of the component parts of the house is enough, the main thing is to take them all into account:
- Side wall (2 pcs.): a rectangle, the height of which is equal to the uppermost interfloor ceiling, and the width is the desired depth of the rooms.
- Back wall (1 piece): a rectangle with a width equal to the length of the house and the same height as the side walls.
- Pediment (2 pcs.): an isosceles right triangle, the hypotenuse of which is equal to the width of the side wall.
- Floor of the 1st floor (1 piece): a rectangle with a height equal to the width of the side walls, and a length equal to the width of the rear wall.
- Interfloor ceiling (1 piece): a floor part of the same dimensions, but with a cut-out staircase opening.
- Interior partition (1 piece): U-shaped figure with a width equal to the depth of the house and a height corresponding to the height of one floor.
- Roof (1 piece): a large rectangle, the height of which is slightly greater than the sum of 2 gable legs, and the length is slightly greater than the length of the house.
If you have a large piece of cardboard, the number of individual elements can be reduced by combining the side walls, gables, floor of the 1st floor and rear wall into one part in the drawing. Doorways will not be needed if the interior partitions are made one third narrower than the width of the house.
Connecting rooms
It is more convenient to connect the walls with wide masking tape. It does not damage the cardboard when removed, does not make the work sloppy and does not interfere with decoration. Adhesive Moment Crystal will help fix cardboard walls relative to each other: it sets quickly and leaves no marks.
To connect the walls to each other you should:
- Coat the cut of the side wall with glue and press it tightly against the edge of the rear wall, trying to maintain an angle of 90 degrees.
- Cover the resulting corner with masking tape on the outside and inside, so that the middle of the adhesive tape is at the junction of the walls.
- Similarly, attach the second side wall, forming a U-shaped frame for the future house.
- Coat the cut of the floor part with glue on three sides, press it to the edges of the walls, while simultaneously adjusting the internal corners of the house.
- Reinforce each joint between the floor and the wall with adhesive tape on the outside and inside.
- Apply glue to those sections of the inner wall that will be attached to the floor and the back of the house.
- Press the part strictly perpendicular to the floor and parallel to the side walls of the house (check the distance between the walls below and above with a ruler, adjust if necessary).
- Cover the resulting corners on both sides of the partition with masking tape.
Pasting the corners on both sides will make the structure stronger and fix the shape more rigidly. To ensure a tighter fit of the tape to the surface, it is recommended to forcefully iron the gluing areas with the edge of a ruler or plastic card.
Connecting ceilings to floors
The ceiling of one floor is the floor of the next. To prevent peeling and sagging, the interfloor ceiling is secured to a support.
- For accuracy, it is recommended to draw a line along the perimeter of the frame at the level of the upper boundaries of the internal walls parallel to the floor of the floor.
- Cut long strips of cardboard no more than 1 cm wide. If the thickness of the material is insufficient, the strips can be cut twice as large and glued together.
- Glue the resulting parts with the wide side around the perimeter of the house, aligning with the control line. There should be a uniform protrusion that encircles the outer walls from the inside.
- Apply glue to the sections of all the parts on which the ceiling will lie, as well as the sections of the ceiling itself.
- Lay the ceiling piece, making sure the internal walls are perpendicular.
- Apply masking tape to the joints of the walls and floor of the upper floor, making sure that the tape goes all the way to the corner without deforming it.
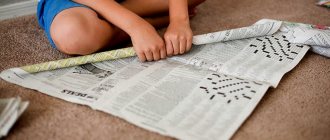
DIY dollhouse from a box
It is easier and faster to build a dollhouse from boxes with your own hands than from individual sheets of cardboard.
For work you will need the following materials and tools:
- cardboard box from large household appliances;
- marker;
- scissors, stationery knife;
- masking tape, glue;
- colored paper, braid, pieces of fabric - everything that can be useful in decorating a finished house.
Before starting work, you need to make sure there are no defects on the cardboard, cut off excess tape and remove the staples from the stapler.
- Mark the middle of the box with a marker. It is convenient to take the connection line of the folding parts of the box as a guide.
- Cut along the line into 2 equal parts. One half will serve as the basis for the house.
- One of the folding parts will become the floor of the first floor. It should be secured to the side walls of the box using tape.
- Cut off the corners of the opposite flap to form a roof gable
- At this stage, until additional volumetric parts are glued in, it is more convenient to cut through windows and doors. First, you need to mark with a marker the future location of the interfloor ceilings. This will allow you to choose the correct location of the windows. It is more convenient to cut them with a stationery knife. Cut the front door on one of the side walls of the house.
- Cut off both opening parts from the second half of the box. They will serve as floors for the second floor and attic. Make an opening for the stairs for each part: cut the upper left part in the shape of a small square or rectangle.
- Using tape, attach the ceilings along the previously marked lines. Openings for stairs should be in opposite, inner corners of the house.
- Cut the roof slopes from the side walls of the remaining part of the box. Use tape to glue them to the pediment and walls. Cover the top corner of the roof with tape.
- Attach cardboard ladders to the openings in the floor.
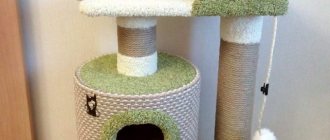
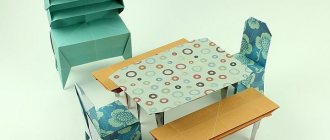
A doll house made from boxes can be furnished with homemade furniture
The construction of the dollhouse from the box is completed. All that remains is to decorate it and arrange the furniture.
Significant money savings
In addition to the above arguments in favor of the implementation of such a plan, the following theses can be cited:
- Due to the fact that doll houses made in toy factories sometimes cost almost as much as real country houses, self-building will save the family budget from serious damage, credit and ruin;
- There is no need to spend a long time shopping around for houses that can fit into a cramped children's small apartment;
- There is an opportunity to decorate and furnish rooms with toy furniture at your own discretion;
- If the girl wishes, instead of a typical modern cottage, you can build a medieval castle, a palace of an oriental beauty, a cozy rural hut, a luxurious “gingerbread” mansion with carvings on the window frames, shutters and facade, as well as a futuristic spacious tower from a science fiction book or film.
Features of working with plywood
Dollhouses made of plywood are lightweight, environmentally friendly, and relatively low in cost. But, unlike houses made from boxes, plywood houses are stronger , can withstand heavy loads and will last longer. When choosing this material, it is necessary to take into account the features of its processing.
- The tool for cutting parts must be very sharp and selected in accordance with the thickness of the sheet: up to 1.5 mm - can be cut with a knife, 1.5-6 mm - with a hand jigsaw, over 6 mm - with a jigsaw.
- It is advisable to saw the sheet along the grain. In the case of a transverse direction, it is recommended to make several cuts along the entire length of the future cut, which will reduce the likelihood of cracks and chips.
- Finished parts should be carefully sanded.
- It is better to connect parts using wood glue. The connection will be stronger if the fibers of the bonded surfaces are in the same direction.
- For nails and screws, you need to pre-drill holes and place washers under the heads.
Compliance with these rules will make the work easier and protect against unnecessary consumption of material.
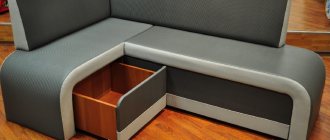
Increasing the functionality of the house
It wouldn’t hurt to approach making a house from a practical point of view. To do this, you just need to provide a section for storing things in the lower tier. Cut the sides of the drawers (practice on a piece of cardboard) to the appropriate sizes, glue them together and screw on the handle.
Insert the finished box into the department. If desired, you can make several such boxes. This will allow you to compactly store small toys and doll accessories.
Required tools and materials
Making a dollhouse from plywood is possible for anyone with minimal skills in working with tools, desire and patience.
To build a house you will need the following tools and materials:
- plywood 6-7 mm thick;
- narrow wooden slats;
- small nails or a construction stapler;
- jigsaw (can be replaced with a manual one);
- drill with a thin drill bit;
- sandpaper for processing the edges of parts;
- wood glue;
- mounting tape;
- a simple pencil and tape measure;
- decor for decorating a finished house.
The amount of material is calculated according to the drawing and depends on the size of the project.
For example, a small tabletop house will require 4-6 main parts, while a multi-story floor house can use 4-6 sheets of plywood. For an accurate calculation, the finished sketch is disassembled into its components, and a detailed drawing is constructed for each element.
After the parts are completely laid out on paper, the total area of the required material is calculated.
Drawings for a plywood house
A do-it-yourself doll house made from boxes can serve as a model when creating a drawing yourself. A visual model, no matter how complex it may be, will allow you to evaluate the scale of the idea, the actual dimensions of the product, identify the features of the main parts and possible weak points of the design.
Story about creating a dollhouse from plywood:
For the simplest house with a pitched roof, you will need drawings of the basic elements.
- Side walls with an opening for the front door. The difference in the height of the walls will determine the angle of the roof.
- Rear wall including pediment. The height differences on opposite sides must correspond to the side parts.
- Single pitch roof.
- The base should extend beyond the house for better stability.
- Interfloor ceilings with staircase openings, which are located in opposite corners so that they do not end up under the stairs leading to the floor above.
- Interior partitions with arched doorways.
Window openings are located on the rear wall, side elements and roof according to the sketch. A front opening cover can be added if desired. In this case, it is more appropriate to place windows on it. The dimensions of the parts depend on the available space where the house according to individual wishes will stand.
The height of the floors should be comfortable for playing - this is 40-50 cm.
It is recommended to install the uppermost ceiling (attic or loft) no higher than the child’s eye level. Rooms that are too deep are not convenient for playing, especially on the extreme floors. Under the folding roof you can place a hidden attic box where doll clothes will be stored.
Some more ideas and tips
- There can be any number of floors, depending on the size of the home.
- In cardboard houses, you can make a door by simply cutting it into the wall.
- Large houses can be made from several cardboard boxes, gluing them together with side walls.
- A small bookcase, such as one from IKEA, can be used as a base for the home. In this case, you won’t have to make anything, you just need to cut a few windows and put a few walls inside.
- You can screw wheels to the plywood base or shelving so it can be moved.
- The big advantage of dollhouses is that you can make them with your child with your own hands, unless, of course, the future home for dolls should not be a gift.
- The baby can help cover the walls of the house with wallpaper, arrange furniture, and come up with accessories. This is a great way to bond even more with your child, as well as help him express his creativity and fulfill his fantasies.
In addition, children will love a dollhouse that you made for a child yourself much more than the most luxurious purchased option.
Step-by-step instructions for a plywood house
A do-it-yourself doll house from boxes can be assembled in a couple of hours without a preliminary drawing, unlike a plywood house, where precision and accuracy are very important, which require time. Carefully double-checking all dimensions will make it easier to fit and assemble the elements.
- Carefully and accurately transfer the image of the elements onto a sheet of plywood using a template and a pencil.
- Using an electric jigsaw you can cut parts faster and with better quality.
- To cut out window openings, use a narrow drill bit to make auxiliary holes. Cut along the contour of the window and door.
- All cuts of each element must be sanded to avoid splinters and scratches.
- On the prepared parts, mark with a simple pencil the location of interfloor ceilings and internal partitions.
- It is more convenient to start the assembly by gluing the external walls, strengthening the outer corners with mounting tape.
- Glue the internal elements according to the markings.
- Connect both pieces. For more reliable fastening of the ceilings, it is recommended to attach ceiling moldings made of lath or narrow strips of plywood around the perimeter of each room.
- Glue the roof slope to the gable and side walls.
- Glue the finished house to the base.
- Reinforce all joints of parts with mounting tape. Leave the house for a day for the glue to dry completely.
- For facade decoration, acrylic paint on wood is used as one of the options.
- When decorating the interior, available materials are selected that do not create large loads: paper, fabrics, pieces of fur.
- To make the stairs you will need rectangular pieces of plywood with a width equal to the openings prepared in the floors. The steps are made from cut narrow slats with a triangular cross-section, thin wooden blocks sawn diagonally or strips of corrugated cardboard.
Stairs are installed after interior finishing work, so as not to create hard-to-reach areas.
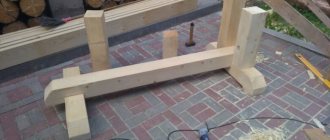
Wooden house master class
A do-it-yourself dollhouse made from boxes or plywood has one significant drawback: the fragility of the structure. Large models that combine the functions of a chest of drawers or a rack require reliable fastenings and are made of wood.
When purchasing sheet material, it makes sense to immediately order cutting of parts.
This will reduce labor costs and compensate for the lack of expensive tools. The cut line made with professional equipment is more accurate and even, which will significantly facilitate further processing of the wood. But, even in this case, the process of making a house remains quite difficult for inexperienced craftsmen.
You can simplify the task by using old wooden furniture as a finished base.
To work, you need to prepare materials and tools according to the list:
- Wooden rack.
- Wood putty.
- A sheet of plywood 20-25 mm thick.
- Fiberboard sheet for interior partitions and the back wall of the house.
- Drill-driver, set of drills and screws.
- Wood glue, masking tape, liquid nails
- Sandpaper.
- Primer and white acrylic paint, universal colors in orange and brown, varnish.
- Decoration materials.
- Scissors, pencil, ruler, tape measure.
- Thick cardboard.
- Brush and roller.
- Construction stapler or small nails and hammer.
- Hand jigsaw.
The list may vary slightly depending on the condition of the furniture being remodeled and the choice of finishing.
Additional materials are replaced with similar ones or those whose characteristics are more consistent with the design. Before starting work, the piece of furniture being remodeled must be removed from unnecessary parts: doors, drawers, guides and similar elements that are not useful.
The entire subsequent process takes place in several stages:
- Making a simple doll house with your own hands begins with the stage of preparing and processing the resulting wooden box. The surface of the former rack should be thoroughly cleaned and treated with sandpaper to remove the old coating. Fill excess holes, chips, and dents with wood putty. After the putty has completely dried, sand the surface.
- Mark windows on the side walls with a pencil. Cut out the openings with a jigsaw, having previously drilled auxiliary holes. Sand the edges until smooth.
- Cut out interior partitions with doorways from a sheet of fiberboard. Secure between the shelves with glue. For greater stability to the ceiling and floor, glue strips of thick cardboard, sandwiching a thin interior wall between them.
- Cut 2 rectangles from thick plywood with the same width , equal to the depth of the rack, and different lengths, which depend on the length of the cabinet. For example, for a house 80 cm long, parts 55 cm and 60 cm will be sufficient. The edges of the boards are tightened with screws at right angles. To do this, drill 3-4 holes along the short side of the long part at an equal distance from each other. At the end of the second part, duplicate the holes. Apply wood glue to the joints and fasten both elements with screws. Sand the workpiece with sandpaper, paying special attention to the cut areas.
- Clean the parts of the house from dust and prime them. This measure promotes better adhesion of paint and glue to the surface and reduces their consumption.
- While the primer dries, cut out rectangles of the same size from thick cardboard . Paint the blanks with orange acrylic paint. Cover the dried rack inside and out with a layer of white acrylic paint. Glue cardboard “bricks” on the outer side walls in a checkerboard pattern, leaving small gaps in the masonry for greater realism.
- Paint the roof dark brown and wait until the paint dries completely. Then install it on top of the house, adjust the position and secure it with screws. To do this, 3-4 through holes are drilled through the internal joint of the side walls and the ceiling with a drill in a direction perpendicular to the roof slopes and screws are screwed in.
- Cover the entire surface of the house with matte varnish. Dry well.
- Cut out the back wall from fiberboard. Secure along the contour of the house with a construction stapler or small nails.
- Decorate the interior, arrange toy furniture.
Making a doll house from boxes is much faster and easier. But even a simple man in the street can make a wooden model if he takes a fresh look at old things.
Features of finishing a dollhouse
Interior decor depends entirely on individual preferences. When choosing materials and finishing methods, the advice and ideas of experienced craftsmen will not be superfluous.
Recommendations:
- The paint must match the surface being painted: gouache is chosen for cardboard, and safe acrylic compounds are used for wood.
- For fragile houses, the decor is light and does not overload the structure.
- The presence of a drawer in the podium or a blind attic with a lid in wooden houses will allow you to store additional interior items or doll outfits in one place.
- Scrapbooking paper is universal in decorating a dollhouse: it is thick, does not fade, and has a huge variety of designs and textures. A small pattern will look more believable as wallpaper; a “wooden” print will add realism to the facade or floor.
- Handmade toy furniture will highlight the uniqueness of the dollhouse. You can make a beautiful chair from a plastic glass. The fireplace is easily assembled from matchboxes. From two cardboard blanks and a mat you will get a bench.
- Textiles will add comfort and texture to the interior. It is more convenient to attach curtains in a house from a box using hot glue. Velvet or velor will imitate carpeting.
- Instead of stairs, you can make an elevator cabin , which the child can raise and lower using a chain.
This is only a small part of what can be implemented in the interior of a house. The use of interesting techniques, such as decoupage, makes the decor possibilities endless.
Important Additional Benefits
It should be noted that every minute spent on mastering the master class for beginners will bring enormous benefits to the creators of the structure chosen by my daughter.
After all, they will have to learn the basics
- Architecture;
- Theories of strength;
- Materials Science;
- Calculation of engineering systems;
- Installation of structural blocks, their soldering and gluing.
All these skills will subsequently completely deprive parents with a humanitarian education of the traditional fear of
- Plumbing repair;
- Laying tiles and other decor;
- Redevelopment of housing or office;
- Assembly of furniture sets;
- Construction and arrangement.
A dollhouse assembled with your own hands will give the father of the family, for example, the idea of constructing a country fence on his own. Accordingly, he will save a lot of money on wages for the construction crew.
Window and door decoration
Windows and doors are designed in accordance with the main material of construction. The stronger the model, the more complex the door fastenings and the more detailed the decor.
- In paper houses, windows and doors are drawn. The front door is cut out on three sides. Windows are cut according to the picture: with sashes or a full opening. It is not advisable to cut openwork grilles and lintels - thin parts will tear very quickly during play, giving the house a sloppy look.
- In houses made of corrugated cardboard, the door is cut in the same way. If the model is assembled from beer or bookbinding cardboard, then the door part is cut out completely. For fastening you will need a small piece of gauze or bandage, strong paper and glue. Insert the door into the opening and coat it with glue, grabbing the part of the wall to which it will be attached. Place a piece of gauze on top and again apply a thin layer of glue. Cut a rectangle out of paper equal to the door and glue it on top of the gauze, connecting the door leaf to the wall. Gauze will add strength to the fastening, and paper will prevent sagging. For decoration, stick an image of a real door on the part. Cut out 2 frames from cardboard and paste them over the doorway on both sides. Window openings are also designed.
- In wooden houses, the doors are secured using piano hinges. The doorway is designed in the same way as in the previous case. The decor can be complicated by imitation brickwork, the presence of a door knocker or a bell. Window openings on the outside can be decorated with “glass” made of transparent plastic. Decorate the top with a wooden photo frame. Make a frame from cardboard on the inside. Using stained glass paints on a plastic window will make the facade bright and unusual.
- Interior doors are usually not installed. An arched opening or installing a narrower wall is sufficient.
The image is created by the details: even the simplest house will become brighter and more interesting if you pay attention to the windows and doors.
Furniture
Of course, dolls simply need furniture! And playing with an empty house is not interesting. What can you think of?
Bedroom furniture
Bedroom furniture can be made from paper using the origami technique, glued from cardboard and laid out, but the most comfortable and beautiful option is upholstered furniture made from cardboard, foam rubber and fabric. You can glue everything using regular PVA, although it will take a long time to dry. Instead of foam rubber, you can take padding polyester or batting, or in extreme cases, cotton wool.
Bed MK
Step-by-step photos of production - enlarge when clicked:
Armchairs
Photos enlarge by click
Kitchen
The kitchen can be filled with a refrigerator, stove, countertop, beautiful chandelier and dining table. Cardboard and ice cream sticks are also suitable materials.
If you have a 3D pen, you can make furniture out of plastic.
Cardboard plate
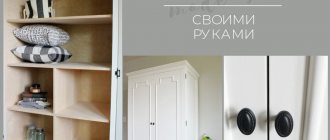
Lockers
Cabinets, shelves, and a refrigerator are simply made from cardboard. Easy to glue with hot glue.
Furniture for kitchen
Furniture - chairs, a table - very beautiful ones made from ice cream sticks. You can cut such sticks with large scissors, but be careful, they can crack in half. You can glue with instant or hot glue.
Little things for the kitchen
You can put a bird in a cage in the kitchen, or put a box of fruit or flowers. Detailed master classes in the photo. Enlarge on click.
Fruits, vegetables, dishes
The easiest way to make fruits, vegetables, and dishes is from plasticine . To prevent the product from getting dirty and losing its shape, it is coated with transparent nail polish.
You can make vegetables from salt dough - they dry out and look like they came from a toy store. Play do is also used to make food, but my play do cracks after it dries. Therefore, I prefer to make salt dough: 1 glass of flour + 1 glass of fine salt + water, knead a very stiff dough.
Also a very good option is air self-hardening plasticine (new material). It is cheap, bright, and when it hardens it is elastic, somewhat similar to hard rubber. We sculpt as from ordinary plasticine and leave to dry overnight.
How to make a roof
If possible, for self-production, it is recommended to choose simpler forms of roofing, with simple fastening.
- For a paper house, the roof is cut out and glued according to the diagram.
- In cardboard models with a gable roof, it is better to place the gables at the ends. Then the roof will have reliable support. To make it you will need a large piece of soft corrugated cardboard. To calculate the dimensions, you need to measure the length of the house and the length of the gable slopes. The roof should have small allowances on each side, like real roofs. Almost the entire middle is cut out from the front to provide an accessible view of the upper floor. The sections of the pediment and rear wall are coated with glue. The roof part is placed on top and pressed lightly for better gluing.
- In wooden houses, shed roofs are popular, which rest on one side wall and go down to the second, shorter one. The back wall also serves as support. This roof is secured with glue or small nails.
- For a gable roof on the top floor, an interior partition is provided, which serves as additional support. In cases where it is impossible to install a partition, the slopes are additionally connected from the inside by a jumper in the upper part of the roof. This method is convenient for cardboard roofs. Heavier materials are more securely reinforced with small-section wooden blocks, which are assembled in the shape of a triangle and, like a gable, support the roof at the front of the house, leaving access to the attic. The ridge of a gable roof is glued or tightened with screws.
When choosing material for a dollhouse, you can use a short table with comparative characteristics. The comparison is very arbitrary, since with a lot of experience you can create a very complex model out of the box, which not everyone will repeat. And make a budget wooden house with your own hands from an old chest of drawers.
Author: Momina Anastasia
Article design: E. Chaikina
conclusions
Making and decorating a dollhouse yourself, from creating a diagram to finishing it, is quite a labor-intensive but exciting activity.
The child will undoubtedly be proud of his father, who can make a house for his child. After all, such an original toy will delight you for many years.