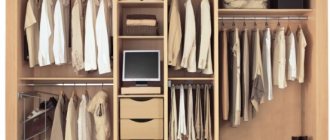
The idea of creating shelves from plasterboard appears approximately simultaneously with the idea of using this building material for wall cladding. Indeed, why not create several shelves where you could store books, keys, paintings, figurines and other “small things”. Although, with the right approach, such shelves can also be used for more bulky things, such as a monitor, microwave or TV. In any case, a plasterboard wall with shelves will help solve the problem of storing many things or simply decorate the apartment.
The advantage of gypsum plasterboard over other materials
Shelves of any length, size and shape can be created from plasterboard.
At first glance, a plasterboard sheet is not very suitable for creating shelves, because its strength raises reasonable doubts. However, with the right approach, it will become clear that the reliability of such a shelf does not depend on drywall alone. Let's take a look at the advantages of this material, which can prompt you to create a shelf made of plasterboard.
- GCR is extremely easy to work with. It is easy to give it the desired shape using available tools. It is enough to do everything carefully and thoughtfully.
- The material is very light. When you carry a whole sheet of paper with someone, it seems very heavy, but the shelves themselves are quite light. In addition, the frame for plasterboard shelves is made of a lightweight metal profile. So the load on the wall is not very large.
- Plasterboard sheets can be finished with various finishing coatings, which will allow the shelves to fit into any interior.
- Over the years, the shelves do not sag, remaining smooth as at the time of their creation.
- The cost of gypsum board is lower than that of a sheet of plywood, solid wood and OSB (the three main competitors when it comes to creating shelves). The calculation was taken from the price for 1 square meter of material.
- Cost-effectiveness plays an important role. To create shelves, you can use not only new sheets, but also leftover material that will not be used after covering the walls. At the same time, you need to be able to carry out calculations so that waste is minimal.
Required materials and tools
If the shelves are created simultaneously with covering the walls with plasterboard, then you do not need to think about any additional tools or fasteners. For the shelves you will need the following materials:
- an ordinary sheet of plasterboard (if the shelves are for the bathroom, then the sheet should be moisture resistant);
- self-tapping screws;
- dowels with spacer;
- guide rails;
- galvanized profile 50*25mm.
Special tools speed up and simplify work.
You also need to stock up on the following tools:
- screwdriver;
- level and plumb;
- plane, grinder, metal scissors, hacksaw and knife;
- roulette;
- hammer, pliers.
Not all of the above may be needed. For example, if plasterboard shelves on the wall will be used for heavy objects, then metal profiles will be required, which will help increase the stability of the frame. If the shelf has a decorative purpose, then it will be enough to use a rack profile with conventional guides.
For finishing, you may need a primer, putty, serpyanka, as well as a brush and spatula, but that's a different story.
Design and sketching
Frontal view of future shelves
Before you make a plasterboard shelf with your own hands, you need to decide what it will be like. There are many options for shelves, and everyone must decide on their own. You can make long shelves or short ones. You can make a couple of them, or you can cover the entire wall with them. They can be angular as well as radial. The final option depends on individual preferences.
Also, before starting design, you need to find out what loads the gypsum board shelves will have to withstand. This affects not only the choice of profile, but also the required thickness of the plasterboard sheet. The leaner it is, the more loads it can bear. The standard thickness of wall plasterboard is 12.5 mm. If the shelves are of a purely decorative nature, then ceiling or arched plasterboard, the thickness of which is 9.5 mm and 6.5 mm, respectively, is suitable for them. These indicators are average, as they depend on the manufacturer.
Even the thickest gypsum board cannot withstand all possible loads. Therefore, pay attention to the profile through which the frame is formed. It is on the frame that all the load should go. There are, of course, gypsum boards whose thickness exceeds 12.5 mm, but they are rare and weigh a lot, so it is better to pay attention to the strength of the frame. For example, think about how to correctly install transverse stiffeners. Or think about supports.
When calculating the dimensions of the shelves, do not forget about the profile thickness
When it is already clear what needs to be created, it’s time to make a sketch. The sketch represents the view of the shelf after installation. This drawing of plasterboard shelves will help you determine the amount of material and fasteners needed. Remember that the standard width of gypsum boards is 1.2 meters, but the length usually ranges from 2 to 3.5 meters.
After drawing a sketch, a person usually sees what flaws were in his plan. Often the planning of shelves changes, because what was seen in the head did not turn out very beautiful in the drawing. On the wall it can be even more unsightly.
As a result, the project should be selected in which the number of joints and connections is minimal. This will simplify an already difficult job for a beginner as much as possible.
Open shelves in the kitchen: advantages and disadvantages, photo examples in the kitchen interior
Open shelving in the kitchen has become very popular this year. They fit perfectly into many styles. For example, Provence and country have become very popular. Open shelves are just right for them.
Some apartment owners still doubt whether it is worth purchasing open kitchens for their kitchens. This article will help you make your choice.
Filling the void in the corner
When you say the word shelf, you mean a rectangular structure. But DIY plasterboard corner shelves have a more beautiful look. In addition to their aesthetic purpose, they are used to fill space in empty corners. By the way, corner shelves, due to their design, are stronger than their rectangular counterparts. So they can be used for their intended purpose without fear that they will bend too much.
Corner shelves are mounted on two rack profiles and can withstand heavy loads
You can create corner structures without sides, which means less material consumption. To cover the front part of the corner shelf, it is best to use arched plasterboard (you need to use the remains of this material, because buying a whole sheet for such purposes is irrational).
Arched plasterboard sheet is very flexible, which means it will be possible to make the shelves concave. In this case, they will look much more beautiful than if they were given a triangular shape.
For the strength of the shelf, in addition to the frame, the thickness of the plasterboard plays an important role, but specifically the thickness of the plasterboard that covers the top of the shelf. Therefore, thinner and cheaper sheets can be used to cover the bottom or sides.
Installing lighting on the shelves
Illuminated shelves
Designers claim that illuminated plasterboard corner shelves are distinguished by their exclusivity.
And this is true, because a huge variety of decorative lighting devices allow you to create a real masterpiece from an ordinary wall shelf:
- The simplest backlight option can be made from LED strip. The flexible structure allows you to attach the tape in hard-to-reach places and on bends of any complexity. Installing it is quite simple: stick it with the adhesive side in the right place and connect it to the power supply.
- A more difficult option is to install spotlights. For them, you lay the wiring in the frame in advance. Drill a hole in the drywall under the lamp body with a round crown. Connect it to the wiring, insert it into the hole, securing it with special antennae-clips.
Bright lighting is undesirable for shelves. They are characterized by soft pastel colors.
A well-designed design scheme, neat finishing, and beautiful lighting are the key to the beauty of hand-made corner shelves. How to do this is shown in the video:
Noticed a mistake? Select it and press Ctrl+Enter to let us know.
Creating a frame from a metal profile
Using a profile and guides when creating a frame is the main step in the process of creating shelves. Everything literally depends on this process. First, shelves are created from a profile for plasterboard, and then they are sheathed with the sheets themselves. But let's discuss everything in more detail.
There are two main ways to create a frame for shelves.
- The shelves are included in the project even before the walls are covered with plasterboard. In this case, the frame is formed immediately taking into account future shelves. And then niches are simply made in the wall, which are sheathed along with the wall. However, this is not exactly what we need, because niches have a slightly different purpose than shelves.
- The base for the shelf is made. It will protrude, so it will not be possible to sew it flush with the entire wall.
It will not be superfluous to know what strength characteristics plasterboard structures can have. This information can be found in the table below. The data in it is more suitable for those who were planning to install plasterboard shelves after the entire wall was sheathed, rather than thinking about them initially.
| Strength characteristics of plasterboard structures | ||
| Index | GKL 12.5 mm | GKL 15 mm |
| Required force to pull out a plastic butterfly anchor 8 mm | 50kg | 65kg |
| Maximum load per 1 anchor | 25 kg | 35 kg |
| Maximum weight of a shelf supported by two anchors | 50 kg | 70 kg |
When creating a frame from profiles, you need to mark the wall. By marking out the places where the profile will pass and be attached, you can ensure that the plasterboard shelves come out perfectly level. Fastening the profile to the wall in the marked places is done using dowels. They can be either metal or nylon (can be used if the shelf is made as a decorative element).
With an electronic level, the design will definitely come out level
The greatest load will be placed on the profile that is attached to the wall along its entire length (so do not skimp on dowels). A rack profile is used for this. However, if the shelf is not made narrow and not for decoration, then jumpers should be used to increase the strength of the frame. To create jumpers and other parts of the frame, a guide profile is used.
Shelves made of plasterboard in a modern interior - multifunctionality in everything
Plasterboard sheets are easy to work with. They consist of thick cardboard on both sides and a gypsum core. Sheets can be cut or bent if necessary, creating smooth shapes from them. Depending on the thickness of the sheet, there are wall, ceiling and arched ones.
Which is better: heated floors or radiators?
Warm floorBatteries
In this case, plasterboard is attached to a frame made of a metal profile or wooden slats, which in turn is securely attached to the wall, floor and ceiling. Drywall is a universal building material with wide application. It is used to finish walls and ceilings, helps hide imperfections and uneven surfaces, and is used to build various types of structures.
If the room has protruding elements in the form of columns or recesses and niches, pipes and other communications are fixed to the surface of the walls, which spoil the appearance of the room and prevent the comfortable arrangement of furniture, then drywall comes to the rescue. And the shelves and niches provided in the plasterboard construction allow you to save useful space. When deciding how to decorate niches and semicircular shelves made of plasterboard in the bedroom, think about liquid wallpaper, which fits perfectly on curved structures
Fastening profiles to each other
To know how to make plasterboard shelves with your own hands, you need to be able to attach the guides to the rack profile. The rectangular frame is made from one profile and three guides. They need to be connected correctly. This is done in one of two ways:
- using metal screws. Special short screws are used. At the junction of the profile with the guide, they are fastened with two self-tapping screws. That is, you need 4 self-tapping screws to attach the wall profile and the guide profile to each other. Also, the guides are attached to each other according to the same principle;
- using a special cutting tool. It is usually used to temporarily attach two profiles to each other. This tool punches a hole in two profiles attached to each other and slightly bends the metal. Due to this, the profiles stick together. With this method, burrs do not appear, and the drywall fits tightly to the frame. Two notches at one profile connection will be enough to secure them.
Profiles can be attached to each other in a variety of ways.
To increase the strength of the structure, vertical posts can be used. In this case, the guides will be attached to these posts and will have support, and will not “sag” in the air. At this stage, a level and plumb line are used to ensure that the stand is clearly vertical. It can be attached to the floor, ceiling or both at the same time (depending on the chosen layout).
Marking
Since we are looking at an example of creating a standard shelf, it will be mounted on a regular wall. That is, the base will be concrete. If you want to learn how to combine shelves with other plasterboard products, then read more articles on our website. This is necessary so that you understand that the shelf is the same plasterboard product as , , . And accordingly, you need to attach it to these products simply, as an additional element of the main structure, but do not forget that the frame, for example the walls, may not support the shelf.
Attaching drywall sheets to the frame
When the frame is ready and securely attached to the wall, you can begin covering it. This is done very simply and does not cause such difficulties as in the case of creating a frame. First, a sheet of drywall needs to be cut to the existing dimensions. It is necessary to calculate everything in advance so that the minimum number of sheets for covering is used. Shelves made of plasterboard will be perfectly flat if the cutting is done carefully so that the edges do not crumble.
To prevent the screws from falling into the plaster during fastening due to the high force on the screwdriver, you can use a special bit. We are talking about a bit with a limiter, which will rest against a sheet of drywall just so that the head of the screw goes to the required depth, flush.
To attach gypsum boards to the profile, 3.5 mm self-tapping screws are used. In this case, the fastening step can be the standard 15-20 cm. As for the length of the fastening, the point is ambiguous. It is generally accepted that the length of the self-tapping screw in this case should not exceed 25 mm. However, for those who are working with gypsum board for the first time, it is better to take longer screws (35 mm), although they are more expensive. The fact is that self-tapping screws can bend the profile and move the plasterboard sheet away from it. This often happens to inexperienced workers who have not yet gotten the hang of working with drywall. Because of this, the minimum fastener length may not be sufficient.
By cutting the profile correctly, you can use it alone to create a frame for a shelf
Sheath the frame from the top, bottom, and then from the sides
The finished shelf can easily support a lot of weight
By the way, for those same beginners, it is better to screw in the screws one after another, and not in different places, in order to attach the sheet faster. If you drill them sequentially, then there is less chance that the profile will be pressed through, because next door there is already a fastener that holds it.
Finish coating of the finished shelf
How to finish a plasterboard shelf? A variety of materials can be used for this, but paint and wallpaper are most often used. Working with wallpaper is very difficult and takes a long time. It will take a lot of nerves, but you may not achieve results. Although if you trim and hide everything correctly, it will turn out very beautiful. Moreover, the wallpaper will also hide drywall cracks if they arise. Wallpaper is usually used for painting.
If you paint the shelves right away, you will need water-based paint. If you use thick paint, you can create streaks on the top of the shelf with a brush, creating unique patterns. In any case, before painting plasterboard shelves, they need to be prepared. To do this, all joints and screw heads are puttied. At the joints of the gypsum boards, you need to create a right angle, because problems with leveling the surface often arise there. It is the putty that will help make the shelves completely even, and not just top and bottom.
To make the edges more durable, paint corners are used, which are attached with putty. You can coat the edges with putty and then press in the corner. It will stick like that. If the shelves are arched, then the painting corner will not hold on so easily; it will have to be secured with a stapler, and then putty. This technique will allow you to get absolutely even shelves, ready for the further finishing layer. Their edges will become strong and will not crumble in the event of an accidental impact. After the putty has dried, you will need to sand it using sandpaper. The surface will come out completely smooth.
Check out examples of plasterboard shelves that you can make yourself.
Common mistakes when working with drywall
In order to make a design in accordance with the project, it is necessary to eliminate mistakes that both beginners and experienced craftsmen make during the work process:
- Using the wrong material. If there are a large number of curved elements in the project, it is recommended to purchase arched plasterboard, because it is a little thinner than the standard one and can more easily take any shape. Thick panels may break under such circumstances.
- Improper storage of gypsum board sheets. With high air humidity, the panels can quickly become damp. If you install them in this form and then finish them, the putty may peel off from the surface.
Drywall storage rules - Use of small parts. Despite the fact that scraps are often used to make shelves, you should not join together too small pieces of material, because such a structure may become covered with cracks after some time.
- No additional reinforcement of seams. When finishing the drywall seams, you will need to strengthen them with reinforced mesh, then cracks will not appear on the structure. This mesh should be pressed into the composition and then puttied again. In addition, the putty must dry thoroughly, and only then can you proceed to painting.
When working with fragile materials, you must follow the instructions to avoid mistakes.
Of course, to make plasterboard structures with your own hands you will have to put in a lot of effort. However, this is a great opportunity to save money and create your own unique product. In addition, you will be able to acquire a very useful skill that will come in handy someday.

