The main purpose of a garage is to store cars. However, this does not prevent car owners from using it for other purposes: storing canned goods, tools, household appliances, unnecessary items, and car parts. Over time, mountains of various household supplies accumulate in the room. The garage is slowly turning into a chaotic dump, and there is less and less space. This is a sign - it’s time to properly organize the space by installing shelves in the garage. They will allow you to rationally place things, save useful space, and improve the interior of the room.
A garage with a convenient storage system when everything is in its place
Making garage shelving with your own hands is quite simple. You need to prepare tools, buy some materials, and free yourself a few hours from work. In this article we will look at detailed instructions, some tips, and recommendations for arranging such a structure.
Shelves with storage shelves
General design issues
Rack with shelves
First of all, you should forget about the first ideas that come to mind - creating the simplest hanging shelves, with a load or area that can accommodate all the property currently contained in the garage. Firstly, this is not rational from the point of view of their manufacture, and secondly, over time, the volume of things stored in the garage increases, so new and new designs will have to be made.
Therefore, it is immediately necessary to plan the design of the shelves in such a way that it is:
- universal
- expandable
- as easily movable as possible
That is, it is advisable not to make each shelf separately, but to make an entire rack consisting of several shelves as a single structure.
Rack with cabinet
The next important question is what the design of the rack will be - collapsible or not. Typically, non-removable structures are more durable and can withstand heavy loads, however, their disadvantages include difficulties in expansion, dismantling and transportation.
Collapsible structures are less stable , their rigidity is far from that of non-collapsible ones. Often, for additional stability, such structures have to be attached to walls. However, they have two special advantages - easy expandability and mobility. In addition, thanks to their modularity, shelving can be made in a variety of sizes.
In this case, the choice depends solely on the desires of each person.
We fasten with bolts or choose welding
Welding connection
So we’ve decided on the material, now let’s move on to choosing a method for assembling the metal components. One of the assembly options is a welding machine. Such structures are a non-demountable structure with high stability.
Connection with bolts
The second option is to assemble the rack using bolts. It is advisable to make such prefabricated options provided that over time they are planned to be moved to another place, or there is no opportunity (knowledge) to use welding
However, please note that such systems have less rigidity. To strengthen them, they are often fastened to the wall.
Choosing a rack design
Collapsible rack
Most often, metal or wood is chosen as the material for garage shelving. Combinations of these materials are common. Plastic is rarely used.
The designs of shelving made of wood and metal can be as follows:
- Stationary , that is, designed and assembled for a specific room. Typically, a structure of this kind is assembled once, and to give it additional strength it is attached to the wall or floor (in some cases also to the ceiling)
- Mobile . It is possible to install the structure in different places, or the ability to constantly move it using rollers (wheels)
- Collapsible . The number of shelves, their height, and sometimes their length can be changed within arbitrary limits
- Hanging . Such structures are fastened to the ceiling or walls.
- A combination of different types or with exotic elements (for example, rotating, sliding). Usually, this is more of an aesthetic rather than a practical decision.
A separate group is represented by shelves for storing tools or shelf-containers for storing small parts - usually fasteners, as well as other “loose” items.
Tool storage panel
How such products are constructed is clear from their images. They are used quite often because they are very convenient to use and easy to manufacture. In addition, any available materials can be used as material for them.
Shelves made of many containers
Naturally, the layout of any rack, which includes calculating its dimensions and determining the number of shelves, should be based on the size of the garage, the parking space for the car, and the location of the doors and gates. In some cases, it will be optimal to use corner shelving.
Corner shelves
Additional amenities in the garage
A large garage should be equipped with additional elements, and not just places for tools, spare parts, wheels and waste materials. Some devices will make technical work easier. A workbench is very useful in a garage; it is a table with many additional amenities: bedside tables, shelves, drawers, local lighting, sockets, a vice. Another practical and functional device is a sink. It will provide constant access to water. Thanks to this, you can quickly clean and wash the room, car, parts. To carry out car repairs, it is necessary to make an inspection hole if there was none initially. In a cramped room, it is also worth setting aside space for a cellar for storing pickles and vegetables. If the garage is used all year round, you will need to ventilate and install a heating system. You can organize a small closed cabinet in the shelving structure.
Preliminary preparation
You should start by preparing a drawing. You can do it yourself, using, for example, frames offered for sale as a basis. It is necessary to calculate the overall dimensions of the shelves and the parameters of the base for them.
Moreover, their dimensions should be based on preliminary measurements of the space in the garage. If you take these measurements correctly, you can consider that half the job is already done.
Shelf drawing
- At the same stage, it is necessary to think about how the shelves will be connected to the frame, and the frame itself will be further strengthened by attaching it to the walls or floor.
- An important parameter here will be the height, since, in the case of low ceilings, it is advisable to make the frame height up to the ceiling, leaving no free space.
- Determining the distance between shelves is one of the important design points, since it is this that determines the rationality of distributing things across levels.
- Traditionally, the lower ones are made the most spacious: large and heavy equipment is placed on them; in addition, they are often used to store wheels and rims.
- Usually the following rule is used - the higher the shelf, the less weight should be placed on it and, accordingly, its height is lower. This can be explained quite simply – by increasing the stability of the rack as a whole.
- We should also talk about the depth of the shelving. Shelves that are too narrow make the entire rack impractical, and shelves that are too deep make it much more difficult to access. The optimal depth is 50-60 cm.
- The width is usually determined by the tensile strength of the material from which the shelves are made. There is no need to make the rack too heavy by making shelves more than 1.5 m wide (this will require too thick iron or wood so that they do not sag under the weight). Usually the width is about 90-150 cm.
Let's look at the most popular shelving devices that you can make yourself.
Creating an inspection hole in the garage
If your garage does not have a viewing hole, you should decide whether you need such a design. Most often, car owners require an inspection pit for car repairs and maintenance. To create an inspection hole, first of all, you need to find out the groundwater level under the land plot on which the building is located.
Information about the depth of their occurrence can be found in the technical documentation of the site. If there is none, you can dig a hole and see for yourself. On a dry site, it is much easier to equip an inspection hole under the garage.
In the case where groundwater is located close to the surface, the construction of an inspection hole becomes more complicated. Then you need to waterproof the pit, and also make a drainage system that will drain the water into the sewer. Only after this they begin to build walls. A well-designed drainage system in the winter will prevent water from stagnating on the floor when the snow brought into the garage on wheels melts.
Good lighting should be provided in the inspection pit
There are several generally accepted rules for constructing a viewing hole:
- creation of a detailed drawing of the inspection pit;
- organization of waterproofing and drainage system;
- creating niches in the walls of the pit so that there is somewhere to put the tool;
- ventilation system equipment that will help avoid unpleasant odors. It is installed using the basement ventilation method.
A detailed drawing will help you create the ideal inspection hole
Simple wooden shelves
Wooden shelving in the garage
Most often, in garages, a simple stationary structure is made independently, located along one or two walls. In the latter case, it can be considered a corner.
This type of shelves has the following advantages:
- low cost compared to metal;
- simple and quick assembly without the need for metal processing (in particular, without welding);
- ease of maintenance;
- naturalness and good aesthetic qualities;
- with proper wood processing and care, a relatively long service life and high structural strength
An approximate view of such structures is given below.
Garage rack
The procedure for making such a structure is as follows:
- The materials from which the racks and the shelves themselves will be made are selected. Hardwoods (larch, oak) are suitable for racks, but, in extreme cases, ordinary pine can be used. The shelves themselves can be made from almost any wood material. Even plywood, chipboard or OSB can be used
- The racks should be made of timber with a cross-section of 10x10 or 5x10 cm. The cross members between the shelves are made from the same timber to give structural strength
- Shelves are cut from the selected material according to measurements
- All structural elements should be treated with an antiseptic before installation to avoid rotting or fungus
- The structure is assembled from racks and crossbars. If necessary, it is additionally reinforced with metal corners and attached to the wall, floor or ceiling
- The racks are marked vertically in the places where the shelves will be attached to them. Their fastening is carried out in various ways: self-tapping screws, tenons, and wood glue are used. In rare cases, dowels are used. Don’t forget about traditional nails, unlike self-tapping screws, they are less likely to come loose. To give extra strength to the shelves, they can also be mounted on metal corners
- After assembly, the ends of the rack are processed, and then the entire structure is varnished or painted
VIDEO: How to make a shelf out of wood
Shelves in the garage: order comes first. General design issues, simple options, step-by-step instructions for making your own (75+ Photos & Videos) + Reviews
Layout, diagrams, drawings, ideas
In the garage you need not only a rack, but also a workbench and a stand for hand tools - all kinds of keys and other small things, of which there are a lot and it is difficult to come up with a specific convenient storage place.
The workbench can be made in the center of the rack. This is convenient - everything you need will be at hand, you won’t have to constantly go to the shelves.
Garage shelving with workbench is convenient
The workbench can be part of the system, or you can make two separate modules, between which you can install the required table. If you don’t like this arrangement, you can change the configuration - at least put it at an angle.
As for the tool stand. There is a factory option - a perforated sheet of metal with holders hung on it. The idea is very good except for the price.
Comfortable))
As usual, there are also several homemade projects (what would a garage be without them) on the same topic. The ideas are simple to implement, maybe not so elegant, but convenient:
- On boards, chipboard sheets, plywood, place nails under each tool. To avoid confusion about where to hang something, trace the instrument in place and paint it with some color.
Everything is in order and in its place
- For heavier equipment - large keys, etc. You can use a mesh onto which you weld hooks from wire. Nail the mesh to the wall.
Option for heavier and bulkier tools
- Make a bar with holes cut in it into which tools are lowered.
This tool stand is very easy to make with your own hands.
And if desired, all this can be put on wheels - to make the tool stand mobile. This is the case if during the warm season you prefer to work with the machine outside.
You can easily roll back to where you want
Well, for inspiration... so that all the tools are in place))
Full order))
Wooden shelves with metal frame
Rack with metal frame
An alternative design option, which is a more expensive, but at the same time more durable and durable solution. The racks in these shelves are made of metal, and the surface of the shelves itself is made of wood or any materials of wood origin.
Such a rack has a higher resistance to moisture and mold. It is more resistant to heat and fire. Moreover, by using metal parts, they can be made dismountable, which will allow you to change the appearance of the structure according to any desire of the garage owner.
Materials and tools needed for work
Corners for shelving in the garage
The racks of such a rack are made from rectangular pipes or from a profile with a width of one of the sides of 5 cm. A 30 mm corner is best suited as crossbars.
The frame is made from a corner, and the thickness of the shelf should be from 1.5 to 3 cm (along the height of the corner). Crossbars made from angles can be attached to the guides in different ways - by welding or using bolts. It all depends on the wishes of the owner.
If you need a durable structure, then welding is preferable; if you require the versatility of the product with the possibility of its further modernization, you should use bolts. The use of bolts allows, for example, to change the height of each level.
Shelves can traditionally be made from any material on hand - from pine to OSB. For reasons of strength, their thickness should not be less than 12-15 mm.
For work you will need the following set of tools:
- drill (screwdriver)
- Bulgarian
- wood hacksaw
- corner
- level
- welding machine (optional)
Manufacturing procedure
Corner shelving frame
Assembling the rack is best done in a free room , and it is advisable to empty the garage of unnecessary things and remove the car from it.
After assembling the frame, it should be screwed to the wall. The assembly sequence is as follows:
- Based on the finished measurements, the material of the racks and corners for the shelves is cut using a grinder
- The racks are marked in those places where shelves will be attached to them
- The corners are bolted to the posts (or welded in the case of a stationary structure). In this case, it is extremely important to maintain a connection angle of 90°, otherwise the structure will turn out skewed
- Similarly, the racks are connected to each other using crossbars, but in this case, right angles must be maintained not only between the racks and crossbars, but between the crossbars and the previously attached corners
- The assembled structure is installed in its place and screwed to the walls and floor. This can be done, for example, using anchor bolts
- The metal frame is sanded using a grinder with an appropriate brush attachment and coated with a primer or paint containing a primer. At this stage, in order to facilitate the labor-intensive process of mechanically cleaning the frame from rust, you can use a chemical rust converter. Typically, converters require a day to dissolve the rust; after which surfaces can be painted without any mechanical or chemical treatment
- After the paint has dried, shelves are cut out of wood or wooden materials and adjusted in size to the finished frame structure
- The shelves are sanded, painted or varnished, and then attached to the frame using bolts or self-tapping screws
VIDEO: DIY universal shelves
Shelves in the garage: order comes first. General design issues, simple options, step-by-step instructions for making your own (75+ Photos & Videos) + Reviews
We fasten with bolts or choose welding
Welding connection
So we’ve decided on the material, now let’s move on to choosing a method for assembling the metal components. One of the assembly options is a welding machine. Such structures are a non-demountable structure with high stability.
Connection with bolts
The second option is to assemble the rack using bolts. It is advisable to make such prefabricated options provided that over time they are planned to be moved to another place, or there is no opportunity (knowledge) to use welding
However, please note that such systems have less rigidity. To strengthen them, they are often fastened to the wall.
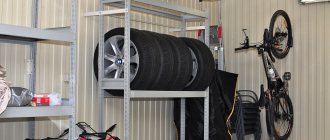
Shelves for storing heavy items
Metal shelving
Typically, metal shelves are used to store very heavy items or items with large dimensions. To securely store things on them, it will be better if they are made as stationary structures.
This approach immediately eliminates bolts as a connecting element. You can buy stationary metal products, the connections of which are provided using various grooves and guides, but this will no longer be an independent production, in addition, such structures are very expensive.
Therefore, it is recommended to use welding to create entirely metal shelves. The use of bolts is allowed in non-critical joints, or where they are assigned the role of fastening light elements.
Metal rack
- As usual, manufacturing begins with the creation of a drawing or sketch . In this case, their location plays an important role. It is advisable to place such products near strong, solid walls. It is possible that a significant part of the load when attaching the rack to the wall will fall on the wall, and if it is of a decorative nature, unpleasant incidents are possible.
- For such shelves, it is best to choose not square profiles as frame elements, but ordinary corners , but with dimensions of at least 50 mm. Often the creation of such products is made not from a frame, but from a wall mount.
- The frame elements are first marked and cut out using a grinder , and then welded into a single structure using a welding machine. At all stages, you should check the right angles of the rack elements: between the racks, crossbars and fasteners.
Frame for metal shelves
- The shelves themselves are made of perforated or rolled steel with a thickness of 1 to 5 mm. Its thickness is determined solely by the desire of the owner.
- At the same time, one should not forget about the weight of the structure . A sheet of rolled steel with dimensions of 50x100 cm and a thickness of 3 mm weighs almost 12 kg, and a sheet with the same dimensions and a thickness of 5 mm weighs almost 20 kg. In addition, do not forget about the cost: a sheet measuring 1000x500x3 mm will cost about 2-3 dollars.
- An alternative would be to use wooden shelves . In this case, you should choose wood with a thickness of 2.5 to 3 cm, which will first need to be treated with a fire retardant to increase its fire resistance.
- These boards can be connected to the frame using bolts. Metal sheets are also attached to the boards with bolts or self-tapping screws. In this case, it is better not to use welding so as not to destroy the wooden elements.
Upon completion of the work, the entire structure must be cleaned of rust and painted.
How to assemble a rack from an aluminum profile with your own hands
Assembling a rack with your own hands from a profile can be done even by a person taking up this task for the first time. It is easier to work with than wood.
The main advantage of the modular design is the ease of assembly from a ready-made kit
Materials and tools
To calculate how much material is needed, first sketch out a sketch indicating the dimensions and number of shelves. Profile dimensions are selected depending on the expected load. To connect the parts, you will need self-tapping screws with press washers, since their fastening is more reliable. It is better to take pointed ones, since drill ones make large holes, so the strength is reduced. Shelves are made from boards 2 - 3 cm thick, 10 mm or more plywood, OSB sheets no thinner than 12 mm.
To work you need to stock up on tools:
- Tape measure, pencil or felt-tip pen, square for checking angles.
- Metal scissors for cutting profiles.
- Screwdriver. If you screw in each screw manually with a screwdriver, it will take several days to assemble the frame.
- A wood hacksaw for cutting shelves. The process will speed up if you have a circular saw or jigsaw.
Build process
When the materials and tools are prepared, begin assembly:
- On the profile, mark the length of the racks, crossbars, and crossbars along the width of the shelves. To prevent the rack from turning out crooked due to errors with the dimensions of the workpieces, you need to re-check the correctness of the markings.
- On the side walls of the profile, cuts are made to the base and bent at this point. The workpiece is cut along the fold line.
- Longitudinal cuts are made on the crossbars to a depth equal to the width of the profile of the vertical supports. Internal bends, if any, are cut off.
- The crossbars are inserted into one another to form a rectangular cross-section. The cut ends are bent 90⁰. You need two of these parts for each shelf. They are installed on both sides of the frame.
- The assembly of the sidewalls, so that there are no distortions, is carried out on a flat surface, possibly on the floor. Cross members are inserted between a pair of vertical supports. After checking the corners, each bend is screwed with 1 - 2 self-tapping screws.
- After both sidewalls are ready, the rack is assembled from the profile. First install the lower crossbars, then the upper ones. If no distortions are found during inspection, the rest are fixed. It is more convenient to screw in the screws by placing the frame on its side. Having secured the parts on one side, it is turned over to the other.
- On profile racks with wide shelves, additional supports are installed from below in the middle of the lower crossbar. After determining the height, bends are made on them and screwed with self-tapping screws.
- After measuring, the shelves are cut. To increase the rigidity of the frame, cutouts are made in the corners so that they extend onto the side crossbars. To fasten wood, it is better to use self-tapping screws with fine threads.
Making hanging shelves
Hanging wall shelves
There are two types of hanging shelves - wall and ceiling. Wall shelves can be made in open or closed design, sometimes they have a back wall. They are attached to the garage wall using corners or anchors. These shelves can also be either stationary or collapsible.
Ceiling shelves are placed at the highest level and are attached directly to the ceiling. They can be hung on hooks welded to metal ceiling beams. In addition, eye bolts or special long studs are used as fastenings.
Suspended ceiling shelves
The advantages of such shelves include the relative simplicity and speed of assembly. However, they are quite flimsy and cannot support too much weight. On the other hand, no one will place items that are too heavy to be stored at this level for safety reasons.
The manufacture of the frame for such structures, as well as the shelves themselves, repeats the procedures described earlier in the production of wooden shelves with a metal frame. In this case, fastenings are made in the upper part of the frame for connection with hooks or studs installed in the ceiling.
VIDEO: Wooden hanging shelves
Shelves in the garage: order comes first. General design issues, simple options, step-by-step instructions for making your own (75+ Photos & Videos) + Reviews
Helpful tips for efficient tool storage
And a few more tips, a kind of instruction on how to ensure convenient storage of the tool:
If the room is made of bricks or blocks, then it is best to place a shelf for storing tools on a plastered wall to avoid the accumulation of condensation between the back wall of the shelf and the wall of the house.
The height of the shelf - shield is calculated based on the height of the garage owner. This calculation will allow you to easily access any tool.
For maximum comfortable use, it is better to make all shelves open.
Combining a shelf-board with pegboard elements, i.e. boards with perforations, will provide additional fastening for tools.
After reading this article, all that remains is to grab the tools and start creating the desired shelf. In this process, you can completely rely on your imagination and experience, or you can use photos of shelves and tool holders. The main thing is to believe in yourself and the result will certainly be achieved.
Shelves made of metal and plastic
Plastic shelves for tools
Due to its low strength, plastic is rarely used in the manufacture of shelves, however, for storing various small items and light items, this option has a right to exist. Plastic is the cheapest material from which shelves can be made; in addition, with its use you can not only save money, but also decorate your garage design with bright elements.
Such shelves can be made using a wooden or metal frame, in a variety of designs. The design and dimensions depend on the desire and taste of the garage owner.
It must be remembered that such racks have a number of significant disadvantages:
- low fire and heat resistance
- vulnerability to chemically active substances (solvent, gasoline, acetone, etc.)
- low holding weight
Other options
A variety of materials are suitable for making shelves. The main requirement for them is strength, the ability to withstand the expected load. Craftsmen find original and practical solutions for organizing garage space.
Cable rack shelf
Cable racks make very durable shelves.
Cable racks, trays, profiles are products necessary for electrical installation work. From these parts you can assemble a strong and reliable structure from several shelves and sections. Also, these products are suitable for constructing a frame on which wooden, glass or plastic shelves are installed.
The range of auxiliary materials for electrical installation work includes a full range of fastening elements for assembling structures from cable racks. All these products are affordable and sold in the hardware or electrical materials departments of any construction hypermarket and shopping center.
From canisters
Shelf made of canisters - option for originals
A plastic canister is a real find for those who love original solutions for organizing storage systems in the garage. Entire racks are built from these containers. Canisters act as drawers, one of the side walls of which is neatly cut off. This way you get a hollow box with a handle.
Installation of such racks is simple. In production, it is recommended to focus on the instructions for installing wooden shelves suggested above. First of all, a multi-sectional frame is constructed from boards, in each opening of which a canister laid on its side is installed. Get a comfortable, deep, drawer with a handle.
We make it with our own hands
Shelves in the garage can be made with your own hands, starting from the very beginning, or you can purchase a ready-made structure and simply fix it in the place you need.
Wall shelf
To attach such shelves, you must use special brackets. They can be of various shapes. Your task is to choose those that can maximally compensate for the pressure of the load, as well as distribute the load over the entire surface of the wall. To mount it, you need to measure a horizontal line on the wall, focusing on it and then attaching the bracket in the future. It is recommended to use anchors for installation; this is more reliable than choosing self-tapping screws. When all the necessary fasteners are installed in place, you can proceed to installing the shelf, which can be wooden or plywood.
Self-assembly
If you want a homemade option, then it’s worth learning how to make a shelving unit from corners with your own hands, since this is one of the easiest ways to make such a structure yourself.
No special skills or craftsmanship are required for this. Usually, racks are assembled from scrap materials, or simply from inexpensive parts, such as simple corners and profiles.
They are used to make the basis of the structure - a frame, on which shelves are then laid, most often wooden or made of plywood and chipboard. In addition, if available, remnants of pipes that are suitable in size are well suited for the frame.