- November 2, 2018
- Furniture
- Natali Michaelis
Shelves are the most important element of any closet. They are used for arranging books, clothes, bed linen or simply decorative items. However, not all closets contain a sufficient number of such elements, so people may have a question about how to make additional shelves for the closet with their own hands. This task should be approached with great responsibility so that the service life is as long as possible. We will talk about all the features of making shelves in our article.
Selection of material for manufacturing
In order to make a shelf in a closet with your own hands, you will need to choose the right material for construction. First of all, you should pay attention to what the wardrobe itself is made of. The most common material used in the manufacture of furniture is chipboard. However, this does not mean that using other materials would be wrong. You will have at your disposal:
- wood is a fairly durable and highly durable material;
- stacked solid wood, consisting of several pieces of wood;
- The blockboard is suitable for storing heavy items.
In addition, you can also use laminated chipboard and MDF with a dense structure. This material is not particularly strong or durable, but is significantly cheaper than any of the three previous options.
General rules
Making a wardrobe with your own hands provides many advantages. So, this is not only a significant saving on the family budget, but also an opportunity for imagination and experimentation. In order for the finished product to be comfortable and practical, at the design stage you should be guided by the following tips:
- The number of compartments inside the cabinet must match the number of doors. But this rule does not apply to wide doors, behind which you can install 2 compartments with shelves at once.
- It is convenient to store laundry in cells with a height of 35-40 cm, books - 20-35 cm.
- The optimal opening for long clothes is 150-160 cm, for short ones – up to 100 cm.
- Large items, suitcases, and travel bags are best placed on the top shelf. The height of the opening must be at least 45 cm.
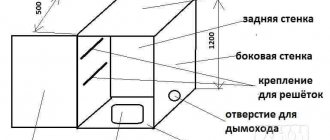
- According to generally accepted standards, the depth of the wardrobe is 60 cm, which is exactly the size of the factory model. If the wardrobe is made independently, it is better to make it at least 65 cm. The fact is that the door mechanism “eats” 10 cm, so only 50 cm remains for clothes with hangers.
- If you plan to install a volumetric handle on the box, then it needs to be recessed a little so that the protruding part does not touch the doors. An excellent alternative to such handles would be the finger grooves on the front panel of the drawer.
- When making drawers with your own hands, it is better to use ball-bearing full extension guides. They are distinguished by their durability, strength and convenience.
- Large cells larger than 80 cm must be reinforced with a partition, otherwise they will bend under the weight of things.
- Rods for clothes longer than 100 cm are also recommended to be additionally reinforced with a vertical rod, the lower end of which rests on the floor, and the upper end on the top shelf. Thanks to this, you don’t have to worry about the heavy weight of your clothes.
- It is better to install the lighting in the cabinet in the remote roof canopy, and not inside the structure, otherwise the light will only fall on the top shelf.
When making a wardrobe with your own hands, we must not forget that the arrangement of things in it must have a certain sequence. For example, on top are placed the most unnecessary things that need to be taken out least often - hats, bags. In the middle are those that are used most often - outerwear. Below are boxes with shoes, bags, backpacks.
Which mount should I choose?
In addition to the material, when making shelves you will need to pay special attention to the holders, since they bear most of the load. There are two ways to arrange the fasteners: along different axes and along one axis. For the first time, it is best to give preference to the first option, since maintaining parallelism on two planes is much easier than looking for joints between two partitions. In addition, you will need to choose the optimal screed method, since the “load capacity” of the future shelf will depend on this. We will talk about all the features of each method in the following sections.
Corner screed
Special furniture corners can be made of wood and plastic. Installation of such parts does not require special knowledge and skills. It will be enough to use a screwdriver and several self-tapping screws to connect the shelf to the side wall of the cabinet. The only difficulty may be the correct location of the corner ties relative to one axis. If you create an uneven structure, then such a shelf will be of little use.
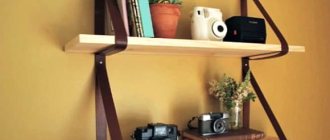
Functional hangers
You can place several items on one hanger. Use special hangers that can support the weight of several shirts.
These hangers are convenient to use for vertical storage of trousers.
Screw tie
Another common type of screed, which is actively used when making shelves in a closet with your own hands. To fasten the shelf, a screw and a special barrel are used, which connect the shelf to the cabinet wall. It is worth noting that such a mechanism is highly complex to install, so if you are not confident in your abilities, it is better to ask a professional for help. The main problem is the difficulty of aligning the hole in the shelf with the barrel. However, the screw tie guarantees a reliable connection and a long service life.
Doors
If you install brackets on the cabinet door, you will have additional storage space.
Add rings with clips to the railing. This way you can store gloves and hats. Scarves can be thrown over the bracket.
If there is not enough space, you can use the inside of the interior door. The example in the photo shows how to organize storage.
Since cabinet doors are thin, it is important to choose the right option for attaching the railing. For fastening, use special adhesive tape, which is designed for heavy weight. This tape can be found at any hardware store.
Euroscrews
Increasingly, Euroscrews are being introduced into furniture production, which show good fastening efficiency. To create such a fastener, you need to screw the part into the end of the shelf into a pre-prepared hole. As a rule, products with a diameter of 7 millimeters and a length of 50 to 70 millimeters are used for this. The main disadvantage of the Euroscrew is that the furniture cannot be disassembled and reassembled frequently, since after three or four such procedures the fasteners may simply collapse. In all other respects, the Euroscrew is ideal for fixing shelves in a closet with your own hands.
DIY wardrobe: 101 photos of ideal designs of different types of stylish wardrobes
The closet plays an important role in any interior. It is not surprising that strict requirements are imposed on it: not to take up too much space, to be spacious, to have a sufficient number of shelves and drawers. The models on the market do not always fully satisfy individual wishes.
But the online store https://www.salon-shkafov.ru/ has both ready-made cabinet options and custom-made ones. So experienced craftsmen will assemble the future owner’s closet to suit any of his whims and desires.
Owners of apartments with non-standard layouts find it even more difficult to choose an option that fits into the room. In this case, you can order a cabinet from specialists who will take into account all your wishes regarding the design and internal contents.
Unfortunately, this option is not affordable for everyone. Then the best solution to the problem will be to use your own hands and ingenuity, because assembling a cabinet yourself is not at all difficult!
Making a wooden shelf
Finally we get to the manufacturing process itself. To make a wooden shelf in a closet, you will need to collect all the necessary tools in one place in advance, so that during the process you will not need anything. Typically the list will be something like this:
- a regular iron for gluing furniture wool;
- drill with drills of suitable size;
- stationery knife and pencil;
- fasteners.
You will also need to get an electric jigsaw or circular saw if you decide to cut the boards yourself.
The workpiece must be cut only according to a pre-drawn diagram (drawing). It is best to do this with a saw, since the jigsaw may leave uneven surfaces that will have to be sanded down. You can also contact a carpentry workshop, where they will cut boards of the required size for you for a small amount.
The ends should be covered with furniture edges so that moisture cannot penetrate into the material. Edge tape is best applied using a hot iron. To cut off the excess, you need to use a utility knife or sandpaper. After that, all that remains is to install the shelf in the closet.
Installing a wooden shelf
This process is not particularly complicated, of course, if we are talking about an ordinary cabinet, and not some kind of pencil case. First of all, you should draw with a pencil the markings on which the shelves will be located. To draw lines between points, it is recommended to use a level so that the fasteners lie in the same horizontal plane. Otherwise, the shelf may collapse. It is also advisable to check with a level that the side walls of the cabinet are at right angles.
Sequence of work when installing shelves in a cabinet:
- Using a drill, we drill holes in the furniture according to the pre-made markings.
- We mount the selected fastening element (holders for shelves in the closet).
- We install the shelf on the mount.
To strengthen the structure, you can use wooden blocks. The parts are fixed to the front edge using screws or special wood glue.
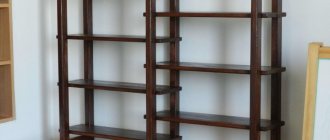
Types of shelves
A shelf is an interior item, usually without a front wall. Its purpose is to store all kinds of items and accessories, and is installed not only in residential premises, but also in bathrooms, kitchens, baths, garages and outbuildings.
With this product you can decorate your interior, adding variety and charm to it.
Types of fastening and installation
There are several options for arranging and fastening shelves. The choice is made depending on the design and configuration of the item and the type of room. In any case, the main thing is that the shelf is securely fastened and can withstand the expected load on its working surface.
- The most common way to install shelves is to mount them to the wall.
Wall shelves - The structure can be suspended from the ceiling using cords, chains, cables, ropes, etc.
- Corner models are installed between adjacent walls. They can be attached to both walls and ceiling surfaces.
- If free space allows, floor structures are used to place objects and decor, which are usually not rigidly fixed to the base and are mobile, i.e., if desired, they can be easily moved to a new location.
- Floor-standing models also include attached ones, which have two points of support - the floor and the wall.
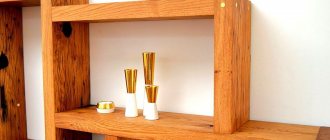
Beautiful floor shelf
Most often, open shelves are installed in rooms, in which there is no front wall. But for storing books, accessories in bathrooms or, for example, spices in the kitchen, models protected by glass are often chosen. It helps protect items placed inside the shelf from external influences. Maintaining cleanliness inside closed interior items is much easier.
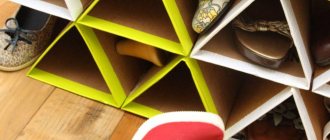
Shoe shelf made from pallets
Shelves can be multi-tiered, horizontal or vertical; several products can be located on the same level, stepped or chaotically. They may have side and back walls or be one horizontal surface. When choosing a model, its size and configuration, as well as placement option, it is necessary to take into account the proportions of the room.
Shelves made of pallets
Today, choosing a piece of furniture suitable for a particular interior is not difficult. It can be made from various materials, which are often combined in the product.
Material of manufacture
You can divide the shelves into several categories.
Shelves are made from different materials
- Made from solid wood . This natural material has an excellent appearance and is characterized by excellent performance characteristics. It is easy to process, serves for a long time without losing its visual appeal (subject to proper processing). The variety of wood species allows us to produce interesting interior details that are in harmony with most interior design styles.
- Metal . Strong, reliable, durable and stylish designs are made from this material. But they cannot fit into all interiors. The main application is modern furnishings (loft, high-tech) and bathrooms.
- From glass . Glass products, due to their light transmittance, look elegant and weightless in the interior. Due to the material’s ability to withstand all kinds of climatic influences: sunlight, temperature, moisture, steam, and also be resistant to mechanical damage, objects made from glass can be installed in rooms for various purposes. The fragility of the material has not been a problem for a long time, since glass that has undergone special treatment is used for the production of shelves. Some disadvantages include the need to keep glass structures perfectly clean, as otherwise they lose their visual appeal.
- Containing wood. Currently, a wide range of materials are produced that are cheaper analogues of natural wood. This group includes MDF, particle boards or fiberboard. When finishing sheets with coatings imitating wood texture (films of other textures can also be used), the consumer is offered a material that is visually attractive and has a long service life.
Wall shelves in the interior - Plasterboard . Today, interior decoration is often done using plasterboard sheets. During the work, it is possible to install shelves made of this material, which can then be finished with any materials suitable for the design. The sheets themselves are not designed for high loads, but they are perfect for placing accessories.
- Made of plastic. Various types of structures are made from this artificial material, which belongs to the budget category. Thanks to the possibilities of decorative processing of plastics, products can have different textures, but, as a rule, they are simple and do not pretend to be very aesthetic.
Light shelves
For each room decorated in a certain style, you can choose a harmoniously fitting piece of furniture that will not only allow you to place things for storage, but will also become a design accent that stands out with its shape and color. Decorative lighting gives the installed structures additional charm.
Pull-out shelves
If you decide to make a pull-out shelf in your closet, then in addition to all of the above, you will need to use a special mechanism on which the shelf will move. You can purchase such a device at furniture stores, or you can remove it from an old chest of drawers, cabinet or computer desk, if the size is suitable. In order not to make mistakes with the calculations, be sure to draw up a drawing of the future shelf.
First, we make the shelf itself from wood or chipboard. If you decide to make a drawer instead of a sliding shelf, then you will have to add three more walls: two side and one front, as well as a handle. Be sure to take into account the dimensions of the mechanism itself when calculating, since it will be mounted on the end of the shelf and the inside of the cabinet. As a rule, its dimensions range from 4 to 6 centimeters in width. Fastening occurs using a large number of small screws.
As you can see, at home you can make almost any shelf of absolutely any size. To do this, you do not have to have special carpentry skills, but simply draw up a competent drawing and select good fasteners. After this, installation is reduced to minimal theoretical knowledge. However, this does not mean that this process should not be approached with great responsibility, because if the shelf is not secured securely, then it will simply not be possible to store objects with a large weight on it. Therefore, use only high-quality screws and a reliable screwdriver.
Arrangement of the hallway and bedroom
The internal design of the wardrobe directly depends on what exactly is planned to be stored in it. This means that when designing a piece of furniture for the hallway, bedroom or living room, you need to clearly know what things will be located there.
Most often, the dimensions of the hallway do not allow for a wardrobe with a depth of more than 40 cm.
Taking into account the fact that about 10 cm is spent on the sliding system, there is very little space left for placing outerwear - jackets, coats, raincoats. And standard hangers simply don’t fit in such a narrow closet. End rods, which are mounted instead of standard ones, will help make the internal structure more functional. They come in both retractable and stationary types. It is unlikely that they will be able to fit the entire outer wardrobe of the family into them, but the basic things can be done.
To store shoes, wire niches are installed where you can place 2-3 pairs of shoes or boots. The rest will have to be stored in boxes. Small pull-out elements will help make the closet convenient, where you can put brushes for shoes and clothes, creams, spare keys, and other small items.
The closet in the hallway is a place where umbrellas, packages, and bags are stored, so you need to take care of the required number of hooks where you can hang everything you need. Using a mirror on the door will not only visually expand the room, but also allow you to see yourself in full size before leaving the house.
A wardrobe for a bedroom is a place to store casual, work clothes, and bed linen. Therefore, before you start making furniture with your own hands, you need to carefully consider all the options for filling it. The most popular are:
- Baskets. They can be made of metal, plastic and are universal for storing things. They can hold both socks and shirts.
- Pantograph. This is a clothes rail equipped with a handle and a mechanism for lowering it down. This option is suitable for those who want to use the upper space as efficiently as possible.
- Iron holder and built-in ironing board.
- Hangers for ties, belts, trousers.
- Drawers for underwear.
- Mounts for storing shoes.
As for built-in wardrobes, many people prefer to make niches for TVs and computers in them. This allows you to unload the room and free up more space.