Recently, original products for relaxation - hanging chairs - have begun to appear in the interiors of country houses and spacious modern apartments. They continue to rapidly gain popularity due to their unique elegant design and the feeling of extraordinary lightness and comfort. A light openwork cocoon hovering above the ground will help you relax and feel peace and tranquility.
It won’t be difficult to purchase the model you like - many large furniture and interior accessories stores offer a wide selection of products for every taste, with an amazing variety of shapes, shades and materials.
The cost of hanging furnishings is quite high; budget options for such products are simply not provided. But what to do if it is not possible to purchase an expensive copy, but you really want to decorate your home with an exclusive item? The answer is simple: you can make a hanging chair yourself. And it will be a truly unique thing.
What if you make it yourself?
We thought and imagined that everything you need for a home hammock can be assembled in a tool block, and your hands are dexterous. Whoever decides: we make the rocking chair ourselves.
And then we will tell you below what and how to make types of hanging chairs like cocoon-hammock-swing. And most importantly, how to strengthen it indoors, so as not to hastily drag a complex device into the office block or living room before the rain.
Stage 2 - weaving the mesh (seats)
Then you can move on to weaving the seat. When choosing a macrame pattern, it is important to consider that some patterns require a stronger tightening of the cord during weaving. For beginners, it is better to use the “checkerboard” pattern. It is important to constantly monitor the tension force - this will affect the elasticity of the seat. It is not necessary to cut off the free ends of the knots - they can be used to form a fringe.
Zhejiang Jowild Outdoor Co.
Making a seat using the macrame technique
For this type of hanging chair you will need:
- 7 strands of 6 m;
- 4 wires 5m each;
- 4 strands of 4.5 m each;
- 2 wires 4 m each;
- 2 metal circles with a diameter of 90 and 110 cm.
Having prepared the ropes of the required length, proceed to attach them to the frame.
- Starting from the center, tie 7 long strands in pairs at a distance of 6 cm from each other.
- Continue attaching threads to the sides of the warp. Accordingly, on one side there should be 2 wires of 5 m each, 2 wires of 4.5 m each and 1 wire 4 m long. Connect the long and short cables in pairs to the base
- Then start weaving the pattern from the center of the piece. Weaving the pattern should start from the center
- As a result of your work, you should get an openwork circle. Finished perforated circle: seat base using macrame technique
- Secure each garment with a flat knot to prevent the rope from slipping around.
- When knitting, always maintain tension by tying knots at 6cm intervals.
If it is necessary to create a fringe, the length of the strands should be increased by about one meter and, upon completion of the work, do not cut the remaining cord.
In addition, equip the resulting structure with reliable strapping and a soft pillow.
A rocking chair made using the macrame weaving technique must be additionally equipped with a pillow
Stage 1 - wrapping hoops
The first step is to braid the hoops with a cord of medium thickness. It can be either synthetic - with the addition of polystyrene - or natural. It is worth paying attention to the uniformity of the winding. You need to tighten it every 10–20 twists. To avoid blisters, it is better to wear gloves. One meter of hoop will take about 40 meters of cord. For greater strength of the product, it is worth using hoops made of metal-plastic pipes with a cross-section of 35 mm.
Amazon Company
DIY wicker hanging chair
Wickerwork is a classic that never goes out of style. For weaving, you can use natural wicker or artificial substitutes. Buy materials in specialized stores.
Housewives who know how to weave from natural wicker can make a hanging chair from rattan. For those who have never used wicker, it is easier to make a product using a variety of thread weaving techniques, creating unique openwork patterns. This will significantly reduce the cost of the final product, and beautiful knitting is in no way inferior in attractiveness to the beauty of rattan.
The most popular wicker model now is the cocoon chair. It is comfortable and beautiful, with its appearance it can decorate any recreation area. The peculiarity of the cocoon is that 2/3 of the space is hidden behind wicker walls, which guarantees complete privacy.
How to make a cocoon hanging chair in wicker style
To do this, you need PVC pipes, from which you should make a strong frame (a round circle), as well as pipes of a smaller diameter to create a round shape. The pipes are connected to each other with self-tapping screws. The finished frame is woven with openwork weave from strong threads or thin rope. Be sure to place soft pillows on the bottom.
The clasp for such a product can be a metal chain attached to the top of the PVC frame. Drawings of a hanging chair in the shape of a cocoon can be found on the Internet and modified based on your wishes and design ideas.
Seat cushions
For a comfortable rest, you definitely need to make several pillows. They can be made from new, wear-resistant fabric or use materials that are on hand. For outdoor use, cushions made from teak, satin or twill are suitable. The color of the material may be different; choose one that matches the external design of the recreation area.
Suitable fillers include latex, foam rubber, and padding polyester. They are resistant to deformation and, if necessary, can be easily washed and cleaned. The shape of the cushion depends on the shape of the seat. It is recommended to use large buttons sewn onto the surface of the pillow as decoration. They need to be sewn in such a way as to fasten both sides of the fabric, passing through the filler. They will serve as an interesting design element and also prevent deformation of the filler. It is better to refuse other decor, because the main thing in a pillow is functionality and comfort of use.
Scheme for making a hoop
A circle as a shape is often used to make a hanging shell chair frame using the macrame method, a fabric chair cover, a hammock chair, a cocoon, and a chair on a wooden base. You can make a circle from a metal or metal-plastic tube. A metal exercise machine of the same name, if available, is also suitable.
The finished design of a hanging chair can be upholstered with foam rubber, polyester padding, fabric, woven with screws or ropes. You can trim the edges with decorative ribbons or braid, and decorate with beads.
Tools and materials
A hanging wood frame is most often used for straighter shapes. Wooden pallets are often used as the base for these chairs. These can be single boards or ready-made structures that are simply sawn into the required blocks.
To make a slatted hammock structure you will need:
- hacksaw or jigsaw;
- drill;
- wood drills;
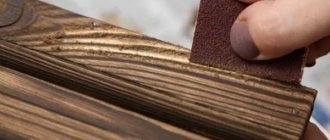
- sandpaper for surface treatment.
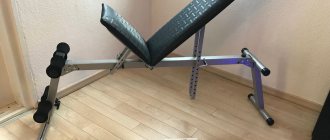
Metal-plastic will be an excellent material for making a chair frame. The diameter of the tube must be greater than 3.5 cm.
Metal-plastic is easy to saw; you don’t need to bend it using special equipment, since they are sold in the form of coils, which means they already have a round shape. To make the frame you will need: self-tapping screws, a screwdriver, a wooden or metal sleeve.
Metal tubes form the strongest structure for chairs of any shape, whether round or joined at the top and splayed down. Welding will help in this matter. The work will require an experienced person and a bending machine. But this frame will be the heaviest, which means it will require strong fastening. This option will take longer.
Manufacturing
Initially, the wood needs to be shaped, sanded, treated with insect repellent, and painted to protect against the elements. Attached to the joint with wood glue and, if necessary, supplemented with screws or bushings.
The metal-plastic base is easily fixed in the ring. Fastening occurs using a wooden or plastic sleeve of smaller diameter, secured with stainless steel screws on both sides of the joint, without extending beyond the sleeve.
The process of bending a metal pipe is quite prosaic if you have special equipment. Some experience with the machine is required. Pipe bending is available upon request.
Welding requires a specific location and skill level. It is not recommended to work with welding without special skills. The number of subscriptions depends on the required form. This could be a simple repeating circle or the shape of a chair.
The frame is ready, how to make a chair out of it?
Types of hanging chairs
The first hanging furnishings appeared in Denmark in the mid-twentieth century. At first they were used as garden hammocks, but then they gradually began to move under the roof and first took up places on terraces and balconies, then finally settled in rooms, becoming part of the home furnishings.
A floating place to relax can be made of natural materials (rattan, willow, solid wood) or artificial (plastic, metal). The structure is securely attached to the ceiling using a powerful hook, chain or cable. In addition, there are also floor products installed on a special bracket. Both seat options can rock and spin.
Amazing design, unusual shapes and different materials make it possible to adapt the product to any room. A properly made chair can withstand a weight of up to two hundred kilograms. Thanks to this, it can accommodate either two adults or an adult and a child.
All hanging models are divided into several types:
- braided type;
- textile;
- hard;
- soft.
All of them can swing or rotate, giving their owners unforgettable moments of relaxation.
During its existence, the hanging accessory has changed many times, and today there are a sufficient number of its varieties:
- rigid frame made from wicker, rattan, acrylic or plastic;
- a soft hammock chair that has compact dimensions and takes the shape of the body of the person sitting;
- the cocoon is remarkable in that its inner part is more than half hidden from those around it by openwork walls;
- The drop, which looks like a fairy-tale house, has taken root well in children's rooms.
Swing chairs are also divided according to the features of fastening (axle or rod), material and possible load. Before you make a chair with your own hands, you should decide where and how it will be used, and what load is planned on it.
Making a simple lying hammock
this is the easiest thing to do: you will need thick fabric measuring 1 m by 2.5 meters, rope and two round wooden or metal strips. It needs to be tucked around the edges. It is necessary to drill holes at the ends for attaching the rope, leaving a reserve for the strips. The fabric must be folded and sewn on a drawstring for the straps, the holes for the loops must be processed. Next, insert the strips into the lace and secure the cords.
If the hammock is fixed on two supports located at some distance from each other, then one is enough for the chair.
Advice. To make it more comfortable to lie down in the hammock along its long edges, you need to make a drawstring through which a tight rope is threaded.
Hammock chair: master class
To make such a suspension you need to take fabric measuring 1.5 x 1.5 meters. Make a drawstring on both sides and 8-12 loops to hang them across the entire width of the side. Thread the lace through the lace for rigidity. Next, thread the ropes through the holes, which are connected on each side with a hanging loop. Both rings can then be attached to the base.
For convenience, strips can be inserted into the transverse part of the seat from below and from above.
Master class on making a nest
You need to take two circles and connect them in one place, winding them 50 cm. Then pull the fabric or cords onto the loom. On the opposite side of the connection, connect the circles with long ropes from 40 cm to 10 cm, shorter ropes should converge at the point of continuous connection of the circles. Attach 4 ropes to the bottom frame, attach the second frame to the back ropes shaped like a backrest. Connect the cords with a hanging ring and attach to the hanging ring. The nest is ready.
This place is ideal for those who love privacy.
These simple chairs can be made at home in 1-2 hours. And you can enjoy them for several years.
Stages of work taking into account the model
To decide how to make a hanging chair at home, you can first consider the manufacturing technologies of several options and choose the most suitable one for implementing your own idea.
For manufacturing you will need the following materials:
- pipes or wood rods for the frame model;
- the material with which the frame will subsequently be covered;
- durable synthetic threads;
- rope with a diameter of 6-8 mm;
- batting, padding polyester or thin foam rubber.
The composition of materials may vary depending on the selected model.
On hoops
By using a gymnastic hoop, you can quickly make a frame model hanging on a hook mounted in the ceiling of a terrace, gazebo or children's room. Making it is not very difficult if you follow the instructions:
- You need to start work by making parts for the seat. For the frame, you can use a steel gymnastics hoop with a diameter of 100-120 cm. To make your stay in the chair comfortable later, the hoop can be lined with padding polyester.
- To fill the space inside the hoop, which will be the seat, you can use two fabric circles. The diameter of the circles should be 50 cm larger than the diameter of the hoop. This is necessary so that the resulting seat sags on the frame. The seat fabric must be strong enough to support the weight of the person sitting.
- Using a sewing machine, two fabric circles are sewn together to form a cover that can be placed over the hoop. The seam should be on the inside of the cover.
- Next, on the sewn product, you need to make semicircular cutouts measuring 5 cm in two opposite ends and overcast them on a sewing machine. You should insert pieces of rope into these cutouts, hook them onto the hoop and secure them with knots. The length of the segments must be adjusted so that the seat is at the desired angle.
- At the top, the ends of all four pieces of rope are connected and tied to a hook.
When making a fabric seat, first make a slot in one of the circles along a line passing through the center, the length of which is equal to the diameter of the circle. It is necessary to sew a zipper of the appropriate length into it so that the cover can be removed and washed if necessary.
We cover the hoop with padding polyester
Preparing two fabric circles for the seat
We sew fabric circles on a machine
Making markings for cutouts
We make cutouts on the sewn product. Insert the trimmed hoop into a pre-prepared fabric cover with a zipper. Insert straps through the cutouts and secure them to the hoop.
We decorate the finished chair with multi-colored pillows.
If you use two hoops, you can make a three-dimensional frame, which subsequently needs to be braided with rattan or plastic cord. One of the hoops, 80 cm in diameter, should become the bottom of the seat, and the second, 120 cm in diameter, should form the back. The procedure for making the chair is as follows:
- A smaller hoop is pre-laid on a horizontal surface.
- You need to place a large hoop on top of it and, combining both on a small (35-40 cm) section of the circle, tie them tightly, braiding them with cord or rattan.
- Having bent upward the remaining unfixed edge of the large hoop, you need to fix it with two stands, which can be used as wooden planks of the required length. To prevent them from jumping off, you can make small cuts in the end part to install the strips on the hoop. Subsequently, the racks must be braided.
- The circle formed by the lower hoop is covered with cord or rattan. The material should be intertwined with each other, forming a mesh with a pitch of 2-3 cm.
- The top hoop, which will be the back, is braided in a similar way. In this case, the weaving is done from top to bottom and ends at the bottom hoop. The remaining pieces of cord can imitate fringe for the resulting seat.
- Having tied four pieces of rope of the required length to the lower hoop, you need to connect their upper ends and hang the chair on a support or hook installed in the ceiling beam.
To make such a chair, you will need several hours of free time, and the interior will have a comfortable corner for relaxation.
We rewind the hoops. The lower hoop is covered with cord or rattan. We connect two hoops, tying them tightly with cord. We fix the upper hoop with wooden planks.
We braid the top hoop with cord
DIY ready-made hanging chair made from two hoops
Children's fabric
A simple children's hanging chair can be made even from a large bath towel if you tie pieces of rope with a diameter of 6-8 mm to each end. Their length is selected experimentally. The ropes tied to the two corners forming the backrest should be slightly shorter. If you gather the ends of four pieces of rope at the top and tie them to a support, you get a small improvised seat that can be built anywhere: in the forest on a picnic, in the park during a walk, if the child is tired and wants to sit.
We tie the ends of the towel with a rope
We tie the ropes to the support
The ropes are shorter on the back side
Simple children's hanging chair ready
Cocoon chair
If you need to figure out how to make a chair that is simple and closed on all sides, step-by-step instructions for a do-it-yourself cocoon will help. Such a chair can be made very quickly from a piece of fabric 3 m long and 1 m wide. To do this you need:
- Fold the fabric in half and sew one side 1.5 meters long. The resulting product must be turned inside out so that the seam is inside a kind of “bag”.
- The top of the fabric seat is assembled and tied with a rope with a diameter of 6-8 mm. The result will be like a bag, tied at the top, but not sewn along one of the sides.
- After hanging the seat, you can put several pillows inside the “bag”. You will get a cozy cocoon in which the child can even hide.
Any of the options for homemade hanging chairs will require some time and effort to manufacture. But the result will definitely not leave household members and guests indifferent.
Fold the fabric in half and sew one side, fold the top and stitch it, pull the rope into the resulting drawstring
We tie the ropes to the support
It turns out to be a cozy cocoon
Standard sizes of rocking pendants
Hammock chair. Has a soft frame. Unlike the hanging bed itself, which is installed on a pair of posts, here it will be held by a shelving unit.
Nest chair. The most famous hammock. It is essentially a ball, and its mounting frame is a frame consisting of a three-quarter diameter tube.
Thanks to its elegant shape, it can be installed in the living room during the cold season.
Throw away the chair. An elegant rocking chair that takes up minimal space. The kids love it. And more often it is called children's. The child plays with it just like at home: the device resembles it in shape. Having played enough, they fall asleep there.
In your home, it is removed from the frame outside and attached to a hook on the ceiling; if concrete, then on a strong anchor.
Rocking chair. The frame can be hard or soft. The swing will decorate your garden or country yard. Only the little ones in the room will adapt to his swing so as not to hit the wall with his back. These are the best chairs for the garden. It can be attached to a large tree branch.
Chair based on a soft frame
The entire chair is made of fabric sewn in the shape of a bag with a hole. Attach a product such as a hammock to the top.
The base is a durable fabric folded in half. Any shape can be created, but during use it takes on the shape of the body.
To do this, you need to draw a picture and choose a size. For a child, a diameter of the lower base of 50-70 centimeters is sufficient; for an adult, 70-100 centimeters is suitable.
Cut out a circle and several triangles in diameter. Treat the edges of all parts with decorative materials. Sew the pieces together, leaving one part open.
As you can see in the photo of a handmade hanging chair, the furnishings and materials can be absolutely anything. The engine of ideas is your imagination.
made of canvas on chains
Here, too, everything is simple - there is a chain + there is a metal triangle + there is a piece of thick tarpaulin.
We hang the iron triangles on a chain - we pass a piece of tarpaulin through the triangles - we bend its edge to the bottom and put 2 large rivets. Ready.
If there are no rivets, you can simply thread the bolts through and tighten them with nuts - and to prevent the bolt from breaking through the hole, then lay wide metal spacers on both edges. And with your own hands you quickly and easily made a soft garden swing from fabric.
MODEL FOUR – garden swing made from chairs.
There are three different ways to attach our rope to such a “chair-like” seat.
Method one (blue chair from the photo above ) - under the seat of the chair, we put 2 thick metal rods (one under the seat of the chair from the back - the other from the front under the seat). We cut round holes in the corners of the chair - thread ropes into them - and tie the ends of the steel rods with these threaded ropes. Thus, we get a rigid structure of our swing
Method two (yellow swing from the photo above) - we nail 2 boards to the bottom of the chair - we drill holes in them - we thread ropes into the holes and secure them with a fastening knot.
Method three (pink swing-chair) – We knock together a small shield from planks. We drill holes in it. We put it under the seat of the chair. We drill grooves in the seat of the chair (not holes - but grooves, that is, vertical cuts along the edge of the seat) 2 through grooves from the front corners of the seat + 2 grooves from the back side of the seat.
The ropes pass through the front grooves - go under the seat towards the shield - there they enter the front holes on the shield - come out of the back holes on the shield - and pass into the rear grooves of the chair seat - and go up to the support on which they hang.
This grooved design is very durable - remember?.. we have already made such grooved fasteners for swings in the article “Swings for a summer house - 20 ways to make them yourself.”
Sizing and drawing
Before you start making a chair, you need to decide what size it will be. In a large one, if you surround yourself with more pillows, of course, it will be more comfortable, but sometimes a small one can feel more comfortable. Also, if you have to use the chair indoors, its size will depend on the size of the room. A large object in a small room will look bulky and awkward, and there will be no feeling of comfort.
A child's hanging chair can have a seat size from 50 to 90 cm, and an adult's from 80 to 120 cm. The height of the finished structure will depend on the installation method. In order for homemade hanging chairs to be safe, it is necessary to calculate their load-bearing capacity with a margin. A child must withstand the weight of a seated person of about 90-100 kg, and an adult - 130-150 kg.
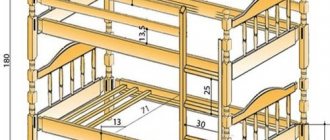
Having decided on the size and purpose, you can draw a small drawing on which the model will be depicted to scale. This simplifies the calculation of the dimensions of parts used in assembly. All elements of the frame can be drawn separately on paper, and then transferred to the blanks, increasing the size.
When drawing a picture, you can take any ready-made version as a basis or draw your own. It is very important to design the environment in which the chair will subsequently be installed or suspended, as its size must be determined taking into account the dimensions of the rest of the furniture. But the material for the seat will need to be adjusted during the work process, when the frame is ready. It is unlikely that it will be possible to calculate the amount of fabric or rattan from the drawings.
Schematic definition of the dimensions of a chair on a stand
Diagram of a round chair without a stand
Materials for frame and base
For the frame you can use steel, copper or plastic pipes, rods, tree branches. Metal pipes, if you need to bend them into a circle, will have to be rolled on special machines, so it is better to use an old gymnastic hoop of a suitable diameter instead. The rods can be bent by first soaking them in water. Frame parts can also be made from PVC or metal-plastic pipes with a diameter of at least 32 mm.
For the base, you can use round or profiled pipes. In order for the furniture to support the weight of the person sitting, the cross-sectional size of the pipes must be at least 30 mm with a wall thickness of 3-4 mm. The base must be made very stable to prevent the chair from tipping over.
When making a frameless chair from a piece of fabric, you can put a circle of plywood inside to give the seat a comfortable shape. Of course, it needs to be covered with fabric and pillows placed on top.
From the many types of materials, you need to choose the ones most suitable for the conditions of use of the furniture. Fabric chairs, for example, are not advisable to use outdoors, since most such materials fade in the sun. Natural rattan is afraid of moisture, so it is not recommended to leave such furniture in the rain. But indoors it is better to use environmentally friendly natural materials.
Artificial rattan and plastic will withstand humidity, sun and temperature changes well.
To braid the frame, you can use the macrame technique. This is the name of the type of weaving for which textile cords, ribbons, and ropes are used.
Gymnastic hoops
Steel tubes
Plastic tubes Rattan rods
Wooden rods Weaving using macrame technique
Technology
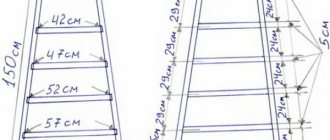
The boards are new or used, the latter are well used. Drill holes in them from the top and bottom to the entire length after 5 cm.
Then lay the boards underneath and tightly add the next piece of wood, threading the cord through the holes diagonally, and fasten the boards together. Next, we thread the cord from the wrong side, we get crosses with which we tie the boards along the holes.
According to the previous principle, you need to thread the cable from the reverse side. The lacing is tight, but loose: the straps should have some freedom. Once you have gone all the way, tie a strong knot in your back.
Next, drill holes for hanging the rocking chair - on the top panel from the bottom and the second from the top, slightly stepping back from the edge on both sides, focusing on the center of the bar. Job is done. Lay down a blanket and a couple of pillows.
Stage 3 - connecting the hoops
The next step is to combine the two hoops. The hoop with the mesh must be fastened to the one that is simply wrapped with cord. To do this, select the junction and tie both hoops with a strong rope.
To give the chair additional support, you can reinforce its back with a pair of wooden rods. If you provide shallow cuts at their ends, you can prevent the hoops from slipping in the future. But you can do without barbells. In this case, you will need to strengthen the structure in another way. We will analyze it at the next stage.
Stattonrock Design + Build Studio
Advantages and disadvantages of hanging models
A hanging chair, like any piece of furniture, has its pros and cons. The undoubted advantages of a handmade product include originality and uniqueness. This copy is absolutely exclusive, there are no others. Its second advantage is comfort. A comfortable soft seat that rocks in space promotes relaxation and tranquility.
The disadvantage of the design is the difficulty of carrying it. Disassembly takes a long time, and after a huge snag, the ceiling will be damaged. The pedestal chair is also too massive and heavy to constantly move.
Design features
Having the skill of working with welding and metal, you can make a cocoon swing with your own hands.
A cocoon swing is a version of a hanging chair in the shape of an oval. The main feature is the drop-shaped shape and the presence of rounded walls closed at the top, covering 3/4 of the surrounding space.
The hemisphere is suspended on a base that has a wide base, ensuring stability and stability.
The design looks interesting, is convenient in terms of physiology, and allows you to create a feeling of privacy and comfort, without diminishing the pleasure of being in an open area.