Shelving is an excellent storage option. They are much cheaper than cabinets, and do not require any skill if you want to make them yourself. Racks are actively used to equip various storerooms and workshops.
This storage system corresponds to modern fashion trends and can be used to store items in a room for any purpose. There are various ways to make a convenient rack yourself.
Main types
You can choose different types of home shelving to best arrange your space. The main types of designs include the following:
- classic floor,
- with ceiling mounting,
- corner,
- built-in
A designer shelving unit is a convenient and practical piece of furniture that not only increases the level of comfort in the room, but also becomes a real decoration of any room. Such designs are widely used in the design of the following spaces:
- living room,
- cabinet,
- bedroom,
- dining room,
- children's,
- library,
- office rooms.
The designs are made from different materials, so it’s easy to choose the most suitable one for any room style. In modern interiors they are often used to zone space. With the help of a shelving unit, it is easy and simple to divide a room in a private residential property or arrange separate workplaces in an office, creating more comfortable working conditions for each employee in order to increase productivity and increase productivity.
What you need to create the perfect shelving
- Decide what you will store there. If these are heavy things, then a rack reinforced with a cross or a back wall is more suitable for you, but not a structure with ropes.
- Be sure to measure the place where the shelving will stand. This advice may seem obvious to you, but it will allow you to use the space as efficiently as possible. Mark the dimensions with masking tape directly on the wall to get an idea of what size shelving you need.
- Make a drawing or at least a quick pencil sketch if you don't fully understand the design. This way you will better understand the structure of parts and connections. It's easier to redraw than to redo the entire rack.
- Stock up on tools . Think about what you can borrow from friends or rent.
- Cut boards and other materials directly at a hardware store if you don't have a circular saw. Many large sites provide this service. It is impossible to make a long cut perfectly evenly with a hacksaw.
- When choosing a workplace, keep in mind that power tools make a lot of noise . Make sure that angry neighbors don't start banging on the wall.
- Cover things that should not get dirty with a covering film. After all, the dust from sanding wood will settle in an even layer on all surfaces in the room.
- Use a vacuum cleaner to reduce mess when drilling holes in wood and walls.
- Do not forget to use protective equipment when working: a respirator, safety glasses and gloves.
- Call an assistant . It's convenient to have someone hold the shelving wall while you screw it on. If you still want to work alone, get a couple of clamps.
- Attach the shelving unit to the wall with anchor bolts if you have an uneven floor or have small children or pets at home. Details are below, in the instructions for the rack on ropes.
Please remember that the following are just examples of work. You can change sizes and materials. Please note that the load must match the design. Check with the store to see if the size and type of material you choose is suitable for the weight of the items you will be storing there.
Material used in manufacturing
Shelving in the interior looks stylish and impressive. A variety of materials are used today for the manufacture of such structures, including:
- tree,
- metal,
- plastic,
- strained glass.
Diversity allows you to choose the most harmoniously combined design for any chosen style of room. For example, for a classic style the best choice is wood, and for high-tech or loft - metal, which can either be simply stainless or coated with a decorative protective powder coating. Plastic is the most affordable and practical in cost; it is often used in office premises when they want to optimize design costs without losing quality.
In a small apartment
For a small apartment, the number one problem is the lack of space, including for storing things. Often the problem of crowding is solved by demolishing the wall between the hallway and the room. The role of a wall can be played by a shelving cabinet. When choosing a model, you should opt for semi-closed models, which have drawers or shelves with doors in the lower part. You can expand a small kitchen in the same way. By removing the wall between the kitchen and living room, you can put a shelving unit, part of which can be used for table setting. This is especially convenient if you only cook in the kitchen and eat food in the room. Once again, you can resort to using some closed cells to store dishes and food.
Shape and dimensions
On sale today there are shelves of various sizes and shapes. You can give preference to a ready-made rack or order a design made to individual sizes. What to do in each specific case, everyone decides for himself. If you are completely satisfied with the finished shelves in terms of size, shape, material and color, as well as installation method, you can buy them. At the same time, you can experiment not only with shape, but also with combinations of materials. For example, you can order structures made of metal and glass, wood and glass. This solution will provide a unique look to the rack, making it unique and capable of becoming a real decoration of the space. The main thing is not to be afraid to experiment in order to create furniture for a stylish property that will increase its level of comfort.
With the help of such bookshelves, a variety of problems are solved in interiors. With their help, large rooms are divided into separate zones. For example, you can use such furniture in a bedroom or nursery to separate the work space from the rest area. It is not necessary to store books on the shelves. They are perfect for placing photographs, boxes, and other useful things that need direct access. Many people value this type of furniture precisely because it provides the opportunity to have everything they need at hand at any time.
How to make a rope rack with your own hands
These stylish shelving units are easy to make: just attach the shelves to ropes and hang the structure. The only problem is that they are not very stable: if you touch them carelessly, things can fall down. To avoid this, place the shelving away from aisles or additionally attach the bottom shelf to the wall.
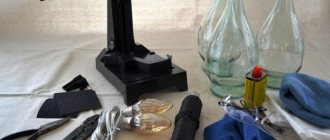
What do you need
- Four boards 90 cm long;
- 8 meters of thick rope;
- drill;
- drill for the thickness of the rope;
- ruler;
- pencil;
- 220 P grit sandpaper;
- wood paint and brush (optional);
- knife;
- two thin sisal or jute ropes;
- perforator;
- a drill whose diameter coincides with the expanding part of the anchor bolt;
- two anchor bolts with a hook;
- wrench or pliers.
How to do
Soak thick rope in hot water to straighten it.
Shot: Living to DIY with Rachel Metz / YouTube
Drill four holes in the corners of each board - the rope will pass through them.
Shot: Living to DIY with Rachel Metz / YouTube
Sand the boards with sandpaper.
Shot: Living to DIY with Rachel Metz / YouTube
If desired, paint future shelves.
Shot: Living to DIY with Rachel Metz / YouTube
Lay the thick rope straight and let it dry. Cut into two equal parts. Fold each one in half to make a loop. Secure the loops using thin sisal or jute rope.
Shot: Living to DIY with Rachel Metz / YouTube
Measure equal distances on thick ropes and secure the shelves with knots.
Shot: Living to DIY with Rachel Metz / Youtube
Attach anchor hooks to the ceiling. To do this, drill a place for fastening with a hammer drill. Important: the depth of the hole must match the length of the spacer part of the anchor hook, and the diameter of the drill must match the diameter of the anchor. Hammer the anchor into the hole and tighten the spacer nut. Hang the shelving unit.
Shot: Living to DIY with Rachel Metz / YouTube
What other options are there?
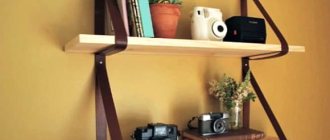
It is not necessary to attach the rack to the ceiling. In this master class they suggest hanging ropes on the wall:
You can diversify the appearance of the rack, for example, by threading ropes through the holes in the shelves crosswise:
Colors
Due to the possibility of using a wide variety of materials and modern technologies to create a rack, it is possible to choose absolutely any color and shade. If we talk about wood, you can leave its natural tone and simply coat it with varnish to prevent the wood from darkening. You can also choose a tint for such a rack to give it the desired shade. The variety of paints and varnishes intended for wood opens up a wide range of possibilities for decorating a rack.
Decorative shelving made of metal can also be given absolutely any shade. Powder decorative coatings help to extend the service life as much as possible. Such compositions best protect the metal surface and prevent corrosion, which makes the shelf life practically unlimited. Separately, it should be noted the aesthetic appeal of such decorative protective coatings.
Today it is absolutely easy to choose the color of the shelves for any style concept of space design.
Furniture design features
A wardrobe with a rack can be classified as a universal piece of furniture that organically complements the design of any room.
The design differences are as follows:
- the main part of the cabinet can be formed by numerous shelves attached to the side walls, and the back wall of the product may be missing;
- may consist of several sections.
Manufacturers produce both simple and complex designs that have various additional elements (separate sections on each shelf).
Location
Shelves in the interiors of living rooms and other rooms can be arranged differently. If we talk about the classic traditional installation, then the shelves are placed against the wall. They can be one of the sides adjacent to the corner or be in the center. If we talk about non-traditional use of the rack, then it can be installed in the center of the room or in another place without adjoining the walls. In this way, the space is zoned, individual places are allocated in it in accordance with their purpose.
Structures can also be corner or built-in, rest on the floor, or be suspended. The use of shelves in a room is possible for absolutely anyone in accordance with the design concept.
How to make a rack from pipes with your own hands
In this master class, the shelves are “strung” not on ropes, but on pipes. This rack is assembled like a construction set and can withstand heavy loads.
What do you need
- Four furniture panels - they will become shelves. Choose the size at your discretion;
- sandpaper grit 220 R (grit);
- drill;
- drill with a diameter of 24 mm;
- 12 pipes with a diameter of ½ inch, 30 cm long;
- eight flanges for ¹⁄₂ inch pipe;
- four ¹⁄₂ inch diameter extended spools;
- 12 x ¹⁄₂ inch pipe connectors;
- spray paint for pipes and wood varnish and brush (optional);
- 12 self-tapping screws 16 mm long.
How to do
Sand the surface of the furniture panels with sandpaper.
Shot: Around Home DIY / YouTube
Using a drill, drill holes in the corners of the furniture panels. Let us remind you that a vacuum cleaner will help you litter less.
Shot: Around Home DIY / YouTube
Paint shelves and pipes if desired.
Shot: Around Home DIY / YouTube
Assemble four rack legs from pipes, flanges and connectors.
Shot: Around Home DIY / YouTube
Assemble the rack: all shelves, except the top one, will rest on pipe connectors.
Shot: Around Home DIY / YouTube
The top one will be attached to self-tapping screws - screw it through the flanges. If you painted pipes, tint the fasteners with the same composition.
Shot: Around Home DIY / YouTube
Before using the shelving, allow paint, if any, to dry completely.
Shot: Around Home DIY / YouTube
What other options are there?
Industrial Style Open Shelving Wall Mounted:
Reliable wall-to-wall shelving:
Shelf styles
The style of the shelving is selected in accordance with the chosen concept of space design. Classic designs are made of wood, preserving its natural beauty or tinting it in the desired color.
For a living room or any other room decorated in high-tech, loft and other modern styles, you can choose appropriate design options. Products made of glass and metal will be the best solution, because they can fit most organically into the space.
Fitment
For those who do not like to clutter up the space with massive furniture, a shelving unit can successfully replace a closet or a classic wall in the living room. This piece of furniture will be useful on the balcony, in the home library, in the nursery, in the pantry, in the garage and in the office. It can act as an accent in the interior if it has an unusual design and color. A standard shelving complements the existing furnishings and emphasizes the overall style.
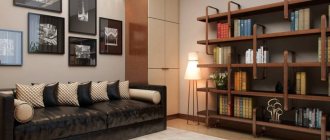
In the living room
A shelving unit in the living room can be used to place a TV, books, and small interior details. A back wall made of mirror will visually increase the space if the shelves are not fully occupied. A wall-mounted model would be appropriate for the living room if heavy objects are not intended to be placed on the shelves. If there is a niche, you can use it to install a built-in shelving unit.
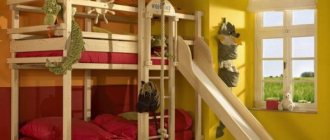
In the nursery
If the area of the children's room allows, then shelving can be used to zone it. When it comes to the interior of a room for a school-age child, it is convenient if the room is divided into zones: playroom, bedroom and study areas. A shelving closet between the play and sleeping parts of the room can be used to store toys, and next to the desk it is convenient to place shelves on which writing instruments and textbooks will be stored. Children's furniture can be bright colors or decorated with drawings.
There is no need to block off a small children's room. It is better to place a cabinet for books, toys and school supplies against the wall.
In the kitchen
There is no need to install a wall-mounted shelving unit in a small kitchen. It will only eat up space. In a large kitchen, it is better to put a closed cabinet instead. However, some housewives love an abundance of open shelves, which “lighten” the interior and serve as a location for a large number of items that can be stored open. It makes the most sense to install a shelving partition instead of a wall between the kitchen and the dining room or living room.
Related article: Design of a kitchen-living room in a studio apartment of 30 sq m
The material for the shelving in the kitchen must match the material from which the kitchen set is made. For wooden kitchen furniture, the option made of wood or MDF with wood imitation is suitable. For a kitchen made of plastic, you can choose a model made of glass, metal or chipboard in plastic. The height of the rack should not be greater than the height of the furniture, with the exception of ceiling-height structures.
ADVICE! Often, after installing a custom-made kitchen set, scraps of countertops or chipboard parts remain. From these you can make a small rack with your own hands.
Purpose and content
A shelving unit in the interior of a nursery, living room and other rooms is intended primarily for storing books, magazines and other useful or decorative items. These can be photo frames, dishes and more. How to fill the shelves, everyone decides for themselves in accordance with the design of the room and personal needs. When it comes to children's rooms, it is important to ensure the safety of the furniture. It is necessary that it be environmentally friendly and have no sharp corners. The presence of a rack will allow you to compactly store toys so that the space is always tidy.
If we talk about office premises, shelves of shelving structures are most often used for storing documentation. Such furniture has long been in demand in archives, libraries and other public places. It is valued for its affordable price, compactness, and direct access to all stored items, making it easy to find everything you need.
How to make a modular rack with your own hands
This design is easy to change: if you run out of space, you can always increase the number of cells or reassemble them to get a rack of a different shape.
What do you need
- Four squares of plywood 30x30 cm;
- pencil;
- drill;
- drill 3 mm;
- eight screws.
The amount of materials is calculated per cell.
How to do
Take four squares of plywood. Mark where the parts will be attached perpendicular to each other.
Frame: BuildersSA / YouTube
Drill holes for self-tapping screws in the corners of each square. You can place an unnecessary piece of wood under the workpiece so as not to damage the table.
Frame: BuildersSA / YouTube
Fasten the elements to each other at right angles using self-tapping screws.
Frame: BuildersSA / YouTube
Make the number of cells you need, changing the length of the walls if desired. Arrange them in any order and additionally fasten them together with self-tapping screws.
Frame: BuildersSA / YouTube
Decorative options
Among all types of shelves, we should highlight decorative ones, which are invented by talented designers who try to fill the space with unique things. For example, glass can be tinted or sandblasted. Such designs can be decorated with forging elements, lighting and more.
Decorative options are developed individually for a specific interior concept. In this way, they create furniture that looks impressive and stylish in the room, becoming one of its bright decorations. The presence of such a rack in a space will help emphasize its originality and refined taste of the property owner. The use of decorative shelves is possible not only in private, invisible, in the living room or other room. This type is appropriate in the halls of restaurants, cafes and more.
Homemade shelving decor options
The shelving can be left unchanged after assembly, especially if solid wood is used. Such designs have a pleasant design with a natural shade (walnut, wenge, oak). However, craftsmen often additionally decorate finished structures in one of the following ways:
- Stencil painting using acrylic paints.
- The use of special PVC films that imitate various materials (stone, brickwork, gypsum panels).
On the facades you can hang beautiful souvenirs made by yourself (papier-mâché plates with original painting).
Kitchen shelving
The use of shelves is possible not only in the living room. Having a shelf in the kitchen will be its advantage. You can install beautiful dishes or frequently used household appliances on it. Openness will allow you to quickly gain access to the necessary things in the process of preparing culinary masterpieces. This is very convenient, so every housewife will appreciate such furniture. You can also conveniently display herbs and spices on the racks to make them easy and quick to find. Such furniture turns out to be useful in absolutely any room.
How to make a shelving unit with corner slats
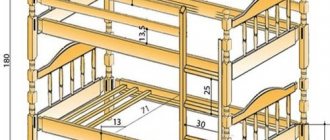
This rack is suitable for a wide variety of places and uses: its dimensions can be easily changed, and the reinforcement of the structure with a cross makes it stable and allows you to store a lot of heavy things in it.
What do you need
- 12 boards 2×5×250 cm for horizontal rack posts;
- circular saw (if available);
- ruler and tape measure;
- pencil;
- confirmations or wood screws;
- drill or screwdriver;
- two boards 2.5 × 10 × 300 cm for the cross;
- six boards 2.5x25x180 cm for shelves;
- 220 P grit sandpaper;
- wood varnish and brush (optional).
How to do
Cut eight narrow boards into 20 equal pieces.
Frame: MonsonSchoolhouse / YouTube
From these parts and four boards 250 cm long, assemble two identical “stairs”. The distance between the horizontal bars will determine the height of the shelves.
Frame: MonsonSchoolhouse / YouTube
Fasten the elements of the side posts to each other - use confirmations or self-tapping screws.
Frame: MonsonSchoolhouse / YouTube
Using self-tapping screws or confirmations, attach two boards crosswise to the side posts. Sand the surface of the wood, and if desired, paint along with the shelves.
Frame: MonsonSchoolhouse / YouTube
Place the frame in place in the room. Install the shelves on the side rails of the “ladders.” There is no need to attach them.
Frame: MonsonSchoolhouse / YouTube
What other options are there?
This type of design is also suitable for smaller racks:
And in this master class they tell you how to make a strong shelving for a workshop or pantry:
How to choose the right furniture
When arranging any room, products are selected that are not only beautiful, but also functional. In order for corner cabinets and shelving to fit organically into the interior and be convenient to use, it is necessary to adhere to the following recommendations when choosing a model:
- When buying furniture for a compact furnished room, you need to pay attention to narrow shelving that can be easily inserted into a free space. This option is suitable if you need to place few things on the shelves;
- If you are looking for a rack for your home (for storing a large number of different things), then it is better to give preference to models with drawers and shelves closed with blind doors. An excellent option is corner cabinets and racks;
- For a children's room, you need to choose low, semi-open cabinets and shelves with lower drawers in bright colors. It will be possible to put toys in the drawers, and on the open shelves the child can independently arrange games and books;
- When purchasing combined cabinets, it is important to pay attention to the quality of the fittings. Doors should open easily, without squeaking, and not warp. Drawers should slide out smoothly, not jump off the guides, and move without noise;
- if the cabinet is intended to accommodate books or documents, then special attention is paid to the strength of the shelves. To prevent the shelf material from cracking in the future, it is better to make sure in advance that the structure can withstand the load;
- When choosing furniture, the dimensions of the room must be taken into account. A small narrow cabinet can practically “dissolve” in a spacious room. The space of modest-sized rooms can be visually reduced when large shelving is installed;
- The shelving design does an excellent job of zoning space. This is especially appropriate in multifunctional rooms. In a children's room where two children live, it is easy to use small shelving to create areas for each child. Such furniture does not visually clutter the room, but adds practicality and comfort to it (especially ufokids boxes);
- Kitchen products should be chosen from inexpensive materials that are easy to care for. It is also better to give preference to combined models with drawers and glass doors. You can picturesquely arrange beautiful tea sets on the shelves, and store kitchen utensils (tablecloths, napkins, cutlery) in the drawers.
The lightness and simplicity of furniture design, its practicality, and affordability make racks very popular. Considering the advantages and variety of models, they can be considered serious competitors to conventional cabinets.