Handmade items are increasingly gaining popularity. Including furniture. This will take some time, so you will have to be patient. But there are also many advantages to creating the necessary things with your own hands.
Surely you have already come across various ideas for creating sofas or other garden furniture from pallets. An interesting solution for use in different directions. But today we will talk about how to create furniture for your home.
In particular, how to make a bunk bed with your own hands.
The benefits of making furniture yourself
Why is it better to make a bed rather than buy it? There are many answers. Let's start with the fact that when creating, you choose the material yourself, and you know exactly its characteristics: strength, reliability. Upon completion of the project, you will be sure that this creation will last a long time and will not fall apart the first time you use it.
Creativity plays an important role in preparing for work.
There are times when a buyer cannot find what he needs in a store. This is especially true for furniture: the size doesn’t fit, you don’t like the design, it looks sloppy, and many other reasons. There are two ways out of this situation: place an individual order or make everything yourself. By choosing the second option, you will not have to explain to the contractor what exactly you want and pay a huge amount of money to complete the order.
You can realize all ideas exactly down to the details.
And, of course, one of the main advantages of creating furniture yourself is satisfaction with the result of your own work. It's nice to know that you made the thing yourself.
By making furniture with your own hands, you benefit from:
- Price;
- Quality;
- Design
- Accuracy in measurements.
The only downside is that the process will take longer than purchasing.
So, if you decide to make a bunk bed with your own hands, let’s get started!
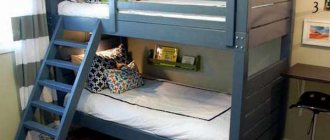
Headboards
The headboard and footboard of the bed are identical, except that one headboard has a slightly different design on the top of the leg, which allows for the placement of railings here.
The footboard is almost identical to the headboard. If you're one of those people who really dislikes resting your feet on the headboard at night, don't install a center board at the foot of the bed.
Choosing design and construction
There are many varieties of two-tier models - as much as your imagination allows. Let's look at the most popular ones.
- Traditional
The easiest to make. Consists of two tiers (beds) and a staircase. Suitable for a nursery with enough space.
This bed does not contain elements of other furniture and significantly saves space.
- With a sofa
The sofa on the first tier diversifies both aesthetically and functionally. This model will save more space in the room because you won’t need an additional sofa. It can be used as a bed or simply as a place to relax. Well suited for placement in the living room.
To make this model you will additionally need a sofa. It will be built into the structure.
- With drawers
In this model, drawers or shelves are attached to the stairs leading to the second floor, used instead of cabinets. In this case, it will take up a little more space in the room than a traditional one.
You can save space by using linen closets or toy closets.
- "Attic"
This option significantly saves space in the room. The sleeping place is on the second tier, the lower one is intended for the working area. Usually it includes a work table, various shelves and racks. This design is usually chosen for older children (teenagers, students). Basically, such a bed is a single bed, but if desired, two people can be accommodated on the second tier. You can build a corner one with two sleeping places on the second floor. An important condition when designing this model is strength.
The height of the ceilings should be taken into account, since the lower tier must be quite high.
- Three-bedroom bunk
There are various proposals to convert a bunk bed into a triple bed. If the child is still small, and the apartment is one-room, you can make it with a double bed on the first tier. If this product is for a child, you can place both places at the top.
The bed option will depend on the design you choose.
- Transformer
Such models are very popular as they save a lot of space. It consists of a table, lockers and a bed. A table or a mattress can be retractable.
If you don’t have enough free space in your room and your child is already going to school, you should think about this type of product.
Characteristics of a reliable sleeping place
A bed with 2 tiers saves space and is suitable for a children's room
A bunk bed consists of 2 sleeping places, located one above the other and connected by a ladder.
High-quality furniture for children's sleep should be:
- safe (eliminate the risk of injury, fire, breakage)
- sustainable
- durable
- comfortable
- beautiful
- functional
- durable
Self-assembly of furniture for a non-professional is a responsible and time-consuming process, which, however, also has a number of positive aspects:
- exact measurements for a specific child
- unique author's design
- low price compared to finished products
- high quality
- maximum safety
- assembly reliability
Preparation
We have figured out which models are the most popular and comfortable, now we will decide what is needed in order to start building a bunk bed.
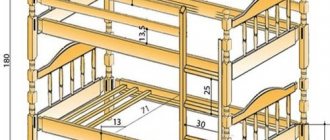
Blueprints
First of all, you need to draw a drawing. The most convenient option would be to take ready-made diagrams on the Internet and, based on them, create your own project.
You will need to take measurements of the part of the room where the product will be located and determine the size of the structure.
The following data is used in the drawing:
- Product height;
- Length;
- Width;
- Distance from the upper and lower tier;
- Length and width of the stairs;
- The space between stair steps;
- Height of the upper tier;
- Width of supporting beams;
- Locker sizes.
If you are planning lockers, be careful about the distance you need to place them.
Photos of finished options will help you clearly determine how to make a drawing correctly.
Required Tools
Tools needed to assemble a 2-tier bed
When assembling a bunk bed made of wood, MDF, fiberboard, furniture panels, you will need:
- drill with drill bits
- screwdriver
- plane
- countersink
- roulette
- milling machine
- jigsaw
- sandpaper (sanding machine with 120 and 240 grit stones)
- knife
- building level
- fastening elements (dowels)
- simple pencil
- wood glue
Instruments
To work with metal and profiles, add to this list of tools:
- hacksaw and metal drills
- grinder
- file
- screws, metal screws
- metal square
- brush and brush for working with metal
- welding machine
Having chosen the type of surface, purchase varnish, stain, wood or metal paint, and primer.
Materials
When choosing materials, consider your skills and the range of available tools. Chipboard or solid pine are excellent for work. Let's prepare the tools we need for the job.
You can use sheets of plywood for the base under the mattress.
Depending on whether you will cut the material yourself or entrust it to professionals, we select the set of necessary tools. The best option would be to cut the boards according to measurements using professional tools in a furniture shop. Then all you have to do is connect all the parts.
We need instruments and devices for measuring and fixing. You can't do your work without a simple pencil.
For this you will need: a screwdriver, screws, glue, a level, a drill, a hammer, a grinding machine for processing the finished product, and blank material cut to size.
Making two-tier furniture is not difficult if you prepare all the necessary tools and remember your existing construction skills.
What you need for work
Of course, you understand that any furniture is made from something and by something, and these components need to be determined immediately. That is, before starting work, you need to prepare the necessary materials and select the required tools.
We select materials
OSB of different thicknesses
In fact, all materials must be made of wood, that is, lumber, but panel products can be different. I’ll just list what you can use, but you’ll have to choose on your own. So, we make a choice:
- block 50×50 mm;
- board 50x70 mm (instead of a block, but this is optional);
- board 100×50 or 150×50 mm;
- moisture-resistant or laminated plywood or oriented strand board (OSB-3 or OSB-4) - here you need a choice;
- dowels with a diameter of 8 mm;
- self-tapping screws (it is better to take white or yellow ones, they do not rust, therefore, they will last much longer);
- wood glue or PVA, it may be useful, but maybe not, it all depends on the assembly method;
- varnish (see footnote!).
Attention! There are different varnishes, but don’t forget that you are making a bed for a child! So, look at the instruction sticker, the varnish can be alcohol, alkyd, alkyd-urea, nitroglycerin, polyester, polyurethane, acrylic, oil and water-based. The latter is natural, therefore, cannot cause harm to humans when inhaled (safe not only for adults, but also for children).
What tools will you need?
An electric jigsaw is more convenient than a manual one
Generally speaking, a hammer, a hacksaw and a screwdriver will suffice, but why complicate your life? Now there are many electrical tools that are always useful in the household and these are:
- electric jigsaw and/or circular hand saw;
- screwdriver and/or electric drill with attachments;
- set of drills;
- metric tape, pencil.
Note. Sandpaper or a sanding disc on an angle grinder can also come in handy, but this is not always the case.
Decoration
It’s worth thinking about decor before production begins, as it can affect the project. Experienced craftsmen can make furniture in the shape of a house, car, or boat. You can attach “branches” instead of stairs, along which “young Mowgli” will climb to the second floor.
An experienced craftsman makes a bed that looks like it came straight from the pages of a fairy tale book.
A common option is to add a Swiss wall, athletic rings or rope. Beds with a slope in the form of a slide have earned great popularity.
You can implement any design depending on the imagination and skill of the master.
If you have built a classic model of a bunk bed, and only thought about the design later, then use any textiles for decoration: pillows, hanging decorations. attach the rope.
There are plenty of options that creative people can easily find.
In general, making a bunk bed with your own hands is not so difficult, moreover, it is profitable and beautiful.
We wish you success in your creativity!
How can you turn a crib into a full-fledged one?
When remodeling a small crib, you will need to purchase some additional materials.
We disassemble the old bed and sort out those parts that can be reused. We build a frame of a certain size for the required mattress. It is best not to redo this part, but to purchase a new one. You should not skimp on stiffening ribs or jumpers , since the more there are, the more functional the bed will be. They will give her reliability. The best frame option would be a metal structure. In the absence of it, chipboard or wood will be suitable for work. In this case, it is necessary to expand the thickness of the frame parts around the perimeter so that they fall on the planks. Including them will result in the most appropriate extension.
Using timber blocks, you need to reinforce the supports. To evenly distribute the load, they are fastened using the letter “G”. To make it easier to screw the screw into the wood, you need to lightly lubricate it with soap. Then the legs of the support are attached at the feet of the headboard. At the same time, do not forget about the back wall. The frame needs to be connected to the back and a decorative panel installed.
After attaching the frame at the feet and headboard, the main parts are connected to the frame with furniture screws so that they coincide with the headboard. This condition is necessary to create a strong bed (how to strengthen a bed?).
Important
For fastening, you can use the back wall, which will be the most economical, since it will serve as a support. The back will never break or bend when the child jumps or leans on it.
Drawings with dimensions
Regarding how big or small to make the bed when children are still small. In principle, you can immediately install a full-size bed. It just seems like it will take a long time for them to grow up. In fact, before you know it, “children’s” sizes will become small. And then the problem arises: where to put the old bed. Naturally, it’s a shame to throw it away, but used furniture doesn’t sell very well. Therefore, recommendations: make a standard size bed right away: 1*2 m or so.
Frame drawing for a bunk bed
Corner bed drawing
Stairs to bunk beds
Conclusion
Now you know about all the features of collapsible bunk beds and can easily choose the right model using this review as a guide. The video will provide additional information on the topic so that you can delve even deeper into it. If anything is unclear or you have any questions that require additional clarification, write in the comments under the review.
Address: Academician Anokhin Street, Moscow
See also:
Similar tasks
Other tasks in the category "Repair and construction"
- 2,000 rub.
A private house with an autonomous 2-circuit diesel heating system. The boiler is working and 1 circuit out of 2 is working. In the second circuit, hot water is supplied to the comb and then to the incoming pipes (sinks.
Vladislav N. village of Manyukhino
Ksenia Aviatsionnaya street, 59, Moscow
The most hygienic shower was purchased for this purpose, what is needed along the way, please buy it Payment via Sberbank online We will discuss via WhatsApp Thank you
How to make separate ones from a two-tiered one?
To make two separate bunk beds, first build a base in the form of a rectangular box, on which a mattress of a suitable size will then be placed. First, prepare the side panels. To do this, take two processed boards, sawn to the required dimensions, and attach two more smaller boards to them at an angle of 90 degrees. This will be a specific shelf.
Attention
The bars are attached to the drawers, between which a board is placed under the base on which the mattress will be placed. In this case, you need to take into account the width of the boards so that they correspond to the parameters of the product and fit harmoniously into the design.
The back is created using the following steps:
- Take three boards that correspond to the width of the bed. They are attached to the racks.
- Use connecting dowels to secure the structure. Place them on the boards and mark the locations for the holes with a pencil.
- Drill holes in two parts and connect them with dowels.
- The side backs are attached in the same way. The first tier will be completely assembled.
The second tier is made in exactly the same way, observing the basic dimensions of the furniture. The staircase should be made according to the connection diagram of its structural parts using the “undersunk” method. It is attached to one of the racks, and the guards are secured to the top bunk. If there are drawers, the ladder is attached from the outside so that it is tightly connected to the rack. Next, the boxes are attached so that they do not interfere with climbing the stairs.
How to change a single bed to a double bed?
The easiest way to remodel is to combine two single beds into a single structure. To do this, they are moved close to each other, tightly connected:
- The legs are tied with durable material, for example, rigid ropes or wire.
- Secure the sidewalls with bolts.
- Combine the frames of two beds to remove the space formed between them (gap).
- One side panel is removed from each single product and cut lengthwise with a saw so as to reduce the height of the panels to the level of the base of the mattress.
- The frames of both beds are bolted together tightly and with a certain tension so as to reduce the possibility of the legs swinging.
- To strengthen the structure, two legs are left in the middle.
At the end of the work, a wide mattress of a suitable size is laid on the furniture. Can be transformed as a sliding structure. Then you will need to make an additional section that can slide out. To make it, you will need to take two bars with a section of 40 by 40 and boards.
First, carefully measure the length, width and height of the bed. Only after this the box of the second section is assembled. The latter should be slightly shorter than the first to easily fit under it. The structure should also be assembled taking into account the thickness of the mattress. The bars are bolted along the inner perimeter of the box. A mattress base made of sheet material is laid on them. The finished section is decorated according to the color and design of the main part. Read about how to decorate a sleeping area here.
Changing the headboard
You can convert the headboard into a panel. This is an interesting option for changing the appearance of a part, transforming it into a more fashionable style. To do this you will need a sheet of chipboard or plywood. It is cut to the size of the bed or made a little wider. At the same time, you can adjust the height according to the parameters that you like most. This sheet is secured and then decorated.
The hard headboard is decorated with a soft finish so that the foam sheet is covered closely with the material. You can use any fabric or leather, but it is important to ensure that it does not stretch too much and does not tear during use. Puffs are placed on top, which are attached in previously designated places under decorative buttons.
Advice
The surface can be made smooth. This is a good option if there is a child in the house. Security will be guaranteed. This panel is covered with parquet or decorative fittings. You can attach lamps to it or even build soft shelves.
It is interesting to redesign the headboard by turning it into a screen. To do this you will need:
- assemble a wooden screen frame with three or more sections;
- cover it with fabric (read more about covering the headboard in this article);
- arrange adjacent sections so that their width is equal to the width of the bed;
- the screen is fixed on the wall or placed behind the bed;
- the finished headboard is decorated with fabric drapery of the required size;
- At the floor, horizontal fasteners are attached to the wall in an open or closed way;
- the fabric is attached taking into account its desired placement in the decoration area.
The headboard can be supplemented with additional materials, for example, by ordering additional structural parts or small mobile structures. You can place shelves, drawers and even make a tabletop in them. The latter can serve as an excellent shelf for lamps and decorative items that decorate the interior of the room.
From the video you will learn 5 design options for the head of the bed:
Find out how to decorate the wall near the headboard, make your own headboard and cover this element of the bed with various materials.
Applying primer
Once all parts of the bed are sanded, use a high-volume, low-pressure paint sprayer to coat all surfaces, front and back, with an even coat of primer. For best coverage, hold the sprayer tip about twenty centimeters from the surface of the bedding, moving back and forth in a slow, controlled motion.
Tip: For finishes that highlight bright colors such as red, black or yellow, it is recommended to mix tinted acrylic primer. This will reduce the number of top coats needed for a proper final coat.