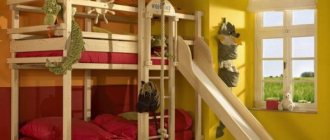
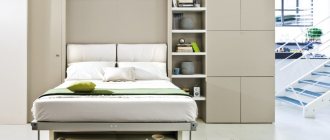
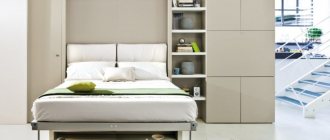
In modern apartments, rooms vary significantly in size, so the room that is not the largest is often chosen for the nursery. The best option for increasing free space is a self-made bunk bed, drawings and diagrams of which will be presented below. The only drawback of this option is the age of the child, since during adolescence he will be uncomfortable on the second floor. By replacing the lower bed with a sofa, you can create comfortable sleeping conditions even for an older child.
Stages of work
How to make a bunk bed yourself? This question is asked by everyone who has decided to correct the problem with the lack of sleeping space in the children's room. Let's try to consider the stages of making a bunk bed at home. Step-by-step instructions will help you complete this work without outside help.
The manufacturing process looks like this:
- the first thing you need to do is choose a bed model;
- draw up a drawing and diagram;
- purchase materials and prepare tools;
- based on the drawing, prepare parts of the required sizes;
- assemble the main frame;
- make the back, side walls, stairs, legs;
- assemble the overall structure.
During design and development, drawings of the bed are prepared. Particular attention is paid to the safety of the entire structure as a whole: strong frame, reliable side walls (fences), easy stair climb.
The difference between fittings from a reliable manufacturer
When choosing various fittings, it is recommended to choose a trusted manufacturer. This will help avoid additional expenses in case of failure of unreliable fasteners.
Fasteners from a reliable manufacturer have the following advantages:
- long service life;
- a large assortment;
- high quality;
- strength.
Manufacturers try to take into account all the needs of customers, try to help with the choice, and select the necessary product. Trusted companies monitor the quality, strength and reliability of manufactured fasteners.
By purchasing goods necessary for assembling or repairing interior items from well-known and reliable manufacturers, you can be completely confident that the furniture will last for many years and provide a comfortable stay.
Drawings and diagrams
All work requires care and precision, so each stage is accompanied by a drawing. It is prepared not just for one, but for all parts. The exact dimensions of the parts, height, thickness will help you get the result that the master strives for.
What is indicated on the drawing:
- dimensions of the final structure;
- assembly diagram of individual parts;
- methods of connecting nodes;
- installation procedure for each part;
- dimensions of structural parts and fastening elements.
Assembly diagram
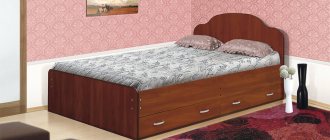
Model with drawers
With side ladder
With perpendicular floors
With built-in wardrobe
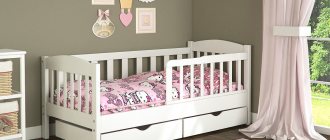
Bed for children
Loft bed
With wardrobe and steps
With work area
Materials
When making a bunk bed at home, you need to choose the right material. Experts recommend paying attention to the following types:
- solid wood - from which beautiful, strong and durable structures are obtained. But working with it requires construction skills and abilities;
- lumber - which must be selected from high-quality dried specimens. Raw wood will not retain its shape, it will begin to move away, and cracks may appear;
- MDF is a modern analogue of ordinary wood. The products look attractive and stylish. You can choose laminated MDF boards. There is an option for a regular untreated slab, then it is finished finished with stain and varnish. If parts of the bed are ordered from a furniture factory, then specialists will process the edges with a special finish. The furniture will be neat, no different from the factory one;
- Chipboard (chipboard) is a material that is not suitable for all parts of the bed. You can use it to make drawers under the base of the frame, back, or panel. It is important to consider covering the ends of the parts with film;
- furniture panel - consisting of pieces glued together into a single whole. Natural wood is not just beautiful, it allows you to make carvings, make other ornaments, and implement interesting design solutions. Only a craftsman with carpentry skills can work with furniture panels.
Tools
Making two-tier furniture for children will not be difficult if you prepare all the necessary tools and remember your existing construction skills. Of course, it’s good if the master has already made something from wood and knows how to work with it.
To work you will need:
- saw - hacksaw;
- screwdriver;
- plane or grinder;
- knives;
- jigsaw (preferably electric);
- sandpaper;
- drill.
We need instruments and devices for measuring and fixing. You can't do your work without a simple pencil.
Frame
Making the frame begins with measuring the mattress. The base and its shape correspond to the selected size of the child's bed. If the design is with a sofa, the lower part of the seat is measured.
Frame manufacturing process:
- the box connects to the sofa at the bottom;
- boards are prepared (long and end), which are assembled into a rectangle. They can be compared to a box. There will be two such boxes according to the number of tiers;
Making a frame for the first and second floors
- the sofa fits into a box;
- To connect the box to the sofa, side supports are prepared. These are two bars standing vertically. They are held together by smaller bars. There should also be two supports. One rectangle for one side wall, another for the second;
This way the frame is attached to the supports
- the assembled frame is pulled together and secured.
Attaching bars to support the frame during assembly
Fastening spacer blocks
Fastening the boards is done in a convenient way: eyes, tenons. Before fastening, they are lubricated with wood glue. The elements are connected firmly so that there is no possibility of any part of the frame weakening during operation. The resulting structure is dried. A photo of a bunk bed with a sofa is presented below.
If the tenon connection is difficult for the master, then self-tapping screws can be used. The main thing is to consider closing them from the outside so that there is no possibility of getting abrasions and scratches. The fastening is reinforced with metal corners.
Technology for creating a wooden bunk bed with your own hands
Measure the mattresses you plan to use. To these dimensions, add approximately 2 centimeters on each side (gaps to make it convenient to tuck in bed linen) - these will be the dimensions of the frame. If you buy sheet material at a sawmill, then ask that the sheets be cut to your sizes on a format-edging machine. Don't throw away the scraps; they may still be useful.
Using screws, connect the 50*100 mm beams. The result should be two frames for a wooden bunk bed.
Screw a 150*20 mm board to one side and one end of the frame. The fastening must be sufficiently reliable. Screw in the self-tapping screws from the inside, making sure that they do not pierce the side board right through. If the self-tapping screws are too short, you can drill holes of a larger diameter in the frame bars, using the depth stop on the drill. Instead of using a depth gauge, you can simply mark the drill with a strip of electrical tape. Install a 200*20 mm side in the same way on the second frame.
In serial models of bunk beds for teenagers, the legs are usually made of 25*100 mm boards. This model is designed for heavy loads, so the leg is made of two 50*100 mm beams. Connect the two beams lengthwise so that the end is L-shaped. The holes from the fasteners can then be sealed with putty and sanded. The length of the leg must correspond to the height of the second tier fence.
You will need an assistant for installation. Drill a hole in the leg at the height of the second tier and a hole in the frame with a side 200 mm high. Then drill a hole in the leg to hide the washer and hex head of the screw, deep enough for the screw to go through the leg, the bead, and lock into the frame timber. Screw in the screw.
Determine the location of the studs (if the walls are made of plasterboard) and mark the location where you need to drill. Have a helper support the frame from below, pressing it firmly against both walls. Level the frame using a level. Drill pilot holes through the frame timber, drywall, and stud to accommodate hex head screws. To do this you will need a long thin drill bit. Drive the screws until they go through the frame and secure into the studs. Install the lower tier (frame with a 150 mm side) in the same way.
A fence is the key to the safety of a bunk bed for teenagers. It can be made from several 20*100 mm boards mounted on vertical posts made of 50*100 mm timber. Screw in the screws from the inside. Leave an opening in the fence for the stairs.
The staircase can be inclined or vertical (it is easier to make). First install the two guide bars. Attach the steps using 6mm bolts. Use the longest bolts to secure the top step while securing the ladder to the bed.
Place the plywood sheets on the frames and place the mattresses. Now you have an incredibly durable teen bunk bed that will last a very long time. Due to the fact that all parts are assembled with bolts and screws, the bed can be easily disassembled and mounted in another room.
Back
Backrests come in different types; this can be a slatted version, when slats are added to the frame of the lower and upper parts. They will hold all the furniture and protect them from constant contact with the walls of the room. Often the back of the lower tier is made soft. Then the sleeping place below can be compared to a sofa.
In this version, for the back you will need:
- furniture board, or boards pressed tightly against each other;
- a solid wall that will limit the bed from contact with the wall.
The prepared boards (board, slats) are attached to the back of the frame. For reliability, attach the bed to the wall by connecting the backrest to the wall with metal corners. With a simple bed, the design of the backrest does not matter. It is only needed to highlight each tier and limit it to the frame. This can be one slat on three sides of the bed. Photos with various backrest options are presented below.
Side walls
In construction terminology, the side walls are called the headboard and backrest. These are two elements similar to each other, with the only difference being that railings are inserted into the back, and the headboard remains solid. Sometimes both parts are ordered from workshops, then all you have to do is attach them to the frame. The side walls can be made solid for two floors.
For the headboard take:
- two sanded boards, one slightly wider than the other;
- 4 side slats.
Side wall mounting:
- the boards for the headboard are inserted into the slats on the sides. The second rail will be needed to fasten the walls with other parts;
- the back and headboard are connected;
- a lattice, lamella or mesh is made to support the mattress;
Laying slats on the top bottom
- the lath is nailed to the inside of the frame to strengthen the strength. It is recommended to make at least one partition for the mattress, which will add rigidity;
Bars for supporting the slatted bottom
Attaching the central strip to the frame
- a frame is prepared for the slats; it is located along the inner plane of the bed;
- a rail is placed on the frame, approximate step 5-7 cm.
All external ribs need to be chamfered (6x6 mm). This can be done using a hand plow.
For the back you will also need two boards and four slats. But the arrangement of the boards here needs to be changed: a wide board should be installed at the bottom, a narrow board at the top. The height of the wide backboard is the same size as the narrow headboard.
Assembling the frame base
Assembling the upper tier
Instructions for making a classic model
It is easier to understand the basic principles of manufacturing and assembly using a classic model made of timber and boards - we will consider it. By adding and adjusting individual elements, decorative overlays, and complementing it with the desired accessories, you can create your own unique and stylish design.
Calculations and purchase of materials
In order not to go to the warehouse for 1 - 2 missing bars and boards, it is worth drawing the future bed to scale in advance and counting the necessary materials.
Some elements - for example, decorative overlays, railings and stair steps - depend significantly on the model, others - drawers and slats - remain unchanged
If the wooden frame is covered with MDF or laminated chipboard, then boards for the headboard and footboard slats, fencing and railings will not be needed.
For the model shown above you need:
- timber 38x76x1730 mm – 8 pieces, for vertical posts and decorative overlays;
- timber 38x38x1850 mm – 4 pieces, for longitudinal strips;
- boards 38x140 - 4 pieces of 2030 mm each (side drawers) and 4 pieces of 914 mm each (end drawers);
- boards 20x90 mm - 4 pieces, 914 mm each; central headboard and footboard strips; 1 piece 1510 mm stair railings, 2 pieces 1800 mm each and 4 pieces 2030 mm each for railings;
- boards 20x140x914 mm - 4 pcs, upper headboard and footboard strips;
- boards 20x64x482 mm – 3 pcs, stair steps;
- boards 20x76x1000 mm - 24 pieces, on transverse slats.
Cuttings of timber and boards, and even shavings left over from processing and sawing, will also come in handy. Take dowels, screws, emery and other small items in abundance. Don't forget about a new sharp file or wood disc for your jigsaw or grinder.
Step 1 - cutting and preparing parts
When all materials have been purchased, they need to be cut into pieces of the required length using a grinder or electric jigsaw. It is not advisable to use a handsaw, as it will leave an uneven, sloppy edge.
In this model, only the upper slats of the headboard and footboard need to be shaped. Before cutting the corners, apply markings so that all 4 boards are the same.
If the lumber was edged, all prepared parts must be planed. Corners and long edges of boards must be rounded using a router or hand plane, and the finished parts must be sanded.
Step 2 - assembling the side part of the drawer
The fastening of the timber to the frame should be as reliable as possible: it is the first to take the load from those sitting, lying and jumping on the bed
Glue a beam - a longitudinal strip on which the lamellas will lie - onto the board along the bottom edge from the inside. Apply wood glue to both parts, press, secure with clamps until completely dry. Then additionally secure with self-tapping screws 6 cm long, screwing them in from the side of the beam.
Glue or nail spacer blocks from pieces of timber or boards 8 cm long on top of the longitudinal planks. There are 13 pieces in total, with indentations of 8 cm from each other. Slats will be placed in the gaps formed.
In the same way, assemble all 4 side, longitudinal drawers.
Prepare the boards for the slats: cut a step on both edges, half the thickness of the board and 4 cm deep. This way it will lie more stable on the beam and take up less space in height.
Step 3 - assembly and finishing
When all the parts are ready, it’s time to drill or chisel holes for dowels in the headboard, footboard, railing and end frames, as well as in the staircase posts and railings - for the mentioned parts. Connections of load-bearing elements - side frames with uprights, as well as stairs - are more reliably made using glue and self-tapping screws.
The first assembly step is the sides of the future bed, headboard and footboard. Lay 2 beams in parallel, place 6 planks between them - the upper and central headboard and footboard, end drawers. Mark the joints on each piece with a pencil. Drill holes for the dowels.
The first time, assemble all the parts without glue and not quite tightly to make sure the holes are located accurately and there are no distortions, and then disassemble
The headboard and footboard should be assembled evenly, without distortions, and be absolutely symmetrical to each other. Then they are completely disassembled and reassembled, but this time coating each fastener with glue. To fit the dowels more tightly, use a wooden or rubber mallet.
The second step is the assembly of the side and longitudinal elements. First, long fencing strips are inserted into the racks on the dowels, which separate the sleeper from the wall. Then attach the side drawers that were assembled earlier to the front side of the racks.
For convenience and checking the level, they are pre-fixed with clamps. For each connection, screw 4 self-tapping screws under the countersunk screws, recessing the caps slightly into the wood. To do this, at the joints, small recesses are pre-drilled along the diameter of the hardware head.
The third step is the installation of handrails and fencing of the second tier. The handrail is attached to the side drawers with glue and self-tapping screws, and the fence is attached to dowels.
If using flat (oval) wooden dowels, drill several holes side by side and then join them together using a chisel
The fourth and final stage of assembly is the installation of steps, decorative overlays and slats. The steps can be placed on top of the post, inserted into pre-prepared recesses, or secured with metal corners and turned horizontally. Decorative overlays are placed on glue and secured with clamps. They should fill all the gaps between the horizontal elements and level the surface of the rack at the front.
The slats are simply laid out between the spacers, without fixation. This way they will retain some elasticity. To stiffen the frame, one central transverse rail is fixed with self-tapping screws. The clamps are not removed from all joints until the glue has completely dried.
To give the bed a finished look, mask the screw heads with wooden rounds, wood putty of a suitable color, or shavings mixed with glue.
Use pre-carved fence posts for a sophisticated design. The high back of the first tier will turn it into a comfortable sofa
Sand the entire product, paying special attention to the joints of parts, corners and stairs. Clean off dust, prime and dry the bed. Cover the wood with stain, varnish or paint, and apply decor if desired.
The bunk bed is ready! All that remains is to bring it into the room, fix it with a bracket to the wall, lay down the mattresses and bed linen. Place several large pillows under the wall on the first floor and it will act as a sofa.
Drape the sides with fabric, like a canopy, and get your own little personal corner, hidden from prying eyes and drafts.
Ladder
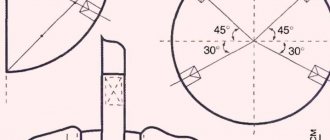
Any children's two-story structure requires the installation of a ladder. A three-step staircase is considered traditional, but depending on the height of the bed there may be more steps. The drawings will tell you the dimensions, height of the stairs, step width and methods of fastening.
Drawing of a bunk bed with stairs
Depending on the type of ladder fastening, there are:
- vertical - tightly attached to the frame;
- inclined - located at an angle.
Staircase manufacturing process:
Preparation for future stages
- two beams are installed, which will be the bases of the stairs - guides;
- then the steps are fixed. The bottom step is connected to the backrest post, and the rest are located exactly one above the other. The steps are inserted into the bars.
Ways to connect steps:
- external;
- into the recess;
- on metal corners.
Please note that any fastening must be closed. This will ensure the child’s use of the bed and protect the entire structure. If the furniture includes a sofa, it is better to make the stairs with wider steps. Then a wide beam is taken, and the steps are cut from the inside. If the steps are secured with bolts, then the longest bolts are selected for the top step.
The stairs need a handrail for the baby to hold on to. Railing drawings are always given along with a description of the staircase installation. The railing is an ordinary board, designed to fit a child’s hand, with a recess for fastening to the frame.
The ends act as stairs
Decorating the product
A bunk children's bed should not only be absolutely safe for small users, but also beautiful, because the aesthetic aspect is one of the important criteria for children. The color is selected to match the shade of the walls and the tone of the furniture, taking into account the overall style of the interior.
For girls, a children's corner is made in light brown, pink, and white colors. The walls and backs are painted with patterns or ornaments are cut out on them. On the bottom floor of the bed you can make a real house, for example, by hanging curtains and making a window in the side backrest.
The structure is decorated with forged parts, mosaics, or ornaments are applied to the surface using the decoupage technique. For girls, bunk bed models with drawers are suitable: they are convenient for storing clothes, linen, toys or books, while at the same time they act as a laconic, stylish decoration of the structure.
For boys, beds are made in the shape of a ship or car. All shades of blue, green, brown, gray are suitable. Yellow, orange, neon elements would be appropriate. From the second tier you can go down not only the stairs, but also the rope or the slide.
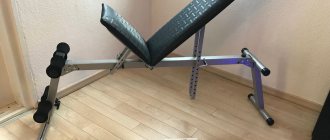
Teenagers are often keen on sports, so designs with a sports wall are suitable for high school students. Often vertical surfaces are decorated with posters and placards - this is the most practical and cheapest option, allowing you to change the decor every day without damaging the furniture.
The model for adults has a more strict design, and a crib for babies can be made in the spirit of your favorite animated film, painting the surface with images of fairy-tale characters.