Children dream of a bed at a height and for this they are willing to put up with even inconvenience. The second attractive point for them is the opportunity to make a “house” of their own territory below. For parents, this option is attractive due to its rational use of space. The only drawback of ready-made options is the substantial price. An excellent solution is a do-it-yourself loft bed. Firstly, the costs will be small, and secondly, build it exactly to your size.
What's the best thing about loft beds? That both children and adults enjoy using them. Moreover, children of any age - from kids who are still in kindergarten to teenagers. It’s a little more difficult with an adult audience. Young people agree on loft beds; older people no longer find the delights of relaxing upstairs. Nevertheless, the age range turns out to be solid. All models described below can be used for both children and adolescents, and adults. Everything can be solved simply by changing the dimensions.
Option for youth and teenagers
Required Tools
Tools for DIY Bed Assembly
Before starting work, you should ensure that you have the following tools and materials (for the manufacture of the sample described above).
- Wooden beams measuring 100x100mm - quantity and size depend on the required size.
- Tongue and groove boards are logs.
- For stairs and sides, rounded slats 2-3 cm thick.
- Plywood board when making a plywood base.
- Nails, screws, self-tapping screws, wood glue, U-shaped staples.
- Jigsaw or saw.
- Screwdriver.
- Sanding machine or sandpaper.
- Laser or water level, tape measure, hammer.
Necessary materials for making a bed
A loft bed can be designed either according to drawings and designs taken on the Internet, or according to your own sketches. A independently calculated drawing will provide individuality and convenience, designed exclusively for your premises, taking into account your own wishes. A sleeping place should be not only comfortable, but also practical, which is especially important for small apartments. By placing the bed on a raised platform, the room gains originality and functionality.
Original loft bed, made by yourself with a built-in table below
Thus, summing up all of the above, we can highlight the main advantages and disadvantages of do-it-yourself loft beds.
Ready-made homemade loft bed for a girl
The main nuances of working for ov
Taking into account all the pros and cons, wood is considered the most suitable material for self-assembling an attic, so we will assemble a wooden structure. The general action plan looks something like this:
- We decide on drawings and sketches - we draw with our own hands or design using a computer program, for example, PRO. Using the drawings, we paint the details, that is, the exact number and dimensions of all parts of the structure. By the way, in most furniture design programs, detailing is calculated automatically.
- We decide on the materials and prepare the tools.
- We assemble the main supporting frame.
- We arrange the flooring on the frame.
- We assemble and screw the ladder to the attic.
- We decide on the contents and install the work area on the first floor, that is, a table, cabinet, shelves, etc.
- At the last stage we are finishing our wooden attic.
No.: loft bed drawing
Not everyone can make a professional drawing; in fact, we don’t need one; a well-made sketch, with all dimensions and fixation points, is enough. It doesn’t matter whether you make a plan by hand or use a computer program, the first thing you need to decide is the size of the bed.
Drawing up a sketch begins with determining the size of the bed.
If you are not planning to make a huge attic for half a room, then you need to start from the dimensions of the mattress. All leading manufacturers strictly adhere to the standards in this regard. True, there are Western and domestic standards; they may differ slightly from each other.
It is advisable to make the upper bed according to the size of the mattress.
There is one small nuance here. Ideally, it is advisable to buy a mattress and make a loft bed under it. It’s not a fact that if you take some standard sizes as a basis, you will then find the same mattress in the nearest store, and ordering from another city can cost a pretty penny.
| Illustrations | Recommendations |
| Single bed . A full-size single bed is suitable for a teenager's room or a miniature home office. The main material is wood. | |
| Children's bed made of timber . Here we have a children's bed raised a meter from the floor. Children like such models, and adults find it easier to control the child. The main material is wood | |
| Complex with wardrobe . The sleeping place in this model is designed for a person no taller than 170 cm, but the filling of the lower level is arranged to the maximum. In addition to the closet, there are also a lot of shelves and a small desk. The main material is chipboard. | |
| Model with wardrobe . A spacious closet and a wide desk are closer to the office version. The main material is chipboard. | |
| Staircase with landing . A durable and comfortable ladder suitable for both children's and adult models. |
Wooden structures can be increased or decreased as desired; the wood will withstand additional loads. But if you take a ready-made drawing of a bed made of laminated chipboard, then it is not advisable to redo it, especially in the direction of enlargement. The fasteners may not hold up.
No.: list of required materials and tools
We will be making a non-standard attic for the entire width of the room, so the main material will be timber with a section of 50x150 mm. For free-standing frames, you can use 100x100 mm timber. The flooring will be covered with a 25x100 mm board.
Only dry, planed wood is used to make furniture.
The easiest way to assemble wooden structures is with metal fittings, this includes metal corners, overlay plates, rafter hangers, etc. Moreover, it is better to buy fittings in construction stores rather than in furniture stores, because they are used in arranging roofs and assembling wooden houses.
A large attic bed is easier to assemble using fittings designed for the construction of a roof rafter system.
Either nails or self-tapping screws are used as fasteners. The first option is cheaper, and the second is more reliable. It is not advisable to take things like rough nails; if you have to disassemble the structure, it will be problematic to pull them out of the timber, so if you don’t trust simple nails, then take self-tapping screws. Anchors are needed for wall mounting.
Nickel-plated screws are best suited for assembling wooden furniture.
For such work, a minimum set of tools is sufficient:
- Tape measure, ruler, pencil.
- The level is bubble and water, or laser can be used, but it is expensive.
- Screwdriver.
- Drill with impact function or hammer drill.
- Wood saw.
- Hammer.
- Awl.
- Set of chisels.
- A pair of clamps.
- Pliers.
- Emery block and a set of emery for it.
The construction of an attic bed made of wood does not require a large number of expensive tools.
No.: assembling the frame
| Illustrations | Recommendations |
| Fastening the wall beam . Holes and anchors are drilled in the load-bearing wall using a hammer drill, and a support beam is screwed horizontally. Fixation step 40 cm. | |
| Suspensions . Metal rafter hangers under the transverse beams are screwed onto the wall beam at intervals of 50-60 cm using self-tapping screws or powerful screws. | |
| Opposite structure. It just so happens that our opposite wall is weak and it is impossible to “attach” to it, so we will mount supports. The structure consists of 3 vertical supports and a horizontal load-bearing beam. It is assembled using T-shaped metal plates on screws or nails. All elements must fit snugly against the wall, so it is advisable to remove the baseboard or make cuts under it in the racks. | |
| First cross member . In the same way, metal hangers are attached to the supporting structure. To ensure that the frame holds itself, the first transverse beam 50x150 mm is inserted and fixed into the hangers. | |
| Installation of logs . The remaining logs are inserted into hangers and fixed with self-tapping screws in the same way as a feather beam. |
No.: flooring
Here, a tongue-and-groove floor board with a cross-section of 30x100 mm was used as flooring. We cut off the tenon of the first board adjacent to the wall and pressed it close to the wall. Then, according to the standard tongue-and-groove pattern, the rest of the flooring was assembled. There is no point in fastening the flooring boards with self-tapping screws, so nails were used.
The board is nailed to the joists.
In this case, we made a small mistake; the tongue-and-groove board produces a continuous, monolithic flooring, without any gaps. While for a large mattress it is desirable to ensure air flow from below, so it is better to use a smooth planed board and nail it with a gap of 5-7 mm.
It is advisable to make flooring for an orthopedic spring mattress with ventilation gaps.
No.: staircase construction
| Illustrations | Recommendations |
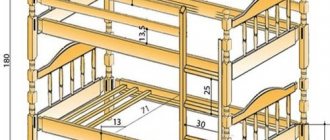
| Bowstring installation. The minimum thickness for timber for bowstring and steps is 30 mm. We used the same timber as on the 50x150 mm logs. The staircase was made at an angle, so the string bars were trimmed for better fixation to the flooring. | |
| Marking and fixing steps. For our height of 2 m, 7–10 steps are needed. The string bars are divided into equal distances and the places for the steps are marked using a level. The step is attached to 3 self-tapping screws on each side. | |
| Handrails . This part can be attached at will; we thought it would be more convenient this way and screwed the metal handrails onto the bars of the staircase string. |
No.: equipment for the working area at the bottom of the loft bed
| Illustrations | Recommendations |
| Tabletop. A tabletop is glued from a board 20–30 mm thick, and slats are screwed on the back side for rigidity. When the glue has set, the tabletop is carefully sanded. | |
| Table top pendant . For these purposes, we used special furniture fittings. We thought that a folding table in a small room would be more relevant. | |
| Shelves . To ensure that the space above the table was not empty, hanging shelves were assembled from boards. The parts of the shelves were assembled onto wooden dowels, glued together and secured with clamps while the glue dried. | |
| Fastening shelves . When making the table and shelves, we focused on the gap between the posts, so all these elements were screwed not onto a light wall, but onto strong wooden beams. |
No. finishing
In theory, it is advisable to sand all wooden elements of such structures before assembly, but we missed this point and had to sand the wood at the very end. After sanding comes decorative processing. Here, whoever likes it, we covered the wood with oil and wax in 2 layers, but this finish needs to be renewed every couple of years.
Oil-wax for wood is an environmentally friendly material.
If you do not want to constantly renew the coating, then use paint or furniture varnish. The second option is more preferable, since the natural beauty of the wood remains visible; by the way, before varnishing, you can stain it and give the wood a certain shade.
There is an important point. After the first coating with any composition, micro-lint rises on the wood; you need to take sandpaper and remove this lint in 3-4 strokes. All other layers of the selected decorative composition are applied without sanding.
Organizing your desk or desk
If there is sufficient height from the floor to the bed, it is recommended to leave some space for the tabletop. This option is optimal for study and work: the width of a single bed is about 80–100 cm, the same depth is optimal for a spacious table.
For double beds, the installation height in this case should be 10–15 cm higher than the height of the person using the work or study place. Also, due to the overhanging bed and side rails, shading is possible, so the table will need a close electrical connection point and at least a simple table lamp.
The table does not have to be tied to the bed structure, but when making a support structure from chipboard, it is very convenient to use one of the side panels as a support point for the table top. All that remains is to place another board 70–80 cm high on its edge - the space for work and creativity is already ready. To further save space, the tabletop can be made folding or retractable.
Installation Features
Nothing should threaten a sleeping person, therefore the most important requirement for a bed under the ceiling is its safety. It should be firmly attached to its supports. Therefore, to install a ceiling bed, it is recommended to contact highly qualified furniture makers.
There are several options for installing a bed:
- Mounting on high legs is the easiest way. The support can also be two cabinets facing each other. Such designs look very stylish. Both options require a firmly fixed, comfortable ladder;
- According to the mezzanine principle - placing a sleeping place between two opposite walls is appropriate in narrow rooms;
- In the corner - in this case the bed is attached to two walls and the ceiling, which ensures maximum reliability. It is better to fasten a wide double bed this way;
- To the ceiling - metal anchors are inserted into it, and chains, ropes or steel cables are hung on them. This is how the hanging bed is secured. This type of installation is often combined by additionally attaching the bed to the wall.
Before attaching the bed to the ceiling or wall, it is necessary to check the strength of the concrete floors. This can be done using an electronic device. The hammer contained in it presses the ball into the concrete. Electronics reads the quality of the material by how the ball bounces back. The results appear on the screen.
In the form of a mezzanine
In the corner
To the ceiling
High legs
Scheme and drawing with working area
Now you know what materials your bed will be made of, what design and size it will be. Next, you will need to transfer all your thoughts onto paper. Having a well-designed project will speed up the work process and prevent errors during the manufacture and assembly of the bed.
You can make a drawing of a piece of furniture in different ways:
- Draw it yourself with a pencil on a piece of paper. To do this, you need to have a little understanding of drawings and be able to independently calculate the ratio of sizes of different elements;
- order from a specialized company . Here they will design a drawing for you, according to all the wishes and features of the room;
- find a loft bed diagram on the Internet . PC users often share their experiences with other people. On such sites you can find a ready-made drawing and, if necessary, modify it according to your personal wishes.
Made from wood?
Once you have decided on the design of the bed and the type of stairs, you should take care of the materials for its manufacture. There are many options for what to make a children's bed from. Here it is worth considering that it should be :
safe and environmentally friendly;- hypoallergenic and hygroscopic;
- aesthetic;
- durable;
- resistant to mechanical damage.
Following from all of the above, people prefer the following materials:
- natural massif. This material is natural and safe.
It does not release toxins, has a beautiful texture, and is pleasant to the touch. There is a huge selection of wood that has different technical characteristics. When making beds for children, it is customary to use: pine, beech, birch, ash; - Chipboard . This material has a wide color palette. It is convenient to work with, as the sheets can be easily cut with hand and electric tools. This material can be given any shape and various types of structures can be built;
- MDF . This material is distinguished by its favorable cost, aesthetics, and resistance to mechanical damage.
As practice shows, furniture makers give preference to boards and timber.
Advice : in order to save money, it is recommended to purchase premium pine boards. If finances allow, you can make a loft bed from oak or beech.
What should you especially pay attention to when choosing?
Like all bunk structures, loft beds have high safety requirements.
It is mandatory to have a guard rail to prevent a child from falling from a height of almost two meters
This is especially important for children from 3 years of primary and secondary school age. Another important safety requirement is that all fixing elements - hinges, screws, bolts, nuts - do not protrude above the surface of the chipboard or are closed with special plastic plugs. The ends of the tabletop and sides must be covered with a special PVC edge to protect against damage to the skin.. A loft bed that meets safety requirements: with sides, correct fastenings and non-slip steps
Loft bed that meets safety requirements: with sides, correct fastenings and non-slip steps
Trusted manufacturers meet these requirements by offering loft beds made to hygienic and environmentally friendly standards. When choosing, it is better to additionally make sure that there are no toxic substances (formaldehyde) in paint coatings.
Materials
To assemble a loft bed you can use:
- Natural compositions, matte board or wood. If you're on a budget, pine or larch (cheap, soft, malleable wood) are preferred, but beech or oak are best. The frame in such bed models is assembled from timber with a cross-section of at least 8 x 10 cm, the walls are made of boards or furniture panels with a thickness of 2 cm or more.
- Boards based on particle boards (chipboard, fiberboard or MDF). With its help, an attic with a work area, side walls and fences is equipped.
- Durable plywood, slats and similar materials for the bottom of the bed.
Types and designs of loft beds for girls, tips for choosing
Metal is rarely used to assemble furniture on your own. Despite all the advantages (durability, the possibility of decorating with forged elements, accessibility), working with this material requires experience and special equipment. Most designers recommend building loft beds from wood, an environmentally friendly, durable and aesthetically attractive raw material.
Education
Chipboard
MDF
Plywood
Finishing
After making the bed, it needs to be given an aesthetic appearance. If desired, the bed can be covered with stain and varnished in two layers . Some parents get creative and paint the beds in bright and rich colors. This option is more popular with young children. So the bed becomes for them not only a place to sleep and relax, but also for active and exciting games.
Advice : if you are serious about saving space in your apartment, try making a lifting bed, a bed-wardrobe and a bed-chair. For children, it also makes sense to make a sand painting table, desk or children's table.
Sizing
Before starting work, you need to decide on the future dimensions. To do this, you need a clear understanding of where the sleeping place will be placed and who will sleep on it. In the case of modernizing an apartment or room, you can move away from the usual stereotypes and choose a new place for it.
Making an iron bed is a responsible, labor-intensive and complex process.
There are standard types of beds: single, double, single. It should be remembered that the place to sleep should be 30 cm longer than the height of the person who is going to sleep on it. Typically the length is 2 m, but can vary from 191 cm to 213 cm.
Some knowledge is required.
It is also worth deciding on the width. So, depending on the type, the width will have the following value:
- single – 91 cm;
- double – 137 cm;
- one and a half – 99 cm.
You need to start small - get lessons from an experienced blacksmith, or ask for help from someone knowledgeable in this matter.
Larger settings are designed for two people. However, they take up quite a lot of space in the room. Therefore, before starting work, it is necessary to measure the space in the room allocated for the bed. And also take into account such parameters as space for a bedside table and simply a place for free movement.
The main difficulty lies in the preparation of components and their processing.
Another important factor is the choice of mattress. When performing work deviating from established standards, it should be taken into account that it will have to be made to order.
The main thing is a little patience and self-confidence.
Photos in the interior of the rooms
When placing furniture at a height, the purpose of the room is not important. To save precious square meters, a bed under the ceiling can be installed not only in the bedroom, but also in the attic, on the front door in the hallway and even above the dining area.
Bedroom
A sleeping place raised to the ceiling frees up space below for a work or play area. A square room is more than 25 square meters. meters, you can make a spacious corner mezzanine, which can accommodate not only a mattress, but also a bedside table, table lamp or flower pots.
In a narrow room, it is recommended to place the bed between opposite walls. When positioned transversely above the door, the bed will be invisible at the entrance; moreover, asymmetrical furniture makes the room visually wider.
For a married couple, a double French bed with a width of 180 cm or more is suitable. The design of the hanging model is more restrained compared to the floor version, but the soft headboard with a carriage frame remains unchanged.
Kitchen-living room
In a small apartment or country house, the bed can be installed directly above the kitchen area. To make the sleeping area aesthetically pleasing and secluded, the bed is decorated with a canopy or slatted panels. Such a sleeping place is only possible in a kitchen with silent ventilation, because the heat from the stove, extraneous odors and sounds can interfere with enjoying your rest.
Children's room
In a small nursery, it is problematic to place a place to sleep, a desk, or a play area, especially if the room is divided between several children. In this case, you can organize an upper berth for teenagers, and place younger ones on the lower tier. Children are generally enthusiastic about the idea of sleeping at height.
In a single children's bed, the bed is combined with other furniture depending on the desire and age of the child. Adults need to take care of a reliable fence and a comfortable staircase with wide steps.
Final stage
Now let's move on to finishing work. We treat the product with varnish or stain twice so that neither moisture, nor bright light, nor scratches harm the product. You can also paint the bed in some bright color, making it more beautiful and attractive.
Check the product thoroughly before use. Does it comply with safety regulations? Will it be comfortable to sleep on? If you find any errors, correct them immediately, and only then lay the mattress. Let us remind you that the mattress should be 1 cm smaller than the frame and at least 5 cm below the partitions. Therefore, we either adjust the bed to the mattress, or order the mattress individually.
The product is ready! We hope you found this guide helpful!
A loft bed is a very comfortable furniture set, a masterpiece of minimalism. You can add a cabinet, cabinet or chair to it.
Drawings for self-production
Drawing: loft bed for a teenager with wardrobe and workplace
A simple option - and no drawing needed
This option can be assembled from wood
A low bed is suitable for younger children
A whole corner with a closet and a workplace
Types of structures
What is this lodge? This is a simple bed mounted on a frame. Its height can vary between 1.3 m and up to 1.8 meters. The main thing is to adhere to the correct proportions. According to the types of structures, the loft bed is divided into:
bed on four bases .
This design is characterized by mobility. It can be easily moved from place to place. To make it comfortable to rest on, you need to correctly determine the height of the lounger. With proper skill, this option is also suitable for an adult double bed;- bed on two supports , with additional fixation to the wall. This option is stable and reliable. But, it is installed in a certain place, and in the future it will be problematic to move it to another corner of the room;
- loft attached to the ceiling . This design has no supports at all. But for such a bed you need to be sure that the ceiling surface can handle the load. In addition, for its installation you will need to purchase high-quality and reliable fasteners.
Attention : people prefer making a loft bed with 4 supports. It is easy to build on your own, and can be moved to another location at any time.
As for installing the stairs, there are also different options:
installing the stairs at an angle is the safest way.
In addition, it will be easy to install and secure. But the slope of the stairs will take up a small space in the room. If the room is already small and cramped, you should pay attention to other options;- the staircase on the facade of the attic implies fastening at the end of the bed. It is recommended to fence such a structure with sides. It can be installed on the left or right side, depending on the characteristics of the room and personal preferences;
- a retractable staircase is the most ideal option for small spaces. But making it yourself, without having the skills to make furniture items, is quite difficult. This design should be equipped with special modules with rollers, which are fixed to the bed frame with hinges. The staircase is located under the upper tier;
- steps with drawers are an excellent choice for small rooms. The drawers can be used to place personal items, children's toys, and bedding;
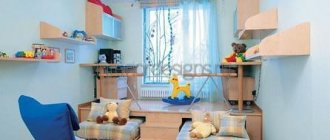
- The design with a podium is suitable for a spacious children's bedroom. The podium is installed at half the height of the bed and is protected by railings.
Attention : when deciding to make a loft bed for your child, be sure to consider his age. For small children, compact models located at a low height of 1.2 meters are suitable. For teenagers, you can build a roomy sunbed at a height of 1.7 meters.