Vadim
5015 0 0
Vadim August 6, 2018
The shortage of square meters is still a problem for many apartments and houses; a loft bed or, as it is also called, a sleeping attic, will help partially solve this problem. Despite its impressive size, it is quite possible to assemble the structure yourself, and then we will analyze a step-by-step plan for creating such an attic with your own hands, and first we will go through the ready-made options.
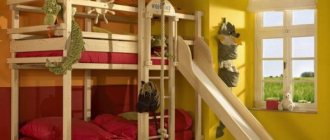
The attic design allows you to combine a study with a full wide bed.
DIY loft bed dimensions, drawings and diagrams of each module
The beauty of the model is that it can be “built” around any chest of drawers of medium height and good depth. If you already have a changing chest of drawers, then you can easily use it as the basis of a new, homemade loft bed, simply by adding an upper tier and adding modules to the side niches - a pull-out table and a chest of drawers-ladder.
The overall dimensions are determined solely by the size of the required sleeping space (or what is available, if the children’s space is limited). The height of the loft bed should be slightly higher than the standard height of the desk - 75 cm.
Let's take as an example the option when there is a children's bed mattress 1600x700 mm. The sleeping area, taking into account the thickness of the side walls of the bed, should be 1650x750 mm.
The basis, the central module of a children's loft bed is a chest of drawers. It is made to the entire depth of the upper superstructure. The optimal functional depth of the drawers is 500 mm. There is no point in doing more, as it will be difficult for the child to use them. But in principle, why not. You just need to be prepared for the fact that the box will not roll out completely, because the length of the largest guides is 550 mm.
On the right (in our version) there is a retractable table. Its position, right or left, depends on the place where it stands, to the right or left of the window. And also the right-handed or left-handed child who will sit behind him. An additional box for toys is rolled under it.
The table does not “fall out” from the overall structure, since it has an upper limiter with an emphasis on the upper bar. This limiter prevents the work table from rolling out completely and falling. And the principle of rolling out can be implemented in different ways. The table can simply slide along the side bars without any other mechanism.
Or roll out using roller wheels on the back of the tabletop. Then in the niche design you need to make a shelf on which they will ride. Roller wheels are attached to the bottom of the module itself and the toy box.
The third module of the do-it-yourself loft bed is a chest of drawers-ladder.
DIY chest of drawers
I don’t know why everyone is so eager to make a do-it-yourself chest of drawers for loft beds of various designs. In my opinion, it is difficult to invent a more traumatic and heavy construction.
- Firstly, the module is really heavy, the child will not be able to move it himself. The floor covering of a chest of drawers-ladder will quickly become unusable - be it laminate or linoleum.
- Secondly, the steps that the child is supposed to go up and down are slippery. Immediately glue some anti-slip mats to them.
- Thirdly, the very idea of boxes is dangerous. It’s enough to not close one drawer completely, hit it with your foot while descending and that’s it - you can’t avoid falling. For the same reason, I advise you to abandon protruding handles (as in the drawing of a chest of drawers-ladders). It is better to make cuts in the facades for easy grip.
Actually, the height of this loft bed does not require a ladder. If it is moved closer to the sofa or there is a chair or armchair next to it, this will be enough to easily climb onto the upper tier. And in the niche under the stairs, the chest of drawers can be used to organize a locker for clothes if you attach a bar to hangers. Or make shelves for toys. Or leave the niche open for games. In general, there are a lot of solutions and the choice is yours.
Basic nuances of work in 7 steps
Taking into account all the pros and cons, wood is considered the most suitable material for self-assembling an attic, so we will assemble a wooden structure. The general action plan looks something like this:
- We decide on drawings and sketches - we draw with our own hands or design using a computer program, for example, PRO. Using the drawings, we paint the details, that is, the exact number and dimensions of all parts of the structure. By the way, in most furniture design programs, detailing is calculated automatically.
- We decide on the materials and prepare the tools.
- We assemble the main supporting frame.
- We arrange the flooring on the frame.
- We assemble and screw the ladder to the attic.
- We decide on the contents and install the work area on the first floor, that is, a table, cabinet, shelves, etc.
- At the last stage we are finishing our wooden attic.
Step No. 1: drawing of a loft bed
Not everyone can make a professional drawing; in fact, we don’t need one; a well-made sketch, with all dimensions and fixation points, is enough. It doesn’t matter whether you make a plan by hand or use a computer program, the first thing you need to decide is the size of the bed.
Drawing up a sketch begins with determining the size of the bed.
If you are not planning to make a huge attic for half a room, then you need to start from the dimensions of the mattress. All leading manufacturers strictly adhere to the standards in this regard. True, there are Western and domestic standards; they may differ slightly from each other.
It is advisable to make the upper bed according to the size of the mattress.
There is one small nuance here. Ideally, it is advisable to buy a mattress and make a loft bed under it. It’s not a fact that if you take some standard sizes as a basis, you will then find the same mattress in the nearest store, and ordering from another city can cost a pretty penny.
| Illustrations | Recommendations |
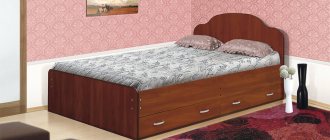
| Single bed . A full-size single bed is suitable for a teenager's room or a miniature home office. The main material is wood. | |
| Children's bed made of timber . Here we have a children's bed raised a meter from the floor. Children like such models, and adults find it easier to control the child. The main material is wood | |
| Complex with wardrobe . The sleeping place in this model is designed for a person no taller than 170 cm, but the filling of the lower level is arranged to the maximum. In addition to the closet, there are also a lot of shelves and a small desk. The main material is chipboard. | |
| Model with wardrobe . A spacious closet and a wide desk are closer to the office version. The main material is chipboard. | |
| Staircase with landing . A durable and comfortable ladder suitable for both children's and adult models. |
Wooden structures can be increased or decreased as desired; the wood will withstand additional loads. But if you take a ready-made drawing of a bed made of laminated chipboard, then it is not advisable to redo it, especially in the direction of enlargement. The fasteners may not hold up.
Step No. 2: list of necessary materials and tools
We will be making a non-standard attic for the entire width of the room, so the main material will be timber with a section of 50x150 mm. For free-standing frames, you can use 100x100 mm timber. The flooring will be covered with a 25x100 mm board.
Only dry, planed wood is used to make furniture.
The easiest way to assemble wooden structures is with metal fittings, this includes metal corners, overlay plates, rafter hangers, etc. Moreover, it is better to buy fittings in construction stores rather than in furniture stores, because they are used in arranging roofs and assembling wooden houses.
A large attic bed is easier to assemble using fittings designed for the construction of a roof rafter system.
Either nails or self-tapping screws are used as fasteners. The first option is cheaper, and the second is more reliable. It is not advisable to take things like rough nails; if you have to disassemble the structure, it will be problematic to pull them out of the timber, so if you don’t trust simple nails, then take self-tapping screws. Anchors are needed for wall mounting.
Nickel-plated screws are best suited for assembling wooden furniture.
For such work, a minimum set of tools is sufficient:
- Tape measure, ruler, pencil.
- The level is bubble and water, or laser can be used, but it is expensive.
- Screwdriver.
- Drill with impact function or hammer drill.
- Wood saw.
- Hammer.
- Awl.
- Set of chisels.
- A pair of clamps.
- Pliers.
- Emery block and a set of emery for it.
The construction of an attic bed made of wood does not require a large number of expensive tools.
Step No. 3: assembling the frame
| Illustrations | Recommendations |
| Fastening the wall beam . Holes and anchors are drilled in the load-bearing wall using a hammer drill, and a support beam is screwed horizontally. Fixation step 40 cm. | |
| Suspensions . Metal rafter hangers under the transverse beams are screwed onto the wall beam at intervals of 50-60 cm using self-tapping screws or powerful screws. | |
| Opposite structure. It just so happens that our opposite wall is weak and it is impossible to “attach” to it, so we will mount supports. The structure consists of 3 vertical supports and a horizontal load-bearing beam. It is assembled using T-shaped metal plates on screws or nails. All elements must fit snugly against the wall, so it is advisable to remove the baseboard or make cuts under it in the racks. | |
| First cross member . In the same way, metal hangers are attached to the supporting structure. To ensure that the frame holds itself, the first transverse beam 50x150 mm is inserted and fixed into the hangers. | |
| Installation of logs . The remaining logs are inserted into hangers and fixed with self-tapping screws in the same way as a feather beam. |
Step #4: flooring
Here, a tongue-and-groove floor board with a cross-section of 30x100 mm was used as flooring. We cut off the tenon of the first board adjacent to the wall and pressed it close to the wall. Then, according to the standard tongue-and-groove pattern, the rest of the flooring was assembled. There is no point in fastening the flooring boards with self-tapping screws, so nails were used.
The board is nailed to the joists.
In this case, we made a small mistake; the tongue-and-groove board produces a continuous, monolithic flooring, without any gaps. While for a large mattress it is desirable to ensure air flow from below, so it is better to use a smooth planed board and nail it with a gap of 5-7 mm.
It is advisable to make flooring for an orthopedic spring mattress with ventilation gaps.
Step #5: building the stairs
| Illustrations | Recommendations |
| Bowstring installation. The minimum thickness for timber for bowstring and steps is 30 mm. We used the same timber as on the 50x150 mm logs. The staircase was made at an angle, so the string bars were trimmed for better fixation to the flooring. | |
| Marking and fixing steps. For our height of 2 m, 7–10 steps are needed. The string bars are divided into equal distances and the places for the steps are marked using a level. The step is attached to 3 self-tapping screws on each side. | |
| Handrails . This part can be attached at will; we thought it would be more convenient this way and screwed the metal handrails onto the bars of the staircase string. |
Step No. 6: equipping the work area at the bottom of the loft bed
| Illustrations | Recommendations |
| Tabletop. A tabletop is glued from a board 20–30 mm thick, and slats are screwed on the back side for rigidity. When the glue has set, the tabletop is carefully sanded. | |
| Table top pendant . For these purposes, we used special furniture fittings. We thought that a folding table in a small room would be more relevant. | |
| Shelves . To ensure that the space above the table was not empty, hanging shelves were assembled from boards. The parts of the shelves were assembled onto wooden dowels, glued together and secured with clamps while the glue dried. | |
| Fastening shelves . When making the table and shelves, we focused on the gap between the posts, so all these elements were screwed not onto a light wall, but onto strong wooden beams. |
Step #7: finishing
In theory, it is advisable to sand all wooden elements of such structures before assembly, but we missed this point and had to sand the wood at the very end. After sanding comes decorative processing. Here, whoever likes it, we covered the wood with oil and wax in 2 layers, but this finish needs to be renewed every couple of years.
Oil-wax for wood is an environmentally friendly material.
If you do not want to constantly renew the coating, then use paint or furniture varnish. The second option is more preferable, since the natural beauty of the wood remains visible; by the way, before varnishing, you can stain it and give the wood a certain shade.
There is an important point. After the first coating with any composition, micro-lint rises on the wood; you need to take sandpaper and remove this lint in 3-4 strokes. All other layers of the selected decorative composition are applied without sanding.
Bed base
The design of the bed is quite heavy; it must also withstand the weight of the person sleeping on it. There are three types of fairly reliable design of the load-bearing part, each of them with its own advantages.
In the simplest case, the bed is assembled from laminated chipboard panels. Due to the correct spatial orientation and stiffening ribs, it is possible to ensure sufficient strength and resistance of the housing to loads. The advantage of such a base is the availability of material, ease of assembly, the absence of protective and decorative processing, and the ability to supplement the walls of the case with parts such as shelves and cabinets. There are also disadvantages: due to its significant size, the body forms a closed lower zone, which is not always comfortable. Also, simply fastening parts with confirmations will not be enough; all loaded units must be fastened with metal corners.
A frame made of solid wood has a slightly greater visual lightness. It’s very easy to imagine such a scheme - it’s an ordinary bed, but with very high legs connected to each other by crossbars at the very bottom, that is, a bunk bed without a lower bed. The advantage of a wooden frame is good “translucency” - to arrange the lower working area it is not necessary to organize local lighting. Among the disadvantages, the significant weight and difficulty in disassembling the bed are especially pronounced, as well as the need for careful processing of materials - sanding, impregnation, painting.
The third type of design is a hanging bed. This is the best option if the sleeping place is located in the corner of the room. Three corners of the bed rest on brackets fixed to the walls, and one corner rests on the ladder. The design flaw is obvious - the bed cannot be moved. The advantages of this installation method are the lowest consumption of materials and maximum preservation of passability in the lower zone.
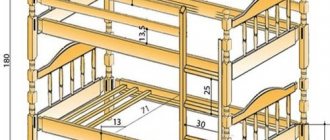
Classic bed drawing
A step-by-step guide with drawings on how to make a classic wooden bed with your own hands. The basic tools you will need are a miter saw and a jigsaw. To make a bed, you mainly use 2 x 6 boards and 4 x 4 lumber. Also, do not forget to prepare wood filler and stain. You can read the full list of necessary materials and tools on the website. Below is the cutting of the bed parts according to the diagram in the picture on the right.
A - 2 pieces of 4×4, 52 inches (132 cm) long, 2 pieces. 15 1/2″ long (36.5 cm)B – 4 1×6 boards C – 13 2×6 boards 36 1/2″ (93 cm) long D – 2 2×4 lumber – 78 1/2″ long (200 cm), 1 2×6 boards 80 1/2″ (205 cm) long E – 2 2×10 boards 80 1/2″ (205 cm) long, 1 piece – 71 1/2″ (182 cm) , 1 2×6 board 71 1/2″ (182 cm) long side rails F – 3 2×4 boards 80 1/2″ (205 cm) long, 14 1×4 boards 76 1/2″ (195 cm) long auxiliary strips
Photo source: howtospecialist.com/finishes/furniture/farmhouse-bed-plans/#more-12846
Drawing of a classic wooden bed
An example with drawings on how to make a classic wooden bed with your own hands.
See diagrams and several step-by-step assembly photos in the gallery below.
Photo source: www.instructables.com/id/Custom-Bed-Frame/
Drawing of a simple wooden bed
Using this example, you can make a simple wooden bed with your own hands.
A few assembly points
Note that the slats rest on the lip on the inside of the side rails. When assembling the headboard, dowel holes are best drilled by clamping the headboard and drilling the hole all the way to the outside, as shown in the diagram
The footrest is almost identical to the headboard. If you prefer to place your feet at the end of the bed, move away from the top horizontal part and make the posts only 45cm long.
The bed rails have a series of blocks on the inside corners. The goal is to spread the slats and prevent them from slipping.
It is best to glue and screw the 38 x 38mm slat support onto the main part of the track to ensure it is securely attached. Bed frames in general are designed to be disassembled and moved. For this frame you just need to unscrew the side guides. The slats are located between the bed rails and are held in place only by gravity. Blocks on the bed rails prevent them from sliding. See drawings and diagrams with step-by-step photos in the gallery below.
Photo source: woodgears.ca/reader/richard/beds.html
Best models and brands (+ price range)
Today in furniture stores you will find a large assortment of loft beds from Russian and foreign manufacturers.
On Internet sites you can purchase a loft bed from the manufacturer.
Among Russian factories, it is worth taking a closer look at such brands as Mebelgrad, Formula Furniture, and Krasnaya Zvezda. The lower limit of the price range for a wooden bed is 10,000 rubles, which is quite inexpensive.
The distance between the ceiling and the bed, as well as between the bed and the bottom of the structure, should be sufficient so that your child does not hit these elements.
Thanks to our article, you got acquainted with the types of loft beds for children, their capabilities, pros and cons. Please take into account everything we have told you when making a future purchase. Discuss with your child the loft bed, what functionality he would like and what design. Together you can choose the best option available on the market.
Most buyers prefer wooden structures because they are the most reliable and natural.
Making a loft bed
We design the product
Before implementing the intended product in material, it is necessary to complete all calculations and draw up a sketch. You must first decide on the location of the bed - attic, its dimensions, and design features. As a rule, they try to place such products not near external, colder walls, but to mount them on internal partitions.
The size depends on the users of the product. There are even double options. More often the loft bed is the prerogative of younger family members.
Having decided on the dimensions, it is advisable to draw up drawings of a bed - a do-it-yourself loft made of wood or choose a ready-made version on the Internet.
Preparing material and tools
The process of self-production requires not only the availability of the necessary tools, but also mastery of them. You can start working only when you are confident that you are up to the task.
We select materials for work:
- bars with a cross section of 80x80 - 7 pieces, 2 meters long;
- planed boards 25x100 – 10 m.p.;
- planed boards 40x100 – 10 m.p.;
- bars 40x40 - 3 m.p.;
- steel corners;
- plastic dowels with self-tapping screws or dowel-nails;
- wood screws 100 mm and 50 mm long.
Photo of a compact resting place
The manufacture of such a complex piece of furniture is impossible without a certain number of hand and mechanical tools.
You will need:
- carpenter's saw;
- electric jigsaw for wood;
- drill with hammer;
- screwdriver
Having prepared everything you need, we move on to making the bed frame - the attic.
We mount the frame
The basis of the design is made up of four racks, through which the entire load from the bed and family members lying on it will be transferred to the floor. There are hanging options, but they are better made on the basis of steel hangers and profiled pipes.
You can make a loft bed from solid wood as follows:
- We distribute bars with a section of 80x80 in the place where the bed is installed. Using dowels - nails and steel corners, we securely fasten two of them to one of the walls of the room at a distance of 180-200 cm from each other for an adult and 160-180 cm for a child. Using a level or plumb line, we control the verticality of the fixed racks.
- Between the studs we attach a 40x100 board of the required length to the wall, fixing its dowel with nails or self-tapping screws into plastic dowels. To make the connection, we first drill several through holes in the part along the center line, and blind holes in the wall where the fasteners are installed.
- If the bed is adjacent to two walls, we also attach the third support vertically to the adjacent wall. Between the corner and the last beam we install an intermediate screed with a section of 100x40 mm.
- We fasten the last rack at the required distance from the previously installed ones using steel angles and 100x40 bars. Additionally, you can fix the lower end of the part to the floor.
- For safety reasons, we recommend installing additional bars on the sides of the bed that are not facing the walls. For a children's bed, it would not be amiss to install flat balusters between the wooden blocks and boards.
- To install the base under the mattress, cut 10 boards 1 meter long with a section of 25x100. Attach them to the long bars of the lower frame of the racks using self-tapping screws.
Loft bed on wooden posts
Building a staircase out of wood
Since we have described instructions on how to make a loft bed from natural wood, it is better to make the stairs to it from this material. For work, prepare a couple of 30x150 boards about 230 cm long. The same boards will be needed for the steps.
The ladder can be placed either from the end of the bed or from the long side. The angle of its inclination should ensure safe descent and ascent and should not take up unnecessary space in a cramped room.
On long boards at an angle of 10-15o we mark the places where the steps will be installed with sufficient distance between them. You can secure the steps using shallow grooves or using self-tapping screws, having previously coated the ends with wood glue.
Having assembled the ladder, we rigidly fasten it to the bed frame using steel corners or making a removable version. By following the proposed sequence of actions, you will receive an original, convenient product, the price of which will be significantly lower than store-bought analogues.
The bed is a loft with an original ladder between the posts
What you can do yourself
A blogger from YouTube under the nickname SLK told how to assemble a loft bed for adults with his own hands.
Blogger's bedroom before the construction of the loft bed began. Designed its dimensions on the computer. Purchased the necessary lumber.
I rented the equipment and cut it to size. I covered the resulting parts with stain. I vacated the room and started assembling.
First, I assembled the frame of the future bed. Then I covered it with side panels and screwed on the crossbars. I selected and secured the spacers (slats) under the mattress. I placed a double mattress on top.
What should you especially pay attention to when choosing?
Like all bunk structures, loft beds have high safety requirements.
It is mandatory to have a guard rail to prevent a child from falling from a height of almost two meters
This is especially important for children from 3 years of primary and secondary school age. Another important safety requirement is that all fixing elements - hinges, screws, bolts, nuts - do not protrude above the surface of the chipboard or are closed with special plastic plugs. The ends of the tabletop and sides must be covered with a special PVC edge to protect against damage to the skin.. A loft bed that meets safety requirements: with sides, correct fastenings and non-slip steps
Loft bed that meets safety requirements: with sides, correct fastenings and non-slip steps
Trusted manufacturers meet these requirements by offering loft beds made to hygienic and environmentally friendly standards. When choosing, it is better to additionally make sure that there are no toxic substances (formaldehyde) in paint coatings.
Types of designs
Furniture stores offer various design options for loft beds, which can be divided into two large groups:
- built-in beds, made to order;
- finished goods.
Built-in models
Built-in loft beds are made to order and allow the apartment owner to fully implement any ideas and purchase furniture of the desired size. You can also choose your own fittings and personalize the design to suit your taste.
Various materials are used for the production of built-in models, the main ones being:
- wood: a natural and environmentally friendly material with excellent performance properties. Wood furniture is durable, strong and resistant to external influences. When making beds, oak, pine, beech and other tree species are used;
- Chipboard (chipboard): a cheaper material that is not particularly durable. In addition, some types of chipboard can be toxic to humans. If you are choosing a loft bed for a child, it is highly recommended not to purchase a model made of chipboard. As a last resort, make sure that the material has an environmental safety certificate;
- metal: strong, durable and affordable material that can withstand heavy loads.
Products made from coniferous trees will not only cost you less, but also fill your home with a pleasant and unobtrusive aroma.
Ready solutions
Ready-made loft beds are cheaper than custom-made models, and the variety of options offered allows you to choose a design that best suits the needs of the buyer, his age and lifestyle.
But the main advantage of ready-made furniture is that there is no need to wait: it can be installed in the room immediately, on the day of purchase. You will have to worry about purchasing custom-made products in advance.
Organizing your desk or desk
If there is sufficient height from the floor to the bed, it is recommended to leave some space for the tabletop. This option is optimal for study and work: the width of a single bed is about 80–100 cm, the same depth is optimal for a spacious table.
For double beds, the installation height in this case should be 10–15 cm higher than the height of the person using the work or study place. Also, due to the overhanging bed and side rails, shading is possible, so the table will need a close electrical connection point and at least a simple table lamp.
The table does not have to be tied to the bed structure, but when making a support structure from chipboard, it is very convenient to use one of the side panels as a support point for the table top. All that remains is to place another board 70–80 cm high on its edge - the space for work and creativity is already ready. To further save space, the tabletop can be made folding or retractable.
What height
Children's loft bed can be of different heights:
- average height (for a bed) is when the sleeping place is approximately 1 meter from the floor level;
- high - this is at a height of 1.5 meters and above.
The average height is more suitable for children under 10-12 years old. And not only because parents are not so afraid that the child may fall. More likely because of the moments of communication before bed. Such children still allow their parents to tuck them in for the night, hug them, read a fairy tale, or talk about something. Doing this at a height of 1.6 meters will not work. In any case, you won’t have a full conversation... But you can sit down on a low (relatively) bed and carry out a full evening ritual.
A children's loft bed can be of medium height - the sleeping place is located at a distance of a meter from the floor
You won’t put a table under a meter-high bed or create a work or play area. But the entire area is lined with shelves, drawers, cabinets, which can hold a lot of things.
Teenagers almost no longer allow such liberties. They are already too old. The ideal place for them would be a high loft bed.
High loft beds are also inconvenient from the point of view of their maintenance: even making the bed is problematic, and changing linen is also inconvenient. But many are willing to put up with these shortcomings because of the savings in meta. The second, not the most pleasant moment occurs during childhood illnesses. It’s good if there is a backup option - the child can be transferred lower until recovery. If this is not possible, mom will have to jump up and down, which is sometimes tiring.
Ceiling height is one of the determining parameters when choosing an attic bed
Another point: the height of the ceilings. There should be at least 80-90 cm from the sleeping area with a mattress to the ceiling. This is the minimum that allows you to avoid hitting your head. And then, at such a height to the ceiling, the air above is “not very” - hot and stuffy. The problem can be solved with a carefully thought-out ventilation system, and if there is none, then at least with regular ventilation.
Frame materials
Loft beds are made of metal or wood. Lightweight wooden structures, characterized by strength, reliability and durability, are in consistently high demand. Carved products have an attractive appearance, fitting into any interior design. Solid wood is considered an environmentally friendly material, since no toxic compounds are used in the woodworking process, and structural elements are glued together with harmless resins. The most affordable price tags are for models made of pine timber, while beech products have increased strength characteristics.
Modern furniture manufacturers, in order to reduce production costs, use combined materials in the manufacture of beds. The production of frames is made from solid wood, while shelves, safety sides, countertops, bases of storage systems are made from laminated chipboard, fibreboard, chipboard
When choosing a children's model, pay attention to the safety class, which is acceptable - E1 and lower. Furniture made from chipboard often contains harmful compounds, so it is better to immediately make sure that there is a certificate of compliance with safety standards or even refrain from buying a bed for a child made from this material.
Metal products have a copper or steel frame made of hollow tubes; polymer or decorative powder coating is used to protect against corrosion. The stylistic solution of the forged structure with chrome plating is interesting. The advantages of metal products are low weight, stability and reliability. Disadvantages: rapid cooling of metal parts, which results in unpleasant tactile sensations and age restrictions. Metal loft beds can be purchased for children starting from the age of 5. An alternative to an all-metal structure is models made of combined materials: metal + plywood covering and metal + wooden frame.
Design features and device
Frame
When choosing furniture you should always look at the quality of the frame. The choice should begin with the material. The following frames are available.
- Solid wood. It is considered the best material. It is highly environmentally friendly and can be used for small children. The best option is frames made of hard wood.
- MDF. This board can easily replace natural wood. In terms of strength and reliability, it is not inferior to natural solid wood. When purchasing such furniture, be sure to ask for a quality certificate.
- Metal. Such frames are characterized by increased strength. The furniture lasts a long time. It is not recommended to install such a sleeping place for a small child.
- Chipboard. It is of insufficient quality and is prone to warping, which reduces service life. The only advantage is the low cost.
Another parameter to consider is the height of the bed. It is chosen depending on the characteristics of the person who will use it, as well as the room. The table shows the types of loft beds by height.
| Type | Who are they for? | Height cm |
| High | Adults | 180–200 |
| Average | Teenagers | 160–180 |
| Low | Children | 70–160 |
Always consider the overall height of the room. There should be no less than 70 centimeters from the surface of the sleeping place to the ceiling.
Sleeping area
Be sure to take into account the dimensions of the sleeping area. This determines how comfortable it will be to sleep on the bed. Now manufacturers often use their own size ranges. We will present generally accepted standards.
| For whom is it recommended? | Length cm | Width cm |
| Children under 10 years old | 160 | 80 |
| Children 10–14 years old | 170 | 90 |
| Teens and adults | 190 | 90 |
| Double bed | 190 | 160 |
It's always worth looking at the base of the bed. In practice, there are three variants of this technological element.
- Solid base. It is a sheet of plywood located on the crossbars. A fairly reliable option that can withstand heavy loads. The disadvantage is that the mattress has poor ventilation and there is a risk of mold and mildew.
- Rack and pinion. Slat slats are used, which act as a support for the mattress. The advantage of this design is excellent ventilation of the sleeping area.
- Lamels. This is an orthopedic base; the difference from the slatted version is the slightly curved shape of the lamellas. This solution allows the slats to bend slightly under the weight of the body, providing an orthopedic effect.
Sides must be installed. Their height is usually 30-40 centimeters. They are often made from the same material as the main frame.
Interior placement options
Until recently, loft beds were produced primarily for children and teenagers. Today, the desire to have a full bedroom for owners of small apartments has become more the rule than the exception.
The bedroom (including another area) is located on just one wall. Each sleeping area must be supplemented with individual soft lighting. With a corner model, you can fill space in a certain area of the room, leaving the rest of the space free.
If the free space at the top allows a person not only to lie, but also to sit on the bed, then you can place shelves for magazines, books or a cup of coffee.
What are the pros and cons
The main advantage of such beds is the saving of room space and its rational use. In addition, such models offer great functionality. Many parents buy children's furniture such as a loft bed, as this allows them to save a lot of money due to the lack of the need to buy additional furniture. The child gets his own personal space along with the bed.
Thanks to this unusual bed design, you occupy both the upper and lower space of the room.
But such models also have a number of disadvantages:
- Injury hazard. There is a high probability that one day the child may stumble on the stairs, which will lead to his fall;
- It's stuffy. It is known from the laws of physics that warm air rises above cold air, therefore, the higher the sleeping place in the room is located, the hotter the air;
- Fear of heights. The child may feel uncomfortable due to the high sleeping place.
If the bed itself is at a high level, then below you can place a table for a computer or homework.
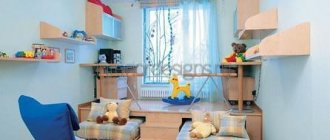
Equipment for the working area below
An attic bed is not only a decorative design for a room, but also a preservation of usable space, especially for small apartments. Let's look at some design ideas for the lower zone.
- wardrobe and desk - the wardrobe doors in this case should be located on the side of the bed. A table is installed in the remaining space;
- shelves and drawers. By dividing the free space with vertical and horizontal partitions and closing some cells with drawers, you can create a unique closet for storing not only personal items, but also toys;
- desk organization. If the bed model provides sufficient height, you can install a tabletop for study or work. This option is very convenient, since the width of the bed is from 0.8 to 1 meter, which is ideal for a desk. But you need to take into account that the bed causes some kind of darkening and for comfortable work you need an artificial light source, and therefore a power source. So, it is better to place the bed next to an outlet;
- a sofa for relaxation - a loft bed with a work area is convenient because you can install any attribute of furniture underneath, it all depends on the needs of the apartment owner and the purpose of constructing such a structure. One of the common options for decorating the lower part of the bed is to install a sofa, which can also act as a sleeping place;
- dressing room - if the attic bed is large, you can organize a dressing room below. To hide things, the design is complemented with a small cabinet with open or closed shelves. If necessary, you can use curtains made in a modern style;
- separate room - high-height beds are mainly installed in rooms with a lack of personal space. For such cases, there is an option to equip the lower part of the structure as a separate room, which is suitable for both children and adults. A fairy-tale room is created for the child with the addition of playful nuances. For an adult, it is enough to install a small tabletop under a computer and a sofa chair.
In order to save space, it is recommended to place the attic installation in a corner, between adjacent walls.
Making a table top
Attaching the Z-shaped structure
Folding hinges installed
Assembling the frame for the shelves
Installation of shelves
Additional equipment
A loft bed is a real construction set that can consist of many interchangeable elements. The only required part is a high frame with a bed on top. The rest depends on the taste and needs of the child.
The following elements can be added to the bed frame:
- The tabletop is fixed or moves to the side. The second type of tabletop is suitable for older children who need a lot of space to do their homework;
- An ordinary staircase, on a cabinet door or with steps-shelves. Without a ladder, it is difficult for a child to climb onto the bed; it can be removed when the owner of the bed reaches adolescence. And the stairs can be used to save space. Use the empty space behind the stairs to place a cabinet there or order steps-shelves that are easier for kids to go down;
- A whole closet the entire height of the attic or several shelves. If there is not enough storage space, place several shelves under the bed or table, place a nightstand;
- A curtain, a chair and other devices for games. The curtain is useful for creating a feeling of privacy and comfort. The rest of the things will change as the child’s taste changes and he grows up. At 3 years old, you should just put a few of your child’s favorite toys on the floor or install a toy castle under the bed;
- A fun element of a loft bed for little ones is a wooden slide for getting off the bed. If there is enough space in the room, you can install such a slide and the child will definitely be captivated by his sleeping complex for a long time.
Any of these elements can organically fit into the design of the room, but you should not overdo it with their quantity. First of all, think about what things your child really needs and focus on them. If your child loves to draw, install a drawing table rather than an additional nightstand. If your child prefers active games, give him more empty space or even install a sports complex right under the bed. When choosing the color and design of a bed, you can rely on the psychology of colors. Each of them evokes a certain association in any person without exception. Red represents aggression and love, while blue is strongly reminiscent of technology and science. For children of early school age, blue, green, and pink colors are suitable. Blue or red colors may be too heavy and tire the child, especially if he is prone to hyperactivity.
Choose a muted color for the bed, not too bright. Beige tones work well here: cream, brown, sand.
Let's get acquainted with the features of the product
If the area of the apartment is limited and you want to comfortably accommodate all household members, you can raise the bed to a level of at least 180 cm from the floor. To climb onto such a bed, stationary or mobile ladders, including stepladders, are used.
Regardless of the intended use of the product, it is necessary to achieve its maximum strength during the manufacturing process. For this purpose, blanks made of natural hardwood with a sufficiently large cross-section are used. Bed posts, if the structure is supported on the floor, can be used for utilitarian purposes, making various shelves and storage areas.
Photo of an originally designed children's bed - attic
The space located under the structure can be used for various purposes - here you can organize a play area for children, a work area for parents, and a relaxation area. The zonal distribution of internal volume and the multifunctionality of areas will allow you to obtain optimal comfortable space even in a small apartment.
How to make a loft bed yourself and decorate it beautifully
The design of an attic bed depends entirely on the capabilities and imagination of the creator. For wooden structures, varnish and paint are used, wood carving or burning is used. Beautiful stickers, fabric, foam, plastic. A kind of lighting will also turn the bed into a fairy-tale home. Any bed will become a real work of art when there is a desire for it.
Design options
When developing such designs, designers do not limit their imagination and produce very interesting modern models. Among the original ones it is worth noting the following:
Loft bed without standard legs. The frame is attached to the ceiling using anchor bolts. This design is appropriate in rooms with high ceilings - from 3 meters. A great idea in this case is to arrange a dining area below.
Mini room under the bed. This option is possible if the bed is double, which will allow you to arrange a separate compact room under it. It is better to make the walls sliding rather than stationary.
Creative design designs with original shapes. These could be, for example, floating house-beds and other configurations that give a special flavor and comfort to the room.
There are a lot of options for the design and organization of space under a loft bed, but first of all you should remember the practicality, safety and comfort of staying in a box on the second floor.
Advantages and disadvantages of the design
The idea of raising the sleeping area to the second tier is relevant in small rooms that are used as a living room or workspace during the day. A traditional bed and even a transforming sofa, along with other furniture - a table, a wardrobe, side tables, take up a lot of free space. By installing a loft bed you can solve a complex of obvious problems in a small room.
Lift bed
The bed structure is installed along one of the walls or in the corner of the room. Under the bed you can organize a spacious dressing room or install all the necessary furniture on a free space: shelves, cabinets, chests of drawers.
Room interior in Scandinavian style
The advantages of a double loft bed include the following:
- The ability to rationally use the space of a small room.
- The original and stylish appearance of the structure, its ability to create a cozy atmosphere in the room.
- Multifunctionality of furniture, the ability to optimally distribute several functional areas in a small area.
- A wide range of design solutions, combinations of materials, colors, arrangement of space under the upper tier.
- Long service life.
- The versatility of the design, which will look organic when changing the style of the interior or its color scheme.
Brutal metal structure for a loft-style interior.
A loft bed for adults has disadvantages that should be taken into account when deciding to purchase it. First of all, it is a high price. Secondly, the height of the sleeping place is high, which creates a potential danger of falling and serious injury. This applies to homemade designs, and those presented in stores are made taking into account all safety measures.
When choosing a design with an inclined staircase, it is necessary to provide free space in front of it
Types of loft beds: sizes and configurations
If children's models of loft beds are more or less typical, then adult varieties of this furniture have a wide range of not only sizes, but also configurations. There are compact models designed for small-sized apartments, which fit literally 1.5-2 sq.m., and there are spacious designs with a sleeping area that occupies half the room.
Loft bed with work area for an adult photo
As we have already mentioned, depending on the number of sleeping places, attics can be:
- single;
- double
The latter are more like a bed under the ceiling (they are also called a mezzanine bed) - spacious, roomy structures that are suitable not only for sleeping, but also for proper rest.
And the second advantage of this design is the size of the free space under the bed, which can be used at your discretion. Designers love non-standard solutions, so they will definitely come up with how to fill this area in an original and functional way.
Under the berth can be located:
- desk;
- bookshelves;
- a full-fledged workplace with a computer and a large tabletop;
- sofa;
- closet.
Most often, a loft bed is placed in the far corner of the room, away from the windows, so the work area under the bed will be dimly lit. You will need to think over a good lighting system and install lighting, wall sconces, and a table lamp.
If you decorate the sides of the support posts with bookshelves, then in this way you will be able to create a kind of office - cozy and comfortable.
Perhaps the most successful option is to arrange a relaxation area under the bed with a soft sofa or several armchairs (if the dimensions allow, you can even put a coffee table here). A kind of “roof” over your head will create a certain comfort and ensure a pleasant pastime.
Also for small rooms, a suitable option is to arrange a dressing room under the bed. A wardrobe will fit under the bed, but will clutter up the space a little. If there is no urgent need, then it is better to refuse this configuration option.
Loft bed for adults with wardrobe photo
And finally, a few words should be said about non-standard models. If you have looked through the catalogs of several manufacturers and have not found the best option for yourself, you can always order individual production of the desired model. It will be more expensive than purchasing finished products, but you will get the configuration and sizes that you need. Both parties will benefit from such cooperation - the manufacturer will earn money, and the buyer will satisfy his needs 110%.
Author of the article: Vladimir Belov
Book-table: a practical solution for small spaces
Changing tables: a variety of choices for caring parents
Furniture walls for living rooms - modern and classic
Leather corner sofas are a worthy addition to a stylish home interior
Key points when choosing a sofa - how to choose the right sofa
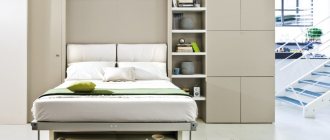
Design Features
Such a bed is called an attic because the sleeping place is located at such a height that it can only be reached with the help of a ladder. A free space is formed below, which is used in different ways: as a dressing room, a study, a relaxation area, a library or an additional sleeping place in the form of a sofa.
Office under the bed
To go upstairs, you need to use the stairs, so this bed design is only suitable for people in good physical shape. The staircase can be made in the form of vertical slats or an inclined structure with handrails. In the second case, it is necessary that the stairs do not serve as an obstacle when moving around the room.
The ladder must be securely attached to the bed frame
A staircase in the form of boxes, the top covers of which serve as steps, will be more familiar. You can store things inside, thereby relieving a small room of unnecessary furniture.
Functional steps with containers for things
Often a loft bed is chosen as a functional sleeping place in a children's room, where it is necessary to combine several functional areas. However, a double bed for adults differs from a children's bed only in the width of the bed and a more massive supporting structure.
Loft bed in a teenager's room
Modern furniture stores offer a wide range of loft beds, so choosing the right size and design option is not difficult.
Multifunctional design with wardrobe and workstations
To make the frame, natural wood or metal is used. Laminated chipboards are used as non-load-bearing elements. On the upper tier of the structure a sleeping place is arranged, and below the free space is used depending on needs, equipping a wardrobe, workplace or living room.
A stationary bed on 4 supports can be installed anywhere in the room
The main advantages of loft beds for adults are their ability to save space, the ability to combine several functional areas in one place and an original design that will make the interior expressive and memorable.
Interior in Scandinavian style for a small apartment
Who is a double loft bed suitable for? This design will be a good purchase for a young family living in a one-room apartment or studio. In the lower part you can organize a living room area or a sleeping place for a child.
Comfortable workplace
Note! One of the differences between adult attics and children's attics is their height and ability to withstand heavy loads (up to 200 kg).
Video - Features of an attic double bed
Designs/configurations
There are the following types of such beds:
By number of beds
- single;
- double.
By type of design
- single beds with a desk;
- double with sofa;
- single or double rooms with a bed on the ground floor.
By type of body material
- Chipboard is a budget material, the service life of which is several times inferior to others;
- wood - the high price of the material is completely justified. Wooden structures are durable, wear-resistant and very aesthetic;
- metal is a durable and quite practical solution. Such beds have an original design, but they cannot always fit into a multifunctional space.
By type of stairs
vertical - compact design looks quite harmonious in the interior, without cluttering it. Disadvantage: less security compared to other options;
inclined - such beds are often quite large, which complicates the task of optimal organization of a small room. An alternative option is an airy, compact staircase;
with a podium – stair steps – additional storage systems with drawers, where it is very convenient to store the necessary things (books, linen, clothes, etc.)
Types of structures
Built-in
The loft bed can be built-in; such furniture is made to order. In this case, you can choose not only the design, but also the sizes, as well as accessories. As a result, the apartment owner receives the most optimally suitable furniture.
Most often, such sleeping places are built into closets; this is one of the best options. But, there are modifications with various additions in the form of a table, sports equipment and other elements. The advantage here is the ability to select components completely individually.
The material is selected based on the owner’s preferences. It is recommended not to skimp on the source material, as this will affect the performance characteristics.
Stationary
If you want to save money, it makes sense to purchase a ready-made loft bed. The advantage of this solution may be the ability to immediately assemble the furniture and begin using it. Ready-made options are also cheaper than custom-made ones.
You can find a huge number of modifications of such furniture on sale. Let's list the most popular types.
- Loft bed. Below there is only empty space suitable for installing any pieces of furniture.
- With built-in wardrobe. The entire lower level is occupied by a closet.
- With a sofa. The optimal solution if you plan to install furniture in the living room.
- With a workplace. The lower level is occupied by a table, as well as the necessary drawers for storing office supplies.
- With a chest of drawers. Low furniture, the sleeping place is located directly above the chest of drawers.
- With a sports corner. This is a children's version, the equipment is selected individually.
Do-it-yourself attic bed drawings and dimensions, diagrams and projects sketches
Despite the flight of fancy and the depth of design thought, all solutions, one way or another, will be derived from several standard circuit diagrams:
- Bed on four supports. A classic option that resembles a regular bed, only with significantly “grown” legs. The sleeping place is complemented by restrictive sides and a ladder. The simplest scheme for self-production.
- Solution with two supports and wall mounting. The design is similar to that described above. The exception is that one of the sides is attached directly to the wall. Not suitable for rooms with plasterboard cladding. Requires special fasteners.
- Hanging option. The bed frame is suspended from the ceiling using special brackets. There is a distinction between full suspension and partial (one side is fixed to the wall). This solution puts forward special requirements for the height of the room and the thickness of the ceiling.
It is better to make a loft bed yourself, relying on master classes and step-by-step instructions. The most common is this model of a loft bed, because it is quite light and easy to move.
Children's bed
The typical option is an upper (sleeping) tier with a staircase and a play area below. An example of how to assemble a loft bed is shown in the figure.
You can make a staircase on the facade of the attic on the right or left side, depending on the layout.
Depending on the gender and age of the child, as well as on the imagination and capabilities of the parents, the frames can be decorated using a variety of decorative elements that turn the bed into a castle, a house, a car or an airplane.
When choosing a model, it is necessary to take into account the age of the person who will be in the loft bed.
Scheme with canopy
Structurally, such beds are practically no different from conventional (standard) designs, with the exception of increasing the height of the upper tier, where, in fact, the canopy and its fastenings are hung (in the figure). Usually, either dense or translucent fabrics are chosen for it. In addition, it can be installed not only on top, but also cover the bottom.
For small children, you need to choose a compact model that will be located at a height of 1.2 meters.
What's the best way to add a staircase?
As a rule, the staircase is mounted on the façade side, but can also be mounted at the end. In addition, there are solutions that show how to assemble a loft bed using cabinets of different heights, whose surfaces form a cascade through which you can get to the upper tier. There are also side ladders and chests of drawers. An example is in the figure.
Some models have steps with drawers instead of stairs.
Construction with a house on top
Sometimes children's beds are designed in the form of a house. In this case, a superstructure imitating a roof is added to the standard frame. It can be covered with fabric or a full covering can be made. Such designs are not suitable for rooms with low ceilings.
The loft bed delights not only small children and teenagers, but also many adults.
Attic bus
Again, this is a solution for children's beds. Basically, such options are suitable for boys, although girls up to a certain age also enjoy playing and sleeping in them.
Thanks to various modifications, interesting design solutions and the use of high-quality materials, you can make even the most boring room unique.
Instructions
Frame
The frame is assembled according to the following scheme:
- First drill holes for the fasteners.
- Lubricate the joints with regular wood glue.
- Connect the frame to all supports using metal angles. The logs are placed at intervals of 50–60 cm. If the flooring is thin, the step can be reduced, if the flooring is thick, the step can be increased.
- Connect the support posts with slats (at a height of 30–40 cm below the feather bed).
If the structure has not 4, but 2 supports, the diagram will change slightly. It would be wiser to attach the frame to the wall with metal anchors (or tie it to a beam).
Advice: Constantly check the evenness of the structure, the corners, and the stability of the bed!
Installation of sides
Regardless of what you use - assembled wooden sides, similar fences, MDF or laminated chipboard sidewalls - you will need self-tapping screws for fastening. If you like a laconic classic style, choose longitudinal strips made of timber or crosspieces. These models are suitable for adults and teenagers. For small children, solid sides or a fine grid are more suitable.
Flooring installation
To make the flooring you will need sanded boards. They are screwed with self-tapping screws to the joists at the same height.
Attention: To fit one board to another, use a mallet. For each of them you need to screw in at least 1 fastener (preferably 3-4) depending on the width of the material.
Ladder
When starting work, remember the following nuances:
- the distance between the staircase posts should correspond to the height of your child;
- all structures must be comfortable and safe;
- the top should be firmly attached to the main frame of the attic.
To make a staircase, take 2 solid, completely dried boards with a thickness of at least 3 centimeters.
- Part of the end is cut off from above with a jigsaw: this will allow the structure to be as close to the frame as possible.
- To mark the steps, you need to install the supports in the working position. To fix the steps, you will need self-tapping screws (6–8 pieces) or a couple of special corners.
- The last stage of assembly is to attach the railings, attach the structure to the floor or to the bed frame.
Work area equipment
With a table
There may be several options for arranging a workplace:
- you can install a stationary tabletop or make it folding to hide it if necessary (this will create more free space, for example, for children’s games);
- The cross section of the attic can be disguised with bookshelves, and a storage system can be installed there (using containers).
Tip The area under the bed is very comfortable, but dark, so don’t forget to think about how you will light it.
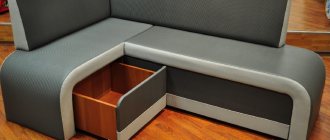
With a sofa
The sofa is not only a place for guests, but also a storage place. Stash toys, out-of-season shoes, or sports equipment in the drawers below to save space and keep unnecessary items out of sight.
Finishing
And now, finally, the finish line. Your task is to sand over all surfaces to remove any remaining dried glue and dirt. Then everything is covered with several (2-3) layers of clear varnish. You can additionally use stain (for tinting) or colored paint.
Tip By installing lamps in the upper zone, using mats, bright textiles, grilles, and other decorative elements, you can add originality to your bed.