The pantry in a house or apartment should be rationally arranged. This is a separate room that is used to store various things and non-perishable food products. In most cases, the pantry contains a huge number of items that clutter the entire room.
A storage room is a separate room in an apartment or house, and its arrangement should be rational.
To avoid this, use racks and shelves in the pantry. They help to properly organize your storage system and avoid clutter. Next we will talk about how to make simple shelves for your pantry with your own hands.
To avoid clutter, you can put shelving in this room.
Preparation
Before installing storage systems, the pantry must be repaired: clean the space, carry out dry and wet cleaning, remove old wallpaper and flooring.
If necessary, the walls of the storage room or attic are leveled and also put in order: painted or pasted over. It is recommended to use a primer that contains antifungal impregnations.
Laminate, parquet or linoleum is laid on the floor. It is also worth equipping the pantry with ventilation and lighting, which will greatly facilitate the use of the room.
What material can be used?
One of the most affordable and durable materials for creating shelves in a pantry is wood. Boards made of natural wood (pine, larch), as well as chipboard, are fixed with metal fasteners. The heavier the items that will be stored in the pantry, the thicker the boards should be. For conservation, large equipment, construction tools and other heavy things, it is worth providing an additional stiffener.
If you make shelves in the pantry with your own hands, you can use what you have at hand - wooden pallets, old unnecessary furniture, plastic fruit boxes. Plywood is considered a budget option, but thin sheets are not suitable for heavy objects. Lightweight but durable plastic is suitable for storing books, clothes and bulk products. It is easy to care for, and the material is not afraid of moisture.
Metal racks are considered the most durable and do not require additional reinforcement. Modern products have a collapsible design, they are easy to rearrange and transport, and the material can easily withstand temperature changes
When purchasing, you should pay attention to the coating - it must be protected from corrosion with a special composition
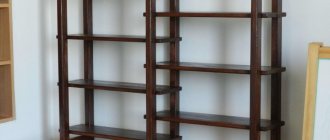
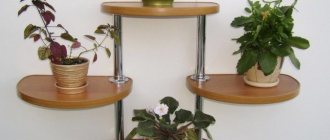
The photo shows shelving, drawers and wall shelves for a spacious pantry.
What is the best way to arrange shelves in a pantry?
The placement of shelves is primarily affected by the size of the utility room.
- A small pantry (about 2 meters) allows you to install shelves in only one row - linearly, along one wall. Sometimes structures are made rounded - this shape allows you to gain a few centimeters and use three walls.
- The angular arrangement in the form of the letter “G” is considered much more practical, but the storage area should exceed 2 meters. For maneuvers you need to leave a small passage, especially if the room is elongated and narrow.
- In a large utility room, it is optimal to place shelves in the shape of the letter “P”. In this case, it is necessary to calculate the depth of the structures so that there is room in the middle for movement.
The photo shows a pantry in which the shelves are functionally arranged in the shape of the letter “P”.
Deciding on the sizes
The most popular and practical form of shelves is straight. The length of the shelf is usually equal to the length of the wall. If the distance between opposite walls is 2 meters or less, then the shelf does not need additional support. Otherwise, the structure should be strengthened, especially if you plan to store seaming tools and tools.
The thicker the wooden shelf, the more fasteners it requires. Also, its strength is determined by the distance between the support posts: the more massive the structure, the smaller the gaps.
To make using the shelves convenient and safe, the heaviest items must be moved down. The width of the projections should decrease from bottom to top. The standard shelf width for canned food is 30 cm. The height depends on the size of the items.
The photo shows a pantry with a wide aisle between wooden shelving.
Features of planning storage systems
The most important thing when arranging a storage room in an apartment or private house is to decide what things it will be intended for and correlate the load with the dimensions of the room.
- For a small pantry, several rows of shelves located one above the other are suitable. It is better to leave space at the bottom for boxes and drawers: this way the area will be used optimally.
- The dimensions of the compartments must be made in accordance with the dimensions of the items that will be stored in the pantry.
- If the room has a high ceiling, it is worth providing space for a stool or stepladder: it will be more convenient to get things from the upper shelves.
- Some pantries have enough free space to create deep shelves. This is not always convenient; moreover, you should leave a distance for passing and bringing in objects.
What is needed to make a rack
Once you decide on the type of structure to be made, you need to calculate the amount of material that will be needed for the work. For example, to make a regular straight rack you need the following materials:
- wooden supports from 1.5 to 2 m long;
- bars for connecting supports;
- boards for making shelves;
- metal corners;
- a set of nails and screws (you need to take it with a reserve, because some of them may get lost in the process);
- special impregnation for wood;
- varnish or paint (optional).
Wood for making shelving
Prices for construction boards
Construction boards
To work, you also need to prepare some tools, most of which can be found in any garage:
- brushes for painting wood;
- vacuum cleaner or small brush to remove dust;
- electric jigsaw or regular wood saw;
- crosshead screwdriver;
- sandpaper or sanding machine (if you have one);
- hammer.
What tools may be required
Tips for making a shelf
In order to make a pantry shelf correctly so that it lasts a long time, before starting production, use a few important tips:
- Decide on the purpose of the future shelf. If you plan to store large boxes, bags and jars in the pantry, you will have to make the shelves spacious and deep.
- To protect the racks from destruction, the wood must first be treated with varnish or stain.
- If your pantry is long and narrow, then the most correct solution would be to place shelves in the shape of the letter “U” on three walls.
- For the manufacture of shelves it is better to use natural wood, and for partitions you can limit yourself to plywood sheets.
Choosing a shelf design
Much depends on the size and shape of the storage rooms
Often space is limited, it is important to correctly determine the shape of the structure. There should be free space in the pantry
The owner needs to come in, stand, bring something in, put it away. It is advisable to optimize the upper space. Therefore, you will have to install a chair, stool, or stepladder.
Main types:
standard. Placing straight shelves between two walls. Often they make racks;
"G" shape. Two of the four walls are used all the way;
"P" shape. Three out of four walls are used all the way.
More often they choose “P” and L-shaped types. They allow you to make maximum use of the usable area
In addition to the shape, it is important to consider the depth of the shelves and the height of the spans. The parameters are affected by storage items
For preservation it is convenient to use different sizes. The spans at the bottom are larger; three-liter jars should fit in. Small jars are placed on top; a height of 20 cm is sufficient.
Do you make your own shelves?
Not really
Pantry shelves are made straight, in the shape of the letters “G”, “P”. They use wood, plywood, bracket, metal, rarely plastic, never glass. Before production, the room is carefully prepared.
Important points when designing utility shelves
You can also make shelving and shelves for your pantry yourself. To do this, there is no need to have specialized knowledge and skills. First of all, a sketch of the furniture set is created, which takes into account all the important parameters.
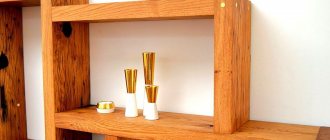
The pantry rack is a convenient storage for food, dishes, and homemade preserves.
The diagram must reflect:
- room size;
- shelf dimensions (height, width, material thickness);
- design features.
Each shelf of such a rack is used to the maximum and allows you to easily find the desired item, saving time on searching.
All these parameters affect the final appearance and correct installation. In order not to miss a single detail, we recommend that you familiarize yourself with the information on how shelves for the utility room are made by hand.
Shelves in the pantry made of planed boards
Before you start making shelves, stock up on the necessary tools and special metal fasteners. Hammer drills should be selected for wood or concrete, and the thickness of planed boards for shelves should be 20 cm.
To work you will need:
- electric jigsaw;
- perforator;
- plane;
- screwdriver;
- knife;
- roulette;
- pencil;
- self-tapping screws;
- PVA glue;
- sandpaper.
The length of the shelf boards is selected solely on an individual basis depending on the size of your pantry. In addition to planed boards, you will also need long blocks of wood (4.5x4.5 cm), plywood (8 mm thick). Treat the wood with stain and then varnish.
Manufacturing technology:
- Before starting work, it is better to make a drawing of the future shelves. Based on this sketch, design the placement of shelves on the walls on both sides.
- Screw wooden blocks to the walls with self-tapping screws, which will subsequently fasten the shelves together. Thus, you should have a frame made of bars.
- To make it convenient to lay the shelves, attach transverse ones between the longitudinal bars. Determine the distance and height between them yourself.
- Next, use a jigsaw to cut out shelves from the planed wood that fit the dimensions of your frame and place them on the cross bars. They should be applied, as they say, “into the paw” or into each other. Fasten them with PVA glue and self-tapping screws.
- Make the first and fourth shelves solid, and separate the middle two shelves with plywood. This will create sections.
- You are not limited to the number of shelves on both sides. Having spent a minimum of free time, you will design the most ordinary, but very durable shelves in the pantry for storing all kinds of items.
How to make a bookshelf yourself?
A bookshelf is one of the most popular options for homemade wooden shelves. It fits organically into the interior of a small room, is comfortable and practical. Wood is an easy-to-work material, and shelves made from it are practical, comfortable, durable and easily fit into any interior.
Classic wall shelf
One of the classic options will be a shelf with three cells measuring 100 * 40 cm. The design provides a small upper side 10 cm high for additional placement of a number of books.
To work you need to stock up:
- jigsaw,
- sanding machine or sandpaper,
- drill, screwdriver or screwdrivers,
- screws or self-tapping screws,
- square,
- brush,
- varnish for wooden surfaces.
The calculation of the dimensions of the parts was made for a board with a thickness of 2 cm.
Step-by-step instruction
First of all, you need to cut out 2 long pieces:
- 50 cm,
- 96 cm,
- 26 cm.
Then they get to work.
- The wooden parts of the future shelf must be sanded or sanded.
- Assembly begins from the bottom, which is fixed in the side walls at a distance of 1 cm from the edge. This will make the product look more interesting. Fastening is done using self-tapping screws.
- On the inside of the fixed base of the shelf, you need to mark the places for attaching additional supports. With the same cell size, the step will be 32 cm from the side wall on each side.
- The inner walls are attached to the base strictly at right angles.
- I secure the top lintel of the shelf.
- If the design does not provide a back wall, then it is recommended to reinforce the shelf with metal corners.
- The shelf is treated with stain, dried and varnished. Varnishing usually occurs in 3 stages with an interval of 12 to 48 hours for surface drying.
Taking this option as a basis, you can make a bookshelf yourself.
Final decor of the rack
The finished structure must be painted. Of the various options, the simplest are coating with water-based acrylic paint or varnishing the product.
The advantage of acrylic paint is that it dries quickly and has virtually no odor. It can even be used indoors, although the room will still need to be ventilated. Varnishing is preferable if you want to preserve the structure or slightly tint the surface of the wood. Clear or tinted varnish to resemble oak, walnut, ash and other wood species should be applied two to three times. Each new layer is applied after the previous one has dried.
Before painting the rack, it is necessary to prime the surfaces to be painted, unless two-in-one paint is used. Priming the surface will ensure a good result and will ensure that the paint does not peel or crack over time. If you intend to paint with oil paints, it is recommended to do this in advance outside the living space. We bring all painted parts into the house for subsequent assembly only after complete drying.
So, once the shelving unit is assembled and painted, you can stand back and admire your work. However, your furniture will look more presentable when books, figurines, framed photographs and other household items for which it was made appear on the shelves.
The most important nuance when choosing is the criteria for the quality of racks
- The best option is to purchase shelving from the manufacturer. This will ensure that quality is not compromised at a lower cost. In addition, if any problems arise during operation, they can always be quickly resolved by contacting the manufacturer.
- It is imperative to consider what material the rack is made of. Regardless of whether it is wood, metal or plastic, it must be of high quality, durable, and reliable.
- Rack size. This is a very important criterion, so before purchasing you need to carefully measure the intended space. If for some reason this is difficult, then you can always call a measurer who will help you determine the size of the structure, advise which type will be most optimal and how to place it more functionally in a given room.
- Racks must have a reserve of additional loads.
- Multi-tiered structures will help save space; they are also the most compact.
- Reliable fastenings are an important part of shelving, especially for warehouses and shops.
- The presence of a warranty, especially a long one, is a guarantee that the manufacturer is confident in its products.
Required tools and materials
If you liked some kind of pantry, seen in a photo or video, with suitable shelves and racks, why not implement it yourself. Even in a small and narrow pantry you can get a practical and convenient room for household items and more.
You will need a set of tools and some materials, consisting of:
- from bars;
- boards or slabs for shelves;
- level;
- screwdriver;
- drills;
- screwdriver;
- hacksaws;
- roulette;
- pencil;
- good lighting;
- good mood.
You can make a base from the bars. Here it is better to choose wood products. You will need enough bars with a cross section of 50x50 mm.
As for the boards, they can be made from chipboard, wood, MDF and other particleboard materials, including regular plywood. After all, furniture is also actively produced from plywood. What can we say about the shelves?
Additional items
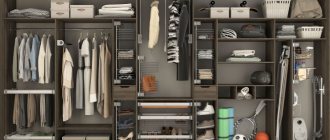
Even if you are making a dressing room from a small pantry in a Khrushchev-era building, in addition to the standard set of shelves, rods and drawers, it is quite reasonable to use modern devices that will make the use of very limited space in a small pantry as efficient and ergonomic as possible. The storage system can be supplemented in the dressing room with:
- vertical shoe racks;
- laundry baskets that can be placed under the bottom shelf;
- hooks for bags;
- all kinds of retractable hangers - for trousers, ties.
The idea of converting a closet into a dressing room is a great opportunity to transform the apartment as a whole, freeing up space that was previously occupied by a closet. Things will be in order, even very small accessories will find a place on the shelves of the dressing room or neatly placed in drawers. The wardrobes of all family members will cease to be a problem and will become orderly in their places.
Tips for choosing
When choosing a shelving unit for your pantry, you should consider the following basic recommendations:
Choose a model with high legs or free space below
Eliminate plastic varieties from your options. Despite the assurances of the sellers, this item is impractical. It will not last long, and under accidental mechanical load it may even break off from the base. Focus on the parameters of the room, taking into account the height of the walls, choosing the permissible width and depth of the model
Don't overpay for a brand name. Advertising is not always an indicator of good quality of a product. To evaluate the performance characteristics of products, study customer reviews on furniture forums. This will allow you to understand which model is worthy of purchase.
Color
The color of the rack should be in harmony with the main color of the interior of the room. True, another option is also possible - the rack turns into a spot of color, contrasting with the decor of the room. For example, a white shelving unit will merge with a white wall, creating the effect of objects “floating” in space, and the same white shelving unit will look advantageous against a bright wall.
The color scheme also depends on the purpose of the rack. For an office or a classic interior, restrained colors (brown) are good, but a bright shelving unit is better suited for a child’s room. The shelving unit for your study or office is matched to the color of your desktop.
Sizing
As mentioned earlier, the dimensions of the rack depend directly on the dimensions of the room
To make shelves in a closet in an apartment, it is important for a home craftsman to consider several parameters before drawing up a diagram:
- width, length and height of the pantry - for the basic layout of the drawing;
- convenient access to the shelves and low height of the rack - for comfortable use of the product without the use of stands and ladders;
- the expected number of items that will be stored on the rack, their sizes, from height to width;
- load capacity - the higher it is, the more stiffeners there should be to ensure the strength of the structure;
- The slope of the floor is an important parameter, without taking it into account you can get an unstable product.
Based on the listed parameters, the home craftsman should sketch out the most detailed drawing, or take a ready-made diagram and substitute his own dimensions. Such a thorough and responsible approach will bring successful carpentry results.
Important! If the floor is uneven, then both stands for the shelving supports and additional fastening of the shelves to the wall of the pantry can help. The load capacity of the rack directly depends on the distribution of load on the shelves
The load capacity of the rack directly depends on the distribution of load on the shelves
Design, construction and mounting methods
Before you start creating a rack, you need to decide what the shelves in the pantry and the structure itself will look like, as well as what fastenings to connect the shelves to the wall.
Read also: How to make a small kitchen big
There are only two options for how to make a rack, namely, make a free-standing shelf, or simply attach the boards directly to the wall.
First, you should draw the idea on paper. This will allow you to visualize the desired rack, take measurements and most successfully place it, taking into account the wishes and intended storage items.
In order for a pantry to be equipped with shelving, it must have enough space.
Read also: 7 banana cheesecake recipes
It must be taken into account that the shelves should be positioned in width from bottom to top, that is, the bottom shelf will be the widest, and the top, accordingly, the narrowest. This is due to the fact that the largest items will be stored on the lower shelves, which are inconvenient and impractical to lift upstairs.
It is necessary to carefully consider the distance between the shelves and correlate it with the items that you plan to store.
Depending on the wishes of the owners, the racks can have any shape that the location chosen for attaching the structure will allow.
Non-standard use
If you don’t want to store construction tools, an ironing board or food supplies in the pantry, then you can pay attention to bold and unusual solutions. Non-standard use will make a small space as efficient as possible
If you often work at home or like to spend your free time at the computer, then a small closet can be equipped as a work office. Place a table with a chair behind the door, and small shelves on the walls. You can also use the door for various hooks and hanging shelves. But this method of arranging a pantry is suitable only for neat people who can give up free useful space for storing things.
If the pantry is located next to the bathroom or kitchen, then you can even organize a laundry room. There is also room here not only for a washing machine, but also for shelves with powders and conditioners, for a basket with clothes and a small dryer. This method will significantly save space in the kitchen and bathroom. And for greater functionality, you can provide and attach a folding ironing board to the pantry door.
Lighting and ventilation
It is incredibly important to ventilate the room, as if you don't do this, fungus, mold or insects may appear. All these factors will destroy the things stored in the closet: be it clothes or food. The pantry must be ventilated: open the door to it and at the same time open the window so that fresh air from the street gets into the closed storage. In general, you should not make a sealed door in the pantry - let air get in through the cracks. It’s worth making a hood in the wall, even if it’s a small one.
The pantry is a small and dark room, so it is very important to light it well. Ideally, there should be a window there (this way you can ventilate the room and illuminate the room with natural light). As most often happens, there is still no window in this room, so you need to equip the walls and shelves with LED strips. This will help you examine every little detail. LEDs do not generate heat and will not cause a fire; they can burn for hours.
Wall and ceiling lights are also a good option. Especially if the closet is supposed to be a study. If you don’t want to install wiring, then wireless light bulbs will help.
Dressing room with built-in light on the ceiling: lamps or lamps with long wires should not be broadcast into the closet - the room is already small in size
How to make hanging shelves in a pantry with your own hands
Wall shelves always look light and laconic. This option is perfect for lovers of high-tech style and minimalism. The whole secret of such products lies only in installing them on the wall. Read more about how to create this piece of furniture and install it correctly in step-by-step instructions:
The first stage is making the shelves. In this design, they must be wide enough so that the mount is securely adjacent to the product
Plywood must be cut into equal pieces - the dimensions in this case depend entirely on individual preferences.
You should get one long and narrow blank - the front side of the shelf, two wide boards for the base itself, two small side ribs where objects will be located, as well as three bars - they will become jumpers. Important! The side edges of each workpiece are sharpened at 45 degrees for easy assembly of the parallelepiped shelf.
Having provided additional convenience with masking tape, you need to fold the shelf around three bars already attached to the base. In this position, they must be glued and secured with weighty objects until they dry.
The next step is to secure the side panels in place of the shelf ribs.
This can also be done using glue. The blanks are cut from the same plywood with a 45-degree edge.
For aesthetics, treat the joints with wood putty - they should become invisible. Sand the shelf. If desired, you can prime, paint and varnish.
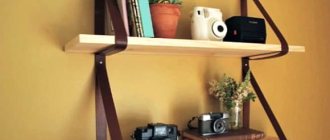
For fastening, you need to take metal bars or profiles. They must go inside the shelf cavity. Weld or fasten the workpieces as shown in the photo. Paint as desired. Place them on the wall.
Place the shelf on the metal fastener.
This design of a wall rack will not take up much space and will be an excellent design solution. Moreover, the load capacity of the structure is several tens of kilograms.
How to choose material and type for shelves
The design and material should be selected depending on the purpose.
Canned food products require massive products that can withstand heavy loads. Fragile products need closed spaces on the upper tiers. Main varieties:
- The classic version of hanging structures is suitable for household chemicals, appliances and other products.
- For heavy objects, you should choose products with additional fasteners, a stand and stiffeners.
- Shelves with natural air ventilation are used for food and outerwear.
- It is recommended to place small and valuable items in a box on a surface with sides and glass.
- The design with a rotating mechanism can be used on racks to make it easier to find the desired item.
Having decided on the type of shelves, you need to select the material. The most common option is wood. The strength of the structure is ensured by species such as spruce, larch, and oak. Chipboard, MDF or plywood are also suitable for manufacturing. This option will be cheaper than natural materials. Environmentally friendly wooden blanks are easy to maintain and install. Old furniture can be disassembled into boards and used to equip a pantry or cellar.
Metal structures are a reliable option, but are prone to metal corrosion and are heavy. For such shelves and racks, additional fastenings must be provided in advance. In rooms with high humidity, it is recommended to cover metal products with a special protective layer. It is not advisable to use solid metal products at home.
Polymer plastic structures are an economical analogue of wooden furniture. Over a long period of use, wood material may lose its original appearance. Drywall products are not reliable, but their use is possible for small structures. There are also shelves made of combined materials. For example, wooden products with iron inserts or stiffeners. To place conservation and heavy objects, it is necessary to choose a material with a thickness of at least 30 mm.
Varieties
The rack is a spacious structure made of different types of wood. It consists of several shelves that are fixed on durable racks. The advantage of making a rack yourself is that you choose the size, color and number of tiers of the future structure. There are several types of racks that are designed to perform their functions. We are talking about stationary, mobile, rotating and hanging racks. Let's consider each of these varieties separately.
Stationary
The structure includes crossbars that serve as supports for the shelves being installed, and racks. To increase the strength of the rack, the structure can be attached to the wall. The number of shelves may vary depending on the taste preferences of the master. Stationary shelving can be open or closed, but the second option is more difficult to manufacture.
Mobile
The design is very similar to the previous version, with the exception of wheels on which the rack can be moved along the floor. The advantages of mobile products include their mobility, so you don’t have to disassemble the structure every time or ask a neighbor for help to rearrange the house. Racks are made with plastic or rubber wheels. The first option is cheaper, but the second is more reliable.
Rotating
A popular type of shelving that is easy to use. Such designs are great for people who need constant access to various items stored on wooden shelves. For example, a rotating rack is suitable for motorists who are working on their vehicle in the garage.
Mounted
Such structures can hardly be called shelving, because the shelves are not attached to the supports below, as is the case with traditional shelving, but to the wall. But still, hanging racks are in great demand. The advantage of such shelves is their convenience, because the rack can be installed almost anywhere where there is extra space. As with other structures, wall-mounted shelving provides for the installation of a different number of shelves.
Original options for shelving structures
Anyone who believes that a rack is a rough frame with shelves is deeply mistaken. Indeed, for the basement and garage you don’t have to imagine too much. Strength, durability and functionality are the main slogans for these premises.
For the home interior, on the contrary, I want to do something special and non-trivial. Therefore, home-made masters spare no time and effort to capture our imagination. A couple of oak boards and a few glass bottles are all that is needed to create an original design.
Photo No. 1 Rack made of bottles and boards
Despite its simplicity, the strength of such a rack is quite high. You can store not only books on it, but also use it to display your wine collection.
Anyone who has dealt with high shelf structures knows that without a good ladder it is impossible to reach their upper tier. Why not use shelves as steps - a resourceful person thought and created such an original system.
Photo No. 2 Rack-ladder
The classic frame shelving rests on the floor, and to install the rope shelving you only need two hooks in the wall. Of course, it won’t be possible to store heavy cans of preserved food on it, but it is perfect for books, photographs and souvenirs.
Photo No. 3 Hanging rope rack
You can make a rack with your own hands so that others will appreciate your creative nature using steel water pipes and fittings. This design looks perfect in an industrial-style interior. In addition, it is quite appropriate in an ordinary apartment.
Pay attention to the original way of mounting the shelves. They are mounted on racks according to the principle of a children's “pyramid”, tier by tier
Photo No. 4 Rack made of water pipes
This rack does not have rear support posts. The high rigidity of a steel pipe reinforced with tees makes it possible to eliminate them. This design can be placed anywhere: in an apartment, on the veranda, in the attic or cellar.
If your house has a staircase leading to the second floor, then the free space under it can be adapted for shelving. It will turn out functional and beautiful, as in photo No. 5.
Photo No. 5 Shelving under the stairs
Having studied the original homemade options, we will consider the sequence of design and assembly of wooden and metal shelving.
What types of metal shelving are there?
Racks are distinguished not only by appearance, but also by size and configuration. Knowing their main types, you can easily choose the desired design that will ideally suit the room you are furnishing.
In addition to functionality, racks are also distinguished by design:
- Stationary metal products are versatile and will not take up much space. Their capacity is much higher than that of shelves or cabinets. Thanks to the design, a wide variety of items can be placed on the shelves;
- Mobile structures can accommodate many documents or books, freezer bags. Such small items will not take up much space on the shelves, so the cabinet is very compact. Most often used in a cold storage warehouse, archive, library or museum.
Archival
Metal shelving works well for archives. You often have to store important documents for long periods of time. The design allows you to organize storage and place not only stacks of papers, but also books and filing cabinets. For greater stability, the cabinet is screwed to the floor with durable metal brackets.
The design of this type of product is characterized by a through structure, which allows access from both sides of the shelves. Manufacturers often make shelves collapsible, which allows you to change the height at the request of the owner.
Office
The presence of shelving in the office allows you to organize the space as efficiently as possible. Often folders, disks, notepads and organizers, product catalogs, small items, boxes of paper or archival documents are laid out on the shelves. For office structures, they are made of lightweight metal with a thin profile. Analogs are often made from chipboard or plastic.
Exhibition
Designs of this kind are created for exhibitions and showcases. They are used not only in trade, but also at various forums, fairs, and also in museums. The main purpose of such a cabinet is reliability and stability. The shelves are positioned so that the product on display is as attractive as possible to viewers.
Warehouse
Shelving for a base or warehouse pantry is needed to store a variety of items. These are not only different materials of manufacture, but also the size and weight of the product. Warehouse products are made of metal, and the frame is often additionally reinforced to accommodate heavy loads.
Sometimes cargo structures can support up to 30 tons in each section. The profile used is steel, thick, made of metal. If the height of the product is more than 4 meters, it needs to be fastened to the wall with several brackets.
Household
Shelving is used in apartments, they are part of the decor and can be used for domestic purposes. Often such designs are made to order. The color scheme, material and shape are chosen by the owner in accordance with the design of the room. Metal in the house is not inferior to wood and is clearly better than plastic.
Stylish designs can fit into almost any decor. The rack consists of racks and shelves on them; the height can be changed with dividers, configured with additional containers, shelves or drawers.
Installing shelves in a pantry
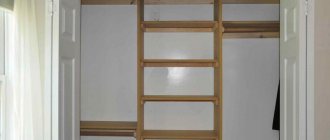
Wooden shelves for a pantry can be made with your own hands in 2 ways:
- without installing vertical posts;
- on a frame made of timber or metal.
For the safety of home owners, it is better to secure the racks firmly to the wall. But sometimes the frame version is made mobile and free-standing.
To make a frameless structure, you only need boards or sheet materials of the required length and width. Corners, brackets or short pieces of bars are used as supports. The length of each segment should be slightly less than the depth of the shelf. Frameless structures are most often assembled when the room is small and the size of future shelving will not exceed 1.5 m.
Construction begins with marking the walls: the height of the lowest tier above the floor is determined, 2 marks are placed on the wall, and then the operation is repeated on the opposite side of the room. Before installing supports under the shelves, it is advisable to check the horizontality of the resulting surface using a building level standing on a board, the edges of which are aligned with the marks on the opposite walls. Having leveled the first shelf, mark the places for drilling holes for dowels.
Hammer the dowel capsule into the drilled holes. Make through passages for self-tapping screws in the bars and secure the supports to the wall. To mark the next tiers, use the installed bars as a zero mark. Fasten the bars at each level in the same way: using self-tapping screws and dowels.
When the supports are installed, cut the boards or plywood into pieces of the required length and sand the cuts. The shelves can lie freely on supports, but for greater strength, it is better to fix the horizontal parts with self-tapping screws to the bars. If brackets are used instead of corners, they must be installed on a long wall inside a niche. The pantry shelves will rest on the parts of the support protruding in front of the wall.
Frame rack
The frame supports can be fixed to the walls or screwed to the ceiling and floor. In this case, the part farthest from the facade is checked with a plumb line for verticality, and fixed on the side wall right in the corner of the pantry. For the front supports, set the desired depth of the shelf along the side wall, place marks and align the verticals and the offset of the front part of the tier. The stand is attached to the side wall with dowels. For horizontal supports, you can install only side elements, as in the frameless version. For heavy loads, it is rational to place 2 long supports between the sidewalls.
To create a mobile structure, use a light metal corrugated pipe or a 5x5 cm block:
- Cut out 2 pairs of posts at a randomly selected height. Their number may be greater if the rack is longer than 2 m. Additional racks are placed every 1-1.5 m.
- Connect the verticals in pairs. The horizontal parts will serve as support for the shelves, so the distance between them is regulated by the needs of the owner. The result of the work is 2 or several staircase-like structures.
- Cut 4-6 longitudinal connecting elements. They will help to combine all the frame posts into a stable structure. They need to be fastened on the inside of the paired vertical “ladders”, under the jumpers between the posts. These parts are placed at the bottom, top and middle of the frame. After this, the structure can be moved.
- The frame installed in the desired position should be equipped with horizontal shelf parts. To ensure the neatness of the product, choose wood at the junction of the shelf and the racks. The finished floors are placed on the frame supports. If necessary, you can fix them along the contour with self-tapping screws.
It is advisable to paint the finished product to protect it from rotting and corrosion.