Shelves for flowers: species diversity
A plan for the arrangement of plants in the room will help you decide what shapes and proportions to make a flower stand.
Basically, in order to save space, they try to raise them on the walls or use hanging shelves for flowers, but this is not always possible. There are plants so large that they can be placed exclusively on the floor.
This allows products to be classified as:
- wall;
- floor;
- hanging.
Further, the designs may vary in shape. They can be done:
- straight;
- curly;
- corner;
- multi-level.
- Shelves for flowers and their capacity will be divided into subtypes.
- Single, double and multi-seat models are conventionally distinguished here.
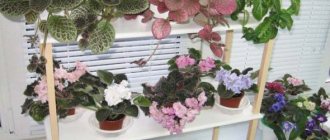
The first ones are good for wall mounting. Liana-like plants and small bushy, densely flowering greens look great on them.
- Plants with identical conditions, most often of the tree family, are placed on double shelves
- Multi-seat models are universal. You can see such shelves for flowers on the wall, on the window, on the floor. It is advisable not to place overly heavy pots on wall-mounted models. They may not withstand the load and fall out with a piece of the wall. But the one made with your own hands for flowers is initially designed to carry serious weight.
So if you build a greenhouse with large plants, then only on it.
Any of the designs considered can be assembled in a corner format. In this way, space will be saved and design talent will be demonstrated.
Fans of climbing plants may like the photo ideas for hanging shelves for flowers with ceiling mounts.
The classification is clear. What are flower stands made of? They can be assembled from any materials of sufficient strength. There is glass, plastic, and plywood. But still, for many, wood remains the priority of choice. Let's look at the most interesting solutions.
Flower stand design
One of the good things about DIY coasters is that you can come up with your own design for the structure you choose. They can be the most unusual: in the form of circles, ovals, honeycombs, in the form of ladders, stairs, ribbons and so on.
You can always be inspired by the options presented on the Internet. However, before you start with the first option you like, you need to understand whether it will be practical to use in your apartment?
The following nuances will help you understand this issue:
- How many pots do you plan to place;
- What type of plant do you want to put in;
- Interior type;
- Your own wishes.
The stands are:
- Single;
- Double;
- Multi-seat;
- Single-tier;
- Multi-tiered and so on.
Single stands, as the name suggests, can only hold one flower pot. They are good for decorative deciduous plants with climbing stems. They can be either wall-mounted or floor-mounted.
Wall mounted flower shelf made of plywood
It’s probably impossible to find a simpler and cheaper material for making wall structures. It is easy to cut out shapes from plywood, and of any size. And you don’t need any special skills to work with it.
So where do you start creating a flower shelf with your own hands?
Are you thinking about tool preparation? Not at all.
The creative process will begin with the creation of a sketch. And here, on paper, you can pour out all your fantasies. Then there will be plenty to choose from. You can pore over the design of a future masterpiece for a long time, carefully working out all the details, but when you get carried away by aesthetics, it is important not to forget about the main purpose of the product. Wall shelves for flowers must be durable and withstand the expected load.
The next step will be to create a design drawing, indicating the dimensions and type of fasteners. We will transfer it to a plywood sheet.
It is most convenient to cut out the workpiece with an electric jigsaw. The cut lines of the finished canvas are cleaned. This can be done carefully with sandpaper. We treat the plywood with a protective impregnation to increase its moisture resistance and leave it to dry.
The finishing touch to working on a wall shelf for flowers will be to open it with varnish. If desired, the product can be decorated. How?
- Cover with beautiful self-adhesive film.
- Paint with paints.
- Decorate with rhinestones, beads, buttons, shells, etc.
- In general, show creative thought.
They try to fix the structure to the wall using metal corners and brackets.
The window shelf for flowers will be assembled using the same principle. It is fixed on the slopes of the window opening. Cascades of such small products look interesting.
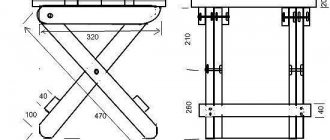
From thick plywood it will be quite possible to assemble a stand for tall plants in large pots standing on the floor. But when working with your own hands on a floor shelf for flowers, you will need to think not about fasteners, but about the legs.
Ordinary pieces of timber, sawn into neat cubes, are suitable for their role.
For such a stand, stability will be very important, so it is better not to experiment and leave the structure with all 4 legs, although their number may vary depending on the shape of the structure. For example, a round, large-diameter shelf can have 8 of them, and the legs are unusually cut - in the shape of hockey pucks.
Metal flower stands
Forged floor flower stands can be made only if the person knows forging techniques. In any case, you can order the production of an original product from a craftsman, according to a sketch created by yourself and control the quality of the created design and its design.
DIY plastic shelf for flowers on the windowsill
It sounds like a pun, but a shelf for flowers on the windowsill is made from... a window sill. It can be found in finished form in hardware stores or purchased from plastic window manufacturers. In addition to the plastic sheet, you will need:
- nickel-plated pipes;
- flanges;
- brackets;
- work tool.
- The window sill is cut to length into three pieces of identical size.
- Next, three holes are made in each blank into which the rack pipes will be inserted.
- They are placed according to the following pattern: 2 holes at the edges of the back line and 1 in the middle of the front line. The result should be a support triangle.
- The next step in making your own flower shelf is to cut the pipes.
- The three parts are given the same length. We assemble the structure and fix the elements with flanges and screws. For greater reliability, the two rear pipes are attached to the wall with brackets.
Plastic shelf options are very practical. They are not difficult to care for, plus they are not afraid of water, which is very important in the case of flowers.
Kinds
Since not everyone can or wants to place flowers on the windowsill, there is a need to select the optimal place for them. At the moment, there is a fairly wide variety of stands that can fit in any room.
Among the most popular options:
- wooden;
- metal;
- combined;
- floor;
- wall-mounted
For indoor plants, any of the above options may be suitable, both in terms of material of manufacture and location. You can make wooden coasters yourself, since only a specialist or a person with experience in such a matter can work with metal.
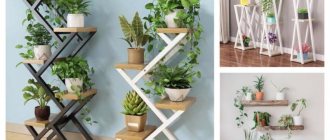
A DIY wooden flower stand can have a different appearance, which depends on the number of plants that will be placed on it.
If there are a lot of pots, then a multi-level design would be the best option. For one or two flowerpots, you should choose something elegant and stylish to decorate the room.
Independent construction of a product may include the use of a wide variety of materials:
- pieces of plastic;
- twine;
- wire of different thicknesses and colors;
- vine;
- threads
The stand does not have to be simple; it can be stylishly decorated and complemented with mosaics, decoupage or painted.
Before you start making the product, you should consider the option of the stand, its height, dimensions, sketch out drawings and decide on the final option. In the process of work, certain ideas for decorating an object usually emerge, but sometimes a ready-made form suggests the desired option, so there is no need to rush with it.
If a floor design has been chosen, then it is worth choosing the most suitable option. It could be:
- ladder;
- multi-level shelves;
- apartment flower bed;
- high stand;
- low stand.
The floor version is also called jardiniere. It is often used as a decorative element. It is not difficult to make such a design, you just need to choose a material that is convenient for the work.
Usually this is chipboard, wood or plastic, from which the stand itself and the base are made, connecting to each other. The stand can have any height, the main thing is that the entire structure is stable, for which the base must be at least 20 cm in diameter.
When creating a jardiniere, it is necessary to provide grooves, thanks to which all the parts will be connected, and to use specialized glue for reliable fixation.
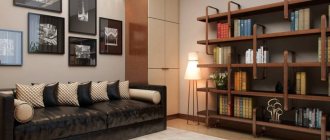
Wall stands are usually created in the form of one or more shelves that connect to each other. This option is used in cases where there is no space on the windowsill or floor for additional objects. Most often, wall shelves are made of metal or wood. The most beautiful techniques are forging and figured wood cutting. If we talk about more affordable options, then these include connecting one shelf with sides or several shelves with membranes that will strengthen the structure.
You can also come up with a variety of stands for the window that will make the room more comfortable and beautiful, and also make it possible to place many more flowers in it. When thinking through the design, it is important to provide several important details:
- free access of light to the room;
- ease of use of the window sill;
- comfortable watering and care of flowers;
- the opportunity to admire the vegetation from anywhere in the room.
Wood, plastic and metal are most often used for window sills. The most beautiful stands are made of metal, with the help of which amazing things are forged.
Wooden and plastic products are less attractive, but more practical, because with their help you can make a small but high stand that will accommodate from 4 to 8 pots. The most popular option is to combine round wooden stands and a metal stand, which ensures the strength of the structure and its neat appearance.
The choice of option depends on the size of the room, the number of colors and the desires of the owner. You can make any stand with your own hands, the main thing is to understand the principles of its manufacture, select the right materials and make a suitable drawing.
When choosing a product for a room, you should also focus on the general style of the room, so that the new object complements it and does not stand out from the already finished concept.
Glass shelves
Working with glass is a rather complex process that requires some skills. If you do not have them, then it is advisable to contact special workshops.
Remember that the work requires glass with good thickness. It shouldn't break if something goes wrong.
To work you will need:
- glass cutting tool;
- hacksaw;
- large glass that is divided into 6 parts;
- 8 iron corners;
- 2 wooden planks.
Progress:
- Cut the large glass into 6 small pieces.
- In the slats we cut a groove 0.5 deep from the width of the future rack.
- We place the boards on the corners, which are attached to the wall from the bottom and top.
- We insert the ready-made rack into the grooves.
Buy or make it yourself?
Perhaps every housewife asked herself this question. Today, a huge assortment of all kinds of decorative forms, stands, holders and supports is available. The only problem is that truly beautiful accessories are not cheap and not everyone can afford them. And what is affordable is not always pleasing to the eye.
Another advantage of “hand made” products is that they can be made to the desired size. If there is a small corner between the sofa and the armchair left for a flower stand, or a fragment of the wall near the closet is ideal for a shelf, then by carefully measuring the space, you can create a neat and very practical interior detail.
Moreover, today you can purchase various accessories, decorative elements and fasteners, so that the item is beautiful and as functional as possible.
Corner shelves for flowers
To create a corner shelf, you can use all the materials listed here. For small products there will be enough leftover materials.
The technology for creating corner shelves with your own hands is very simple.
- A surface of the required size is cut from a sheet of chipboard. A galvanized pipe is threaded into the prepared holes and the entire invention is connected to each other with flanges. Using brackets it is fixed to the selected surface.
- The next stage is treatment with varnish or paint.
- To create a green corner, an interesting solution would be a kind of corner shelving. As they grow, the shelves become smaller, representing a pyramid. On this design you can arrange flowers of different sizes using climbing plants on the sides.
Drawer coasters
An original and conceptual floor wooden flower stand will be made from small boxes. This is an excellent solution for placement on an open terrace or in an apartment decorated in a loft style, rustic style or classic Provence style.
The boxes can be installed in a checkerboard pattern, creating a visible structure, or they can be formed into a pyramid or other geometric figure. For the Provence style, the wood is bleached or coated with white paint; for a loft, it is left in its original form; for classics, it can be artificially aged.
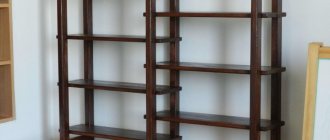
Wooden flower shelves
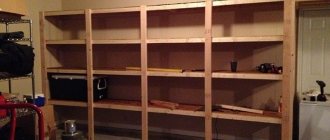
Wood is one of the most reliable materials used in construction.
Properly assembled and secured wooden racks or shelves can accommodate any number of plants, regardless of size. When choosing wooden wall shelves, you can limit yourself to the simplest option. To do this, take a beam of the required length, coat it with varnish or paint and attach it to the wall using metal corners.
If you replace the fastenings with leather straps, you get a creative design approach that brings individuality.
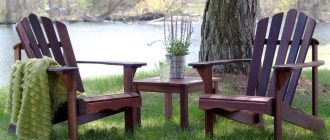
- Wooden floor racks are made for plants in large flowerpots. They can withstand a lot of weight, allowing you to combine different types of colors.
- A corner shelf can be easily assembled from scraps, even if they are of unequal length. Flowering bushes diversify the boring life of corners with their bright colors.
- For those who like unusual options, we offer wooden shelves that combine several different materials.
- The method of assembling wooden shelves or racks is the same as in the version with plywood.
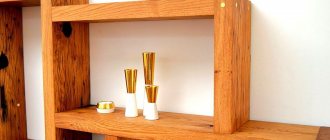
Wall flower shelf made of wood and metal
When combining materials for flower shelves, we recommend choosing a combination of metal and wood. A welded metal frame with wooden flooring is used for wall-mounted shelves and fits very harmoniously into a modern interior.
For manufacturing, you will need a drawing with measurements, several rods that will later create the base of the shelf, and a wooden board for the partition.
After welding the main part, it must be treated with an anti-corrosion solution and painted in the chosen color. Next, the prepared wooden plank is installed, the finished product is attached to the wall using self-tapping screws.
Considering this combination of materials in floor options for flower racks, the main work is carried out according to the same plan. Preference is given to options with several tiers, and lovers of sophistication will appreciate forged flower stands.
Shelves for flowers from furniture panels and bars
Scraps of glued furniture panels can be found in furniture workshops and bought for pennies. After all, shelves require very small pieces that are difficult to find other uses for.
But you can also buy a sheet of the appropriate size.
This material is practically no different in appearance and characteristics from solid wood, it is just as easy to process and also requires a protective finish to increase resistance to moisture. The proximity to which is inevitable when placing living plants on shelves.
Step 1. Decide on the number and shape of the shelves, draw their outlines with a pencil on the furniture panel.
Step 2. From the wrong side we cover the outline with adhesive tape or adhesive tape to prevent chips from breaking off during cutting.
Step 3. Cut out the parts with a jigsaw.
Step 4. We secure the workpieces on the table with clamps and process their edges with a milling machine, rounding them or giving them a shaped shape.
Step 5. Remove all irregularities and minor defects by sanding. To avoid abrasive scratches on the surface, sanding should be done along the grain of the wood fibers.
Step 6. We also process the bars for the legs with a milling cutter, rounding the corners, and grind them until a smooth surface is obtained without scoring or burrs. If there is a desire and opportunity, they can be given a curly shape. If not, normal processing is sufficient.
Also, instead of bars, you can use ready-made balusters for stairs and railings.
Step 7. Turn the bottom shelf over, evenly space the legs on it and trace each one at the base with a pencil. Then in the center of the drawn square we drill a hole with a thin drill so that we can see where to screw in the self-tapping screw from the front side.
Step 8. Coat the ends of the legs with glue, set them in place according to the marks and fasten them with self-tapping screws using a screwdriver or screwdriver.
Step 9. Decide on the position and height of the second shelf. It moves relative to the bottom to the side, so you will need two legs of different lengths: one to the floor and the second to the plane of the bottom shelf. We calculate these dimensions, saw off the bars of the required length and fasten them according to the already known pattern.
Step 10. We attach the third tier, one of the legs of which rests on the bottom shelf, and the other on the second.
Step 11. We cover the finished structure with paint or varnish or impregnate it with a protective impregnation in two or three layers.
Wall shelf
A small hanging shelf can be made from any sheet material or wide board. Let's consider manufacturing from laminated chipboard, as the most difficult material to process.
The structure will consist of the following parts:
- a base that will be adjacent to the wall;
- the actual shelves, the number of which can be any;
- supports for shelves in the form of right triangles with a straight or figured hypotenuse.
First, as with any other model, a product diagram is drawn up to determine the dimensions and amount of material.
- Then all the elements are cut out from the laminated chipboard using a jigsaw. Markings are made on the base for attaching shelves and supports to it. Holes for self-tapping screws are drilled along the marking lines. The parts are first glued to the base with universal glue, and then screwed into the ends on the back side of the base.
- After the glue has set, the ends of the chipboard and the joints are puttied with wood putty. This is an excellent alternative to edges that are difficult to apply to curved cuts, especially if they are not made very carefully. All unevenness can be easily eliminated with putty.
- When the putty has dried, all surfaces are sanded with fine sandpaper or sanding mesh and painted in the chosen color.
This is how, without much effort and professional skills in making furniture, you can literally make a useful and beautiful thing for your home in just a few hours. Having made it exactly what is needed in terms of functionality and decorative design.
Floor shelf with drawers
Such models are quite rare, but they look amazing. The step-by-step manufacturing instructions are almost the same as in the previous case, with the exception of some nuances:
- the area of storage space for pots can be variable;
- it is not necessary to adhere to a specific structure: they can “look” in different directions;
- Such shelves will be supported on a vertical base made of wood or metal;
- they can be attached to it using bolts, as in the general case;
- The most difficult thing will be to make the boxes, but it is quite possible: just prepare rectangular or square elements, and then knock them together, giving the shape of a cube/parallelepiped (depending on the desired shape of the finished structures);
- Of course, it will be necessary to provide legs or wheels; as already noted, it is best to purchase them ready-made.
The procedure is similar , only instead of holes for the rope, recesses are made for installing legs if the shelf is classic, and a special base if it is “standing”.
Which material is better to choose
There are several types of raw materials for constructing shelves:
- metal;
- plastic;
- tree;
- glass;
- combined material.
Metal structures are very durable and can withstand a lot of weight. This configuration looks expensive and solid. But it requires special care and special treatment, otherwise corrosion may occur and the flower shelves will deteriorate.
It is almost impossible to build a plastic cabinet yourself.
It can be ordered in stores or online. They are unpretentious and very easy to use. Sections can be chosen in any shade. Since plastic is very flexible, crafts made from it can have different shapes and sizes. They are easy to wash and move as they are lightweight.
Wooden crafts are very popular. But the furniture is not convenient to use. When watering plants, water often gets on the surface of the stand or board, which can rot and swell.
If you decide to build a shelf out of wood, it must be carefully processed and the surface well coated with a special varnish.
Glass structures have a simple, elegant appearance, but to build it you need to have experience working with glass. They need special care. And you can’t put a lot of weight on such stands. They are good if you need to place one or two pots.
Combination sections include several components. Usually it is wood with metal or glass with metal. The crafts have an unusual appearance. They can withstand a lot of weight due to the combination of materials, and are not very fussy about cleaning.
Peculiarities
The use of green spaces in residential premises has its roots in ancient times. As soon as a person realized the need to build a place in which he could live for a long time, the path of evolution of the interior within this space began. In addition to the appearance of furniture and necessary household items, flowers and useful plants began to appear in the house.
Since there was no medicine as such in ancient times, people were well versed in the healing properties of herbs and flowers and tried to keep them to themselves.
There are a number of beneficial properties that a person receives if they have green plants in their room:
- normalization of a person’s psychological state;
- indoor air purification;
- protecting your home from unknown forces.
In addition to the undeniable benefits, having flowers in a variety of colors at home decorates the room, making it brighter, pleasant and cozy. There are no clear limits on how many flowers there can be in a room, but if you want to have them in sufficient quantities, you should take care of the place where they will be located.
Since plants have certain needs, it is important to provide them with the necessary amount of light and moisture, otherwise they will not live long.
The most common place where pots are usually displayed is the windowsill, but this is not always convenient, so having specialized stands at home can significantly improve the situation.
Such products can be found in the store or you can make them yourself if you try a little.
The benefits of creating a masterpiece yourself
The main advantage is that such work costs significantly less than buying a flower rack in a store.
To make furniture you will need a little patience, raw materials from which the craft will be made and tools.
The range of store stands is very small. Not all purchased ones are of good quality. Most often, in stores and on the Internet, there are the same type of cabinets that are found in every home. Some sections will not fit your interior or room dimensions.
When making a craft with your own hands, you have the opportunity to independently choose the size, shade, design and location of the structure. New universal furniture will only be in your home.
When creating outdoor furniture for plants, it is possible to take into account the nuances of its placement.
Build it so that the flower rack is out of the way and does not have to be walked around. You can create a sliding or moving structure that can be moved to the desired location at any time.
To make a stand, you don't have to buy something from the store. You can build a stand from an old garage cabinet or an unnecessary ladder.
Advantages of a homemade stand
You can make a whole list of factors that testify in favor of hand-made coasters:
- Price. Of course, you will only pay for materials and, possibly, the necessary tools, when the cost of store goods includes a much wider range of services.
- Choice of material. Here you are free to choose the color, shade and texture that you like, and not based on the assortment already offered by the store.
- Variety of shapes. No one limits you in creating your own unique stand. Moreover, you always know how and what it is made of. In addition, you always know what design you need for a particular room.
Necessary materials
To make a classic shelf you will need:
- board made of wood, chipboard, MDF, plastic or metal;
- plywood;
- screws;
- plugs;
- additional tools;
- paint for decoration;
- varnish (when working with boards).
Additional tools can also be used to decorate the structure. If the furniture is floor-standing, you may need legs or wheels to secure the cabinet to the floor.
Required Tools
To assemble the configuration you will need the following tools:
- screwdriver;
- building level;
- electric drill;
- saw;
- pencil for marking;
- hammer;
- screwdriver;
- roulette;
- ruler.
The choice of fasteners will depend on the raw materials of the future configuration. The heavier the raw material, the more powerful the fastening is needed. If you plan to install a wall-mounted flower rack made of metal, then you must use a welding machine for fastening.
Otherwise, there is a chance that the stand will fall soon.
The final stage is decoration
When creating a rack, you can come up with your own product design. By choosing the right materials and spending a little time, you will get a unique masterpiece!
- For example, a plastic product comes in different palettes. To make the design original, you can attach decorative handrails to it.
- The wooden shelf is coated with glitter varnish. This gives shine and shine to the product.
- Glass shelves are often decorated with patterned metal elements.
In addition, for a craft to become beautiful, it is not necessary to paint it or attach anything to it. It’s enough just to place pots and beautiful pebbles, toys, and shells on it. Furniture can also be decorated with various fakes and toys.
Don't be afraid to experiment! Create new masterpieces and improve your skills! A rack for indoor flowers is just the beginning. Nothing decorates your home like handmade items.