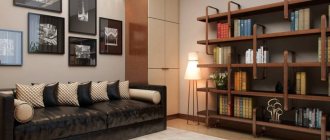
Complete harmony of the interior of the room is achieved with the help of indoor flowers. Green plants fill the room with oxygen and decorate the house every day. Flowers of extraordinary beauty saturate the lives of household members with comfort, peace, balance, and joy. Admiring the flowers, apartment residents forget about hardships and sorrows.
Fresh flowers always create a special atmosphere in the house
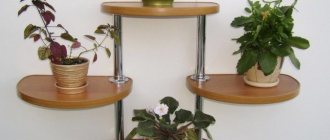
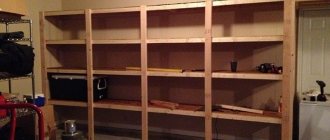
From time to time, housewives plant and add purchased plants, replenishing the large flower collection with exotic specimens. It is quite difficult to place an increased number of plants in a small place. Professional flower growers recommend using shelves for flowers on the windowsill, which significantly save effective space and allow you to increase the size of the green corner.
A simple shelving allows you to place plants so that they do not interfere with each other
What types of shelves are there?
A shelf is a type of furniture that does not have a front wall; its main function is to place various objects.
There is a huge range of shelves, so choosing the right option for any interior is not difficult.
- A wall shelf is the most popular type of shelf.
- Hanging shelf - designed for light decorative elements.
- The floor shelf is the most stable and strong of all possible.
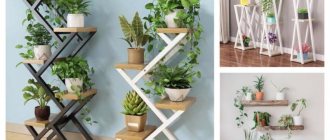
In addition to these features, the shelf can be angular, straight, curly and have several levels. Corner shelves fit perfectly into small rooms and help save space, and multi-level and group designs are suitable for creating an entire composition on the wall.
The benefits of creating a masterpiece yourself
The main advantage is that such work costs significantly less than buying a flower rack in a store.
To make furniture you will need a little patience, raw materials from which the craft will be made and tools.
The range of store stands is very small. Not all purchased ones are of good quality. Most often, in stores and on the Internet, there are the same type of cabinets that are found in every home. Some sections will not fit your interior or room dimensions.
When making a craft with your own hands, you have the opportunity to independently choose the size, shade, design and location of the structure. New universal furniture will only be in your home.
When creating outdoor furniture for plants, it is possible to take into account the nuances of its placement.
Build it so that the flower rack is out of the way and does not have to be walked around. You can create a sliding or moving structure that can be moved to the desired location at any time.
To make a stand, you don't have to buy something from the store. You can build a stand from an old garage cabinet or an unnecessary ladder.
Shelf materials
This furniture product can be made from a variety of materials. In the photo of a homemade flower shelf you can see what shelves are most often made from.
- Wooden shelf - absolutely any type of wood can be used.
- Plywood is not the most durable material, but it is light and easy to process.
- Metal rods - you can use them to make a beautiful stylish shelf.
- Sheet metal.
- Plastic is durable and easy to use.
Illumination for violets, what to use
There are many different lighting options for indoor plants. The most suitable lamps for violets are fluorescent.
It is most practical to choose such lamps of standard sizes: 26 mm in diameter and 59 cm in length. The average power is suitable - 30 W. Although for young plants you can use 18 W.
The radiation of one standard fluorescent lamp is enough for an area of approximately 1 m². Hang the lamp at a height of 20-25 cm from the violet bushes. It is advisable that the lamp shines from above, and not from the side.
You need to turn on the artificial light source for violets for 12 hours. Some people use special switches with a timer, when the lamp goes out and comes on at the same time automatically, which is very convenient.
LED strips are also effective. They are convenient to attach to any surface in any position. In addition, they are very energy efficient. The only negative is their cost, which is quite high.
If you are seriously passionate about growing Saintpaulias and grow them not only for yourself, but also for sale, then backlit racks for violets would be an excellent solution. The lamps are immediately mounted on the shelves on which the pots are placed.
If you know little about electricity and carpentry, it is better to order such a rack from professionals. Design, size, number of shelves - all this is done at your discretion
When assembling such a structure, it is important to take into account electrical insulation, because the plant will be regularly watered
Tips for placing violets on racks with lamps
- The optimal height between shelves is 45 cm.
- For varieties of violets that bloom with red flowers, there are special phytolamps that have a specific emission spectrum that allows you to obtain many shades of red. Such lamps are installed as additional ones.
- You need to gradually transfer violets to artificial light: first turn on the lamps for an hour, then increase this time by 15-20 minutes day after day.
- Types of violets whose leaves are dark and denser are best placed in the center of the shelf; they need a little more light.
- The temperature on the upper shelves is always slightly higher than on the lower ones. Place young bushes on top, they will be more comfortable in the warmth.
Do not forget that lighting for violets is the most important condition for their existence. Without light, many processes in the plant will go out, it will not bloom and may soon die. If you have a fairly free meta on the window sills, then try to place Saintpaulia on the server or eastern side.
A rack for violets with lighting is the best solution for all lovers of these wonderful flowers. After all, indoor violets, no less than other plants, need good lighting, but cannot tolerate direct sunlight, so natural window lighting is extremely rarely suitable for them. More or less, a northern, northwestern or northeastern window sill, which is illuminated mainly by diffused sunlight, may be suitable for them. Of course, there are some tricks for placing plants on south-facing window sills. For example, curtaining it to the middle with a cloth is not scary if the rays of the setting sun fall on the flowers, but it is best to protect the fragile leaves and flowers of Saintpaulia from the burning rays of the day, which means you will have to block the access of sunlight to the room. Which is not very comfortable.
Daylight hours for a homemade violet should last 13-14 hours, and if you manage to organize additional lighting for it in winter, it will bloom tirelessly even in the February cold. This is why you should buy a shelving unit with lighting. Even distribution of light will make the plant more neat, symmetrical and attractive. It will also significantly increase the number of flowers and the duration of flowering of the plant.
We have prepared racks with automatic lighting for you. In the light of which your violets will feel great! With lighting power: 300 W per 1 m2.
In our online store you can choose a rack for violets.
Master class: plywood shelf
Making a shelf from plywood is not difficult; at the very beginning you need to prepare a suitable sketch.
- Plywood is easy to process; many interesting shapes can be cut out of it, so the shelf will turn out to be unique and original.
- The sketch must be transferred to a sheet of plywood. You need to remember that such a shelf will not withstand heavy loads, so you should not fill it with flowers and load it too much.
- To cut out figures, it is best to take a regular or electric jigsaw, after which you need to sand the edges of the cut with sandpaper and apply a special impregnation.
- The last step is to apply varnish, which will allow the plywood shelf to become more resistant to damage and moisture.
You can decorate the finished shelf in any way you like, just use your imagination and prepare the necessary decor.
Mobility
There are stationary and mobile types. The first option means that you will not move the shelf from one place to another.
In the second case, the design has several wheels that allow the rack to change its location. The movable structure with wheels requires special care.
It is necessary to lubricate the fasteners every few months so that they do not lose their functionality.
Mobile structures allow you to change the location of the rack
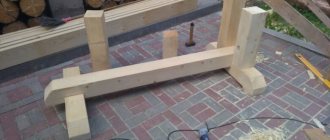
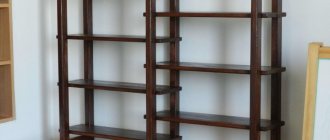
Master class: wooden shelf
You can try to make shelves for flowers from wood; in this case, a very interesting option is offered. The shelf will be in the form of a ladder; it will become a real decoration of the home.
It is necessary to prepare the following materials:
- Wooden boards and beams;
- Screwdriver and screws;
- Impregnation and varnish;
- Plane;
The base for the stairs should be A-shaped. There will be shelves between the legs; niches in the beams should already be prepared for them. For greater strength, the shelves need to be fastened with screws.
The height between the shelves should be such as to freely accommodate flower pots. A plane is needed to ensure that there are no uneven spots on the shelf; sandpaper can be used instead.
The wood is impregnated with a special impregnation and varnished on top. After the varnish has dried, you can use the shelf for its intended purpose.
Classic stand
It is not at all difficult to make, but requires patience and effort.
To create it you will need:
- Wooden plank;
- Decorative element for connection;
- Drill;
- Dye;
- Varnish;
- Saw;
- Marker or pencil;
- Brush;
- Roulette.
When choosing a material, you need to proceed from the weight that will be on the stand. Of course, if the dimensions of the product are large, then reliable fasteners will be required.
Master class: plastic shelf
Answering the question of how to make flower shelves with your own hands, you can try to make a plastic shelf, which is very convenient to use. The material used is a plastic window sill, which can be ordered separately.
Before this, you need to decide what size the shelf will be.
- You need to drill holes in the window sill for the legs, two on the sides and one in the center.
- A shelf is placed on the legs and all additional elements are attached.
- The most ideal place for such a shelf is a window, where it will look most appropriate.
- If desired, you can use any plastic; you can even take an old plastic basin and cut a shelf out of it.
It can be wall-mounted or hanging; plastic shelves can be freely installed outdoors; they are not afraid of temperature changes and precipitation.
Hanging plant stand
This design will look quite unusual and beautiful, where pots with hanging plants will stand. This practical decorative item is quite easy to make.
To do this you will need:
- Shelves;
- Durable rope;
- Drill.
Master class on creating a pendant:
- Drill 2 holes in the shelves on all sides. The diameter of the hole should be the same as the diameter of the rope.
- The rope should be passed through these holes and secured at the required level using knots.
- Secure the structure with rope.
This option is perfect for a window sill. The whole structure is not very large, so it can successfully decorate the room.
Also, wood material can be used to create shelving. This design can be absolutely anything, so again, don’t be afraid to experiment.
Master class: metal shelf
To make the shelf as strong as possible and withstand a lot of weight, you can try to make floor flower shelves from metal. But to work with metal you need to have a little experience, since this material is not as easy to process as plywood or plastic.
The materials used are:
- Metal sheets
- Dye
- Fastening elements
If you know how to forge, then order a metal vine in advance. It will serve as a decoration for the shelf and make it incredibly stylish. All that remains is to attach the shelf stand, this must be done using a welding machine.
All fasteners are added, the shelf can be painted black or bronze, and the top can be additionally coated with clear varnish. It is best to cover the legs of the shelf with felt so that it does not scratch the floor.
Such a metal shelf will serve for many years and will not be afraid of heavy large pots with large plants.
Design Features
A huge variety of shelves, stands and racks sold pre-assembled can be excellent ideas for interior design. The main design can be supplemented with original design elements or decorations, which will help create a unique and stylish design solution:
- floor and portable structures
- hanging shelves and flower stands
- wall-mounted, in the form of shelves with a base;
- corner, saving maximum space.
Any model from the existing variety will be a worthy interior decoration and is not difficult to make with your own hands. This will require choosing a sketch and an idea that can be easily implemented with minimal time and money, using available materials and home tools.
Unusual shelves
Any flower shelves, floor-mounted, hanging or wall-mounted, can be made from the simplest materials. As a result, you will get very unusual options that will please the eye and serve excellently for their intended purpose.
- Plastic PVC pipes.
- Metal water pipes.
- Cable channels.
- Old waste paper.
- Leather belts.
- Pallets.
To make a shelf, you can use a lot of different materials, including improvised materials. Some of them are easier to process, and some require special experience.
A shelf for flower pots that you make yourself can be a pleasant experience in this type of craftsmanship and inspire new creations.
There are an incredible number of ideas for creativity, and the process of work itself will bring great pleasure to every master.
Plastic stands
Leftover laminate or plastic panels can be given a second life by making coasters out of them.
This material is good because it is not afraid of moisture, and you can give the product any color using acrylic paints.
Often, decorative elements are simply added to finished plastic products. Think about how the product will look best and create it!
Photo of homemade shelves for flowers
Choosing a phytolamp
Rack for seedlings: why you need it and how to make it yourself
Please note that different varieties of Saintpaulia require different phytolamps, since the perception of flower shades is influenced by the spectrum of LEDs. Popular lamp models include the following:
- AquaGLO emits light predominantly in the red and blue spectrum - this combination produces pink light;
- models FloraGLO, Tropic Su, Plant have soft warm light;
- the spectrum of the LifeGLO phytolamp corresponds to natural sunlight; it seems very bright to people, since, in addition to red, it emits a lot of yellow and green rays, to which we are susceptible, and the blue spectrum is less represented;
- PowerGLO: blue, green, yellow rays predominate; significantly less red spectrum radiation;
- Life-, Sun- and PowerGLO give a yellowish light, they can be combined with phytolamps with pink light to neutralize the obsessive purple tint;
- Blue Sky and Daylight Brilliant models emit light in a similar spectrum;
- Fluora gives a pink light, enhances the brightness of Saintpaulia with red flowers;
- Aquarelle: blue rays predominate in the spectrum, produces lilac light; it is suitable for violets with blue colors, as well as pale pink and white varieties; It is recommended to complement this phytolamp with models with a predominant red spectrum.
If everything is done correctly, you can become the happy owner of a “smart” home flower garden, which, thanks to wick irrigation technology and lamp timers, irrigates itself and regulates the lighting mode. All that remains is to choose a shelving design that is pleasing to the eye and enjoy the flowering of Saintpaulias, which have been glorifying the name of their discoverer, Baron Walter von Saint-Paul, for more than 100 years.
In the video below you can clearly see what a rack for indoor violets looks like and how to correctly arrange the flowers on it.
Window sill rack
This type of rack allows you to install boxes with seedlings next to the window. This certainly plays a positive role, especially in terms of lighting. This design does not require the installation of lamps. However, this scheme also has its disadvantages. For example, the size of such a rack is limited by the width of the window sill and window. Therefore, some types of plants may not fit here.
Window sill shelving diagram.
| Side racks | Metal profile, pipe, an option with timber is possible. |
| Fastening under shelves | Metal corner No25 |
| Canvas for shelves | Wooden board, chipboard, glass, sheet metal |
Before starting work, as usual, we prepare the project and draw a drawing. It must indicate the dimensions of all future structural parts. This will prevent confusion during the assembly process.
- First of all, we assemble the side parts of the rack. To do this, two rectangles are made from the profile by welding. Their height is five centimeters below the window opening. In depth they are equal to the width of the slope.
- We fasten both rectangles together with long pieces at the bottom and top.
- The frame for the shelves is welded from corners.
- We make special threaded holes in the side posts (you can simply weld a nut). This will allow you to firmly clamp the structure between the window sill and the upper slope using bolts.
- At the last stage, the structure must be treated with an anti-corrosion agent and painted.
- After this, we cut out and fasten the shelves.
This type of rack is good because it can be removed from the window at any time by unscrewing the bolts and moved to a new location.
Video instructions for making a simple window rack
The video below is perfect for beginners. The design of the rack is very simple, airy, the author successfully chose the necessary camera angles and revealed in detail all the manufacturing aspects.
Do you need lighting?
When assembling a rack for seedlings with their own hands, some gardeners think that they can do without additional lighting. It is worth noting that even for a structure that was mounted on a window, it is necessary to provide for the presence of lamps of the appropriate type.
In winter, daylight hours are quite short. Due to lack of natural light, seedlings may not develop well. Photosynthesis processes will proceed slowly. Because of this, biomass growth will not occur at the required pace. In order for plants to develop normally, it is necessary to install additional lighting on the rack. This will provide normal conditions for the seedlings and allow the seedlings to gain strength before transplanting them to the site
It is important to choose the right lamp that will meet all requirements
Wooden rack for seedlings
If you are planning to make a shelving unit from wood, you will first need to draw a sketch of it so that you do not forget what dimensions to adhere to. Here is an example of a suitable diagram:
After preparing the sketch, you need to collect the following materials and tools:
- wooden beams for racks with a section of 45x60 mm (2 pieces of 3 m each, you can immediately ask to cut them into 1.5 m sections);
- wooden beams for crossbars with a cross-section of 20x60 mm (2 pieces, 2 m each, you can immediately ask to cut them into 50 cm pieces);
- wooden board for shelves with a section of 22x100 mm (one shelf takes 5 pieces 75 cm long, then for all 4 shelves you need 4-5 boards of 3 m each);
- saw;
- screws, nails;
- chisel;
- hammer;
- wood glue;
- roulette;
- pencil.
After preparing all the necessary materials and tools, you can proceed directly to the construction of the rack. This process essentially consists of two main stages - cutting parts and assembling them. We will consider each stage separately.
Cutting parts
The timber purchased from a hardware store must be cut taking into account the following parameters:
- the length of the bars for the manufacture of supporting parts of the rack (racks) is 1.5 m each;
- the length of the bar for the crossbars is 50 cm;
- the length of the shelf boards is 75 cm.
On each beam you will need to measure the required length, draw a line and cut along it using a miter saw or a regular saw. To save overall time, it is advisable to use a circular saw or jigsaw. Based on the cutting results, you need to obtain the following elements of the future design:
- 4 supports 1.5 m long;
- 8 short timber crossbars;
- 15-20 boards for shelves.
To further strengthen the rack, you can prepare bars that will need to be screwed to the finished structure diagonally at the back wall.
Assembly
The prepared boards need to be connected like a construction set to get the finished product. You must act in this order:
- Mark with a pencil where the groove for the crossbar will be located, attaching it to the support beam:
The first crossbar should be located at a distance of 23-24 cm from the edge of the support beam, and the subsequent ones - 40 cm from each other. Measurements should be taken from the end of the support beam, which is in contact with the floor. This will ensure that the shelves are at the same height. - At the marking sites, first make cuts taking into account the thickness of the crossbar, and then cut out the grooves using a hammer and chisel.
Please note that the crossbar must be recessed into the groove. - Secure the first cross member between the two support bars by driving it into the groove with a hammer (dimensions in mm in the photo).
- After 40 cm, fix another crossbar, and behind it two more (the last crossbar will be at the very top edge). The result should be a kind of staircase.
- Prepare the second side of the structure as described above.
- Lay the boards that will make up the shelves between the two support posts. Secure them to the crossbars using self-tapping screws or nails.
- Cut corners in the end boards so that the support beams fit into them.
- Create the two top shelves in the same way.
- The top shelf can be made longer.
The finished structure will look like this:
Successful examples and options
Modern equipment allows manufacturers to produce plastic models of window sill blocks that skillfully imitate expensive natural materials. A wood-look window sill will add solidity and weight to your home. It is these qualities that are a successful combination of luxury and wealth.
It’s hard to imagine, but in this interior a PVC panel imitating natural stone was used as a window sill block. And the application of an acrylic layer increased the strength and moisture-resistant characteristics of the product. The bright glossy iridescent surface of the window sill block, skillfully imitating natural stone, will add chic and aristocracy to the interior of your room.
The standard white window sill block is characterized by low cost and high strength. This product combines perfectly with a white plastic window profile, forming a single structure. At the same time, the coincidence of technical parameters will greatly facilitate the maintenance of the entire structure.
To learn which window sill to choose, watch the video below.