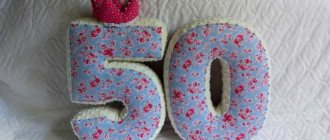
We offer you step-by-step instructions on how to make three-dimensional numbers with your own hands for a birthday or party. They will not leave any child indifferent, and you can also make a wonderful photo session with them. Master classes on making numbers for both children and adults, from very simple to more complex. There are also many design options: napkins, paper, fabric or glitter.
But in fact, such decorations are suitable not only for a children's party. Party, corporate event, New Year, bachelorette party - what is not a reason to decorate the room with an original huge inscription?
- 1 unit per year - for beginners
- 2 Volumetric figures made of cardboard 2.1 Creating a design for a volumetric figure
- 2.2 Design and decoration of numbers
- 2.3 Some additional tips:
- 10.1 One for a girl
One for a year - for beginners
A very simple master class for those who have never done needlework.
- Cut out the base of the number from an old cardboard box (dimensions are given below)
- Take napkins or wrapping paper and cut it into squares with a side of 5-10 cm as desired
- Take the center of the square and glue it to the base with PVA glue.
- Let it dry for 2-3 hours. Ready!
Also below in the photo are several sizes - ready-made diagrams and drawings for the number one . You can take more or less, at your discretion.
Blank for small decoration
Food packaging produces small numbers. If you decide to use a box in which cornflakes, juice or milk were sold, then before starting the process of decorating the number, glue the surface of the base with a layer of papier-mâché so that the factory design is not visible. For pasting, take thick PVA glue and toilet paper (newspaper or plain thin paper). This will give the workpiece additional strength, because thin cardboard may swell and blur during operation. Another option is to simply choose foil-faced packaging. These produce many dairy products and juices.
Volumetric figures made of cardboard
This master class is for a more advanced level, and we will need at least 2-3 hours to make such a voluminous figure.
Necessary materials:
- Thick cardboard
- Stationery knife
- Pen
- Ruler
- Scotch tape or duct tape
- Crepe paper
- Glue
Creating a three-dimensional figure design
- Place two pieces of cardboard together. Draw the selected number (or letter), and then cut out two layers of cardboard at the same time with a stationery knife.
- We recommend placing several additional layers of cardboard underneath to avoid cutting the floor or table. In this case, the size of the numbers in height is 50 cm.
Step 2: Side Stripes
In the previous step we cut out the front and back of the number, and now we need to cut out the side. For this you need strips of cardboard 10 cm wide.
Step 3: Connecting the Cardboard Pieces
Using tape or tape, secure the cut out numbers to the side strips at the seams. For strength, do this not only from above, but also from the inside.
Step 4: Bend Mounting
When you get to the bend, simply bend the strip of cardboard to fit the shape of the number. In such places you can strengthen the structure with tape.
TIP: Creating the design is very simple and takes about 20 minutes. If you want to make the numbers stronger and more durable, you can reinforce them with a layer (or two) of paper and glue. To do this, apply glue to strips of paper and cover the cardboard structure.
Design and decor of numbers
- Step 1: Prepare the crepe paper.
Decorating takes longer, especially if you make some unusual design. You need to make a small garland from crepe paper. Now let's look at how to do this in detail. First, cut strips of crepe paper about 8cm wide. - Step 2: Making the fringe.
Cut the strips on both sides into small pieces of fringe. - Step 3: Preparing for gluing.
Fold the strips in half to create a fuller fringe when gluing. - Step 4: Select a design.
Here we will make a zigzag design for the number “2” and a wavy design for the number “5”. To simplify its execution, it is better to draw lines by number based on how far apart the zigzags or waves will be located. Then, guided by these pointers, we will glue the fringe. - Step 5: Start gluing the fringe.
We will glue from bottom to top. Apply glue to the bottom of the number, following the chosen pattern (that is, if you made marks with a pencil, apply glue on top of them). Take the crepe paper fringe and dip it in the applied glue. - Step 6: Finishing the design.
Continue adding glue and fringe, moving higher up the number until your design is complete. Please note that each subsequent layer of fringe slightly overlaps the previous one, creating more volume. In the finished version, the number should be pasted over on all sides.
Numbers can be filled with Candy!
- Carefully cut a hole at the top of the number to place the candy inside.
- Also make two small holes through which to string the rope for fastening.
- Then attach the cut out part of the number back to the same place. Consider the correspondence between the weight of the candies and the strength of the structure so that they do not fall out on their own before the number is hit with a bat.
How to Decorate a Room for a Birthday - Ideas and Tips
A few additional tips:
- To strengthen the design of the number, you can insert additional cardboard partitions . Thus, the front and back of the number will be connected not only at the seams, but also with these cardboard columns (their width should be equal to the width of the letter).
- When attaching paper fringe, glitter and other decorations, you can use double-sided tape instead of glue. To do this, you need to apply it to the entire surface at once, and then glue the decorations.
- If the decorations are heavy or large (for example, a flower on top of a number), then for a more secure fixation you can use a glue gun .
In the master class above, we decorated the numbers with crepe paper, but, of course, this is not the only way to cover a cardboard structure. Let's look at other possible design options.
Additionally, you can make a birthday garland with your own hands - as in the photo below, see the link for a detailed tutorial.
Delicious cake for March 8 in the form of the number 8: recipe, photo
Delicious cake for March 8
When you have already prepared a paper template, start preparing the dough. On March 8, you can bake a cake from delicate shortcrust pastry. Here is the prescription:
Ingredients:
Cake products
Now start creating the test:
- Beat eggs with granulated sugar.
- Add melted and cooled butter and sour cream - stir.
- Mix flour with baking powder and add to other ingredients.
- Stir everything well. You will get a dense lump of dough.
- Divide the dough into 3 parts and place in the freezer for 15-20 minutes.
- When the dough has cooled, take it out and cut out three number 8s. Use the scraps to make cookies.
- Bake the cakes for 5-7 minutes no longer. Be careful not to dry out the cakes.
- Prepare the cream: beat all ingredients for 3-5 minutes.
Decorating the cake 8
Now you can soak the cake layers with cream and use a pastry bag to decorate the top of the cake.
Tip: Apply cream between the cakes also using a syringe, it will turn out beautiful and original. To make the cream slightly colored, coat the inside surface of the syringe nozzle with dye. Then apply the cream and start squeezing. You will get white roses with colored edging.
Wrap fresh flowers on the bottom with cling film and cut off the stem. Now you can decorate the cake with them.
Preparing fresh flowers for the cake
On such a cake, cocktail cherries, colored meringues and figured marmalade will look beautiful as decoration. Place the cake in the refrigerator for several hours to soak and serve.
Corrugated paper decor
The process of making numbers from crepe paper is similar to working with crepe paper, but you will almost certainly have it on hand at home if you have small children. Of course, it is better to use double-sided colored paper.
LIFE HACK: You can glue white office paper and then paint it with watercolors or spray paint.
You can also add colored tape, which will decorate the number and additionally hold the paper.
TIP: If you have thick multi-colored napkins, you can also cut them into fringes and use them for decoration.
Types of frame
First of all, you should make a frame onto which the paper elements will be attached in the future. It is advisable to choose thick cardboard that will not tear or deform during the decorating process. There are several options for the basis for numbers and letters from napkins. They can be voluminous, flat or frameless.
One of the simple and uncomplicated ways to decorate your home is the holiday trend of recent years - numbers made from napkins.
Flat figure
Flat figures look less impressive compared to voluminous ones. However, their production will require less time and effort. To create such a frame with your own hands, you will need to follow the recommendations.
This decorative element has gained popularity; it is used as a prop at children's photo shoots and at various holidays.
- If the size of the figure does not exceed an A4 sheet, you can find a suitable diagram on the Internet and print it.
- To create large figures, you need to draw a diagram on whatman paper by hand or print it in parts.
- Cut out all components.
- If there are several parts, connect them end to end with tape.
- Then the resulting diagram must be attached to the prepared cardboard and carefully traced around the outline.
- After this, you need to cut out a figure from cardboard.
- If you plan to make several numbers from napkins with your own hands, you will need to repeat the entire process in the same way.
From paper napkins
To make these flowers, we will again need crepe paper, or the easiest way is to take paper napkins.
Step-by-step instructions for decorating letters:
- cut one square from such paper;
- fold like an accordion and tie in the middle;
- fluff to create a flower shape.
ATTENTION: Flowers can be either the same color or different colors, harmoniously combined with each other. The more flowers, the more volume will be created.
General rules for making flowers
You can make flowers with your own hands from almost any napkins, paying attention to the following recommendations:
- single-layer thin material is suitable for airy flowers without clear straight lines;
- In order for the craft to retain its shape for a long time, it is better to use high-density material;
To make flowers, it is better to use plain napkins.
- to add scent to decorative flowers, you can use scented napkins to make them;
- Accuracy is important in the work, since the material of the napkins is not strong enough.
Sequins or glitter
When decorated with sparkles or glitter, the birthday numbers are less voluminous, but they sparkle and shimmer. So here whoever likes it more.
How to make the following numbers for a birthday boy:
- Option one - apply PVA glue to all surfaces and sprinkle with glitter.
- Option two: buy ready-made glitter paint in a bottle.
Tip: after covering with glitter, apply varnish on top so that they do not fall off on the floor and do not remain on your hands when you touch them.
Don't forget to make a beautiful cake stand - this article contains ideas!
DIY flat unit
It’s not at all difficult to create a flat number 1 with your own hands. To do this, we need to get an unnecessary box made of high-quality cardboard
, draw a 1 on it and cut it out. The next stage is decoration. In this case, everything depends solely on your imagination: you can paint the number with paints or paste it over with colorful wrapping paper, wrap the silhouette of the number with threads or carefully wrap it in foil. To make your creation even more festive, you should decorate it with butterflies or a crown. If it’s a boy’s celebration, then you can paste over the number with cars and airplanes.
You can use this attribute on a birthday in every possible way: hang it on the wall, decorate the birthday boy’s chair with it, or put it on a candy bar. And also, don’t forget about the festive photo shoot.
In order to make a three-dimensional figure, we first need to make a frame
, which we will decorate afterwards.
You can make it using thick cardboard or ordinary unnecessary large boxes
.
If you did everything correctly, then you have a three-dimensional figure
, which will serve as an amazing decoration for a children's party.
Numbers from photographs
When creating numbers for an anniversary or wedding anniversary, you can make a design using small photo cards with images of the most significant and happiest moments in life.
It will be much more original for a framed photo or wall collage and will definitely surprise and delight the heroes of the occasion. You can also decorate with beautiful cutouts from magazines or postcards.
Painting numbers with acrylic
Volumetric numbers can be simply painted using a brush or spray can. Just pay attention to the fact that after gluing the cardboard structure, adhesive tape remains on top and after painting it can be visible.
Paint: the best option is acrylic paint
TIP: Therefore, for a more accurate result, we initially recommend gluing paper on top of the cardboard , but using double-sided tape to create a flat surface.
Let these numbers, regardless of the chosen design method, give joyful emotions to you, the birthday party and all the guests of the party, because this is their purpose! Good luck!
Materials and equipment for work
Looking at pictures depicting three-dimensional numbers made from napkins, many people fear that it is impossible to do something similar with their own hands. In fact, they are not difficult to make. The process takes some time, but the birthday boy’s emotions of happiness cover all costs.
Not the last place at the holiday is occupied by external paraphernalia - flowers, gifts, music, surroundings.
Tools and materials required for work:
- Paper napkins. They can be single-layer or multi-layer. When choosing a color, you should focus on the occasion of the celebration, the gender of the baby, and the surrounding interior. It is advisable that the napkins be plain. The approximate quantity is calculated based on the planned number of flowers - 1 napkin will be required for each unit.
- When creating numbers from napkins, you can combine several shades, alternating them with openwork and carved specimens. They will make the composition more voluminous and unusual.
- The threads can be simple cotton. For ease of cutting, you will need scissors or a stationery knife.
- A stapler will simplify the fastening process.
- Glue or tape for fixation.
- To create the base you will need a cardboard blank. You can use an empty box from household appliances.
The decor of the room in honor of the festival can turn a traditional celebration into something special.
Important! To ensure a high-quality connection of elements, it is necessary to select the strongest options.
Numbers for a boy
Several design ideas for a boy: simple and tasteful