Have you been looking in stores for a long time at beautiful samples of bedspreads made from scraps of fabric of various colors and patterns , but was the price too high?
Do you love to sew, but have a lot of leftover fabrics of different colors accumulated at home?
Then you can make your dream of a beautiful patchwork quilt come true with your own hands. patchwork will help you with this .
How to sew a patchwork blanket
For beginners, it is better to choose patterns with large fragments, this will allow you to make a blanket faster. For experienced needlewomen, there are many master classes that talk about creating complex patterns from small shapes.
Only the upper part of the patchwork cover is made from scraps, and a whole cloth is taken for the bottom layer. This simplifies the work and increases the wear resistance of the product. To sew fragments together with a machine, it is better to use a regular edge stitch. Undoubtedly, linen stitching is stronger, but it may not penetrate fabric consisting of three layers.
Types of patchwork:
- “Quick squares” - patchwork bedspreads are sewn from square fragments.
- “Watercolor” – special attention to color.
- “Strip to stripe” is a blanket made of long rectangles sewn alternately.
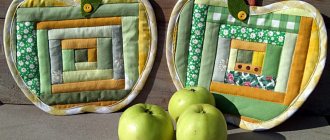
- “Log cabin” - in the central part there is a square, and stripes are sewn around it in a spiral.
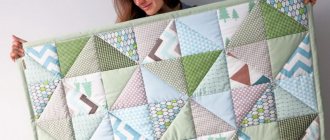
- “Magic triangles” - simple or complex shapes are made from triangular fragments.
- “Checkerboard” - the blanks are sewn in a checkerboard pattern.
- “Russian square” – multi-tiered sewing.
- “Honeycomb” is a pattern of hexagons.
From denim scraps
And if you have a lot of old jeans and shirts lying around idle in your house, then they can become an excellent source material for a bedspread and even pillows for it.
How to sew a blanket from old jeans?
STEP 1 First
strip out the clothes , leaving only those pieces of fabric that do not have stains, signs of heavy wear, zippers or other accessories. Then wash and iron them. STEP 2 The next step is to cut out squares, triangles or other shapes according to the design or pattern you have chosen. STEP 3 Next, the patches are sewn together 2 at a time, then in strips, then the strips are joined together. STEP 4 Sew on the padding polyester and the lower part of the bedspread. STEP 5 If you wish, you can trim the patchwork bedspread around the perimeter with a satin ribbon, decorate it with beads, sequins or braid .
The resulting product will be dense and wear-resistant due to the properties of denim, and one of a kind.
In conclusion, we can say that patchwork is a fascinating, but very labor-intensive process of matching scraps to each other, and then connecting them to obtain an overall design.
The resulting products will be an original decoration for your apartment and the pride of the needlewoman.
Experience working with fabrics, a machine, as well as perseverance and patience will help you master this unusual style quickly enough. Piece by piece, it will become one of your favorite things to do!
Tips for a beginner on where to start sewing using the patchwork technique
Simple tips to make it easier for beginners to sew patchwork bedspreads with their own hands:
- determine the exact size - a lot depends on this parameter;
- choose a color - the organic nature of the entire product depends on their compatibility;
- prepare the fabric - soak for 10 minutes in hot water;
- To make working with textiles easier, it is recommended to starch and iron it;
- cut into fragments of the required size, leaving allowances;
- prepare the backing textile.
Prepare your tools:
- needle and thread;
- scissors;
- pins;
- sample;
- pencil;
- sewing machine
[Master class] A new way to quickly sew a quilt
Using this sewing technique, you can quickly and easily make a patchwork quilt. Even a beginner can handle this. The main thing is to observe the dimensions, make indents in the necessary places and lay straight lines. Step by step process:
| 1 | To begin, cut out a paper square measuring 15*15 cm. Using this stencil, cut the insulation and fabric squares. | |
| 2 | The result should be 80 multi-colored and white blocks, as well as 80 squares of insulation. Also prepare a knitted tape (preferably white) 4 cm thick. | |
| 3 | Next, you can start sewing a patchwork quilt: prepare 1 colored square, a white square and insulation, which must be carefully divided into 2 parts. Lay the fabric blocks face to face, apply 1 resulting layer of insulation to the colored square, and cover the other side of the workpiece with the other part. Stitch diagonally, using a paper stencil for convenience. | |
| 4 | Separate the block so that the right side of the fabric squares is on the outside, and secure the layers with needles. Then, using a stencil, sew the workpiece diagonally on the other side. | |
| 5 | Cut off the remaining padding polyester along the edges. And sew all the remaining squares in a similar manner. Next, lay the blanks on the table, forming a blanket. To do this, you need to make 2 layers of prepared blocks, placing them on top of each other. | |
| 6 | Then apply the binding to the edge of the squares and stitch down the middle. Sew the next strip of blanks to the other side of the tape. Do the same with the remaining material. | |
| 7 | Next, lay out the strips for sewing the blanket again and sew the tape on the other side of the squares (horizontally), folding them in half without cutting the binding. Make a “lock” at each corner of the blocks. There, cut off the excess fabric remaining from the tape. | |
| 8 | Turn the resulting product over to the other side, fold in the rest of the binding and stitch. Do the same throughout the blanket. | |
| 9 | Now you need to make the edging: carefully place the tape along the edge of the product, retreating from the corner 5 cm, and stitch at a distance of 7 - 8 mm. | |
| 10 | Using this principle, make an edging around the entire perimeter. Wrap the tape at the corners and sew diagonally. |
Working technology step by step
The main stages of making patchwork bedspreads with your own hands:
- drawing a sketch;
- choice of material;
- stitching flaps;
- formation of the finished product;
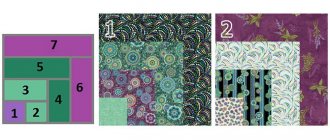
- Drawing a sketch.
The most important part of the process, because the appearance of the product depends on it. You can draw a sketch on paper, take it from the Internet, or lay it out on the floor from fragments, following the patchwork style. Many ideas on how to sew a bedspread are available in master classes, which greatly simplifies the creation process.
Material selection
Choosing fabrics to match is not easy, but it is very important. The appearance of the bedspread depends on this. In this matter, it is worth relying on the taste preferences of the craftswoman. For two-color products, the only choice rule is dark and light colors. With multi-colored bedspreads the situation is more complicated. Colored fragments should be sewn not in disorderly chaos, but by laying out a pattern, based on existing patchwork patterns.
Technique of stitching flaps
The sequence of actions when stitching fragments is as follows:
- You need to cut two equal strips from textiles of different colors.
- They are folded inside out to each other, stitched, and ironed.
- Now from the textile of the third shade you need to cut a strip equal in width to the first two.
- The third and first two are folded right sides together and stitched.
This technology allows you to make a double-sided sleeve, from which squares are then cut. Next, you need to decide on the pattern, and then you can start connecting.
Fragments of a certain shape are sewn together in pairs if the pattern is complex. Then you should connect 4, 8, and so on until the composition is complete. If the bedspread is made of squares, the joining technology is slightly different. Square blanks are sewn into strips, and after carefully ironing the seams, they are assembled into a finished patchwork product.
Formation of the finished product
When the front part is ready, you should start sewing the back side. To do this, a piece of selected fabric is laid out on any flat surface, face down. If the bedspread is insulated, then a layer of synthetic padding should be placed on the reverse side.
The front side with a patchwork pattern is placed on top, and the product is stitched around the perimeter. The edging is made from a strip of fabric approximately 8 cm long, sewn along the edge. If the edging according to the sketch is wide, then more fabric is needed to make it.
Style Description
Patchwork
The word patchwork translated from English means a product made from multi-colored patches .
Initially, things were made from leftover fabrics for economic reasons. This then grew into the process of creating unique, unusual products.
Patchwork is a very hard and painstaking work that deserves respect and admiration.
Sometimes craftswomen create simply works of art consisting of many small pieces.
These include pillows , napkins, bedspreads and baby blankets of extraordinary beauty .
To work you will need:
- Sewing machine.
- Scraps of fabric.
- Fabric for the reverse side (about 1.5 meters by 2.20).
- Needles and pins.
- Threads in the color of the fabric.
- Well sharpened scissors .
The fabric for shreds can be of any texture, but always with the same density and thickness.
You also choose colors according to your taste, but no more than 6-7 different colors .
- Also, experienced needlewomen in master classes advise taking one color as the main one, and the remaining pieces should be harmoniously combined with it.
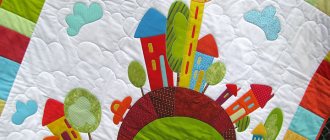
DIY baby blanket in patchwork style
For beginners, the “Fast Square” technology is suitable. To make a patchwork bedspread for a girl, you should choose more pink textiles, for boys - blue.
You will need the following materials and tools:
- 4 types of textiles;
- fleece for the back;
- needle and thread;
- ruler, pencil;
- scissors;
- sewing machine.
The simplest option is children's patchwork bedspreads made of 48 squares. To make such a thing, it is enough to cut the prepared fabric into square fragments of the selected size, adding 0.5 cm to allowances on each side. The squares are sewn together in strips, each seam is carefully ironed. When all the strips are ready, you should sew them.
Spread the fleece on the floor, place the front part on it, carefully round the edges with scissors and sew. The child will be happy to cover himself with such a blanket.
Benefits of a patchwork quilt
The main idea of such products is that remnants of fabrics or old clothes are used to make them. Thus, this is an economical way when you don’t have to spend money on buying materials, and at the same time there is an opportunity to give a “second life” to things that are no longer needed.
Another advantage of a quilt is that its size is unlimited. You can sew both a small baby blanket and a large one, including for non-standard beds.
Also, sewing a patchwork quilt is a creative process where a needlewoman can realize a variety of ideas and fantasies, for example, by laying out a pattern or drawing.
DIY patchwork bedspread master class
To ensure that all the squares are even, you need to use a ruler. For the same purposes, the fabric is laid in several layers. In our case, the patchwork bedspread will be two-color. Having laid each type of textile in a double layer, we cut off the edge to even it out.
Using a special ruler, mark the width and cut off the strip. You can use a regular ruler, but then it is better to secure the fabric with pins before and after the cutting site.
Here are the cut square pieces, ready for stitching. Their number and size are determined by the dimensions of your product.
The synthetic winterizer also needs to be cut into squares to make the quilted patchwork bedspread warm.
Now you need perseverance. We take a fragment of padding polyester.
Cover it with a yellow cloth.
Turn it over, cover it with textiles with a pea pattern, and secure the “sandwich” with pins.
Now we need to mark the lines in the middle. To do this, take a pen, apply a ruler at an angle of 45 degrees and draw.
When the square piece is stitched diagonally crosswise, you can put it aside and move on to the next one.
The photo shows the process of creating fragments. Also in the left corner there are two stitched squares.
We continue to make preparations.
This is how the fragments will be arranged - in a checkerboard pattern.
First we sew in pairs, then in 4 pieces. The photo shows 3 blanks consisting of 4 squares.
But 8 pieces have already been sewn.
To decorate the seams, you can use scissors to make cuts and unravel the threads. Use scissors carefully so as not to cut the seam.
Decor features
Patchwork has many different techniques. English technique is the most popular. It is characterized by brevity and strict geometry.
Crazy patchwork is, on the contrary, patchwork sewing without frames or rules.
Eastern technology involves a combination of strict forms and smooth lines, free patterns and classical geometry.
Japanese technique is a whole art with the help of which patchwork paintings are created. Having mastered simple classical techniques, you can proceed to more complex and fantasy versions of patchwork.
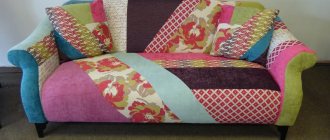
Patchwork bedspread in a modern interior 61 photos
Examples of original ideas can be seen in the photographs. Here are bedspreads made in patchwork style that fit perfectly into the style of the home. Products can be cotton, cotton and others. The color should “echo” the main color chosen for the design of the room.
Handmade things retain the warmth of the craftswoman. The tutorial above shows that even something as large as a bedspread is easy to make. The only thing a beginner may lack in the process is patience.
Author: Galina Kanashchuk
Choosing the right fabric
To sew a blanket from scraps with your own hands, you need pieces of fabric of the same thickness and texture. The color palette of fabrics is selected in accordance with the interior style, wall colors and furniture.
Contrasting combinations of fabrics look most advantageous against the discreet background of the main fabric. You should not allow excess variegation; it is better to give preference to moderation.
Before starting the sewing process, you need to make a preliminary layout of the blanks on the leading base of the fabric, move a little away from it and evaluate the resulting masterpiece. So to speak, a look from the outside will help you understand the success of the combination of design and color scheme.
Technique
First of all, using the analysis of all photos and descriptions of the materials used to form your idea, you must stock up on all the tools and equipment, and also consider whether the tiles are ready so that the blocks turn out equal.
Your story begins with the following list:
- Fabric sorted into varieties for the top of the blanket;
- Fabric for the bottom of the blanket - lining;
- Various sewing needles: for hand stitching with a large eye, and for a machine;
- Ruler;
- Pins: safe and straight ordinary;
- Threads for auxiliary and main seams;
- Sewing machine.
To assemble the upper part of the product, at which the tiles will connect, we create the desired duvet cover and its image.
We perform the following actions:
- The tiles are sorted, for which fabric is taken according to semantic characteristics;
- Cutting to the required size is carried out;
- We sew together two pieces of scraps, right sides down;
- We connect the stitched pairs together so that the tiles look neat;
- We fold the blocks right sides together and sew them together.
A patchwork quilt is made up of identically sized pieces of fabric of different characteristics.
[Master class] Life hack for connecting squares with a perfectly straight joint
Here is the connection of squares with a perfectly even joint using the example of a napkin. To sew a blanket, increase the size of the fabric and binding.
Step by step process:
| 1 | To begin, prepare fabric squares measuring 10*10, then lay them out on non-woven fabric measuring 30*30 cm, pre-linearized into 9 blocks for convenience. Then iron the workpiece well on both sides. | |
| 2 | After all the squares are glued to the interlining, make 2 parallel lines. You can first fold the fabric and draw lines on the strips for future seams. | |
| 3 | Then make cuts without affecting the resulting stitch, and sew 2 other parallel strips. After finishing sewing, press the seams well, placing them in different directions so that there are no seals. | |
| 4 | Place the resulting product on another piece of fabric of suitable size. Using chalk or a pencil, draw a line running through the middle of the stripes of squares: first horizontally and then vertically. Next, lay the lines along the marked lines and along the joints. Do the same with the other squares and sew them together in a similar way. | |
| 5 | Then sew the trim along the edge of the fabric, first by placing it on top of each other and forming an angle of 45°. Draw a line using a ruler or other suitable object. | |
| 6 | Next, stitch the selected area, cut off the remaining fabric and smooth the seam. | |
| 7 | Attach the tape to the product from the wrong side, making an indentation, and sew on a sewing machine, having previously fixed the material with needles. At the corner, make a seam diagonally (45°), retreating 1 cm. | |
| 8 | Then bend the ribbon, fold it to form a square, secure and stitch. Do the same on the other side of the product, stitching the fabric around the entire perimeter. | |
| 9 | Turn the tape over to the other side, fold it to the squares, fix it and carefully lay a stitch along the entire perimeter of the tape, making an indent of 3 mm. |