Patchwork video lessons different techniques
Taking advantage of the opportunities provided by patchwork, quilt, chenille, shoil, yo-yo and other popular patchwork techniques, you can create original and practical products for the home with your own hands from leftover fabric - blankets, pillows, curtains, tablecloths, rugs, panels, and also clothes, bags, cosmetic bags, notebook covers, toys and much more.
Tips for a beginner on where to start sewing using the patchwork technique
Simple tips to make it easier for beginners to sew patchwork bedspreads with their own hands:
- determine the exact size - a lot depends on this parameter;
- choose a color - the organic nature of the entire product depends on their compatibility;
- prepare the fabric - soak for 10 minutes in hot water;
- To make working with textiles easier, it is recommended to starch and iron it;
- cut into fragments of the required size, leaving allowances;
- prepare the backing textile.
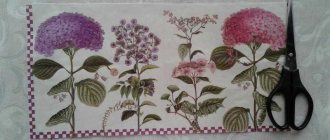
Prepare your tools:
- needle and thread;
- scissors;
- pins;
- sample;
- pencil;
- sewing machine
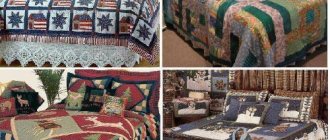
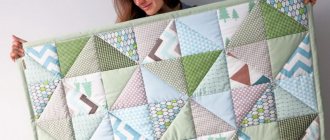
Patchwork Quilt
The patchwork fashion has revived the popularity of patchwork quilts in today's world. The history of their appearance is associated with a lack of funds to purchase expensive products, as well as a shortage of fabrics. In addition, the patchwork quilt had a sacred character, acting as a talisman and a symbol of the connection between generations within the family. Not without reason, patchwork quilts were a mandatory wedding gift for newlyweds or a dowry for a newborn baby. Traditionally, brightly colored chintz was used to make it, so the blanket had not only a practical function, but also an aesthetic one, decorating the home.
The warmth and comfort that patchwork style blankets provide has ensured their popularity in the present day. When sewing them, they still use natural cotton fabrics: chintz, calico, calico, flannel, flannel. Only the filling has changed; now modern materials are used to make blankets: padding polyester, Thinsulate, batting, Isosoft, holofiber, etc.
When sewing blankets in patchwork style, simple assembly patterns are used. Individual elements are mainly cut out in the form of squares, which are connected to each other in any order. This simplicity is explained by the fact that clothes are most often used tucked into a duvet cover, so there is no need for particularly complex patterns. Stitching remains an essential element of a patchwork blanket. Figured or simple, it connects 3 layers - the top patchwork, the middle one consisting of insulation and the bottom one - a lining. Quilting can be done by hand using a buttonhole stitch, hand stitching or a goat stitch. But most often, quilting has recently been performed on a sewing machine, using a figured or simple stitch along the contour.
Features in creating blankets
Choosing a blanket making technique is not the last thing you will have to deal with when sewing. First you need to approach the issue of size. You can make a blanket of the following size with your own hands:
- 120x120 cm – a blanket for a newborn or a small blanket for a chair;
- 150×120 cm and 140×110 cm – for older children;
- 150×200 cm – single;
- 150×205 cm and 155×215 cm – one-and-a-half blankets;
- 175×215 cm, 180×210 cm, 220×240 cm – double;
- 200×200 cm, 200×210 cm – European sizes.
The duvet filling is also heavy. They may be:
- synthetic winterizer is a cheap hypoallergenic material, but not natural;
- wool is a very warm and fairly light material;
- fluff – not suitable for allergy sufferers, it is quite heavy, and over time, if used without proper care, it picks up unpleasant surrounding odors.
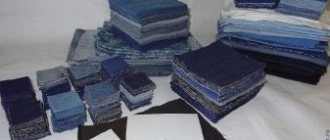
The fabrics of the flaps should be chosen to be approximately the same in density, thus avoiding possible stretching and damage to the blanket in certain places. If this is not possible and the materials were taken from what was available in the house, then it is necessary to place fabrics that are more susceptible to damage closer to the center, alternating them with flaps that are more dense in composition. However, the best choice for such work would be scraps of cotton fabric.
Patchwork bedspread
A bedspread, unlike a blanket, is thinner and has greater functionality. It is used as a blanket to cover or wrap up while sitting in a chair or on a sofa, and also as a cape to cover bedding or upholstery. Like a blanket, it consists of 3 layers, only instead of bulky insulating pads when sewing bedspreads, non-woven fabric or thin padding polyester is used, which does not create a large volume. For the details of the top, when sewing it, denser materials are used - linen, jacquard, tapestry, mixed fabrics. Since the bedspread often plays an aesthetic role in the interior, more complex and interesting patterns and designs are chosen for sewing it.
Creation technology
The process of sewing a product from small pieces of fabric is actually a very exciting activity. In addition, it does not require huge financial investments. After all, the necessary materials in the form of various pieces of fabric can be purchased as a set or you can use old things that may be lying in your closet.
As a result, things that have gone out of fashion will be able to continue to exist in a new way and will remind of the wonderful past. But you should not use very old things, so that your diligence will not be in vain.
To create a patchwork quilt, you need to prepare 6 or more different colors of fabric. To realize a unique design with the help of your irrepressible imagination, you should use different colors, fabric structures and patterns on them. Slightly gathered details will add volume to the texture and an impressive appearance.
How to sew a patchwork quilt with your own hands? To do this, just watch master classes from the Internet that will help you learn the patchwork technique yourself.
Patchwork patchwork patterns
Experts recommend mastering the patchwork technique by creating a large product - a blanket or bedspread. You can assemble patchwork elements into a whole product at will, improvising along the way, but products where patches sewn together form a certain pattern or color gradation look much more interesting. To do this, a sketch or diagram is created in advance, where all the elements are drawn in detail. Then individual parts are prepared, which are assembled in accordance with the diagram, first into blocks, and then individual blocks into a single sheet, which is connected to the lining. For convenience, when cutting flaps, cardboard or plastic templates are used, which make it easy to cut the required number of parts of the same size.
Patchwork and patchwork techniques
Patchwork is the most popular patchwork technique, which involves creating a whole product by sewing together individual patches. Working in this technique, you can master several types of patchwork:
- classic or English involves assembling a whole product from scraps of the same size and shape - square, triangle, rhombus, rectangle, hexagon, etc.;
- crazy is a type of patchwork in which products are created from scraps of various colors, sizes and shapes, sewn randomly. The seams of such products are additionally decorated with ribbons, lace, and the products themselves are decorated with beads and seed beads;
- Japanese patchwork - a technology for creating floral and geometric patterns from silk rags using sashiko stitches;
- knitted patchwork involves creating a product from scraps of knitted fabric, knitted or crocheted elements;
- quilting or quilted fabric consists of 3 layers - the top or decorative layer, assembled from individual elements or consisting of a single piece, the middle layer is a soft cushioning material - batting, holofiber or padding polyester and the bottom layer is a base or lining consisting of a single piece of fabric . All layers are quilted together by hand or by machine; the top layer can additionally be decorated with braid, appliqué, and cords.
When creating products in the patchwork style, various techniques are used.
Those who are just starting to master this type of needlework should try the following techniques:
- squares - a method that assumes that the entire product consists of identical square or rectangular elements assembled into large square blocks;
- stripes - a method of assembling rectangular elements of various sizes in a spiral, parallel, zigzag, ladder, etc.;
- triangles - a method that uses triangular-shaped parts assembled into strips, squares or star-shaped blocks;
- honeycomb - this technique is used when assembling hexagonal parts.
Having mastered the assembly of simple geometric elements, you can move on to more complex patchwork techniques - lapachika, chenille, watercolor, yo-yo, shoil, English park, rag quilt, bargello, patchwork corners, boro, frayed quilt, Australian stained glass, etc.
Recommendations
If you are just taking your first steps in the patchwork style, then you should use some recommendations from experienced craftswomen.
Start with squares. These are the simplest blocks that can be formed from fabric fragments - they are very easy to sew. Leave all the more complex geometric shapes for the future - they will require skill, because sewing the blanks together without distortions is much more difficult.
Take large pieces. The smaller the size of the fabric blanks, the more work you will have to do. Accordingly, this will increase the number of errors, and in addition, you will get tired of such work quite quickly, and it is possible that you will simply quit your job halfway. If you use large scraps of fabric as a basis, the first product will take very little time.
Don't chase originality. For beginners, it is best to copy the work of other masters at first.
First, it is important to “get your teeth into” by creating interior items using ready-made step-by-step master classes. And over time, each needlewoman develops her own individual style.
If you are disgusted by the idea of completely copying the products of another master, simply change the color scheme of the fabric.
Assembling blocks is the main stage of any patchwork sewing, and having mastered this simple technique, you will be able to please yourself and your household with stylish and cozy decorative items that will highlight the unique style of your home.
The fast block technique is presented in the video.
DIY patchwork bedspread
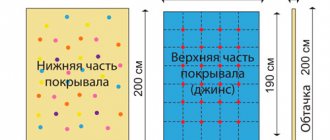
A beautiful, bright bedspread measuring 140x110 cm, sewn from squares of the same size, can be made even by those who are just trying their hand at patchwork, the main thing is to know how to use a sewing machine. Work begins with developing a sketch and procuring the necessary materials. As a pattern diagram for the future blanket, you can use the examples presented in this article or come up with your own.
To work you will need:
- cotton fabric of various colors, which must be cut into identical squares measuring 16x16 cm, 63 squares in total;
- a piece of padding polyester measuring 115×145 cm;
- a piece of cotton fabric for lining measuring 120x150 cm;
- bias binding 4.1 m;
- cardboard template;
- scissors, thread, pins, chalk;
- sewing machine;
- iron.
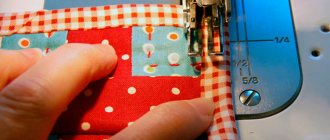
1. Before cutting, the fabric should be washed and ironed to prevent it from shrinking later. Since precision cutting is the key to a neat product, you should use a cardboard template when cutting individual elements. Using it, I cut out 63 square blanks 16x16 cm (taking into account the allowance, in finished form - 15x15 cm). 2. Place squares on the table, 7 pieces in each row (9 rows) in accordance with the selected pattern. 3. Sew individual elements, folding them face to face, using a machine into strips of 7 squares. Iron seam allowances to one side. 4. Sew the collected strips into a single fabric, iron the seams. 5. Place the lining piece face down on the table, place padding polyester or other insulation on top of it, and cover it with a patchwork fabric so that it faces up. Pin the product together at the corners of the squares in each row. 6. Quilt the blanket lengthwise and crosswise on a machine, placing stitches in the seams connecting the squares, or parallel to them. Remove the pins and sew along the edge of the product.
7. Cut off the excess padding along the edge of the product, and then process the cuts with bias tape. To do this, fold a short section of the bias tape, place it on the lining side of the blanket and stitch along the stitching of the edges of the blanket. Not reaching 0.5 cm to the end, interrupt the stitching and, turning the product, start a new stitch from the corner, placing a corner of the bias tape in the fold. Having sewn it along the entire perimeter of the blanket, turn the binding onto its front side, straighten the corners. Fold up a long section of the binding and stitch it onto the front side of the blanket. The blanket is ready. You can watch the video in more detail about the process of sewing a patchwork quilt.
Cutting out a blanket
Take measurements before cutting. Dimensions are taken depending on the size of the crib and the purpose of the blanket. To make it gracefully hang from the crib, add an allowance of 15-25 cm to the width and length. There are standard sizes of blankets:
- 90x120 cm;
- 110x140 cm;
- 143x215cm.
There are non-standard sizes:
- 90x90 cm, blanket for stroller, cradle;
- 120x120 cm, blanket for discharge from the maternity hospital, for walks;
- 150x130 cm, blanket - sleeping bag in the shape of a bag, then useful as a simple blanket.
Make a quilt pattern by drawing a rectangle from your measurements, with a 1.5cm seam allowance on all four sides.
Patchwork crochet patchwork knitting
Crochet patchwork provides great opportunities for creativity. Using this technique, you can make a variety of products for the home, toys, clothes, and accessories. When creating individual elements, traditional crochet techniques are used - granny square, fillet technique, triangular, round and hexagonal openwork motifs and dense patterns. The individual elements are connected to each other using a hook into larger parts. When knitting blankets and rugs, finished knitted fabrics can be placed on a lining or used without a lining. Along the perimeter, such products can be decorated with a knitted border or scallops. Products that combine several crocheting techniques, as well as crocheting and knitting, or assembled from knitted and textile parts will look interesting.
We sew a blanket for discharge
An original, beautiful, convenient and safe envelope for the discharge of a newborn.
The topic of how to sew a baby blanket for discharge from the maternity hospital is relevant in cool weather. Festive satin and lace envelopes will not work. For this purpose, a transformable blanket is sewn using the same method as a regular quilt on padding polyester. Sew two main parts of the blanket measuring 46x85 cm and 46x60 cm, two side flaps measuring 20x70 cm. Fasten the two main parts and two side flaps to the bottom of the blanket with Velcro, or sew satin ribbons. The top of the blanket can be decorated with lace or pleated ribbon. This blanket can easily be converted into a regular stroller blanket.
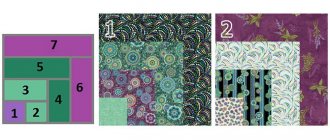
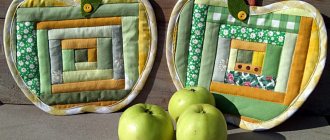
Patchwork pillows patchwork pattern, do it yourself
Decorative pillows are a great opportunity to add some zest to the interior of your living room or bedroom. When doing it in patchwork style, you can choose not only simple natural fabrics, but also those containing mixed fibers or those with a rich texture.
To sew a pillow 36×436 cm in patchwork style you will need:
- several scraps of fabric, harmoniously combined with each other;
- piece of fabric for the back of the pillow 40x40 cm;
- a piece of non-woven fabric 40×40 cm;
- pillow filling;
- zipper 20 cm long;
- threads, pins, scissors;
- sewing machine and iron.
Pre-wash and iron the fabric.
- Cut 9 squares measuring 11x11 cm, 5 heart-shaped pieces of smaller size, 4 strips 30x8 cm and 4 squares 8x8 cm.
- For 5 squares measuring 11x11 cm, cut a heart-shaped notch, 1 cm smaller than the heart-shaped pieces.
- Cut 4 squares measuring 11x11 cm diagonally into 2 triangles, and then cut each triangle again, so from 1 square you get 4 triangular elements.
- Lay out the parts on the table to create a pillow pattern, as shown in the diagram below (Fig. 1).
- Sew square blanks from triangles (Fig. 2 and 3), seam width 1 cm.
- Sew the details of the hearts into the squares with the corresponding notches (Fig. 4,5), iron the seams.
- Sew the square blanks into strips of 3 pieces, observing the sequence of the pattern, iron the seams.
- Sew the strips together into a whole fabric in accordance with the diagram, iron the seams.
- Sew previously cut strips of fabric along the perimeter of the assembled fabric and sew square elements measuring 8x8 cm into the corners. Iron the seams to one side (Fig. 6). Glue the entire part from the inside with non-woven fabric.
- Cut the piece of flap for the wrong side of the pillow into 2 parts. Stitch them together along the edges, leaving a hole for the zipper - 20 cm. Sew in the zipper (Fig. 7).
- Fold the front and back pieces of the pillow with the right sides facing in, pin together and stitch around the perimeter.
- Turn the pillowcase right side out and place it on a ready-made sofa cushion of a suitable size or fill it with padding polyester or holofiber.
[yframeurl='
https://youtu.be/QItfJeRWwwM
']
Necessary materials
Choose fabric according to the following criteria:
- wear-resistant and durable, able to withstand repeated washing;
- natural and with antistatic effect (chintz, calico, linen, silk);
- not cause allergies in the baby;
- without toxic dyes;
- all layers must allow air to pass through well.
For the bottom of the blanket, choose a cotton fabric. It is absolutely natural, breathable, but not wear-resistant. Silk and twill are soft to the touch, but require very delicate care. The most acceptable options are cambric, satin, fleece, flannel, calico, bamboo fabric, which meets all the specified criteria. The top part of the blanket can be sewn from any fabric, as long as it is soft and natural.
The following fillers are used.
- Downy – lightweight; soft; air circulates through it, but clumps; it has a characteristic smell.
- Sherstepon – soft; absorbs moisture well and remains dry; It is not recommended to machine wash.
- Sintepon - light; does not provoke allergic reactions; washes well; not expensive.
- Hollow fiber – resistant to knocking down; very warm; does not deform during washing; more expensive than padding polyester.
- Bamboo fiber – meets all criteria; crumples.
The most popular types of filler are padding polyester and holofiber.
Calculate the amount of fabric as follows: take two lengths as measured, take into account a seam allowance of 1.5 cm on each side and 10 cm for shrinkage, i.e. total allowance is 13 cm. Calculate the amount of filler depending on the size of the blanket and the number of layers.
For sewing you will also need threads No. 40-60, machine needle No. 90-100, pins.
Patchwork patchwork bags
A bag is a must-have element of any woman's wardrobe. Having mastered the technique of patchwork, you can create original designer accessories yourself. To sew patchwork style bags yourself, it is recommended to choose durable, wear-resistant fabrics.
Patchwork quilting
Quilting is a type of patchwork. Its characteristic feature is the figured stitch. Products made in the quilting manner - quilts - are often complemented with embroidery, appliqué, and decorated with beads, buttons, and ribbons. Inspired by the ideas below, you can sew your own quilt by hand or on a sewing machine.
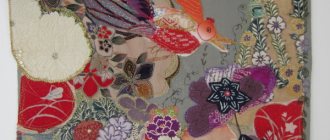
Patchwork paintings and panels
The possibilities of quilting as a type of needlework are enormous. Experienced craftswomen use this technique to create real paintings from fabric.
Step-by-step example of performing patchwork
Blanket
Before starting work, you need to purchase fabric of various colors, filler and make a template.
Execution algorithm:
- Based on the template, you need to cut out the required number of square flaps from the fabric.
- All elements are connected to each other. This turns out to be the front side of the blanket. Iron thoroughly.
- For the base of the blanket, it is best to use fabric of the same tone. Sintepon, or any other filler is laid out with a reserve.
- All three layers are folded together and stitched.
Patchwork is a fairly simple type of needlework that allows a person to reveal their creative abilities and create.
Patchwork patterns templates
Using the presented diagrams, it will not be difficult to sew a product yourself using the patchwork technique.
Patchwork classes are a wonderful opportunity to unleash your creative potential and develop your taste. A few scraps, imagination and a sewing machine will allow you to create original little masterpieces.
What tools are needed?
The creative process itself depends on the successful organization of the workplace. Every detail and every tool should be literally at hand, but not create chaos. It is necessary to prepare tools and materials in advance.
- To work you will need sharp scissors and several types of cutting knives.
- Needles are inserted into a sewing machine depending on the type of fabric.
- When selecting threads, you need to focus on the selected material.
- An iron with a steam function must work flawlessly; the patchwork process cannot be done without it.
- You will need pins to secure the fabric.
- You need pre-prepared templates and chalk to work with them.
- Materials (or trimmings) should be selected that are compatible in texture and color.