Many people prefer to create a variety of interior items with their own hands. In this case, they embody their ideas in them, and also ensure that they receive a high-quality product, since they use only suitable materials during work. A good solution is a do-it-yourself cabinet made from furniture panels, which is very easy to make, and is also highly environmentally friendly, durable and reliable. Every apartment or house certainly has a closet, which serves as the main element for storing numerous items, clothes or shoes.
Advantages
The advantages of creating such a structure yourself using furniture panels include:
- there is no need to spend a large amount of money on this process;
- there is an opportunity to realize your own unique ideas regarding obtaining an unusual cabinet;
- it may have a non-standard shape and design, but for this, before assembling a cabinet from a furniture panel, competent calculations should be made;
- the resulting cabinet will fit perfectly into the existing interior style, so it will become a real decoration of any room;
- you can choose any suitable fittings for it, as well as make the optimal number of shelves and drawers.
Thus, creating a cabinet yourself using furniture panels is the optimal solution for every residential property owner who prefers to do a lot of housework with his own hands.
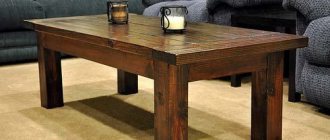
Computer desk made from furniture board
I was prompted to create a computer desk by purchasing a multifunctional device, commonly known as an MFP. The dimensions of the device did not allow it to be placed on an old small table, so I had to use my imagination. For myself, I determined the most important thing is that the main dimensions should not differ greatly from the generally accepted ones, otherwise the computer desk will be large and unpresentable. At the same time, the question arose of how to save more work space and at the same time conveniently position the MFP. After analyzing many options, I developed, in my opinion, the most simple and optimal one.
Preparation of material
Creating a cabinet with your own hands from furniture panels begins with preparing the necessary materials for this work. Furniture board is a special material made from natural wood, and under pressure the wooden blocks are properly glued to each other.
Furniture panels are presented in numerous types on the market. They differ in size, thickness and type of wood used in their manufacturing process. The most popular are products made from spruce, pine, oak or birch.
The advantages of using furniture panels to create furniture include:
- environmentally friendly materials, which are completely free of any true or even dangerous components;
- are easy to process, so you can get designs that have an unusual and bright appearance, as well as a non-standard shape;
- the cost of the material is considered affordable for every buyer;
- it makes really attractive cabinets.
To create a cabinet from furniture panels with your own hands, prepare the following materials:
- the furniture board itself, and it is desirable that its thickness be 2 cm, and it will be used to create not only the body, but also the facade of the structure;
- plywood, with the help of which different shelves will be created, and its thickness should be 1.2 cm, and this material is also often used to save money for molding internal partitions in the cabinet and its rear wall;
- plywood 6 mm thick, used to create drawers if they are planned to be in the closet;
- furniture rod and various holders, ensuring effective and optimal arrangement of various clothes and other items in the structure;
- numerous fittings, which include handles, hinges, guides and other elements for comfortable use of the cabinet for its intended purpose.
Furniture panels are also usually used for the lid and bottom. You can first provide for the presence of lighting in the design, for which spotlights or a special LED strip are used.
DIY chest of drawers
I haven’t been able to find time to write another article for a long time, and I finally forced myself to do it. I made the chest of drawers from furniture panels more than six months ago.
Homemade products from a washing machine engine:
1. How to connect a motor from an old washing machine through a capacitor or without it 2. Homemade emery from a washing machine engine 3. Homemade generator from a washing machine engine 4. Connecting and adjusting the speed of a commutator motor from an automatic washing machine 5. Potter's wheel from a washing machine machines 6. Lathe from an automatic washing machine 7. Wood splitter with an engine from a washing machine 8. Homemade concrete mixer
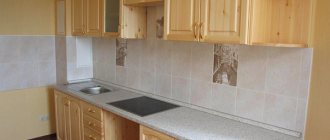
DIY kitchen made from furniture board
It was time to change the kitchen. The doors are already completely dirty, the drawers are stuck to the floor. And it doesn't look very fresh.
I scoured the internet and walked around salons. It turned out that the most defective modular kitchen of 2.4 meters will cost me about 40 thousand. I really didn’t want to pay for glued laminated panels, despite the fact that this miracle doesn’t look much more presentable than an old kitchen, of which there are millions all over Russia. For the tree they asked about 100 per meter. Okay, at least it’s a birch tree. But not affordable at all. It was decided to cut it myself. My hands are not crooked, but I have never done such things. I started by studying YouTube, watching the work of both pros and beginners. The main thing is not to be afraid.
It all started with a drawing on a piece of paper. Someone will say you can draw 3D. Well, I drew it. Essentially it was just for visualization. I mostly used the sheet. Again, changes are made quickly. The next stage is the selection of material. In my city there was not much variety. There were furniture boards of grade A. But it looked somehow boring and gluing the lamellas with a herringbone facing outward was ugly, and even more expensive. Later I realized that I would hardly have seen a Christmas tree anywhere in a finished kitchen. I chose grade B with knots, but lamellas for the entire length. There are no complete photos. Length 2400*600*18 I don’t remember how much. Here's the start of the process.
Tools
If you plan to assemble the structure yourself, you should prepare the necessary tools for this work in advance. These include:
- varnish for wooden structures;
- self-tapping screws for reliable fastening of individual elements of the product;
- an electric drill, which should have different drill bits;
- chisel, screwdriver, pencil and tape measure, as well as a hacksaw for working with wood;
- sanding machine for wood processing.
All of these tools are simple, so they are usually available to every man who does a lot of housework.
Tools
Types of structures
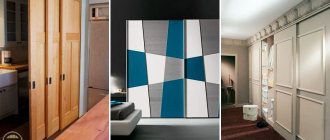
Modern cabinets can have different appearances and styles, but in terms of design, in general, they are divided into only a few types. Let's get to know them.
In terms of design and construction, DIY cabinets can be different.
Table. Types of bedside tables.
| Type | Short description |
| Floor | This is the most common option, which is simply placed on the floor near the bed. If necessary, such a cabinet can be easily moved to another place or moved. This is a stable and reliable option, inside which you can put even quite heavy things. Usually has drawers or doors; the space inside can be filled with shelves. This type of cabinets is the most popular and widespread. |
| Hanging | These bedside tables are a small shelf suspended from something against the wall. This option is not always convenient - you can put very few items on such a cabinet shelf. But in general, in some design styles, such cabinets look very cool. The main disadvantage is the risk of a possible fall or collapse of the structure. But the undoubted plus is the way such a cabinet looks. She seems to be floating in the air. |
| Wall-mounted | This option is a small cabinet that does not have legs, unlike the usual floor option. And this cabinet is mounted on the wall. It can also have shelves, drawers, doors. But such a bedside table cannot be easily moved if desired, and if you remove it, then traces of fastenings will be visible on the wall. But it’s easy to remove dust under such a bedside table. |
Beautiful hanging cabinet
Also, depending on the design features, bedside tables can be made with or without legs. And these furniture products can be different in shape: square, rectangular, even round and angular. There are also very geometrically complex options, but, as a rule, they are difficult to find on the open market - usually these are designer items that cost quite a lot of money.
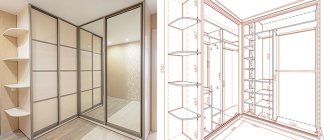
Drawing
Any sliding wardrobe or other similar structure is assembled only after the preliminary creation of a special diagram presented in the form of a drawing. To do this, you should first decide on the main features of the future furniture, for which you decide:
- what height, width and depth the structure will have;
- what number of different doors, compartments, drawers and other compartments will it have;
- what height will the mezzanines have if they are planned in such a cabinet;
- what will be the filling of the cabinet, and it can be represented by numerous partitions, shelves, drawers, rods or other high-quality elements that increase the comfort of using this product.
After answering these questions, the procedure for creating a sketch of the future cabinet begins. To do this, you need to draw it. If you have experience in creating drawings, then the diagram can be made on a sheet of paper. If you do not have the necessary skills, then it is considered optimal to use special computer programs for design. All you need to do is enter predetermined data, after which the required drawing will be automatically obtained. It is on this basis that you can correctly assemble the cabinet yourself.
Thanks to a well-made drawing, you can get answers to many questions regarding the future cabinet:
- details are drawn up;
- the required amount of materials is calculated;
- it is determined what dimensions furniture panels intended to create an interior item should have;
- it is decided how they will be cut.
Often a new cabinet is created to replace an old design, and in this case it is possible to make exactly the same product. After creating the diagram, it is recommended to carefully consider it, since it will be possible to understand on its basis what appearance the future piece of furniture will have. It is advisable to make changes in advance, since during the actual creation of the structure this will no longer be possible.
General tips for calculations
Regardless of the size and appearance of specific kitchen items, general factors are taken into account during design. Before drawing up sketches, you need to collect the following initial data:
- ceiling height;
- the length of each wall of the room;
- placement and dimensions of door and window openings;
- utility network plan;
- decomposition of ventilation ducts.
To draw up a drawing, it is necessary to take measurements of the kitchen.
You should always start from these initial data when developing the dimensions and names of the blizzard.
The room should have several zones: sink, cutting table, stove. Additionally, a refrigerator, dishwasher and other household appliances may be taken into account. The comfort of using furniture is influenced by the location of the handles of cabinets and bedside tables, the height of work surfaces, the placement of wall drawers, the depth of countertops, and the power of lighting fixtures. All these nuances must be taken into account when calculating the size of the set.
Kitchen design
Cabinet assembly technology
After all the preparatory stages, you can begin to directly create the cabinet. You will assemble the structure quite simply if you strictly follow a certain sequence of correct actions. The entire cabinet assembly process is divided into several stages, each of which has its own characteristics.
Assembly
If the work is being done for the first time, it is recommended to start with the procedure for creating a standard double-door cabinet, equipped with a small number of internal elements. It does not have any specific elements, so you do not need to spend a lot of time or effort on its creation.
To form the structure, certain elements are certainly cut out, and for this it is recommended to use an electric jigsaw, which ensures truly smooth and high-quality parts. This tool creates structural elements:
- 2 walls, which are the side parts of the future cabinet;
- the bottom, and it must be highly durable if it is intended to store shoes on the bottom or other elements and structures of significant weight in such furniture;
- the lid, and it should not be too heavy, and it is also recommended that it be slightly larger than the width and length of the cabinet, as this ensures an attractive cabinet;
- a plinth that ensures the closure of the hole formed between the bottom of the cabinet and the floor of the room;
- two doors;
- the back wall, and furniture panels or standard thin plywood can be used for it;
- shelves, and their number should be determined in advance when creating the diagram of the future cabinet.
It is advisable to make grooves at the bottom of the sides of the structure for the plinth, and they can be rounded or rectangular, and thanks to such elements it is possible to move the furniture close to the wall of the room.
Before assembling the cabinet itself, it is recommended to coat all elements with a special varnish designed for working with wood. It is advisable to apply this product 2 times to ensure a truly high-quality and reliable coating. After applying the first layer, the surfaces of the structure must be sanded, but the second application can be performed after the cabinet is directly assembled.
Assembly is a fairly simple job, carried out in sequential steps:
- holes are marked for fastening elements and future fittings;
- in places where there are marks, holes of the required size are created;
- during the work, it is taken into account that the hinges are usually fixed at the top and bottom at a distance of 10 cm, however, in the presence of massive doors, it is recommended to use three hinges;
- the bottom is fixed between the two side walls using self-tapping screws;
- you can immediately start fixing the base, for which self-tapping screws are also used;
- a cover is installed at the top, and it is advisable to use a level or other measuring equipment during work to prevent any distortions or other shortcomings;
- if no problems with evenness are detected, then the rear wall is securely fixed, for which small nails are usually used, since this wall has a small mass;
- the process of installing the door begins, for which the hinge bowls are inserted into pre-made recesses, and the hinges themselves are fixed to the structure with standard self-tapping screws;
- door handles are fastened using ordinary screws;
- The doors are hung, for which hinges are fixed to the side walls, and it is advisable to use adjustable fasteners, which allow you to obtain a truly even fastening.
Thus, the cabinet assembly procedure is a simple job that can be easily done on your own. To do this, only simple sequential actions are performed. During the work process, it is necessary to constantly use a level or other similar equipment in order to quickly see various distortions or other problems, since they must be eliminated promptly.
Creating markings Fixing the base
Fixing the bottom
Holes
Filling
The assembled structure must certainly have different compartments and other elements to ensure ease of use for its intended purpose. To do this, it is necessary to provide for the presence of drawers, different rods or compartments. Boxes are easily made in successive steps:
- custom plywood is purchased, onto which markings are applied in accordance with the required dimensions of the main elements of the future box;
- holes are drilled, and to prevent the thin material from breaking during this process, it is recommended to make holes at a distance of approximately 10 cm;
- to create drawer fronts, a narrow panel of high attractiveness is used;
- the resulting elements are securely connected to each other;
- To make the drawers easier to use, it is recommended to install special guides, thanks to which the elements simply slide out and slide back in.
In addition to drawers, any closet must have a rod. It is intended for hanging various clothes on hangers. To fix it, special high-strength rod holders are used.
Marking
Creating holes
Connecting plywood
Installing guides
Facade
It is important to get not only a strong and durable cabinet, but also an attractive piece of furniture that fits perfectly into the existing style of the room. Various methods can be used for this. The initially obtained structure is certainly coated with a reliable varnish, ensuring a high-quality protective coating. Various methods are used for decoration:
- painting in different shades, for which it is necessary to use special paints designed for working with wood, and it is also taken into account that the resulting color must fit perfectly into the existing color scheme;
- creating different carvings with your own hands;
- use of various films;
- hand painting, which can only be done if you have the appropriate skills;
- the use of expensive, bright and beautiful fittings that attract attention and provide excellent decoration to the structure.
Thus, if you were going to purchase a wardrobe for any room in a residential building or apartment, then creating it yourself is considered an excellent solution. For this, different materials can be used, but the use of standard furniture panels is considered optimal. Designs made from them have many advantages. The procedure for creating a cabinet is considered simple if you carefully study the instructions in advance and use only high-quality materials.
Kitchen furniture layout options
Not only the list of items, but also the comfort of use also largely depends on the location of the furniture.
Table 2. Type of kitchen furniture arrangement
| Furniture placement option | Brief description of operating parameters |
| The simplest layout of a kitchen set, a complete set of items can only fit near a very long wall. Its dimensions must correspond to the total length of all items in the set. Disadvantage: the large distance between work areas significantly increases fatigue during cooking. |
| The most common option, found in both large and small kitchens. Allows you to accommodate the optimal number of items and greatly facilitates the cooking process. |
| It is also recommended for use in large rooms; the set simultaneously creates several zones. In such sets, a bar counter is often used instead of a dining table. |
| It is found very rarely and only in prestigious apartments. It requires a very large volume, the layout is completely different from the usual one. Along the walls there is a refrigerator and special kitchen appliances, all other pieces of furniture are in the center of the room. A work area and a eating area are created here. |
When choosing a specific option, take into account all factors, from the architectural features of the room layout to the amount of lumber for the manufacture of a particular kitchen set.
Which ones to choose?
Furniture panels can be made from the following wood species:
- From beech,
- From oak,
- From ash,
- From pine.
For more information about furniture panels in general and each type in particular, see here. Prices are also indicated there. For example, coniferous species (which include pine) are the cheapest and quite practical. Ash is the most premium in color, style, and design. Oak is the leader in strength (and price). And beech occupies the middle price category, and is excellent for bent products, wood carving, and milling.
At the same time, furniture panels made of more durable materials, for example, oak, should be used for those furniture elements that will have to withstand the highest load. And for the rest, you can take cheaper varieties. Especially if you plan to repaint the resulting product in the future.
Grade AA or AB - determines the appearance of the final product (if the texture is not completely painted over). The first ones are without darkening from knots, the second ones are with darkening on one side. Although many people also like this option, when all natural defects are noticeable.
Spliced or solid-lamella panels will also affect the appearance of the product. The second ones are more like an array. And the first ones are considered a little more durable.
Reviews
- Saving room space. The sliding system allows you to install a dressing room in any corner of the house and there is no need to worry whether the door will get in the way when opening;
- The system is safe for installation in houses and apartments where there are small children. It will be possible to avoid pinching your fingers;
- Sliding doors are easy to install and do not require any additional skills.
How to treat the surface → Room decoration → How to choose the right paint → Surface treatment technologies → Leveling and finishing the walls → Selecting and applying a primer → Removal from the surface → Stretch ceilings and technologies → Reviews and testimonials
Dimensions and functionality
Before you start creating a homemade bedside table, you should decide on its size and functionality, and also decide what material it will be made from. So, in order to decide what size to make a cabinet, you need to measure the available free space near the bed and pay attention to the dimensional parameters of the room. If the space allows you to install any cabinets, then you can make them, adjusting them to standard sizes. In any case, you need to make a drawing of the product and apply all the necessary dimensions to it. Having a drawing will greatly simplify the work in the future.
Bedside table drawing
Advice! If there is not enough free space in the room, it is recommended to install simple hanging bedside tables. They will not load the room and visually will not take up much space.
As for functionality, it is important to decide what structural elements the cabinet will have. So, these can be shelves, drawers, doors. It will be more convenient to use a cabinet that has a door and an upper shelf that is not covered by it. But, however, it will be more convenient for someone to constantly pull out the drawers. By the way, making a cabinet with drawers is not much more difficult than making a simple one with a door.
Small bedside tables for the bedroom fit perfectly into the interior of small rooms
On a note! Cabinets can only have shelves that are not closed by a door. This is the simplest design option, functional and easy to use, but often requires cleaning, since the inside of the cabinet is not protected from dust.