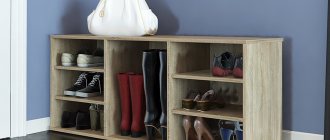
Hi all! Creating a beautiful and practical interior in a frame house, in a country house or in an ordinary high-rise building often becomes the task of the immediate home owner. One of the pressing issues is how to hang a shelf on the wall.
This procedure may seem extremely simple and mundane. But not everyone knows how to act so that the fasteners are not visible, or what to do correctly if the walls are made of PVC, that is, of plastic panels, brick, shingles, lining and other common materials.
Today I will try to answer key questions, talk about the features of installing shelves and existing installation methods. You will get some answers from the video. And if you still have questions, you can always ask them in the comments.
Attaching shelves to the wall without visible fasteners
With all the variety of existing methods of interior design and modern design, it is almost impossible to imagine a modern room in which shelves would not be used.
Decorative and easy to store various small items, massive for books - shelves can not only be an additional useful surface, but they can also act as a decorative decoration for any room or office.
There are two main ways to attach shelves:
- traditional mounting of shelves to the wall
- invisible or hidden fastening of shelves to the wall
The traditional method of fastening using various types of brackets, metal or wooden racks is popular only when the fasteners, correctly selected in color, texture and material, also add their own “zest” to the artistic image of the room.
But often, the presence of additional decorative and technological elements is not always consistent with the overall design of the designer and the target orientation of the structures. In this case, it would be better to use the second fastening method.
The development of modern design craft and the construction industry makes it possible not only to quickly cope with the task of hanging shelves, but also to successfully use the fastening of shelves to the wall without visible fasteners, thereby creating the illusion of floating in space.
Invisible fastening of shelves to the wall
Let's consider the main stages of properly attaching a shelf to the wall, while hiding all fastening elements:
- First, you need to assess the strength of the wall or partition on which the shelf will be attached.
With a brick partition thickness of 250 mm or more, concrete partitions with a thickness of 100 mm or more can be safely used for hanging shelves without additional load-bearing structures.
Scheme of invisible shelf fastening.
1 – bracket for fastening the shelf; 2 – mounting holes; 3 – steel axle; 4 – suspension; 5 – shelf.
With thinner bricks, cinder block and plasterboard walls up to 100 mm, it is possible to use invisible fastening of shelves to the wall, but such shelves are suitable only for decorative purposes.
Since they simply will not withstand additional loads.
Then you need to determine the thickness of the shelf itself.
It can be determined by placing a load of expected weight on it. The absence of visual deflection and deflection to the touch indicates sufficient thickness of the board.
An exception may be cases when the choice of a thicker board is dictated by the general concept of the interior.
However, it is also necessary to take into account the fastening features, due to which the thickness of the board, as a rule, cannot be less than 30 mm. The thickness of the shelf must be selected depending on the load, for example, for books - boards with a thickness of 45 to 60 mm are suitable.
The board must be dry and processed in accordance with its purpose.
Types of fastening shelves to the wall
After this, the types of fastening the shelves to the wall are selected, depending on its purpose and the thickness of the board.
There are a huge number of fastening materials that can be expertly hidden from prying eyes; let’s look at some of them:
- The most popular at the moment is
the use of hidden hinges located on the back of the shelf.
Fastening technology using hinges:
For accurate hanging, you need to accurately measure the distance between the centers of the loops. This distance will determine the markings on the wall for the mounting holes. To ensure that the shelf hangs evenly and does not warp, it is better to use a building level, which will ensure an accurate horizontal line for the shelf. After the holes in the wall are drilled in accordance with the markings, they are filled with a plug into which screws are screwed. The screw should be screwed in deep enough, but the distance between its head and the wall should allow the shelf hinges to be put on.
The shelves come complete with special fasteners designed for invisible installation. A shelf installed in this way will be securely fastened. This will create a visual impression that it is literally hanging in the air.
Method of installing shelves using special furniture fittings
Let's look at the step-by-step implementation of this installation.
It starts with purchasing a modern shelf in a furniture supermarket or online store.
Step 1. Measure the distance between the centers of the mounting holes directly on the product.
Step 2. After this, mark the location of the shelf on the wall. Using a building level, we draw a horizontal axis on which we mark the position of the mounting holes, taking into account the center-to-center distance between them.
Step 3. Next, we attach the bracket to the resulting axis in the center of the shelf holes and mark the places for its future attachment to the wall. They must be located strictly along the horizontal axis.
Step 4. The next step is to drill a hole for attaching the brackets. They must be made strictly perpendicular to the wall, this will ensure that the shelf angle is 90 degrees relative to the wall. To simplify drilling, it is advisable to use a square.
Step 5. Next, remove the remaining drilling products from the holes and hammer in wood plugs or plastic dowels.
Step 7. Now we carry out the direct installation of the shelf. To do this, we put it on the steel axles of the brackets, alternately tapping it with a rubber hammer on the left and right sides in the front part. The shelf will be evenly installed on the fastening elements, eliminating distortions.
Step 8. The final stage will be to check the play and reliability of the fastening. After this, we remove the remaining debris and install a flowerpot with an orchid. The installation process is complete.
Another method of invisible fastening (metal rods)
Installation technology for fastening metal rods:
As a rule, reinforcing pins or threaded rods with a diameter of at least 10-12 mm are used.
First of all, we take our shelf and measure its length and width.
Then, using a ruler and a building level, we mark this length on the wall (not the entire distance, but a little shorter), at the location of the future location of the shelf.
We mark three board thicknesses on each side of the shelf and drill holes equal to the diameter of the pins; we make such holes in the shelf itself (you can use a template, since the holes in the wall and in the shelf must match exactly).
Related article: Calculating the amount of paint for walls
Then judge from the subsequent filling of the shelf, if there will be light souvenirs there, then these two pins will be enough, but if there will be heavier things, you can make more fastenings (even every 5 cm)
. We take the required number of long rods (their length should be approximately 1/3 of the width of the shelf, but keep in mind that there should be at least 10-15 cm of pin in the wall).
Insert the rods into the wall half their length, check with a level so that they are exactly perpendicular to the wall; the durability of the entire structure and the safety of the objects standing on it depend on this. Then fix the rods with synthetic glue or resin and wait until the glue dries.
After this, we place the shelf on the rods (you can additionally glue the pins to the shelf by pouring glue into the holes). One of the mounting options can be considered preliminary installation of a square block into the wall (usually used for narrow shelves). Fastening installation technology: To do this, a square block is attached to the wall, the side of which is equal to the thickness of the board for the future shelf.
It is attached using dowels, nails or plastic anchors with self-tapping screws. Then, round wooden pins (pins) are driven into the block into holes pre-drilled according to the template, which are lubricated with glue, after which the wide part of the shelf is put on them.
In order to place the board on pins or dowels, use a mallet with a rubber striker, which is gently struck on the outer edge of the board.
By varying the height, texture, color and thickness of the shelves, you can achieve an original and unique design and create a feeling of orderliness and completeness in the design of the room. Without limiting your imagination and taking advantage of all the advantages of the modern construction market, you should remember about safety, carefully manufacture and check all fasteners. In this case, the shelves, like any other element of the functional decor of the room, will serve for a long time, remaining a reliable, useful and beautiful element of the interior.
You can also watch a video of hanging a shelf on the wall
Fixing the shelf on the wall using hidden fasteners
Step 1. In order to fix a shelf on the wall using a hidden fastening option, you will need to prepare a hammer drill with a drill of a certain section, 2-3 special titanium pins, a building level, a square, a drill and a bit, the shelf itself, and a pencil for marking. The pin is a metal rod that is threaded on one side and smooth on the other. The threaded part will screw into the wall, and the smooth part will need to be fitted with a shelf. Typically the pin diameter is 10-12 mm. The drill is selected with the same diameter as the purchased titanium.
Special metal pin
Step 2. First of all, you need to apply markings to the shelf itself. By the way, you can make it yourself from any part of other furniture that has served its age, rather than buying new one. Using a ruler, you need to set aside the required distance from the end edge of the shelf. In this case, a distance of 12 cm was chosen.
Marking
Step 3. Having chosen the distance, you need, using a square and a pencil, to draw a line perpendicular to the plane of the shelf at the end where the hole for fastening will be drilled.
A perpendicular line is drawn at the end
Step 4. Next you need to find the middle of the end of the board and make a corresponding mark for the drill. It is important to understand that if the shelf consists of two sheets of chipboard glued together, then in this case it is better to drill a hole for fastening not in the middle, but with a slight offset towards one or another board (better - towards the bottom, it will be more reliable).
A mark is placed for the drill
Step 5. Similar markings must be applied on the opposite side of the shelf.
On the other side the same markings are applied
Step 6. Next, to the end of the shelf where the markings are applied, you need to attach a building level and directly on it make marks parallel to those previously applied to the board, as well as marking the edges of the shelf itself. The level cannot be moved while the marking is being transferred. Pencil marks can then be easily erased from the surface of the level, but this technique of transferring markings will make it easy to make markings for drilling holes in the wall.
The level cannot be moved while the markings are being transferred Marks are made on the level
Step 7. Then you need to select the approximate location of the shelf on the wall. Having applied it to the surface, you need to mark the boundaries of the product directly on the wallpaper with a pencil.
The shelf is attached to the wall
The boundaries of the shelf are marked
Step 8. Now you need to take a building level with markings and, attaching it to the wall in the selected and marked place, align and transfer the markings from the level to the wall, also using a pencil. In this way, you can easily and quickly make precise markings for the locations for drilling holes for the pins without unnecessary movements.
Transferring markings from level to wall
Step 9. Next, in the end part of the shelf, in the designated places, you need to drill holes for the pins. They should be the same depth as the length of the part of the pin on which the board will be placed.
A hole is drilled in the end
The depth of the hole should correspond to the part of the pin on which the shelf will be placed
Step 10. Now you need to take a hammer drill with a drill of the same diameter as the pin and make holes in the wall in accordance with the previously made marks. To prevent dust from concrete from falling onto the floor, it can be removed immediately using a switched on vacuum cleaner, the hose from which will be held by an assistant.
Holes are made in the wall
Step 11. Both titanium pins need to be installed in place, that is, inserted into the holes in the wall. If they are difficult to enter, you can carefully knock them out with a hammer or screw them into the wall using a key.
The pins are inserted into the holes
Step 12. All that remains is to put the shelf on the pins in the wall, aligning the holes with the metal fasteners. The shelf is installed. By the way, for better fixation, you can add a little glue to the holes of the shelf - then the connection will be even more reliable. This mounting option will allow you to achieve an effect where it seems as if the shelf is supported on the wall by itself.
The shelf fits onto the pins in the wall
Finished shelf without visible fasteners
Video - How to install a shelf with invisible fasteners
Types of fastenings
Shelf mounts are selected taking into account the weight, design features and material used to manufacture this interior element, as well as the type of surface on which they will be installed.
Types of fastening shelves to the wall differ in structure, design, method of fixation and support. The most popular type is visible fittings, usually brackets. They are the easiest to install, can withstand the heaviest loads, and provide reliable support.
Attaching shelves to the wall without visible fasteners is more difficult. In addition, this option is not suitable for all walls - a solid base is required: concrete, brick.
Some structures, for example, gypsum plasterboard partitions, must be thick enough to allow shelves to be hung on them in this way.
Which shelf mounts should I use?
To attach racks and shelves, you can use different types of fasteners, depending on the material of the wall on which they are attached.
For walls made of bricks, blocks and other traditional building materials, you can use:
Anchor bolts, the newest and most reliable fasteners. It can withstand significant loads and is even suitable for aerated concrete or foam blocks, which can crumble during operation. In addition, anchor bolts are easy to work with.
Dowels are also a fairly reliable way to attach a shelf. But they have one drawback: under heavy operating loads, the plastic can wear out and the dowel will simply begin to gradually crawl out of the wall. Therefore, dowels are a cheap way to secure shelves with little load. Usually these are shelves that are used to store souvenirs.
The oldest, but also unreliable method is to simply nail the shelf to the wall. But it is not recommended to nail it if you want the shelf to stand for a long time. In addition, when nailing a shelf, you always risk damaging the finish, and this is undesirable, even if the shelf itself will hide these flaws.
For wooden walls, it is best to use special screws, although in some cases you can limit yourself to nails if you do not plan to use the shelf often.
Hidden
Hidden fastening for shelves is a solution for interiors decorated in high-tech, minimalism or modern style.
To install shelves on the wall use:
- Hidden hinges. They are suitable for products of different thicknesses and materials (chipboard, solid wood, plywood). Using a building level and a marker, mark points on the surface of the wall and drill holes for fasteners. Then the dowels are driven in and the hinges are secured with self-tapping screws. At the end of the shelf, with which it will adjoin the wall, it is advisable to make a recess to the size of the hinge, so that due to the protruding fittings, no free space will form between the wall and the shelf.
- Metal rods. This type of fastener belongs to the console type. It is usually sold complete with the shelf itself, in which holes of the required diameter and depth are already made. The method of fixation may vary - either it is screwed into the wall with a dowel, or it is attached to flat hinges or strips. Reliable fixation is ensured only by those hardware whose diameter is at least 10 mm.
- Wooden beam. Used for installing closed shelves. On the wall, using a level and a marker, draw a line on which the auxiliary fasteners will be placed (it should go under the shelf). Then the block is attached using dowels and screws. Hang the shelf and secure it with an additional block.
Fixation on drywall
Many people now prefer to line the walls with sheets of plasterboard or make room partitions from this material. And it is clear that attaching shelves to it using pins is not the best option. Drywall is a fairly thin and fragile material, not designed for heavy loads . So the option of hanging shelves on the partition is completely eliminated.
Types of fasteners for drywall
But if the walls were leveled with plasterboard and it was already known where the shelf would hang, then you can use a trick and still use invisible fasteners. To do this, it is enough to install a reliable wooden block between the wall and the sheet of drywall in the place where the shelf will be attached. Next, you will need to fix the shelf itself so that the pins pass immediately through the drywall, through the block, and through the concrete wall. However, it is important to understand that such a piece of furniture should not be heavy in itself, and you should not place massive or significant objects on it. Also, special fasteners for drywall can be used to fix lightweight shelves.
How to hang shelves on drywall
That, in fact, is all that could be said about invisible options for attaching shelves to walls. Everything is quite simple and should not cause any difficulties even for a beginner in this matter. The main thing is to purchase everything you need in advance, and the work can be completed within 30-40 minutes. A shelf will appear on the wall that will stand “by itself.”
Brackets, fasteners, corners
If the wall is not strong enough, it is not possible to install a shelf with a hidden fastener, then use conventional visible fasteners. When installed correctly, it can withstand a load of up to 50 kg, so for hanging structures on which books are supposed to be stored, it is preferable to use just such a solution.
Types of fastening shelves to the wall:
- Bracket holder. The most durable fastener. It can have a variety of shapes and designs and is made of metal, plastic and other materials. It is advisable to select it taking into account the decor of the room and the color of the interior.
- Loops. They are fixed on the wall, the shelves are hung on them using furniture screws.
- Corner. Metal corner fasteners are practically invisible, but provide high-quality support for suspended structures.
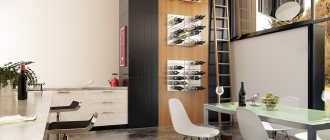
Shelves in a modern interior
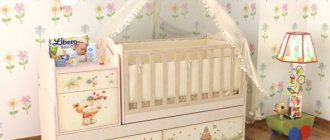
In any house, if a person lives in it, there are always a lot of different jars, bottles, maybe books, souvenirs, photo frames and much more. And in order to keep order in the house, it is recommended to put each thing in its designated place. And often a wall shelf acts as such a place. It usually serves two functions - it is a convenient stand for something decorative or useful, and it can also be the highlight of a certain design.
Wall shelves in the interior
Depending on the room in which the shelf is installed, it can perform a very different role. So, in the kitchen there may be a set of spices on it or some elements of utensils. In the bathroom , a shelf is a must-have for arranging various bottles and bottles. A shelf is also needed in the bedroom , where you can place on it various things you need before going to bed. Of course, these interior elements are also in the living room - books, flowers, and souvenirs can be placed on them. Often they are able to significantly save space, as well as overcome clutter in the room, because from now on everything will be in its place. That is why this piece of furniture is absolutely irreplaceable, despite the fact that there may be many wardrobes or chests of drawers in the house.
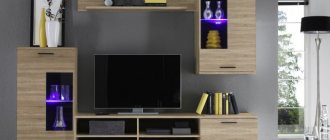
Wall in the form of shelves
On a note! The shelf is appropriate and functional in absolutely any interior, regardless of its style. The main thing is to choose the right and suitable option and place it in a place where the shelf will look organic and as part of the interior.
Black and white shelf
Moreover, it is important to choose not only a shelf that is suitable in style, but also one that you will like and look aesthetically pleasing when hung. When creating certain styles, it is important that the fastenings on it are invisible. In general, there are several variations of fixing shelves on the wall.
Wood shelf
Fastening glass shelves
Fastenings for glass shelves should be selected taking into account the characteristics of the fragile material. Most often, special metal or plastic holders with silicone or rubber gaskets are used to prevent scratches and other damage to transparent surfaces. They are ideal for hanging shelves in bathrooms.
Pull-out baskets assembled with frame
| basket for 1 rail assembled with frame (height 85 mm) | ||||
| Width Width | 436 mm 605 mm | 264110 264180 266410 266480 | white platinum white platinum | |
| Mesh basket for 1 rail assembled with frame (height 85 mm) | ||||
| Width Width | 436 mm 605 mm | 264190 264188 266490 266488 | white platinum white platinum | |
| basket on 2 rails assembled with frame (height 185 mm) | ||||
| Width Width | 436 mm 605 mm | 264210 264280 266210 266280 | white platinum white platinum | |
| Mesh basket on 2 rails assembled with frame (height 185 mm) | ||||
| Width Width | 436 mm 605 mm | 264290 264288 266290 266288 | white platinum white platinum | |
| basket with 3 rails assembled with frame (height 285 mm) | ||||
| Width Width | 436 mm 605 mm | 264310 264380 266310 266380 | white platinum white platinum | |
| Mesh basket on 3 rails assembled with frame (height 285 mm) | ||||
| Width Width | 436 mm 605 mm | 264390 264388 266390 266388 | white platinum white platinum | |
Rules for fastening shelves and necessary tools
The method of fastening the shelves is chosen taking into account:
- Base material. Any fastener can be fixed on brick, wood and concrete surfaces. For plasterboard and paneled walls, invisible fittings are used, which can be fixed in the frame (wooden blocks or metal profiles).
- Shelf material and thickness. Glass structures are fixed with holders, metal ones are hung using hidden hinges, and wooden ones or those made of laminated chipboard are hung on rods. Thin products are hung on small corners or loops made of any material, massive ones - on durable metal ones.
- Length of the hanging structure. Typically, 2 fasteners are used, placing them at some distance from the edges of the shelf. However, long shelves (one meter or more) will require additional support.
Related article: Fastening for frames on the wall without drilling
You also need to consider the thickness of the wall. If it exceeds 25 cm (for brick) or 10 cm (for concrete), then the invisible fastener can withstand heavy loads. When installing on thinner partitions, as well as walls made of wood or gypsum board, you need to understand that the shelf will perform an exclusively decorative function; placing heavy objects on it is prohibited.
Tools
To independently attach shelves to the wall without visible fasteners, you need to prepare everything that is required in the process:
- building level;
- drill or hammer drill (these tools are needed for drilling holes);
- mallet or hammer;
- screwdriver;
- ruler;
- marker;
- accessories;
- dowels, furniture screws or self-tapping screws.
Installation rules
First, mark the line on which the fasteners for the shelf to the wall will be installed. A level is applied to the surface at the desired height and its position is leveled so that the bubble is located exactly in the center. Make a mark with a marker.
Drill holes in the wall at the designated points. For hard materials (brick, concrete), it is preferable to use a hammer drill. The drill is suitable for working with wood or plasterboard. Plastic dowels are driven into the holes using a mallet.
The next step is to install a self-tapping screw into the dowel if hinges or strips with metal rods are used. Single rods are screwed directly into dowels instead of self-tapping screws.
Proceed to the installation of the shelf:
- On the rods. You need to drill a hole of equal diameter and length in it, and then attach it to the fittings.
- On the hinges. The hinges are screwed to the rear end of the suspended structure. And then the shelf is attached to the wall using pre-screwed screws.
Afterwards, check the evenness of the installation using a building level - place it on a shelf and look at the position of the bubble. If it deviates, you need to correct the position of the product, otherwise the objects placed on it may fall. When everything is aligned, check the reliability of the fastening by placing an object on the shelf whose mass is equal to the permissible load.
Hanging system
carrier railLength1350 mm421310 421380 white platinumLength1950 mm421910 421980 white platinumCan be shortened to required lengthhinged guideLength508 mm426810 426880white platinumLength900 mm426018 426048white platinumLength1200 mm426310 426380white platinumLength1530 mm426618 426648white platinumLength2000 mm426410 426480white platinumLength2300 mm426510 426580white platinumclips for hanging rail2 pcs. per pack470718 470768white platinumHinged guide can be cut to required sizeFeatures of fastening shelves depending on the type of wall
When installing fasteners for shelves to the wall, you should take into account the characteristics of the material from which the base is made. The higher its strength, the more securely the hinged structure will be fixed. Soft wood and brittle plasterboard surfaces are not capable of providing quality support. The methods for attaching shelves to them and the type of fittings used differ.
Concrete wall
To drill a hole in a solid concrete surface, you need a hammer drill. The work must be performed using a special concrete drill, the diameter of which is selected according to the size of the dowel. The depth of the hole must match the length of the fastener.
Plasterboard wall
When working with gypsum boards, 2 methods are used:
- The first is suitable for already erected structures, however, suspended structures installed in this way can only be used for decorative purposes. Heavy objects cannot be placed on them. In this case, holes are drilled in any place where you want to fix the shelf on the wall. The most reliable fixation in a fragile material is provided by a specially shaped dowel - a butterfly. It is inserted into the hole, and when a self-tapping screw is screwed into it, the wings of the dowel open. They distribute the load over the entire adjacent area of the gypsum board, so the material does not crumble.
- The second requires preparation at the stage of creating a plasterboard partition. When constructing a frame on the line where it is planned to install wall shelves or other heavy hanging pieces of furniture, additional crossbars are made. They are attached to vertical posts. This improves the rigidity of the entire structure. The fasteners are then screwed strictly into these crossbars.
Hidden shelf mounts allow you to create additional storage space with minimal disruption to your interior design. The installation can be carried out independently, however, it is important to correctly calculate the load and select hidden fittings in accordance with it.
Shelf system details independent of depth
| barbell hanger | ||||
| 35x43x77 mm | 470910 470980 | white platinum | ||
| end plug for rod | ||||
| 2 pcs. packaged | 623903 | chromium | ||
| hanger rods | ||||
| Length Length Length | 1000 mm 1500 mm 2000 mm 3000 mm | 620903 621503 621803 621003 | chrome chrome chrome chrome | |
| corner rod for hangers | ||||
| radius 270 mm | 621100 | chromium | ||
| universal hook | ||||
| 3 pcs. packaged | 472410 472480 | white platinum | ||
| Elfa single-tier shoe shelf 60 cm (no bracket required for installation) | ||||
| Length Depth Height | 598 mm 194 mm 92 mm | 482010 482080 | white platinum | |
| side stop | ||||
Length Length | 250 mm (1 piece) 200 mm (2 pieces) | 465110 465190 465016 465096 | white platinum white platinum | |
How and with what help to attach a shelf to the wall
You can attach various shelves to the wall yourself. At the first stage of work, it is necessary to select the most suitable fastenings for shelves of a certain type, which is the main problem. Next, the tool is prepared and the work is done. What methods are used for fixation and how to install the shelf yourself, read on.
Device for storing various items on the wall
494mm deep wire shelf system
| wire shelf bracket | ||||
| Length Width Height | 500 mm 13 mm 73 mm | 410510 410580 | white platinum | |
| decorative cap for bracket (Left/Right) | ||||
| Length Width Height | 500 mm 8 mm 16 mm | 602918 602988 603018 603088 | white platinum white platinum | |
| Elfa shelf | ||||
| Length Length Length Length | 500 mm 607 mm 900 mm 1212 mm | 452818 452848 451818 451848 451910 451980 452018 452048 | white platinum white platinum white platinum white platinum | |
Types of fastenings
To attach the shelf to the wall, you can use:
- exposed (visible) fasteners;
- hidden fasteners that are invisible to the average person.
Exposed Fasteners
Open fasteners include:
- brackets of various configurations and sizes. It is recommended to use such a shelf fixing element only if it fully matches the design of the room;
Shelf holders of different types
- metal corners. The devices are the simplest, most common and reliable fastening elements. Can be installed in rooms with any finish;
Corners for fixing shelves
- loops. They are also a common option. Easy to install and reliable;
Open loops for hanging shelves
- holders. Used advantageously as fastenings for glass shelves. Can be of different shapes, colors and different sizes.
Holders for shelves made of glass
Hidden fasteners
Fixation with hidden fastening is carried out using:
- hidden loops. A special structure is installed inside the shelf, which rests on a bolt screwed into the wall. From the front side, neither the hinge's retaining hole nor the bolt are visible;
Fixing the shelf with hidden hinges
- metal rods that are attached to the wall and “recessed” inside the shelf.
Using metal rods to secure the shelf
How can I mount a shelf on the wall?
To hang a shelf, you do not need to have great skills and abilities. Sometimes it is enough to have the shelf itself, a hammer drill and a building level on hand. Next, the work will go quickly and smoothly - hanging the shelf will take five minutes. However, these interior items can be fixed in different ways. This is often influenced by the type of shelf, the owner’s desire to use visible or invisible fasteners, and a number of other factors. Sometimes the type of fastener is important.
Table. Methods of fastening shelves.
| Mounting option | Short description |
| Bracket or holders | This option assumes the presence of visible fastenings for shelves. They can be seen, and they are fixed both below and above the shelf. The brackets can also be hidden. Visible brackets can be simple or decorative. They come in both plastic and metal, ornate and simple, etc. One side is attached to the wall, the other to the shelf itself. However, it is important to understand that this option is not suitable for every interior style. |
| Loops and corners | This is the choice of those who save on mounting costs, but want to install the shelf as quickly and easily as possible. It is suitable for almost every interior. Moreover, this is a fairly reliable fastener, and depending on its size, you can vary the load on the shelves. |
| Fastenings for glass options | These fasteners are used only for fixing shelves made of glass and characterized by their large mass and fragility. They are usually made of metal and have special gaskets that will allow you to securely fix the shelf itself to the wall, preventing it from falling. There are also suction cup fasteners for glass, but they are not very reliable. As a rule, the suction cup is fixed on the underside of the shelf. Typically, such fasteners are small in size. |
| Invisible | This option will allow you to install the shelf so that the fasteners themselves will not be visible from any side of the shelf. It will seem like it's just glued to the wall. |
Concealed shelf holder
Installation of fasteners
Installation of fastening the shelf to the wall with your own hands is carried out according to the following algorithm:
- choice of fastenings;
- preparation of instruments;
- fixing the shelf to the wall.
Selection of fasteners
When choosing fasteners, consider the following parameters:
- the material from which the wall is made. You can hang shelves on brick and concrete walls in any way. For plasterboard walls, it is recommended to select stronger fasteners;
- the material from which the shelf is made. Massive fasteners are not suitable for glass shelves, as they make the structure too heavy. For metal shelves, external fasteners are best, and for wooden shelves, internal fasteners are best;
- thickness and other overall dimensions. For massive shelves, it is recommended to select similar types of fastenings: large brackets, hidden metal rods, and so on. For light, thin shelves intended for storing souvenirs, cosmetics, and so on, it is advisable to use small corners.
Related article: Toilet tiles: which one to choose and how to install?
Additionally, it is worth considering the number of fasteners. If brackets, corners or hinges are used, their number cannot be less than 2 pieces, located on each side of the shelf. If the shelf length is more than 1 - 1.5 m, it is recommended to increase the number of fasteners.
Preparing tools
To complete the installation work, you will need to prepare the following list of tools:
- ruler, tape measure and marker for marking;
- building level for leveling in a horizontal position;
- drill. If installation is being carried out on a brick or concrete wall, then it is recommended to use a hammer drill instead of a drill;
- screwdriver or screwdriver, hammer;
- dowels, screws and other fasteners.
Shelf fastening
The instructions for attaching the shelf are as follows:
- At the first stage, it is necessary to determine the place where the shelf will be hung and mark the location of the fastening elements. When applying markings, it is important to take into account the horizontal level of the piece of furniture, since otherwise it will be impossible to put anything on the shelf;
Determining the locations of fasteners
- hole preparation. Before attaching the elements fixing the shelf, it is recommended to pre-drill the holes, even when attaching to a wooden wall;
Preparing holes for mounting the shelf
- installation of dowels. If the shelf is hung on a brick or concrete wall, then before fixing it with self-tapping screws, it is necessary to install plastic dowels, which allow for a stronger adhesion of the fastening element to the wall. Dowels can simply be hammered into the holes;
Installation of devices for reliable fixation of the shelf
- fixing the selected mount to the wall using self-tapping screws of a suitable length;
Fixing the selected fastener to the wall
- fastening the shelf to the bracket. If fixation is carried out using hidden metal rods, then before fastening it is necessary to drill holes in the shelf of appropriate size and length;
Fixing the shelf on the fastening element
- checking the correctness of the work. At this stage, it is necessary to check the reliability of the shelf fastening, applying the maximum permissible force to the piece of furniture (for example, you can lean your elbows or hang slightly on the shelf) and the horizontal installation using a building level.
Checking that the shelf is installed correctly
How to install a shelf with hidden fastenings, watch the video.
To secure the shelf, you can use other completely different objects, for example, thick leather belts. Unusual types of fastenings will add individuality to the interior of the room.
How to choose a fixation type?
This is not an easy task, since when choosing a method for attaching shelves, several factors must be taken into account. And they are the ones who will influence the final decision.
- The thickness of the wall itself on which the shelf is fixed. This is one of the main factors to consider when choosing a mounting option. The fact is that it is not always possible to use, for example, a hidden pin fastening. It is better to avoid it if the wall is made of soft materials such as plasterboard. The thickness of the partition should not be less than 10.5 cm if it is made of concrete, and less than 25 cm if it is made of brick. If the wall does not meet these parameters, then it is better to choose another fixation option. In relation to drywall, a shelf can be hung using a hidden fastener only if the wall thickness is at least 10 cm, and only light souvenirs and nothing heavy or giving a serious load will stand on the shelf.
Brackets for mounting shelves in the wall - The thickness of the shelf itself and its weight also have a serious impact on the choice of fixation method. So, the shelf should not be too soft or damp. If you plan to place only light objects on it, then you can choose a shelf with a thickness of at least 3 cm, and if you plan to place heavy elements and possibly an increased load, then the shelf should have a thickness of at least 4.5 cm and no more than 6 cm.
Relationship between shelf depth and load on each mensolo holder
Important! You can choose the right mount only if you know the answers to the questions: “What will stand on the shelf?” and “Which wall will the product be fixed on?”, only then can you make the right choice.
It is also important to estimate the number of fasteners in advance. So, if the shelf is shorter than 1-1.5 m, then a couple of fasteners are enough. If the length is greater than the specified parameters, then it is better to increase the number of fasteners in order to evenly distribute the load on the product and the wall. Moreover, again, the number of fasteners can vary greatly depending on the thickness of the shelf itself and its quality.
The free space above the sofa is organically filled with shelves to match the walls
The nuances of fastening shelves
As the main support for the shelf, you can choose an anchor bolt, thanks to which you can securely fasten the piece of furniture.
Its dimensions are as follows:
- diameter up to 12 mm,
- length – 180 mm.
There should be a thread on one end of the anchor bolt to screw the anchor into a wooden surface, and on the other end to screw it into a metal sleeve.
As a base for the shelf, you can take a piece of board from a window sill with artificial turf.
The dimensions are as follows:
- thickness – 25 mm,
- width – up to 200 mm.
There are only two options for mounting:
A hidden option for fastening shelves is needed in cases where decorative elements are absolutely incompatible with protruding fasteners. Attaching shelves in this version is just as easy as in the traditional one.
305mm deep wire shelf system
| wire shelf bracket | ||||
| Length Width Height | 320 mm 13 mm 55 mm | 410310 410380 | white platinum | |
| decorative cap for bracket (Left/Right) | ||||
| Length Width Height | 320 mm 8 mm 16 mm | 601218 601288 601318 601388 | white platinum white platinum | |
| shelf | ||||
| Length Length Length Length | 450 mm 607 mm 900 mm 1212 mm | 452618 452648 450210 450280 450410 450480 451210 451280 | white platinum white platinum white platinum white platinum | |
| plastic mat for wire shelf Elfa | ||||
| Length Length | 450 mm 607 mm 902 mm | 605430 605432 605433 | ||
| hanger rod | ||||
| Height Depth | 88 mm 272 mm | 491688 | chromium | |
| wire shelf divider | ||||
| Length Width Height | 311 mm 54 mm 200 mm | 100162 | white | |
| basket shelf | ||||
| Length Length Length | 450 mm 610 mm 902 mm | 457418 457448 457018 457068 457110 457180 | white platinum white platinum white platinum | |
| basket shelf divider | ||||
| Length Width Height | 334 mm 11 mm 95 mm | 473018 | p/transparent | |
| 2 pcs. packaged | ||||
| side hooks (4) 30 cm | ||||
| Length Width Height | 316 mm 47 mm 36 mm | 473316 473386 | white platinum | |
| side hooks (8) 30 cm | ||||
| Length Width Height | 316 mm 37 mm 36 mm | 473516 473586 | white platinum | |
| side tray 30 cm | ||||
| Length Width Height | 316 mm 84 mm 36 mm | 473716 473786 | white platinum | |
Sequence of work
Before you attach the shelf to the wall, you need to know that the thicker the shelf, the thicker the support should be. A hole is drilled in the end part an average of 5 mm below the surface. All holes for shelves in the wall must match, otherwise attaching them will be quite problematic.
Attaching the shelf to the wall:
- A strip of the required length is considered a template. It is applied to the end of the shelf and a hole of the required diameter is made, after which it is applied to the wall.
- The next step will be drilling, which must be done with maximum precision.
To attach the shelf you will need:
- electric drill,
- threaded coupling,
- brackets,
- lath - template,
- carpentry glue,
- screws.
Installation of a corner shelf (video)
Wall system
wall guideLength316 mm400310 400380white platinumLength636 mm400610 400680white platinumLength956 mm400910 400980white platinumLength1276 mm401210 401280white platinumLength1596 mm401610 401680white platinumLength1916 mm 401910 401980white platinumLength 2236 mm402210 402280white platinumLength 2400 mm402410 402480white platinumStore shelf mounts
A shelf that you bought at a hardware store can be very difficult to attach to the wall. Be sure to read the instructions that came with it. Most likely, it will contain all the necessary recommendations on how to screw the product to the wall.
Next you need to understand what type of fastening the shelf has. Usually, complete with a shelf and instructions, it also includes elements that are used to fasten the product. It is also necessary to select brackets, thanks to which the shelf will be secured.
Bracket options may vary:
- fastenings that do not extend beyond the shelves;
- flat brackets with pear-shaped holes at the end.
To fasten a shelf from a store to the wall, first carry out the careful measurements given above.
Steps to attach the shelf to the wall:
- Based on the possible dimensions of the shelf, you will need to decide on the place where the fastening will be made. Choose the right place so that other furniture in the room does not interfere.
- Using a building level, you need to control the position of the product.
- Nests are first created in the walls so that after this procedure the shelves can be safely attached. These nests are made with a puncher or drill, and then dowels are driven into the resulting holes.
- After this, the shelf is mounted on the wall.
- The final stage is screwing the fastening elements into the holes.
Baskets for attaching to the guide
| small basket | ||||
| Length Width Height Length Width Height | 435 mm 79 mm 70 mm 435 mm 80.6 mm 74 mm | 333210 333280 333290 333288 | white platinum white platinum | |
| medium basket | ||||
| Length Width Height Length Width Height | 435 mm 104 mm 70 mm 435 mm 144 mm 135.6 mm | 333110 333180 333090 333088 | white platinum white platinum | |
| large basket | ||||
| Length Width Height Length Width Height | 435 mm 134 mm 140 mm 435 mm 144 mm 135.6 mm | 333010 333080 333090 333088 | white platinum white platinum | |
| media basket | ||||
| Length Width Height | 435 mm 167 mm 70 mm | 334310 334380 | white platinum | |
| divider for media bin | ||||
| Length Width Height | 159 mm 67 mm 20 mm | 334430 | insight | |
| set of baskets with guide | ||||
| Included: Small basket - 1 pc. Medium basket - 1 pc. Large basket - 1 pc. Wall guide 636 mm - 1 pc. | 333380 | platinum | ||