Even before the baby is born, the mother thinks through absolutely all the details concerning the newborn. Especially clothes, children's textiles. In addition to vests and caps, close attention should be paid to the blanket. It contains a child on his way home from the maternity hospital during the first months of his life. The choice will depend on weather conditions and the time of year the little one was born. It is better to give preference to a natural product. It is not cold, not hot, the body breathes. It is not blown through, dense, soft, approximately 1.20 x 1.20 in size. Let's figure out how to wrap a baby in a blanket or diaper.
Walk
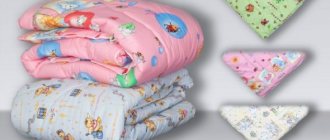
We need a diaper and a blanket. The first one replaces clothes. The fabric is cotton, soft, pleasant. The second will warm the child and limit movements.
Diaper
- Cover the baby with the right corner of the diaper. The left leg remains free.
We wrap the right end over the shoulder - under the back
- We cover the body with the lower part.
We refuel. We also wrap it over the left shoulder and under the back - We wrap the other end around the baby. We tuck it under the back.
Straighten the bottom edge of the diaper and wrap it over the baby’s tummy
We fasten the free ends of the diaper into a fold
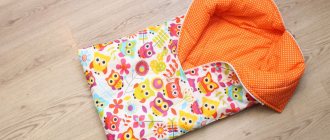
Blanket
- We place the child closer to the edge.
- We cover the toddler with the lower part up to the chin. The remaining corner is folded inward.
- Cover the child with the left one. Tucked under the back.
- We cover the other, wrap it, straighten the folds.
- We fix it in a convenient way: fastener, tape, without fixation.
You can't swaddle tightly. The child should feel comfortable. Instead of a diaper, it is allowed to use a specialized cocoon with Velcro and zippers.
How do day-night security roller shutters work?
The canvas is assembled from strips of fabric of different densities - from translucent to light-proof. They are arranged alternately, which is why day-night roller shutters are often called “zebra”. When the shaft rotates, the fabric passes in a circle, the strips overlap each other, forming the desired degree of illumination. If two transparent strips are combined, then soft, diffused light enters the room. If the transparent strip is blocked by a dense one, then the room will be in semi-darkness.
By turning the mechanism you can get one of three options for lighting the room
This design allows for smooth light transitions, letting in the right amount of light into the room. At the same time, the person inside the room remains invisible to prying eyes from the outside.
If it's hot
Free changing with closed handles
Do not use undershirts, shirts, or bodysuits. It is worth limiting yourself to one thin diaper - the baby will feel comfortable. It is better to use partial swaddling. The arms remain free, the legs are swaddled. Not tight. Now it's better to put on a shirt.
- We tuck the edge of the diaper.
- We place the baby in the middle. The fold line is located near the shoulder blades.
- Cover with the right side and tuck.
- Straighten out the folds. We cover it with the left one and tuck it in.
- The remaining part is covered from bottom to top. Straightens out.
Free changing with open handles
The little one is afraid of the movements of his own hands - swaddle him completely, freely.
Pay close attention to your toddler's diaper. Change it in a timely manner, wash your child, and wipe dry with a towel. Use powder or a specialized cream. Arrange air baths - excellent prevention of diaper rash and prickly heat.
Tips for first-time parents
If dad or mom decide to completely abandon swaddling, then it is necessary to remember that while in the womb, the baby is accustomed to a cramped space, and freedom of action may frighten him. Now on the Internet or children's stores you can find many things that imitate swaddling with a blanket and diapers.
You can teach your baby to swaddle in a similar way. You need to seek help from your parents or pediatrician. As a rule, more experienced people can give good advice in raising children and will always show how to swaddle a baby correctly.
Open head
Open head envelope swaddling pattern
The little one has grown up. He actively turns his head, sticks his nose into the side fold of the product - swaddle up to the neck. A child's hat is worn for a walk. The best option is a helmet. Covers the top of the head, ears, neck, throat.
We lay out the blanket and turn the corner. Diagonally.
We spread the blanket on a corner, turn the top corner with the fold outward, the child’s head lies above the edge of the blanket
- We put the little one. The lapel is located near the neck.
- We cover the body with the left edge.
We tuck it under the back. We wrap the left corner around the baby’s body, leveling it under the back - Cover the baby with the bottom.
Straighten out the folds. We fold the bottom corner of the blanket, do not tuck the free end under the fold, but press it from the side of the baby’s left arm to support their neck - Cover the child with the remaining part of the blanket.
Tuck. We wrap the resulting structure with the right end of the blanket, leveling its free corner under the backrest - Record your wish.
We fix the resulting envelope on top with tape
It is important to take into account that the head will be lower than the level of the body. You need a pillow to level your body.
Description, distinctive features
“Day-Night” is a simple design that consists of only three parts - a fabric sheet, a rotating shaft and a weighting tube. The closed type also has a plastic box.
The main parts of the “Day-Night” type curtains
The principle of operation is approximately the same as that of most roller blinds. But there is one significant difference. In conventional roller shutters, the fabric consists of one layer and falls only on one side of the driving shaft. The day-night system is double, consisting of two layers. The fabric is on both sides of the shaft.
The main difference between the “Day-Night” curtain and other rolled products is its unusual fabric, consisting of transparent and opaque strips
Open face
Swaddling an open-faced baby in a rectangular blanket
- The blanket is laid out diagonally. The edge is folded inward. A fold line is created.
- We place the baby closer to the top line.
- We wrap the head with the top part of the blanket. Press along the ears.
- The edges straighten out. We wrap the right one around the child.
- Cover with the bottom.
- We turn it with the left side.
- We fix it.
How to install roller blinds day and night on plastic windows?
Before installing the zebra, you need to decide where it will be placed - on the sashes, on the wall or in the window opening. Then installation is carried out depending on the type of fastening. There are three types of fastening:
- Self-tapping screws.
- Brackets.
- With special tape.
Installation using self-tapping screws
- We assemble the roller shutter and install the chain mechanism on the side where it will be convenient for you to operate it.
- We make markings on the profile with a pencil: mark the location of the first bracket. Drill a hole and install a dowel. We screw the mount.
- Mark the location of the second fastening. To avoid distortions, use a level. Install the second bracket.
- Next, installation is carried out according to the instructions that come with the device.
Installing curtains with self-tapping screws
Important. To prevent the curtain from sagging, it is recommended to additionally install a guide line or string.
Installation of curtains with string included in the kit
Installation using brackets
In this case, brackets on special tape are used. This type of mount is best suited for sash windows. Installation instructions look like this:
Installing a curtain on a moving sash without drilling the frame
- Remove the protective film from the tape on the back of the brackets.
- We attach brackets to the top of the open sash.
- We install the structure according to the diagram attached to the manual.
Installation with tape
The easiest way to fix the roller blind, since no drilling is required.
- We use a special degreasing compound to treat the window profile in the places where the zebra stripe will be installed.
- Remove the protective layer from the tape and glue it to the profile.
- We carry out installation according to the instructions.
How to install curtains with double-sided tape
Important. Before gluing, the tape needs to be heated a little. This way it will be better fixed on the profile. Use a regular hair dryer for these purposes.
Extract
How to wrap a baby in a blanket for discharge? The question is relevant. Upon discharge, the patient is swaddled completely, covering the face.
- Place the blanket with the left corner up.
We spread the blanket on the corner (for a rectangular one, the left corner is higher), we place the child in the middle - We put the little one inside. We wrap our head with this edge.
- Make a fold under the neck.
We wrap the left end of the blanket tightly around the baby's torso, level the free edge under the back, make a fold on top so that its fold covers the neck - We wrap the right edge of the product.
We turn it up. We tuck the bottom end of the blanket over the child’s legs, placing it under the fold we made earlier. - We cover the stomach with the bottom edge.
We refuel. We wrap the right corner of the blanket, wrapping it tightly under the back, and also make a fold along the top edge - We wrap the remaining side of the blanket.
- Secure with tape.
Additionally, we tie the resulting envelope on top with a ribbon
We replace the tape and eliminate it completely. We choose a convenient way to wrap a baby.
Types of zebra roller blinds by type of control
- Chain. Control is carried out using a plastic chain. If you pull it, the rotation mechanism starts. To stop it, it is enough to stop controlling it. The canvas will automatically lock at the desired height.
Chain control is the most common way to regulate curtains - Remote. The electric drive does not require an electrical cable. The motor has a built-in battery, which is charged using an adapter. At the same time, the charge lasts for a long time - for 6 months or more. The automation is controlled using a remote control.
You don't have to get up from the sofa to open the motorized blind - Spring. Non-automatic control is carried out using a spring, which constantly keeps the winding shaft in tension to roll the web. There is a special mechanism for fixing it in the closed state. This could be a handle, a hook, a ring, or a hole in the bottom bar.
Thin blanket
A thin blanket means a woolen, flannelette, or fleece product.
- Place the blanket diagonally.
- Place the little one closer to the top. Leave an angle above your head.
- We cover the little one with the right side of the blanket. We make a lapel near the face.
- We turn it up. Smooth out the folds.
- We perform a similar action with the left side.
- The lower part of the blanket is straightened out and the toddler’s legs are covered. The product is large, the lower part reaches the chin - tuck in the excess.
- We wrap the right one around the child.
- We wrap the other one around the baby. We hide the end.
The baby's head will be additionally insulated. You should wear a lightweight children's hat. Do not drape the loose corner over the baby's face. The blanket is thin and fits easily to the body - it will be difficult for the child to breathe. Constantly look at the condition of the little one. Small children often spit up. It's important to be nearby. Mom is nearby - the little one is calm.
Photo ideas for decorating windows with curtains “Day-Night”
PreviousCurtainsSizes and types of ceiling curtains: mounting methods
Next
CurtainsRoller blinds for plastic windows with photo printing
How to make your own cake stand
Many people believe that things made with their own hands have a special energy and create harmony in the home. If you're of the same mind, or just like to make things, here are some easy options for cake holders.
From foam plastic
- Glue two circles of foam plastic (square, oval, etc.) together.
- Place them on corrugated paper and trace them. Cut out the circle.
- Glue it to the top of the foam cylinder.
- Cut a strip of corrugated paper. Its width corresponds to the height of the foam cylinder. Fold it like an accordion. Sew in the middle.
- Glue the strip in several layers along the side of the structure. Decorate the middle with decorative ribbon or beads.
Such a holder can be covered not only with corrugated paper, but also with fabric, strings of beads, and sparkles.
From plastic dishes
- Paint the prepared dishes: two glasses, two plates.
- Glue one glass to the bottom of a large plate.
- Glue the top of the second glass to its inside, and the bottom to the bottom of the second smaller plate.
The main thing is to get a harmonious composition with the cake.
Made of wood
- Paint or coat wooden circles of different diameters with a special product.
- Place them on special columns.
- Attach their lower part to the prepared platform in a semicircle or other shape.
Cutting circles for a stand out of wood yourself is feasible, but labor-intensive.
A cake stand is a functional and effective attribute of any celebration or simple tea party. There are many varieties of it, each of which is suitable for a specific occasion. This makes this design even more practical and convenient. And the main thing is that everyone can make it with their own hands and decorate their home in a special way.
The finished stand must be perfectly clean and safe for use, because children are rightfully considered the main lovers of sweets at all celebrations.
Why do you need a turntable?
A rotating cake table is a great find for those who are interested in baking complex confectionery products.
The device has the following advantages:
- significantly facilitates the final processing of the cake, rotating around its axis;
- the pastry chef can decorate the product without moving, which greatly speeds up the cooking process;
- Often there are special markings on the table surface that allow you to create smooth and neat elements.
The rotating stand will help professional confectioners and ordinary housewives create culinary masterpieces.
Beautiful oval rug with a spiral pattern
Scheme
Description
A very beautiful oval rug is obtained with a pattern in which the elements in each row are shifted to the right, as if in a spiral. It turns out so original.
If you knit strictly according to this pattern, then the rug comes out very small: 48 x 37 cm. But this can be corrected by casting a chain, the length of which can be calculated using the formula I proposed, taking into account that the number of loops should be a multiple of 5 plus 3.
In addition, starting from the middle, my knitting began to tighten too much, so I advise you to increase the number of air loops in the arches in the last rows: instead of 2, knit three at a time.
Video
Types of rotating cake platforms
Specialized markets offer many tray stands from world-famous brands.
Someone wants to have compact products for a dessert bar (Candy bar) when serving sweets. Some people are impressed by rotating models with a tilt, while for others the ability to use only 2 tiers of the stand is not suitable.
Specialized markets offer many tray stands from world-famous brands.
Varieties of design
Models are distinguished by shape:
- Oval;
- Circle;
- Square;
- Rectangle.
As well as shaped trays for an extravagant demonstration of confectionery creativity.
A rotary cake maker is often equipped with complementary accessories: it may be supplied with a spatula, a lid, baking dishes, a pastry syringe, etc.
A rotating cake maker is often equipped with complementary accessories.
Materials used to make a rotating cake decorating stand
There are cake makers:
- Steel;
- Glass;
- Plastic;
- Ceramic;
- Wooden.
Plastic rotating cake stands are a rather fragile product. This is the most affordable option. Thanks to the last circumstance, it is also the most common. They are presented in a wide range of models, made with or without tilt. Plastic cake pans usually have a non-slip material, which promotes good grip on the table. It's quite convenient.
Plastic cake pans usually have a non-slip material, which promotes good grip on the table.
The glass rotating cake tray looks elegant. Made from high-quality tempered glass, often decorated with an original design. It looks neat, impressive - you can take a photo and serve it on a rotating plate. It has a non-porous surface, washes quickly and easily, and does not absorb odors.
The glass rotating cake tray looks elegant.
Metal structures are heavy, but they are designed to last longer. They can withstand heavy cakes and do not deform over time.
Metal structures are heavy, but they are designed to last longer.
The wooden cake maker is constructed from natural material and looks aesthetically pleasing. Sweet products can be served directly on it. The cost, compared to a plastic rotating stand for decorating cakes, is higher.
The optimal diameter of wooden structures is at least 34 cm. This cake pan is spacious, it is convenient to decorate products from three kilograms (or tiered ones) and make confectionery decor on them. The wide surface makes it possible to place the leveling spatula in a convenient way.
A wooden tray has some advantages:
- It is durable;
- Does not absorb odors and moisture;
- It is not difficult to care for and is easy to clean.
What is important is that it fits into any interior.
The wooden cake maker is constructed from natural material and looks aesthetically pleasing.
Cardboard cake stand
Cardboard, as a separate type of material, rather than a box, is also available for sale. To create a cardboard backing for a cake, we need to stock up on some materials and tools:
- one sheet of high-density cardboard - it is better to choose three-layer cardboard;
- self-adhesive paper or beautiful special packaging paper; a simple plastic bag.
Assortment of cardboard thickness
We will not cut out a cake shape from cardboard. We simply cover, for example, a square-shaped stand with wrapping paper, which we secure on the reverse side with pieces of tape.
We will assemble the cake on a base, only on baking paper cut to fit the circumference of the cake. And first, we will cover the substrate with additional polyethylene.
Simple kit for covering a cake base
It will turn out neatly and very convenient to carry and serve dessert.
Cake on a simple dessert base
For throw-on brackets without drilling
Another easy installation method. To mount the curtain you will need:
- insert mini-type brackets into the throw-on brackets;
- install brackets with a latch;
- place the fasteners on the window sash, pressing until it clicks;
- insert the curtain bobbin into the fastener;
- install a weighting agent.
At this point the installation process is completed, the curtain can be used. Please note that the distance between the fasteners must exactly match the length of the reel.
Tools
Having decided to make a rotating cake table with your own hands, prepare the following tools and materials :
two bearings (they can be purchased at any auto store);- lumber for the countertop (in our case, plywood);
- hard nails;
- self-tapping screws;
- plastic tubes;
- metal circle;
- thin plastic.
Important: bearings are double and pressed. The second option is preferable when assembling a rotating cake stand, as they are more convenient to install.