The market offers a wide range of this furniture in different designs. But if you have free time and some carpentry skills, making a rocking chair with your own hands will not be difficult.
With well-chosen materials and design of the product, it will harmoniously fit into any interior of the room and become its bright accent..
Features of wicker furniture
The history of wicker furniture goes back thousands of years. Archaeologists often find it all over the world. Weaving from vines and other natural materials of plant origin was common in settlements located near bodies of water. The proximity of suitable raw materials in large quantities contributed to the fact that people made most of the products used in everyday life on their own.
Wicker furniture was used more often in the homes of the poor, as the cheapest and most accessible option. But quite quickly wealthy people and representatives of the nobility appreciated its beauty, functionality and possibilities of use in the interior. Since then, not only single craftsmen, but also entire artels, and later factories, have been engaged in weaving. There are even special schools of wicker weaving.
Prince Golitsyn brought the fashion for wicker furniture to Russia. Often traveling abroad, he appreciated the properties of wicker products and created an entire workshop for their production on his estate.
Wicker furniture can be a real work of art
Nowadays wicker furniture is very popular. Making it becomes a favorite hobby for many, even generating income. In addition, it has many advantages. These include:
- low cost, especially compared to products made from other natural materials;
- light weight, thanks to which you can easily move the furniture anywhere without outside help;
- environmental friendliness: wicker interior items not only look beautiful, but are also safe for health and do not have a specific odor;
- easy care: most often it is enough to wipe off dust from the furniture with a cloth dipped in water;
- durability, subject to high-quality weaving, performed according to all the rules.
True, there are also disadvantages that need to be taken into account. Furniture woven from wicker and similar materials is not resistant to the vagaries of the weather. In heavy rain it gets wet, and with prolonged exposure to sunlight and high temperatures it can dry out. This leads to loss of shape and disruption of the weave. Repairing a damaged product is very difficult. Therefore, it is not recommended to keep such furniture in open areas for a long time.
Nowadays wicker furniture is very popular, and many people are starting to make it at a professional level.
Types of wicker furniture
According to the structure and manufacturing principle, wicker furniture is divided into several types:
- Frameless products. In them, the rigidity of the structure is ensured by strong stick-ribs.
- Frame furniture, in which the body is made of durable material, such as steel rods. The metal parts of the frame are braided with wicker or other appropriate material.
- Wooden furniture in which the supporting frame is made of wooden sticks that impart rigidity and durability.
Pieces of furniture made of wicker or rattan - photo gallery
It is impossible to imagine a summer garden without comfortable pieces of wicker furniture
A rocking chair is the dream of anyone who loves comfort. Even a bed and an entire bedroom set can be woven from wicker or rattan. A cozy basket chair with a low base will appeal to kids and pets
It’s good to relax in a comfortable rattan hanging chair after a hard day. An airy openwork set of a sofa, armchairs and table will decorate any dining room
Video: wicker furniture made of wicker and rattan in the interior
Production technology of wicker rocking chairs
Various types of wood are suitable for making wicker furniture, but most often for these purposes we use:
- willow (almost all varieties of the middle zone);
- maple;
- bird cherry.
Willow, rowan, hazel, cherry and many other species of trees and shrubs have qualities valuable for weaving. But in the required quantities it is relatively easy to prepare mainly the first three listed rocks. When going to harvest, we cut off a furniture stick without knots, approximately 2 m high. The diameter of the material may vary, depending on the purpose of application.
Prepared furniture stick For a rocking chair like Veduga, you need to select at least 35 sticks. It is always necessary to prepare material in reserve. Because during the bending process the stick may crack or break.
Video about harvesting vines for production:
Video about preparing a furniture stick:
Bending and drying a furniture stick
After the preparation, the most labor-intensive, physically difficult process begins - bending the furniture stick into metal templates. We bend each chair by hand. The stick is first boiled or heated, depending on the time of year, type of wood and other conditions.
Rocking chair template
Next, the workpieces are dried in a specially equipped room. When working with natural material, it is extremely important to monitor the drying progress. The blanks must be completely dried, otherwise the rocking chair simply cannot be assembled; undried blanks quickly unbend, losing their given shape. However, you shouldn’t overdry the stick either. Because its processing becomes more complicated.
Template with furniture stick
Video: bending a furniture stick
Next, the carefully dried blanks are removed from the template and the master begins to polish the stick. We grind the workpieces using a flap grinding wheel. The final smoothness is achieved manually using regular sandpaper and a sanding sponge.
Raw blanks for rocking chair
Video: preparing to assemble a rocking chair and sanding a furniture stick
Frame assembly
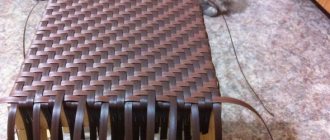
Next, the process of assembling the chair begins, tinting it in the required color. The finished frame of the rocking chair is braided with a thin willow ribbon.
Assembling the sidewalls of the Veduga rocking chair
And finally, the completely finished product is varnished. The process of creating wicker furniture is very labor-intensive. Some manipulations can only be performed by an experienced master. Most of the work is done by hand. We try to make our chairs with soul, carefully selecting materials and taking a responsible approach to every stage of work.
Tools for work
Weaving from wicker is a labor-intensive task that requires scrupulousness. You just can't do it with your hands. You will have to stock up on a whole set of tools:
- special knives and garden shears for cutting and trimming twigs;
- ladder for sorting raw materials;
- large capacity, tank for soaking the rod;
- boiler for cooking and bleaching workpieces;
- squeezers for cleaning twigs from bark;
- splitters for dividing rods into parts;
- shof for obtaining planed strips;
- shmyg for figure processing, notching;
- iser for aligning rows;
- jigs for straightening frame blanks;
- pruner;
- measuring accessories - ruler or tape measure;
- pliers;
- saw on wood.
Comfortable holiday in the country
Required tools and materials
To make a comfortable recreational device with your own hands, you will need:
- Disc sander with attachments of various grain sizes.
- Fraser.
- Jigsaw with wood saws.
- Screwdriver.
- Set of bits for a screwdriver.
- Set of wood drills.
- Clamps.
- Hammer.
- Brushes.
- Drying oil.
- Wood putty.
- Waterproof varnish for wood.
- Antiseptic for wood.
- Roulette.
- Measuring ruler with right angle.
- A simple pencil.
In order for a rocking chair made by yourself to be of high quality and last a long time, you need not only to try, but also to use materials with good characteristics. Buy:
- 12 confirmations 5x120 mm.
- 140 screws for wood 4x45 mm.
- Sheets of plywood 30 mm thick for the side parts and drawers (800x120 mm).
- Bar 50x25 mm.
Before you start work, prepare the necessary preparations with your own hands. This is painstaking but easy work. Please study the drawing below carefully. Part of the side base is depicted on a grid, one step of which corresponds to 100 mm.
Cut out 3 drawers 800x120 mm from plywood. These slats will fasten the 2 sides of the rocking chair together. Use the drawing as accurately as possible to transfer the sidewall markings to the plywood. Cut it out with an electric jigsaw
The main thing is that both sides are identical. Therefore, it is better to make the second one using the first one as a pattern. Cut the prepared timber into pieces, the length of which is about 1200 mm. To effectively use the material when assembling a rocking chair with your own hands, calculate the exact length of the parts. There are 35 of them to be made in total.
Description of work
Carefully process the prepared timber and plywood blanks. To do this, use a grinder to make chamfers (round the corners and edges of the parts)
Sand all surfaces of the workpieces. Approximately, focusing on the drawing, we mark the places where the drawers are attached. One should be installed at the head, the second in the middle of the sides, and the third at the feet. To ensure that the holes on identical parts match completely, mark only one, then place one on top of the other. After fixing their position with clamps, drill through holes.
- You need to make holes: through holes in the side arcs - use an 8 mm drill, for the ends of the drawers - a drill with a diameter of 5 mm.
- Connect the drawers and side panels using confirmations.
- You can begin to prepare holes for fastenings on the bars, from which a place for lying or sitting will be made. To make the task easier and to apply the correct markings on both ends of the 35 parts, use a homemade stencil. Take a piece of timber, use a 30x3.5 drill with a countersink, drill a sample in it - two holes, the diameters of a pencil. Then simply apply the finished stencil to the parts and make marks.
- Drill holes on the bars.
- When attaching the bars to the ends of the base with 4x45 screws, use the same strips, which will allow you to maintain the same distances (about 15 mm) between the installed bars. First, drill a hole through the block at the end of the sidewall with a 3 mm drill, only then make the connection with self-tapping screws.
- Start decorating the rocking chair. First, you should cover all the recesses with screw heads with putty. This will make the seat smoother, more comfortable, and will also protect the metal parts of the fastenings from moisture. After the putty has dried, sand the surface with a sander.
- Treat the product with a special antiseptic composition. Afterwards, cover its surface with three layers of waterproof varnish, taking breaks to allow complete drying. This will increase the service life.
This piece of garden furniture, which you made with your own hands, is not only original and useful, but also beautiful. Sew or purchase a thin mattress and several pillows for him. And if you slightly reduce the original dimensions, you can build a similar fashionable rocking chair for your home with your own hands.
Weaving patterns and methods
There are several ways to weave furniture and interior items. Each combines decorativeness and functionality.
Weaving patterns - table
| Name of weaving | Peculiarities | |
| Solid thick | Simple |
|
| Rope |
| |
| Checkers |
| |
| Openwork | Diamond-shaped | The weaving is complex, creating geometric shapes and open cell patterns. |
| In the form of columns | ||
| Chess | ||
| Rosette | ||
| Ring | ||
| Spiral | ||
| Pigtail | The method is used for weaving decorative elements and in the design of edges. | |
| Bending | This type of weaving is used to decorate the edges of the product. | |
Weaving methods - photo gallery
This simple weaving pattern is easy for beginners to master.
The edges of the product are often braided. Rope weaving is created from two or more rods
Openwork weaving will give the product lightness, airiness and transparency. Using checker weaving, you will decorate the furniture with a three-dimensional pattern
How to make a rocking chair with your own hands
The selection of high-quality material determines how high-quality and durable the chair you make will be. After all, the material should be light and durable, since the owner of this chair may get used to carrying it around. Those who do not want to pay a lot of money for such a thing ask themselves how to make a rocking chair with their own hands at home, choosing the most suitable and high-quality materials. Therefore, when selecting materials, we recommend making a rocking chair from wood, reed, or wicker. Also, sometimes the chair is made from light metals.
A rocking chair is the perfect way to create an atmosphere of comfort and tranquility.
Plywood rocking chair
Plywood - Can fall apart due to water, but is an excellent option for creating a chair. Because of this, many are interested in how to make a rocking chair with their own hands, drawings from plywood. We recommend making such chairs for your home or apartment. Therefore, if you want to make such a chair, then you should carefully monitor it if it is in the yard.
A rocking chair made by yourself in a classic style with curved runners will be an excellent option for your first experience in making furniture.
To create a simple and comfortable rocking chair, you need to prepare:
- For the sides: plywood sheets (1200x1400 mm, a moisture-resistant type of plywood would be an excellent option) 30 milliliters thick;
- For the base: 3 boards (20x150x800 mm);
- For sitting: 32 small boards (15x39x1200);
- Portable router;
- Screwdriver;
- Electric jigsaw;
- Portable electric grinding machine;
- Self-tapping screws (20 pieces);
- Wood glue;
- Putty;
- Varnish.
Making a rocking chair with your own hands is not at all difficult; a minimal set of tools and a great desire are enough.
Sidewalls
To begin with, the side parts are prepared, which are also the runners, as well as the base for the chair. Two parts are cut out with a jigsaw.
To begin with, let's draw out 2 sides of the chair using the template and carefully cut them out according to the markings with a jigsaw.
Frames
With this action, they are created with markings on the sidewalls, which are drilled (20x150x800 mm). One of the main conditions for this operation is its accuracy. After this, grooves are made that correspond to the grooves of the jumpers. They are 5 mm deep. Before installing the frames, coat these holes with glue. To prevent the material from bursting, holes are made in advance.
All edges of the parts must be sanded with sandpaper.
Boarding
Mark the holes in the planks (15x39x1200) that make up the seat. Mark 20 cm from each edge, draw lines where the screws will be fixed. The distance between parts is 1 cm.
We glue the supports to the side walls with wood glue and, for reliability, secure each of the bars with a self-tapping screw.
Finishing elements
It is made with putty dissolved with sawdust, the holes where the boards were attached are hidden, and the surface is leveled. Sand after the putty has dried. Then they are varnished with water, after which a mattress or carpet can be placed on the chair for comfort. It is better to do this, because a stationary mattress will be wet from the rain.
The ends of the sidewalls can be varnished or painted with glossy paint.
How to make a rocking chair out of wood
When starting to create a chair, many people ask the question: how to make a rocking chair with your own hands from wood, while finding suitable drawings and sizes? They search for a long time on various sites, ask on forums, and so on. In this section we will tell you how to make it high-quality, reliable, convenient and modern.
These rocking chairs are beautiful and can decorate your interior in your apartment, on the balcony or in the courtyard.
In order to create a chair, you will need:
- hacksaw with fine teeth;
- a plane to process the structure;
- belt machine for grinding parts;
- folding milling machine;
- plumb line;
- screwdriver;
- hammer;
- portable ruler and pencil;
- clamp;
- brush.
You can create a drawing at your own discretion and to your own size, or you can find it on the Internet.
To begin, make 1 meter grooves in a wooden board measuring 4.5 by 4.5 centimeters. Grind the ends of the boards to fit into the slots of the runners. Place the runner boards in hot water until the wood is pliable for bending. Using the jig, bend the board to a suitable radius and set it aside until it is completely dry. Place the dried runners on the legs, treating the grooves with glue in advance.
Anyone can make a new homemade rocking chair at home
Finishing wicker furniture
When a chair, table, sofa or other item is ready, all that remains is to give the item a marketable appearance. Finishing work is carried out in several stages:
- Inspection for various defects, eliminating them: correct the uneven density of the weaving by slightly moving the rods, align the legs, cut off the tips of the rods and smooth out the unevenness with fine-grained sandpaper.
- Bleaching and painting. To make the product white, it is treated with lime or sulfur dioxide. To give a different color, use regular paint. They also use decoctions of onion peels, wolf berries, heather, alder bark or moss, if you like naturalness and environmental friendliness.
- Varnish coating. In order not only to preserve the texture of the material used, but also to make it even stronger, apply 2-3 layers of varnish (each subsequent after the previous one has completely dried).
Build process
Let's start assembling the chair from PVC pipes. Let's divide the process into several stages
To begin with, we will select the necessary pipes - we pay special attention to the material parameters
If there are more elements than necessary, cut off the excess.
We assemble the structure using fittings and a soldering machine.
For greater comfort, you can make an upholstered chair. To do this, take a piece of plywood and place a piece of foam rubber on it. Cover the resulting structure with fabric. Please note that the soft seat should have larger parameters than the plywood part. This is necessary so that the edges can be stapled together. The seat is attached to the frame with self-tapping screws.
Caring for wicker and rattan products
Wicker furniture requires special care, which is due to the characteristics of the material used: wicker and rattan can become very fragile if not used correctly.
- At least once a week, wipe off dust from products with a damp cloth.
- If a large amount of water gets on wicker furniture, first wipe thoroughly with a dry cloth, then take it out into the air to allow the product to dry naturally. Do this immediately.
- Vacuum wicker items only using soft attachments.
- If you notice that the braid has begun to dry out, spray it with linseed oil from a spray bottle.
- To protect wicker furniture from moisture, treat it with tung oil or tung-based products twice a year. Do this at the beginning of the season (before moving furniture outside) and at the end.
To protect wicker furniture from high humidity, treat it with tung oil-based products.
Wicker furniture is a rather difficult product to repair. In the event of a breakdown, it is difficult to find a repairman who will undertake the repair. Therefore, proper care is mandatory and necessary for products made from wicker and rattan.
Creating a design
A wicker chair should be durable, the basis of which will be proper manufacturing. The procedure for forming the skeleton of the structure is as follows:
- Assembly begins with a wooden base. The frame often looks like a single element that includes the seat and back of the rocking chair. The support legs are attached to it with self-tapping screws.
- To strengthen the structure, cross strips are mounted between the front and rear legs.
- Armrests and other elements are installed on the chair body using self-tapping screws, according to the drawing.
- After the frame components are securely fixed, the temporary fastening is removed.
Braid construction
This fascinating process begins when the frame is completely assembled. The braiding procedure includes the following steps:
- Gives softness to tires. To do this, use a cylindrical shape, over which they throw the vine, pull it a little and pull it several times in different directions.
- Coating the braid with two-component glue or PVA. After this, the body of the chair is woven.
- Winding the frame in three rods. This will strengthen the fastening of the structure and also facilitate the process of internal weaving, which is performed in different ways: single, openwork or combined.
- Braiding the body using several techniques: braid, checkerboard, simple linear method, etc.
When the braid is ready, support skis and supports are attached.
Installation of runners
To increase the service life of the rocking chair, it is recommended to install runners that are wear-resistant. The procedure is as follows:
- Turn the structure upside down.
- Heat the skis with a hairdryer, place them on the runners one by one and wrap them along the entire length with cotton tape.
- After the pads have cooled and taken the desired shape, glue them to the runners, first removing the fabric. For high-quality fastening, secure the ends of the planks with nails.
- Allow the glue to harden for 48 hours, after which remove the nails and replace them with self-tapping screws. Cover the installation areas with a mixture of glue and sawdust.
It is recommended to install fasteners only on the edges of the runners. This is due to the fact that during operation the linings wear out, the heads of the hardware will begin to stick out and spoil the floor covering.
Final Steps
The finished structure is treated with an antifungal agent and liquid that will prevent the appearance of wood pests.
To increase moisture resistance, special varnishes with water-repellent characteristics are used. Before coating with a protective agent, the product is given the required shade. To do this, use stain or paint.
The finished rocking chair will bring beauty, comfort to your home and will become a favorite relaxation spot for every family member.
Materials
The price, convenience and durability of the product depend on this parameter. The most durable of them are on a metal frame. Frameless chairs are less wear-resistant. Let's take a closer look at the materials used to make cocoon chairs.
Metal
For the production of such models, steel and aluminum are usually used. The wire is coated with paint that does not wear off or wash off.
Rattan
This is a type of tropical vine that is characterized by its smoothness. It has been used for furniture production for a long time; this material is not afraid of moisture and is resistant to wear. To produce cocoon chairs on an industrial scale, manufacturers began to use an artificial analogue of vines.
Vine
Like willow twigs, vine has become an economical option for eco-furniture. The durable, breathable material is inferior to its counterpart, rattan. It is not so smooth and soft, so pillows must be placed in such models.
Plastic and acrylic
Solid chairs that look like eggs are made from such materials. Furniture made of plastic and acrylic, as well as plexiglass, successfully complements interiors in modern styles of minimalism, hi-tech and pop art.
Slats made from this natural material can hold their curved shape well.
Nylon or cotton cord
Pliable fibers take the shape of the body of the person sitting, which gives special comfort. The strength of models made from cord is lower than that of others, and they also have to be washed periodically.
Textile
A wide variety of colors allows you to make bright, unusual cocoon chairs. For such furniture, tarpaulin, raincoat, denim and other fabrics are used.
Knitting
The most original pieces that bring warmth and comfort to the room. There are many knitting patterns, and the range of threads is truly huge.
Macrame
Macrame products combine beauty, simplicity and durability. They are often used as outdoor versions of cocoon chairs.
Color options
Some may think that natural material is monotonous and faceless. This is a wrong opinion; there are simply no flashy and poisonous shades in it. The colors of nature are soft, cozy and perfect. At the same time, they are diverse; in addition to black and white, you can find a wide palette of colors; contrasting models made from several tones of natural material are especially beautiful. Let's look at examples of chairs in different colors:
- hanging green models: one is made in the shape of an apple, the other follows the shape of a fig;
- white classic armchair;
- orange color can become an accent spot in the interior;
- the yellow straw color looks very natural;
- brown model with a chestnut tint;
- with notes of reddish tonality;
- dark brown, actually black product;
- examples of combined chairs made from different types of natural materials.
Shape the seat slats
Making a rocking chair with your own hands is the stage of preparing the seat.
- Cut out the seat strips (J) - 38x38x497 - 10 pcs. Glue the outline template to one of the blanks. Then adjust the drill press stop and install an additional stop block. Using a wood drill bit, drill 4mm through mounting holes centered on both ends of the pieces. Countersink the holes.
Seat Slat Template
- Using a bandsaw, cut out the seat strip along the outline of the paper template. Using the strip as a template, trace the outline on the remaining pieces. Then cut them out and sand them.
- Mill roundings with a radius of 3 mm on all edges of the seat slats. Sand the details.
Types of models
Floor chairs made using the weaving technique are available in different designs.
- The classic version has a high back, armrests, and a reinforced frame. The support is provided by 4 legs. Its weightless design can withstand heavy loads, the weaves allow the body to take a comfortable position, and the natural material contributes to energy replenishment.
- The rocking chair makes rhythmic movements back and forth thanks to the curved runners. The high backrest, armrests and footrest allow you to take a comfortable position. People suffering from insomnia and young mothers will appreciate the benefits of such a product.
- A variation of the previous type is the “Papasan” model. The seat has a round shape. The low backrest gradually turns into armrests. The chair is located on a round base, inside of which a special mechanism is installed that provides rocking. The product also has the function of rotation around the central axis.
For a comfortable rest, any wicker chair is usually complemented by soft pillows with cotton or linen covers.
Armrest
The branches you will use for the armrest should be the size of a person's thumb. Make sure you clear all the side branches and buds so that the branches are smooth.
With the frame upright and facing forward, tuck one end of the branch over the middle of the bottom rail of the chair. Now tilt the branch back towards the topmost cross member [#1]
Now add a second branch to the outside of the first, and then nail one to the other every few centimeters. It is best to nail this second branch from the inside. This way, if any nails are sticking out, the next branch will cover them.
Continue this until you have completed the width of the armrest. Now repeat the entire procedure on the opposite side.
What will you need?
To work with plywood at home, you don't need a lot of tools. The required list includes a jigsaw with a suitable saw blade, a drill for drilling holes, a sander or sandpaper, and a brush for applying paint and varnish. You also need to have a pencil, ruler, and pattern on hand.
Almost every craftsman has an electric jigsaw.
As for materials, in addition to the required amount of plywood, you will have to purchase fastening elements, as well as a composition that will be applied to the product in order to decorate it and protect it from external influences. Wood glue may be required.
Some general information
Whatever one may say, it is a rocking chair, especially one standing in the garden or near a lit fireplace, that many associate with comfort, a pleasant evening in a narrow family circle, peace and quiet.
In such an environment you can have a great rest and relaxation by reading your favorite book or watching a good movie. Rocking movements increase concentration
It is still unknown exactly how and where the very first rocking chair came from. Usually many people associate it with old England, fireplaces and rugs. At the moment, there are two main versions of the history of the origin of this chair. According to one of them, the first rocking chair was invented by the Viennese furniture maker, experimenter and innovator, as well as a fan of bent wood, Michael Thoneta in the mid-19th century.
However, there is one more fact that casts doubt on this version. Thus, at the end of the 18th century, the word “rocking chair” was added to the English dictionary, and since the 1800s, such chairs began to be produced by many English furniture manufacturers. But the fame and peak of popularity of rocking chairs came precisely in the 19th century. They were used mainly by rich and aristocratic people, as well as those involved in literary and artistic arts.
Plywood rocking chair
According to the second version, the rocking chair was invented by Benjamin Franklin. In terms of time, this was also the 19th century. But there are those who refute this version, believing that Franklin was just the one who became the first owner of the rocking chair.
In a word, we can say that the beginning of the history of the chair is the 18th-19th centuries. The sources are silent about the rest. And, nevertheless, rocking chairs still remain popular and in demand, and are primarily intended to create a special ambiance and comfortable environment in a certain place.
The rocking chair has its own history
How to make a rocking chair with your own hands
The selection of high-quality material determines how high-quality and durable the chair you make will be. After all, the material should be light and durable, since the owner of this chair may get used to carrying it around. Those who do not want to pay a lot of money for such a thing ask themselves how to make a rocking chair with their own hands at home, choosing the most suitable and high-quality materials. Therefore, when selecting materials, we recommend making a rocking chair from wood, reed, or wicker. Also, sometimes the chair is made from light metals.
A rocking chair is the perfect way to create an atmosphere of comfort and tranquility.
Plywood rocking chair
Plywood - Can fall apart due to water, but is an excellent option for creating a chair. Because of this, many are interested in how to make a rocking chair with their own hands, drawings from plywood. We recommend making such chairs for your home or apartment. Therefore, if you want to make such a chair, then you should carefully monitor it if it is in the yard.
A rocking chair made by yourself in a classic style with curved runners will be an excellent option for your first experience in making furniture.
To create a simple and comfortable rocking chair, you need to prepare:
- For the sides: plywood sheets (1200x1400 mm, a moisture-resistant type of plywood would be an excellent option) 30 milliliters thick;
- For the base: 3 boards (20x150x800 mm);
- For sitting: 32 small boards (15x39x1200);
- Portable router;
- Screwdriver;
- Electric jigsaw;
- Portable electric grinding machine;
- Self-tapping screws (20 pieces);
- Wood glue;
- Putty;
- Varnish.
Making a rocking chair with your own hands is not at all difficult; a minimal set of tools and a great desire are enough.
Sidewalls
To begin with, the side parts are prepared, which are also the runners, as well as the base for the chair. Two parts are cut out with a jigsaw.
To begin with, let's draw out 2 sides of the chair using the template and carefully cut them out according to the markings with a jigsaw.
Frames
With this action, they are created with markings on the sidewalls, which are drilled (20x150x800 mm). One of the main conditions for this operation is its accuracy. After this, grooves are made that correspond to the grooves of the jumpers. They are 5 mm deep. Before installing the frames, coat these holes with glue. To prevent the material from bursting, holes are made in advance.
All edges of the parts must be sanded with sandpaper.
Boarding
Mark the holes in the planks (15x39x1200) that make up the seat. Mark 20 cm from each edge, draw lines where the screws will be fixed. The distance between parts is 1 cm.
We glue the supports to the side walls with wood glue and, for reliability, secure each of the bars with a self-tapping screw.
Finishing elements
It is made with putty dissolved with sawdust, the holes where the boards were attached are hidden, and the surface is leveled. Sand after the putty has dried. Then they are varnished with water, after which a mattress or carpet can be placed on the chair for comfort. It is better to do this, because a stationary mattress will be wet from the rain.
The ends of the sidewalls can be varnished or painted with glossy paint.
How to make a rocking chair out of wood
When starting to create a chair, many people ask the question: how to make a rocking chair with your own hands from wood, while finding suitable drawings and sizes? They search for a long time on various sites, ask on forums, and so on. In this section we will tell you how to make it high-quality, reliable, convenient and modern.
These rocking chairs are beautiful and can decorate your interior in your apartment, on the balcony or in the courtyard.
In order to create a chair, you will need:
- hacksaw with fine teeth;
- a plane to process the structure;
- belt machine for grinding parts;
- folding milling machine;
- plumb line;
- screwdriver;
- hammer;
- portable ruler and pencil;
- clamp;
- brush.
You can create a drawing at your own discretion and to your own size, or you can find it on the Internet.
To begin, make 1 meter grooves in a wooden board measuring 4.5 by 4.5 centimeters. Grind the ends of the boards to fit into the slots of the runners. Place the runner boards in hot water until the wood is pliable for bending. Using the jig, bend the board to a suitable radius and set it aside until it is completely dry. Place the dried runners on the legs, treating the grooves with glue in advance.
Anyone can make a new homemade rocking chair at home
The final stage is decoration
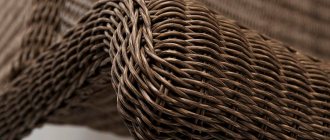
Wicker furniture practically does not need additional decoration. It is already textured in itself, especially if it is made using openwork technique
But, if you want to add even more color, pay attention to voluminous fabric pillows. They fit harmoniously into the aesthetics of the wicker set and add a feeling of comfort and coziness.
You can make a small pillow that will only take up the seat area.
You can decorate furniture with pillows.
Or you can make a large, soft cloud seat that takes up almost the entire chair or sofa. Craftsmen also skillfully weave tinted willow twigs into the wicker fabric. This way you can make an original edging or ornament.
A large soft pillow will provide comfort and coziness.
Do-it-yourself garden wicker furniture is a fascinating activity. Once you understand the basics and master the technical base, you may be able to ditch the store-bought headset entirely. It’s so nice to spend the evenings sitting in a chair made with your own hands.