How to make a corner fireplace yourself. Features of designing and arranging a fireplace with your own hands. Detailed manufacturing instructions: from creating the project to finishing decoration.
A corner fireplace made of brick is an excellent decorative solution that can fit into any room. Wall decoration in this way is possible even in small rooms. Building a corner fireplace in a house with your own hands is not easy, but it will add some zest to the decor, warm up the house, and fill it with comfort and coziness. To solve the problem of how to build a corner fireplace, you should decide on the features of the device, design and design of this decorative solution.
How to easily and safely make a corner fireplace with your own hands?
Construction of a cottage or country house very often involves the construction of a fireplace. How best to make a good fireplace only with your own hands, without help, installation is planned in the kitchen, dining or living area.
INTERESTING! The most successful way to fill a building with home comfort is a classic fireplace powered by wood. It is possible to use ceramic tiles or brickwork as decoration.
A corner wood-burning fireplace requires proper placement. Then, in the end, he will please his household and correctly fulfill the duties assigned to him. Features of accommodation in a private house:
- The best place to build a good corner and functional fireplace with your own hands is the wall located opposite the window. It is also possible to install a fireplace near the outer surface, but in this case the heating function will be reduced;
- It is prohibited to place near windows, as well as near flammable fabrics and materials;
- if it is necessary to use the fireplace area for culinary purposes, you will need to consider a location in close proximity to a solid internal wall.
Decorating a living space with corner fireplaces allows you to use the entire room to the maximum, while achieving significant financial savings.
INTERESTING! Such structures are guaranteed to heat several living rooms, which reduces the cost of electricity and the purchase of firewood.
Firebox design options
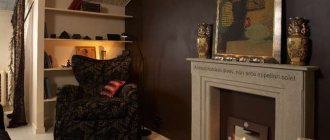
Candles and mirrors in decor
The naturalness and authenticity of your fireplace largely depends on how the firebox is designed. There are different options for serving it, both expensive and budget. Let's look at everything in order:
1Built-in electric fireplace or biofireplace. This has already been mentioned above. The devices will emit heat and visually demonstrate real fire.
2A modern solution would be a built-in 3D photo frame. Load a GIF image of a burning fire onto her flash drive and enjoy the makeshift fireplace. There are copies for sale with sound - you can download an audio track with crackling logs. Make sure there is an outlet close to the fireplace. The size of the firebox must ideally match the parameters of the photo frame for the effect to be as reliable as possible
3LED strips in yellow, orange or red perfectly convey the desired feeling. They cover the interior of the firebox and lay out piles of firewood.
4You don’t have to try to imitate a burning fire. Place logs, chips, sand, shells, stones, pebbles, clay pot inside
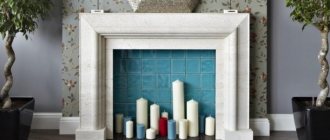
5Candles of different heights and diameters look elegant when placed around the entire perimeter of the combustion chamber
6A bold and not the safest option is to install a burner or kerosene lamp inside. But such a fireplace, when turned on, cannot be left without the attention of adults.
7The back and side walls of the firebox, as well as the bottom, are finished with mirror plates. This makes the hole seem more spacious, and even minimal lighting looks much more impressive.
8Neat doors made of tempered glass look gorgeous on the pseudo-fireplace. This is an optional element, but very expressive and catchy
9The metal lattice gives the structure an additional charm and finished look. It is ordered in a special workshop or purchased at a finishing building materials store
Corner fireplaces and their uniqueness
Of all the types of fireplace designs, the corner one is considered one of the most relevant. Corner wood-burning fireplaces for the home are most often installed in a corner that is not used. This solution is not entirely profitable, since the heat will be distributed to adjacent empty rooms. Placing it near external surfaces can lead to loss of necessary heat, because the fireplace will heat the street directly, and not the interior.
It is for these reasons that the most acceptable installation method is between blank walls adjacent to each other. This ensures proper circulation of warm air masses and thermal efficiency.
The advantages of a do-it-yourself brick fireplace are:
- attractive design;
- many ways to decorate the surface;
- the ability to combine the element with various design concepts;
- significant savings in living space and heating costs for a private home;
- availability. You can build a fireplace with your own hands.
Subject to fire safety, construction and operating conditions, corner fireplaces can become a luxurious highlight of the cottage, part of its home comfort.
Design selection
A corner false fireplace can become the central decorative element of a room or apartment, which makes it an even more unique design. An important point in arranging such a product is not only the choice of size, location and materials, but also the development of design. The appearance of a decorative fireplace should be harmoniously combined with other interior elements. When choosing a design, you must be guided by the following rules:
- to simulate fire in a medium-sized portal, you can use a plasma TV, which will not only make the structure as natural as possible, but also reduce its depth;
- a fireplace of a similar color or dark tones can be combined with light walls (it can be an excellent color accent for a sunny room, especially if its size is not large);
- Mirror surfaces, which can be used to decorate the product, will help to visually increase the space, but you need to remember that it will require more careful care;
- for a long but narrow room, it is recommended to choose a low but wide design, which will visually expand the room.
You should not use ornate details for decoration, as they accumulate dust.
Installation of fireplaces
How to make a corner fireplace with your own hands? First you need to understand its design features, that is, what components it consists of. The most important elements are the firebox, portal and chimney. Apart from the mentioned parts, it is difficult to imagine a fireplace without a reliable and solid foundation. Let's take a closer look at all the internal components of the structure.
Firebox
The combustion chamber is considered the main component. In most situations, it is made of cast iron or heat-resistant metal. In the latter case, cast iron plates, fireclay or vermiculite are placed on the inside.
Fuel tanks are:
- closed;
- open.
The absence of doors reduces the efficiency of the design. That is why closed fireplaces, for example, with a door made of heat-resistant glass, are currently popular.
Chimney
An equally important part of a DIY brick fireplace is the chimney. It is connected to the firebox using a special pipe. In most cases today, thermoceramics and heat-resistant steel are used for the production of chimneys. Such materials are equipped with multi-layer thermal insulation. Therefore, operation is comfortable and completely safe.
Base
The fireplace base is a place that is located directly under the fuel chamber. Before its arrangement, it is necessary to place a two-layer waterproofing on the prepared foundation. Roofing cardboard with special impregnation or roofing felt are suitable for this.
Portal
It will not be possible to build corner fireplaces with your own hands without cladding. The portal is considered the exterior of any fireplace; it demonstrates its belonging to the design style. Nowadays, very often fireplace lining is made of expensive granite, tuff, and steel modules. The current solution is mosaic made of colorful glass, masonry, and ceramic slabs.
Plasterboard construction
The metal frame is covered with plasterboard
Let's try to make a fireplace from plasterboard. Buy a moisture-resistant one, as it is considered more durable. You will also need rack and guide profiles for the frame.
To attach the parts and the entire structure to the wall, prepare self-tapping screws and dowel nails. Buy everything you need for finishing: wallpaper, tiles, film, shaped elements. The tools you will need are a screwdriver, an electric drill, a level, a tape measure, a knife, and a hacksaw.
1First make a drawing
2Transfer the markings from it to the wall in the selected location
3Attach the frame guide profiles to the wall
4Attach them to the posts using self-tapping screws
5First, assemble the frame for the external portal. Then install the firebox frame inside
6Mark the sheets of drywall and cut out the parts. Carefully cut out all the elements
7 Cover the portal with plasterboard using screwdrivers. Do not press on the sheets as they are very fragile
8All seams, fastening points and ends are carefully puttied
9Next, finishing is carried out
10The firebox can be decorated as desired
The wall at the installation site must be perfectly flat. Before starting work, check this parameter using a level. If necessary, level the area with putty or choose another location.
Design, drawing of corner fireplaces
Step-by-step instructions for building a fireplace with your own hands consists of drawing up a detailed diagram of the decorative element, selecting materials, laying the foundation and directly erecting the structure. We suggest you look at each important stage in more detail.
Construction materials
A DIY corner fireplace is not complete without building materials. To arrange a fireplace area you need:
- bricks. The number of elements directly depends on the created drawing. The main thing is that the components should not be defective, under-burnt or over-burnt. For the combustion chamber you will need to purchase fireclay bricks;
- crushed stone for the foundation. The size of the fractions is no more than seven centimeters;
- fittings with a diameter of 0.8-1 centimeter, length 0.7 meters;
- Portland cement marked 400;
- grate;
- roofing felt for waterproofing;
- smoke damper;
- medium-sized sand.
To cover the finished product, you will need the components you chose. As previously stated, this can be tiles, steel sheets, granite, tuff and other types of finishing materials. You can choose decor ideas from photos or videos.
Fireplace foundation
Corner brick fireplaces begin to be built with the construction of the foundation. It must be personal, that is, independent from the general foundation of the cottage. Drawings of the pipe, firebox and foundation are combined together. The construction of a fireplace foundation occurs in several stages:
- designing a pit with a depth of about 60 centimeters;
- placement of crushed stone. The layer should not be higher than 10 centimeters. After this, the crushed stone is well compacted;
- arrangement of wooden formwork panels. It is treated with bitumen or decorated with waterproofing, then placed on the bottom of the pit;
- placement of large fractions of stone. The resulting gaps are filled with fine gravel;
- pouring with rubble (cement, sand and crushed stone in proportions of one part to three and five, respectively). The layer cannot be higher than the floor by the thickness parameters of 1 brick;
- adding liquid;
- tamping. It is possible to add strength to the base using reinforcement. After a week, the formwork is removed, and you can begin laying the brick base.
IMPORTANT! After this, you will need to cover the foundation with polyethylene and leave it to harden for 7 days.
Layout of corner fireplaces
How to build a corner fireplace? Installation begins with laying out the first 3 rows of bricks. It is imperative to observe the features and modules of such masonry. Using the first row, the foundation is leveled to the level of the floor surface. For this, standard fireplace bricks are used: parameters 25 by 12 by 6.5 centimeters.
A seam is formed between the elements, the dimensions of which should not exceed 5 millimeters. The first few rows serve as the fundamental foundation of the fireplace area. They are laid out up to the combustion chamber, after which the masonry continues according to the diagram, which indicates the layer-by-layer order.
IMPORTANT! To increase fire safety, it is recommended to equip the firebox with a cast iron door. Today, many designers advise equipping the door with heat-resistant glass, this way you can monitor the flame.
During the construction of a decorative heating element, it is necessary to regularly check the drawing. This will allow you to adhere to the sequence of work.
Video fireplace masonry
Building a corner fireplace with your own hands is not easy. To facilitate understanding of the entire process and features of brickwork, we recommend watching a video on this topic.
Laying a firebox near the fireplace
Do-it-yourself installation of a fireplace insert begins after the third row of bricks has been erected. The base of the combustion chamber is located at a height of 30 centimeters from the floor. Compliance with these parameters will allow you to operate the fireplace area with maximum comfort in the future.
INTERESTING! To increase the coefficient of performance (efficiency), it is necessary to place reflective heat-insulating material between the fireplace and the wall.
Installation of the firebox is represented by the following sequence:
- the fourth row of masonry is the hearth. Construction takes place using a similar method as the previous three, that is, with complete filling;
- in the next row there is an ash pan. At the same stage, you will need to place supports under the grille. At this moment, it is also necessary to slightly push the masonry forward, this is how the overlap is formed;
- at the next stage, the bottom is formed, which fixes the supports. A grate is installed on the upper tier;
- after the seventh tier, the lower part of the fuel chamber is laid out.
Chimney and chimney
Depending on the layout, the ash pan and grate can be located lower, for example, on the third and fourth row, respectively.
The next important question is how to make a corner fireplace, or rather a chimney. Its design occurs in the interval of 19-22 rows. It is imperative to be guided by the dimensions that were established at the initial stage. This fireplace element is similar in external parameters to a hood, in the inner part of which a metal pipe is placed. Subsequently, the steel pipe turns into a chimney. An alternative option is to use special ceramic blocks.
On the 22nd tier you will need to prepare a place for the valve, and on the 23rd - a smoke hole. The arrangement of the smoke collector ends in the next row. In most cases, the chimney is laid out without tools, that is, craftsmen use exclusively their own hands. This will prevent foreign objects from getting inside.
In the process of creating a chimney and chimney, it is very important to adhere to a pre-developed plan and diagram. This solution will help maintain the order and density of the brickwork. You can visually familiarize yourself with the procedure for laying out this part of the fireplace in the following video.
Imitation from old furniture
Stages of rebirth of a mirror sideboard
Let's look at the stages of the most budget-friendly method for assembling a false fireplace using the example of an open glass sideboard with a mirrored back wall:
- The cabinet has drawers at the bottom of the body. We remove the containers, along with the glass partitions
- We cover the front with a sheet of plywood and cut out a rectangular hole in it for the future firebox. The height of its location is determined arbitrarily, at will
- In the lower part of the front we cut out a semicircular hole for the blower. You can neatly place logs there
- For the pedestal and mantelpiece, find old headboards. On such a podium the structure will stand stably and reliably
- The portal is ready, now we need to start finishing it
- Using a sander, go over the polished walls to make them rough. This way the putty will fit better on them
- Apply a layer of primer, and after drying, carefully fill the fireplace
- When the plaster has dried, sand down any uneven areas.
- Apply acrylic paint
- Finish with brick, stone, glue gypsum elements
- Cover the bottom of the firebox with LED strip around the perimeter
- Place stones, shells, firewood inside
- If you turn on the backlight, the contents of the firebox will be displayed in the red-yellow flames in the rear wall mirror
Choose warm colors, maybe even red. She perfectly imitates fire
Step-by-step technology for building a fireplace with your own hands
It is possible to install a corner fireplace with your own hands in various interiors of a private home. The main thing during the construction process is to observe the design features and brickwork. We have collected several videos for you that answer basic questions about arranging a fireplace area.
Video: fireplace laying
Brickwork in the video is a labor-intensive process that requires compliance with certain rules. We invite you to watch a video on this topic.
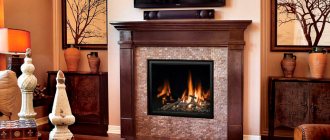
Imitation of a hearth in an apartment interior
Artificial oven
A false fireplace can be decorated in any style, from ornate baroque to minimalist high-tech.
- Classic examples look noble and solid. They are finished with materials that look like expensive stone, such as marble. The front side is decorated with bas-reliefs and stucco
- Products in the spirit of Art Nouveau deny any pretentiousness, openwork and classics. Strict lines, straight shapes, and minimal design are welcome. It can be a simple box against the wall, with a twist in the form of a catchy color or metal tubes in the decoration
- Country style is the interior of a cozy country house. A bulky fireplace decorated with artificial brick and wood will fit perfectly here. A rough wooden beam can be installed as a mantelpiece
When taking care of decorating your stove, don’t forget to decorate the area closest to it. It makes sense if there is a recreation area in this place. There are comfortable sofas and a small table for a pleasant tea party.
Candlesticks, photographs, paintings, and figurines are placed on the mantelpiece. You can lay a long-pile carpet, a rug knitted from thick cords, or the skin of a wild animal on the floor.
Imagine how lovely your living room will be if you have a cozy, homely fireplace in it! How pleasant it will be to spend evenings next to him with your family playing an exciting board game. A device assembled with your own hands will delight not only the owners, but also guests, friends, and acquaintances.
Niche as a hearth
This is a wonderful decorative element that can play a dominant role in the interior. Or become one of its stylish attributes. This installation will never go out of fashion, so the design of your apartment will always be stylish and original.
Before you start, watch a five-minute video that shows how to independently assemble an artificial hearth from scrap materials in one day:
Finishing
The appearance of the fireplace is dictated by the texture of the finishing material that you decide to use. You can familiarize yourself with the entire range and choose the material you like. Wooden lining, MDF panels, ceramic tiles and artificial stone tiles are especially popular when carrying out such work. All these materials are quite processable. The use of MDF is somewhat limited by the temperature and power of the fireplace, so they are trying to avoid this type of finishing.
It is advisable to use fire-resistant adhesive for installing tiles. It's not that this zone experiences high temperatures. This glue, even when frozen, is elastic. It is needed to avoid destruction of tile surfaces due to thermal expansion. The technology of laying tiles is that each element in a row is glued and aligned with the previous one, which is why it was necessary to maintain the levels of the frame.
To imitate the presence of a real fireplace in the room, many construct a chimney from plasterboard. Its installation steps are the same as for the portal. This type of work is often performed by novice craftsmen and is considered the most accessible and easiest.
Fire that doesn't burn
An excellent alternative to a conventional fireplace that uses coal or wood as fuel is its electric counterpart. Many people have seen the most primitive version of such a device: a backlit fan and an orange fabric stretched over it, which depicts flames. More advanced versions use backlit steam, which, by the way, turns out very realistic. But besides the aesthetic function, the fireplace also performs a very necessary one - it heats the room. His electric brother is also capable of this. They are equipped with heating elements that are much safer than open flames.
To create a more natural and harmonious image of an electronic fireplace, you need to build a frame for it and decorate it. Real fireplaces are quite large in size, which is what you will need to recreate for an electronic one. Drywall will be used as the main element of the structure's cladding.
Final chords
At this stage, work on the fireplace that you made yourself is almost finished; all that remains is to paint the fireplace, attach stucco moldings and install shelves and various panels that will allow you to effectively manage the free space. Now it’s ready, plug it in, take a cup filled with delicious cocoa, and sit down in a cozy chair. It is worth noting that it is better not to place anything next to this element of the interior, neither **cabinets**, nor tables, but simply leave a space that the fireplace will fill with its atmosphere.
Installing gypsum boards
There is no need to list all the advantages of drywall, but it should be emphasized that in different designs certain qualities can be most clearly highlighted. We are interested in heat-resistant drywall, since an electric fireplace has a heating function, which means that heat will certainly be transferred to the walls of the portal. Any drywall is already fire-resistant, the only difference is the paper.
The more jumpers you make on the frame, the easier it is to cover the frame with plasterboard. After all, you can cut the sheet into small pieces, but you shouldn’t get too carried away with this matter. It is desirable that the casing be solid. Solid sheets give the portal additional stability.
If experience does not allow you to cut the material so precisely, as an exception, it is allowed to divide it into parts, because all the joints will be sealed with high quality. The main thing is to make sure that the place where the sheet is attached is not empty, otherwise you will simply ruin the material.
The drywall is attached to the profile using self-tapping screws. They need to be tightened with such force that the caps fit inside the sheet, but do not damage the cardboard layer. The joints of the sheets and the holes from the screw heads are puttied with a metal spatula.
Seam processing has a certain technology. Using a stationery knife, the joint is deepened and a chamfer is removed from the sheet. It turns out to be a kind of channel for putty. Thanks to this channel, the mastic will stick to the sheets better. Putty is also applied to the screw holes. After it dries, the excess should be removed with sandpaper. The resulting perfectly smooth surface is ready for finishing.
Facing material
For cladding, it is better to use unpainted gypsum tiles in the form of brick or stone.
Select the paint as desired, and additionally cover it with varnish. Start laying from the top row, so that if trimming is necessary, the tiles of the bottom row are reduced.
Important! Using a screwdriver, adjust the power, otherwise the screws in the metal will spin and can push through the drywall.
Frame assembly
Installation of the frame begins with drawing out the contours on the wall and floor. Firstly, the assembly will be carried out according to established guidelines, and secondly, vertical and horizontal lines will be immediately marked off, which will guide the future edges of the portal. By the way, level verification is one of the most important stages. Any violations will lead to gaps forming during the cladding, especially if the finish is in the form of tiles.
You can start with a horizontal base or a vertical frame. The frame is assembled to size from four prepared profiles. The profiles are fastened together with self-tapping screws. Immediately the frame must be secured to the wall. The portal itself, after the firebox is installed in it, will turn out to be quite unstable. When fastening, a hammer drill is used. Dowels are inserted into the holes and the frame is screwed to the wall.
Next, horizontal posts at the corners are attached to the frame. Their length should be several centimeters greater than the depth of the firebox. And even though you haven’t chosen the firebox yet, you should evaluate all the dimensions and make racks with a certain margin. Another frame is installed on the racks. The frame in the form of a parallelepiped is ready.
The remaining work will only strengthen the resulting frame from the profile. Prepare horizontal spacers and secure them along the portal plane. It is important that these spacers cut off the space for installing the firebox. To attach these elements, you will have to work with scissors. At the ends of the profile, the side parts are cut off so that they do not interfere with the tight joining of the horizontal and vertical posts. The completed composition must be screwed to the floor. Note that such a portal, together with the fireplace, could theoretically be placed in another place, but the remaining perforations will need to be sealed.
We return to the place where the fireplace was installed. In the simplest version, it is only necessary to make vertical inserts between the horizontal struts. An opening is formed where the firebox will be inserted. The support for the firebox is made from the same profile. It is mounted horizontally in the form of slats that go deep into the fireplace and attached to the wall. If you decide to make a fireplace opening in the form of an arch, then our favorite profile is used as the ceiling. You can bend it by making notches with scissors. The completed arch already makes a change in the entire design process.