Hello, friends! Not long ago, the site published an article “Wallpaper Tricks | Part 1”, in which I talked about all sorts of subtleties in a seemingly trivial task - wallpapering.
But after a few days I had accumulated material for one more lesson. In it we will consider questions such as:
- Fighting air bubbles with little blood
- Fighting protruding edges of canvases and external corners
- Wallpapering door slopes
- How to join different types of wallpaper at outer corners in the least ugly way
As you can see, the questions are really important and worth looking into. So let's not hesitate.
- 2 We deal with undefined edges of canvases and external corners
- 3 Glue wallpaper on door slopes
- 4 We join different types of wallpaper on the outer corner
price for wallpapering
Gentlemen, masters, the following question arose: when estimating the cost of work for wallpapering, how to evaluate openings (windows, doors)?
where the wallpaper does not stick, but pasting such places also requires labor. It’s just that the price varies depending on the complexity of the pasting. Ours ranges from 100 to one hundred and eighty.. exclusive ones are even more expensive
In linear meters, this is clear to the horse. In this case, the areas of windows and doors are discarded. Otherwise, you can also charge for floors that are not painted)
ssvkrym wrote: how to evaluate openings (door windows)? where the wallpaper doesn't stick
Labor without art is barbarism!
but you also need to spend time and effort on pasting the window; for me, it’s easier to glue a strip of wallpaper a meter wide than to go around the window with wallpaper.
The worker wrote: In linear meters, this is clear to the horse.
ssvkrym wrote: what about windows? to count or not these, for example, two squares of a window?
why consider that they didn’t paste over
ssvkrym wrote: or not to count these, for example, two squares of a window?
No. The area of the walls is calculated, then the area of all openings is subtracted from it.
ssvkrym wrote: but pasting such places also requires labor
Which ones?
It’s easy to calculate yours by the wallpaper used - the dimensions are indicated on each roll and at the end of the work you can estimate plus or minus a meter... in general, the wall area is the floor area multiplied by 2.5 for a typical housing
Explain. If you cut the wallpaper around the window, then it takes about 2 minutes of labor, but if you cover the slopes with wallpaper (once in my life I glued them with painter’s non-woven fabric), then you can count the squares, or, if the slopes are narrow, then the shoulder straps.
thanks ussur, that means we don’t count openings, which is what I wanted to know.
Let me explain, all this fuss near the window, radiator, trimming for the trim is very tiring.
ssvkrym wrote: I’ll explain, all this fuss near the window, radiator, trimming for the trim is very tiring
I agree, but where can you find such a fool who will pay for this?
It’s easier to increase the price per square meter, but even here you can’t jump much higher than the city average. So, no matter where you go, you can only get money for what is done, and not for the fact that we work hard.
lvov7104 wrote: you can only get money for what is done
I agree, and I only take it for what I did
Yes, it’s not evaluated in any way, you either include it in the total price or not. I don’t understand what’s so difficult about a doorway or window. There is a laser on it and you check the stripes, well, to the extreme plumb line.
Doorways in some cases even make work easier, but a window wall is often the opposite. If the radiator is not removable, there is also more than one, pipes, window sill. Some don't subtract openings.
GKL wrote: There is a laser on it and you check the stripes
laser, that is, but I haven’t used it yet when gluing wallpaper, I think that SUCH precision is not always needed.
The laser gun is a very good assistant when gluing wallpaper - all sorts of inserts, vertical control, corners, etc.
Why are you all fussing? I count without subtracting anything and announce the total. arranges? then we work. and then.. window
1.5. this is from 300 to 500 rubles. If the customer is such a penny-pincher, then you should think hard: do you need it?
Masters, are you interested in the customer’s opinion? (I often speak on behalf of customers here on the forum). In my opinion, this approach is the most correct.
spaceeggs wrote: why are you all petty? I count without subtracting anything and announce the total. arranges? then we work.
When I hired craftsmen, I never asked them for calculations by square meters, by linear meters, with deductions, without deductions. Well, I’ll force him to subtract the openings - so he’ll add a price per sqm, introduce a surcharge for trimming, and for gluing behind the radiator he’ll generally charge the same. and will still adjust the amount to the desired amount. You tell the master what you would like to have, he tells you how much he would like to receive for it. If it seems expensive to me, I can try to bargain, but bargaining is also not for individual transactions, but for the amount as a whole. They didn’t make a deal - they shook hands and went their separate ways.
A quick way to change the mood of your interior
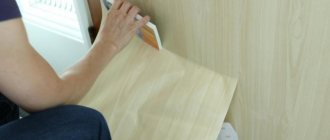
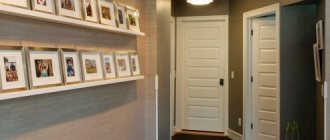
My relatives pushed me to change the interior. They reproached me for having a construction company, but nothing had changed in my own house for three years. I ordered everything I needed from the store. The door panels were 60 cm wide. I selected some with the intention of cutting them off, and ordered several. I measured each closet in the house and wrote down the dimensions of the doors for wallpapering.
We create an impressive room design using photo wallpaper on the door
My family went to visit my grandmother for the weekend. I did all the wallpaper myself. I ordered paper photo wallpaper for children's rooms. The doors of the office and bedrooms were covered with fabric wallpaper. The theme was chosen to suit the interior style and tastes of family members. Each wardrobe was turned into a work of art.
How to hang wallpaper yourself: tips and life hacks
Proper wallpapering is half the success when creating a unique interior. Therefore, some people trust this work only to professional craftsmen, but some decide to do the repairs themselves. Especially for such readers, we have prepared an article in which we will describe the technology of wallpapering and little tricks for impeccable quality.
We assume that you have already prepared the walls for work. This means you have removed the old coating, plastered and primed the surface, and removed the front parts from switches and sockets. Do not ventilate the room for 3 days before and after gluing.
Technology for proper wallpapering
We will describe each stage of the work, starting from purchasing the covering and ending with fixing the last sheet of wallpaper.
Calculation of the number of rolls
Here is a sequence of mathematical operations to make it easier for you to calculate how much materials you will need:
Measure the perimeter of the room and divide it by the width of the wallpaper to get the number of stripes that need to be pasted. Don’t forget to convert the values into a single system: if the perimeter is measured in meters, it must be divided by the width converted to meters.
Measure the height of the ceiling. If it is less than 2.5 m, one roll will give 4 strips, if more - 3 plus trimmings.
Divide the total number of strips by 3 or 4. This is the number of rolls.
Round all data up. Always buy 1 spare roll, especially if you choose a patterned model. The wider it is, the more fabric it will take to fit it.
Beginners can line the wall into strips with a pencil so as not to make mistakes in the calculations, or contact a consultant at a hardware store.
Choosing glue
There shouldn't be any difficulties here. Manufacturers indicate for what types of fabrics the solution is intended. Cheap universal glue, as a rule, contains a lot of starch and is devoid of “goodies” in the form of antifungal components and color indicators that allow you to identify smeared areas.
Use adhesive according to the type of coating. Otherwise, the binding force of the solution will not be enough to hold the sheet if it is too heavy, such as vinyl wallpaper.
The adhesive ability of the mixture decreases when the room is cold. If you cannot move the work, add PVA to the wallpaper glue. It will enhance adhesion, and the wallpaper will not come off even from a cold surface.
How to glue wallpaper: basics and nuances
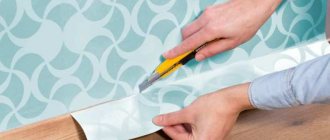
We start working from the window in any direction. With this movement there will be less cuttings and no shadows will appear. We retreat from the window opening a distance equal to the width of the canvas minus 5 cm and, using a plumb line and a pencil, draw a vertical line. This will become the starting point for gluing the first strip. The result is a small overlap on the slope, then the excess will need to be trimmed.
Don't focus on the doorframe or corner of the room. They are rarely strictly vertical.
The further sequence of actions depends on the type of wallpaper. We grouped them according to the method of applying the glue, and not according to operational or aesthetic parameters.
Changing the appearance of the entrance transforms the room
After that, questions immediately started pouring in. And I told a friend what the photo wallpaper on the door was. How to make a decoupage cabinet with them and why canvas 60 cm wide is rarely produced, mostly to order. Is it possible to decorate a door with regular wallpaper? What are the benefits of self-adhesive vinyl stickers?
Photo wallpaper on the door
The following wallpapers are available for finishing various types of doors:
- paper;
- non-woven;
- vinyl;
- fabric;
- door stickers.
The subjects of 3D images are very different:
- nature;
- flowers;
- cities;
- perspective views from above;
- children's pictures;
- Art Deco;
- abstraction.
The choice is very large. There are many manufacturers and each has its own catalog. Additionally, you can bring your photo or picture. Each major store has its own website and offers home delivery.
Each manufacturer selects its own sizes. They all take into account that the minimum door width is 60 cm, height 2 meters and make them larger. It’s easier to cut to size than to leave stripes around the perimeter that aren’t covered with wallpaper.
Door stickers are made from vinyl film. The front side has a matte or glossy three-dimensional image. The back is covered with an adhesive composition. Self-adhesive ones are easy to attach to any surface and can be quickly removed without damaging the door leaf. They can be changed frequently.
Slopes are different!
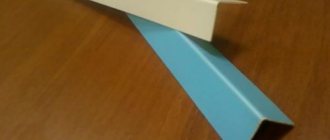
There are different slopes: door and window; made using plasterboard or simply plastered; covered with wallpaper, laminate, tiled, simply puttied and painted. I will tell you about the types of slopes that I have at home, justifying their use in this form. Let's start with the general:
All the slopes in our house are made using plasterboard: a layer of rodbunt is applied to the primed surface (it is used as glue), and a pre-prepared sheet of moisture-resistant plasterboard is glued onto it. To strengthen this structure, we used a metal corner, which was also “glued” with a rod band. We glued it only to the outer corners, those that, as they say, can be caught with a shoulder or torn down with a foot or a toy (in our case). We prime the almost finished “rough” slopes again, putty, clean, putty (if necessary) and prime again. Now the slope is ready, all that remains is to decorate it. And now the most interesting part begins: We only have a door to the combined bathroom, but there are no other interior doors (due to financial difficulties after the renovation), and no one knows when they will appear, maybe in a month, or maybe in a month. year. And living with unpasted, unfinished door slopes waiting for doors, with our little children, is simply not realistic: in a couple of days they would have “removed” all the wallpaper for us, peeled off everything they could: it would be a sin not to pull and pick where something came unstuck or began to slowly come off.
Canvases 60 cm wide are made to order or cut
Photo wallpapers are made with the expectation that they will be larger than the door. Each manufacturer has its own sizes. In stores, the width usually starts from 86 cm for wallpaper, and from 80 cm for self-adhesive films. If the image can be cut to size without damage, then take ready-made photo wallpaper. Otherwise, by paying a little more, in a few days you will receive canvases 60 cm or larger, whatever sizes you ordered.
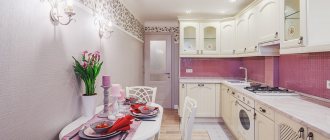
Photo wallpaper on the door in the kitchen
This applies to a decoupage wardrobe, when there may be 2-3 non-standard doors and you want to unite the entire facade with one theme. Sometimes the door exceeds the standard dimensions and then you also have to order wallpaper or self-adhesive film.
Children's wallpapers are highlighted in a separate section. They are designed to suit the interests of boys and girls of different ages. Favorite characters, educational pictures and themes that correspond to teenage hobbies. Non-standard furniture sizes are also taken into account. Photo wallpapers that are glued to the door have a protective film that allows them to be washed. Marker marks can be easily removed from the surface.
How to wallpaper an arch: simple instructions
How to wallpaper an arch + video How to carefully wallpaper an arch in an apartment? Finishing an arched opening with your own hands is quite simple and not very labor-intensive...
- Choosing the right wallpaper
- Preparing for work
- Preparing the walls before gluing the arch
- What tools will you need?
- What wallpapers exist
- How to wallpaper an arch and doorway in 4 easy steps
- How to wallpaper an arch: choice of wallpaper, technology, design
- Sequencing
- From the door
- How to apply?
- Maintaining verticality in uneven corners
Choosing the right wallpaper
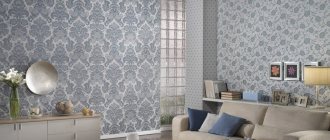
At first glance, there shouldn’t be any particular difficulties when choosing wallpaper for an arch. It seemed, what does the design, color, texture matter? But we must not forget that if the wallpaper for the arch and the walls of the rooms adjacent to it are different, then problems may arise during pasting. The fact is that due to the shape of the arch, it is almost impossible to match the patterns on its front and side sides. And in general, it’s not easy to match curved boundaries on walls. When you also need to try to combine patterns on the wallpaper, the task becomes much more difficult.
The easiest way is to cover the arch with the same wallpaper, choosing plain rolls without a pattern. Or with a small image that does not require alignment. Another option is suitable for creative people: choose wallpaper with an abstract pattern, and when pasting, combine it with different pictures.
It will be easier to choose wallpaper when the surface inside the arch is covered with other compatible colors or painted. Then the patterns on the main wall can be anything, but it is better to make the inside of the opening monochromatic.
How to paste with wallpaper
The so-called companion wallpaper, that is, panels with a common background and a different pattern, are perfect for covering openings inside an arch. Moreover, when you paste wallpaper with a pattern on an external wall, plain or striped ones are good for the arch itself.
It is important to mention the quality of the rolls. It's better to give up paper wallpaper. After all, they have low wear resistance, and when pasted over them, the surface can be deformed at bends. As a result, paper wallpaper in the arch will look ugly. In addition, paper wallpaper is difficult to clean. Therefore, the best option is rolls that can be easily wiped with a damp sponge. For example, non-woven, bamboo, vinyl wallpaper.
So, to summarize: it is best to purchase durable and washable wallpaper such as:
- vinyl;
- non-woven;
- bamboo;
- glass wallpaper.
Preparing for work
As with any other work, before wallpapering, you need to prepare the arch.
If your arch is already plastered and leveled, then all you have to do is prime it.
Primer is a must before wallpapering. In order to create good adhesion and to ensure that your wallpaper sticks firmly to the arch, a primer is used.
If your arch is not prepared at all, then you need to perform a number of actions.
Preparing the walls before gluing the arch
Now a few words about what the arch should look like so that after wallpapering it, they look beautiful and don’t fall off.
Let's take a quick look at the arch preparation process:
- first of all, the arch is primed to remove excess dust and create good adhesion - remember, primer is the basis of the foundation, without its participation your wallpaper will not stick to the arch properly, especially if we are talking about heavy and dense wallpaper;
- then we move on to plaster, which firstly eliminates all the flaws of the arch, and secondly levels the walls of the arch vertically;
- prime the arch again;
- arch putty is the final stage, which serves to ensure that your arch walls become smooth;
- we clean the walls of the arch using grout and sandpaper;
- We prime the arch and its walls for the last time.
We have described the ideal option for preparing an arch for wallpapering. You don’t have to use putty if you are going to cover the arch with thick wallpaper, because minor imperfections will not be visible under it. It all also depends on how well you plastered your arch. It is likely that your arch does not require a layer of putty because the plaster has removed all the imperfections in your walls.
What tools will you need?
- pencil and ruler (to make markings);
- construction knife or scissors (for cutting rolls);
- special wallpaper glue;
- brush, roller or spatula;
- dry rags (to clean the glue from the front of the wallpaper if necessary).
Original wardrobe in the children's room
Vadik and I went into the children's room. It was decorated in a marine style. The inside of the door was covered with wallpaper with a picture of a porthole through which fish could be seen. The wardrobe had three doors. Two of them had various drawings of the sea from children's cartoons on them.
Front door design using photo wallpaper
I decoupaged the cabinet and the front door with paper wallpaper. A child’s hobbies change quickly and photo wallpaper on a door is a convenient way to change the design of a room without much expense in a few hours.
There was an elephant in my daughter’s room from the side of the door. I covered the chest of drawers with wallpaper with educational pictures. I cut the strips at 60 cm, but only horizontally. This is the width of the front panels of the drawers. Self-adhesive films can be glued to any surface. A large selection of pictures allows you to choose them for any age and change them often.
Saving the appearance of an old door with photo wallpaper
No matter how intimidating the word “repair” may sound, sometimes a creative wave hits us, and the soul demands change. It’s just desirable that they be inexpensive, quick and without a lot of labor. Is it really possible to come up with something with such requests? Quite! Photo wallpaper on the door will help you add something new to your interior without having to undertake complex work and spend a lot of money on it. Perhaps this highlight will seem insignificant to some, but believe me, with the right design solution, such wallpaper will make the interior truly unique.
Variety of surfaces, formats and designs
You can use photo wallpaper on the door on almost any surface. You can glue them on interior or entrance doors and even on compartment doors. Photo wallpaper will also decorate kitchen cabinet doors or even kitchen cabinets! In addition, you can paste photo wallpaper on the wall with the door as a continuous sheet: this will make the door invisible, but for this option you will need wide-format wallpaper for the walls.
Any catalog will tell you better about the variety of designs: landscapes, fashionable macro, geometric designs and reproductions of famous paintings will make choosing a design a long but very exciting time. You can even order wallpaper to your own design and decorate the door with your favorite photo or your own drawing!
But the main question that you have to decide is whether it’s worth spending money on self-adhesive wallpaper or is it better to buy paper wallpaper?
Door decor with stencils
Old doors can be updated using printed drawings. It’s just a pity that not everyone has artistic talent. But in this case, the problem is solved with the help of stencils. You can draw them yourself, or you can find an image you like, print it on thick paper, cut out the design with a sharp knife, leaving jumpers in places. Now the stencil is ready.
The disadvantage of a paper stencil is that it doesn’t last long. If you need a “long-lasting” one, you need to transfer it to a transparent thick film. The technology for cutting out stencils for door decoration is shown in more detail in the video.
The drawing can be anything. Both geometric and floral, stylized images of animals, birds, and cartoon characters are popular.
Here are some options for small stencils
But they can also cover the entire area of the door leaf. It all depends on the style of the room and your desires.
Using the same technique, you can decorate doors with glass. Many older doors have a regular glass insert. In order not to spend money on patterned ones, you can apply the pattern yourself.
Stencil on door glass
Decorating a door with self-adhesive film
Perhaps the easiest way is to update old doors using self-adhesive. All you need:
- the film itself,
- a spray bottle containing soap and water;
- plastic spatula or soft cloth;
- sharp knife (can be wallpaper).
This film is available in different versions - there is a plain matte or glossy one, there is a plain one with holographic patterns, a wood effect, there are even special ones for covering doors with photo printing applied.
Part of the range of self-adhesive films
Regardless of the type of film, it is glued in the same way. In this case, we decided to update the old doors using a photo printing option. One point: before gluing, remove handles, latches and other door fittings.
For the decor to be of high quality, the surface of the door must be clean, even and smooth. If you processed it with a sander before, try gluing a small piece of film. If it sticks well, everything is fine. If it “doesn’t stick,” you’ll have to prime the doors and then paint or varnish them to create a smooth surface.
Take a spray bottle and evenly wet the surface of the door.
Spray the doors
We shave the film, remove the protective layer from one of the corners, and also spray it. So, by wetting, we separate the protective paper from the top along the entire width of the film.
Separate the paper backing on the upper corner and moisten the film with water
You should get a strip 15-20 cm wide. Do not remove any more so that the film does not stick to the canvas. We apply the peeled part to the upper edge of the door leaf (or the area to be decorated), it quickly sticks. Try to apply it evenly right away, but the position can be corrected - that’s why we wet the surface so that the film could be moved. If you pull it, it moves little by little.
Apply the film to the upper edge of the door leaf and smooth it, removing air
After making sure that the canvas lies flat, take a plastic spatula (for wallpaper) and smooth the surface with it, moving from the center to the edges. The goal is to remove all the air. Since the surface is wet, this is not difficult - the water displaces the air.
Everything else is simple. We pull down the protective paper, peel off the strip, glue it and so on - to the very bottom of the door. If you glued the top part for a long time, the bottom part may dry out, so periodically check whether the doors are dry and spray again if necessary.
Cut off the excess
After all the film has been glued, use a sharp knife to cut off the excess along the edges. All that remains after this is to install the fittings.
This is how you can update old doors using film with photo printing