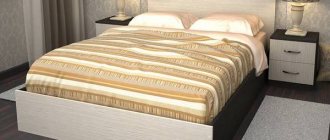
DIY children's bed house
You've probably noticed that frame-type children's beds are very popular right now! Of course, today there is no shortage of beds for babies of all shapes and sizes. But one of the most fashionable cribs today is the house bed. Therefore, we devoted this article to the topic of how to make a house bed with your own hands . As the name suggests, the structure is designed in the shape of a house. In short, it makes the transition from a crib to a big baby bed a lot less daunting. Here we present several examples of how to make a children's bed house made of wood in different versions - floor-mounted, with storage drawers, with or without sides, with simple frames or in the form of a real playhouse, with walls and a roof. You may also be interested in the interesting shape of a children's wigwam bed , which your children will definitely like.
DIY bed-house
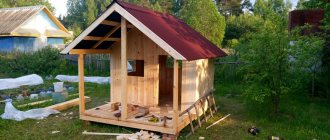
Many loving parents, not trusting manufacturers too much, make bed-houses on their own, purchasing solid wood for this and using either light slats and beams for decorative and functional elements, or carefully rounded fragments. Fathers who love and know how to make things create entire princess palaces or fairy-tale huts. Such “real estate” is perceived by children with great enthusiasm.
Those craftsmen act wisely who make the house quite spacious, making only hints of the contours of the roof from natural slats. By covering the “walls” with fabric while playing, children will play in such a house, and when it is necessary to do cleaning, the fabric can be easily removed, and the walls of the house will not cause a huge number of bumps on the head and bruises on the body.
Here is the simplest drawing of a bed-house with dimensions:
The process of making a house bed yourself is shown in the video.
Loft beds for adults and children
Children's
Even in a fairly spacious children's room, it makes sense to install this functional and compact type of furniture, thus freeing up a significant part of the space for outdoor games. When choosing a loft bed for children, you need to focus on age and personal preferences.
Depending on the age of the child, several types of models are produced:
- for children 2-5 years old with a low second tier with a total height of no more than a meter;
- for children from 5 years old with play areas and a sleeping bed length of up to 160 cm;
- the sleeping area is 1.3 m from the floor;
- for schoolchildren with areas for study, sports and entertainment 150 cm long;
- for teenagers 180 cm long;
- the maximum height from the floor is 1.8 m, in this case the working space under the sleeping bed also increases.
Beds for children and teenagers are equipped not only with work areas, but also with play and sports areas. For two children, structures with paired sleeping places are installed.
If the room already has a desk, you can opt for a model with two functional zones. In this case, there will be more space for games and storage.
A loft bed with removable elements is very comfortable. In this case, it will “grow” with the child - at a certain point it will be possible to raise the sleeping place to a greater height and change individual parts.
For preschoolers
The industry produces special designs of such furniture intended for 2-5 year old children. Such models have a low sleeping place - the second tier is only a meter or even slightly lower from the floor. The semi-loft bed is equipped with additional sides of sufficient height.
The height of the “ground floor” is quite enough for a baby. There is a desk where he can draw, as well as a “tent” for games. Pull-out elements located under the upper and lower tiers in the form of drawers are designed for storing children's things.
But still, the age at which a baby can be safely placed on the second “floor” of the bed at night is very individual. It is worth leaving him alone at the top only if he is not afraid of heights, sleeps peacefully and does not fidget in his sleep. Seat belts will also come in handy.
For teenagers
A teenager in adolescence especially needs periodic solitude. The allocated territory will allow him to calmly go about his business in his own cozy corner.
For a teenager who spends a lot of time studying, it is necessary to choose models with a more spacious workplace and the ability to install a computer, printer, equipment for creative activities, etc.
Don't forget about proper lighting. The lower tier is always insufficiently illuminated, so it will be necessary to install an additional, fairly bright light source. On the second floor you can install a small lamp for reading or viewing magazines.
It’s good if your child can modify individual elements of furniture, thereby expanding its functionality. For example, roll away a couple of bedside tables or install a compact sofa not only under the bed, but also at the other end of the room.
The girl will need enough free space to store not only clothes, but also little things dear to her heart: handbags, straps, jewelry and other accessories.
It should not only be functional, but also stylish and appropriate for his age. Your tips should be very tactful - after all, at this time the child is already forming his own taste preferences.
For adults
The differences between adult and children's loft furniture are only in size and finish. Single- or double-bed designs for adults are larger in size, more durable and equipped with a reinforced frame.
In their lower part, as usual, there is a work area or a folding sofa for daytime relaxation. Cabinets or shelving, just as in the case of children's furniture, are equipped at the ends. Stairs can be positioned strictly vertically or made in the form of a combination of drawers, cabinets or podiums.
You can relax on it in your free minute during the day. In a studio apartment, this furniture, despite its overall dimensions, can serve as a small living area for receiving guests. If necessary, a coffee table can easily be moved to the sofa. By purchasing a model with a retractable table, you can also create a very comfortable workplace here.
You can install a product with a built-in sofa in your office. Especially for bedrooms, loft beds with a double bed are produced. For such a room, it is wiser to purchase a model with built-in wardrobes or a wardrobe.
Useful tips
Building a hut at home is not difficult if you adhere to the following recommendations:
- The easiest way is to build a hut from just pillows. However, such a design will not be durable. It will last for a few minutes of play. If you plan to spend more time in the hut, you should take care of other components - blankets, furniture and means that will hold it all together into a single whole. This design will be durable.
- If the size of the room itself is large, you can increase the hut itself that is being built in it. In this case, it will be possible to divide it into compartments - several small rooms. To divide the hut into compartments, you can use chairs, pillows, and boxes.
- To illuminate a house that will be dark without windows, you can use a battery-powered flashlight. So that you don’t have to constantly hold it in your hands, you can choose a place for it on the ceiling or floor, prepare elements with which it will be secured in the chosen place.
- The constructed hut will have many cracks. Pillowcases and towels will help eliminate them. It is enough to fill unwanted holes with them;
- Since the hut is made mainly of soft objects that do not conduct heat well, it can become very hot inside. It is recommended to take care of installing a portable fan here in advance. It is important to be careful: under no circumstances should you cover it with blankets, otherwise a fire may occur.
- It is not necessary to leave the inlet open. Here you can install an element that will act as a door. This could be, for example, a pillow or a large sheet of cardboard.
- Those who want the construction to last not a few minutes, but several hours, are recommended to use lighter items. This is especially true for the blanket, which will act as a roof.
- To build a hut, you need to try to take items that none of the household members will need in the near future.
- Do not use fragile items that could break or cause harm to health.
- Plastic sheets should not be used as they emit an unpleasant and toxic odor.
- There is no need to use light bulbs that get very hot, as they create a fire hazard.
- If the fortress is large, you can put a mattress in it so that you can sleep fully in it.
- You need to place the hut so that it does not block the doors. Otherwise, if something happens, it will be impossible to leave the room.
A small hut, built from a blanket and pillows at home, is great and simple entertainment for children, family or a group of friends. It’s a pleasant place to spend time in this cozy place: play, communicate, fantasize.
Selection of materials
Making a house-shaped bed for children with your own hands is actually not difficult, even for a novice craftsman. The design is so simple to implement that it does not require special skills. You should start with the choice of material; its consumption will depend on the size of the structure:
- Tree. This is a durable, environmentally friendly material that is easy to work with. The product will be of high quality and will last a long time. To make the frame, a beam with a section of 5 by 5 cm is usually used. The roof and walls of the future house can be built from boards, but with them the product will turn out to be heavy. Therefore, they are often replaced with birch plywood. Any detail is cut out of it. The optimal thickness is about 1 cm.
- Drywall. Lightweight, flexible material that allows you to create different geometric shapes. It is cheaper than wood, but is significantly inferior to it in strength. It will make a good frame for a future house. You can make real windows in it and equip the entrance with a door. A wooden bed is placed inside the structure.
Wood Plasterboard Tent
Explanation of the details of the Pattern
Layout of pattern parts:
L – Part color. Can be combined.
L1 – End part of the roof, L2 – End part of the wall, L3 – Top part of the roof, consisting of two pieces of fabric, L4 – Front part of the wall, L5 – Rear part of the wall.
Windows D1, D2 are cut along the internal line. D1 – Window frame (consists of four parts). For window D1, you can make a frame similar to window D2, which is located on the end wall of the roof. D2 – Frame and partitions of a round window. D3 – Entrance curtains. D4 – Entrance frame.
FX – Garland detail, cut out in 2 pieces (front and back sides). FX dimensions are given in “Patterns for Printing a Children's House”.
See “Pattern for a children's house with a base 150x88x150” for all dimensions and number of parts and markings of windows and entrances.
Fabric consumption:
With a fabric width of 1.6 m.
- The approximate consumption for all walls of the house and roof is 7 m.
- The approximate flow rate for flags is 1.2 m.
- The approximate consumption for entry frames and curtains is 2.5 m.
- The approximate consumption for curtains on windows is 1.5 m.
Provided that the design runs along the length or width of the canvas and cannot be turned over.
End walls:
L1 – Roof end piece, 2 pcs. L2 – End part of the wall, 2 pcs.
Additional details:
1) Curtains for windows, 2 pcs., per window. 2) Horizontal detail of a rectangular window frame (D1), 2 pieces per window. 3) Vertical part of the frame of a rectangular window (D1), 2 pcs., per window. 4) Garland detail (FX). You can print the pattern for this part from the file “Children’s House Patterns – Print”. For end walls 24 pcs. For the front wall 20 pcs., for the back wall 20 pcs. Total: 64 pcs. 5) Vertical frame piece for entrance (D4), 2 pcs. 6) Entrance curtain (D3), 2 pcs. 7) Tie for the entrance curtain, 2 pcs. Ties for window curtains and for attaching the cape to the frame. For curtains, 2 pcs., per window, for attaching the cape to the frame, from 17 pcs. 9) The round window frame detail (D2) can be printed from the file “Children’s House Patterns – Print”. Parts 8 pcs. Additionally, an allowance size of 10 mm is indicated. 10) Partition for round window (D2), 4 pcs. 11) Horizontal frame piece for entrance (D4), 2 pcs.
Choice of design for children: one- or two-tier
You can make a bed house for a child with your own hands in different designs. This can be a one- or two-tier structure. Products for boys can be painted blue and thick curtains hung on them.
And cribs for girls can be equipped with a canopy made of airy tulle, decorated with flags, ruffles or balls.
Before deciding on the type of design, you need to choose the shape of the product, its dimensions and design. For very young children, it is worth choosing low single-tier structures. If there are two children in the family, it is recommended to make a bunk bed - a house with a ladder.
Any house bed design will consist of the following elements:
- rectangular bottom base;
- vertical supports;
- wall-ribs;
- roofs.
Important: any children's furniture must be practical, durable and safe. Safety lies not only in the choice of environmentally friendly and natural materials, but also in the stability of the product, the absence of sharp corners, and the presence of sides.
Design
The design of a house 150x88x150 cm, for a pattern made from a single piece of fabric, is similar to that for a house made from separate pieces of fabric. Consists of PVC pipes with a diameter of 25 mm and fittings with a diameter of 25 mm.
Fitting:
- Equal tee – 4 pcs. (Blue color)
- 45 degree angle – 4 pcs. (Purple)
- Two-plane tee – 6 pcs. (Green color)
- Two-plane crosspiece – 4 pcs. (Yellow)
PVC pipes:
- Cut 1440 mm, – 1 pc. (Orange color)
- Cut 800 mm, – 4 pcs. (Yellow)
- Cut 610 mm, – 4 pcs. (Purple)
- Cut 621 mm, – 4 pcs. (Pink color)
- Cut 918 mm, – 6 pcs. (Blue color)
- Cut 882 mm, – 4 pcs. (Green color)
- Cut 40 mm, – 4 pcs. (Red color)
Bed drawing and dimensions
The tools are prepared, now you need to take measurements of each future part, calculate all the elements and methods of their fastening. All do-it-yourself house bed drawings must be carefully thought out and verified. The strength, durability, and convenience of the entire structure will depend on their accuracy.
When drawing up a drawing, you should rely on the age of the children. Children under 7 years old need a bed measuring 130 by 140 cm, 75 cm high. An older child needs a bed 160 by 170 cm, 90 cm high
When calculating the frame, it is important to take into account the size of the mattress. To avoid mistakes, it is better to purchase it in advance.
The diagram of the future house bed should fully reflect its design. It can be floor-standing, classic or two-tier. The space under the sleeping bed can be left free, but the furniture will be more functional if you use it and equip storage drawers there. They can be of two types: on wheels or guides. You should think in advance about how many there will be and how to harmoniously integrate them without spoiling the overall appearance of the furniture.
What you need to make a crib
The main stages of working on a baby's crib include:
- Creation of walls and roof.
- Frame fastening.
- Assembling the base and creating a slatted bottom.
Before going to the store for lumber, draw a diagram of the future crib and take measurements. It is worth considering the height of the child, the place where the future crib will be, as well as the size of the mattress.
Necessary materials for the crib:
- wooden blocks;
- special safe glue;
- wood screws;
- flat wooden planks;
- fabric for decoration.
Tools for work:
- screwdriver;
- pencil;
- hammer;
- screwdriver;
- ruler;
- saw.
Assembling a wooden bunk bed
Let's consider one of the simplest options for assembling a wooden bed. The option is simple to assemble; making such a design is quite difficult, since you will need to use a lathe to turn the racks.
The entire structure is assembled using tenon and groove joints. For such cases, glue is usually used, but the connections can be fixed with screws, so that later it will be possible to disassemble the product for transportation or other needs.
The first step is to assemble the backs. To do this, you must first connect straight and figured crossbars with balusters, insert the resulting pairs into the sockets and tighten the backs so that the tenons fit into the sockets as tightly as possible, without gaps. This can be done with clamps or using a regular rope, which is wound several times around the back and then wound onto a stick. The loop contracts and tightly connects the structure. This unit can be assembled with glue, since its width is relatively small and will allow it to be carried or transported without problems.
Then they move on to attaching the longitudinal strips. They are inserted into the appropriate sockets, the structure is tightened in an accessible way and the connections are fixed with self-tapping screws. The screws must be screwed in places approximately corresponding to the middle of the tenons in length and width.
After this, they begin to install the beds. Support slats are attached to the longitudinal slats with screws, on which transverse slats are mounted, serving as the base for the mattress. As an option, you can use ready-made orthopedic lamellas with fasteners. They provide greater elasticity and better facilitate the adoption of the desired position of the plane under the weight of the body.
After installing the beds, the enclosing side and stairs are assembled. The side strips are inserted at one end into the sockets, and the other ends are attached with screws to the upper edge of the ladder string. It itself is also attached to screws in the longitudinal strips.
There is another manufacturing option, when the backs are assembled into a tongue and groove, and the longitudinal strips are attached to furniture ties. This option is simpler in that there is no need to tighten long sections; they are pressed well with ties. It is also possible to assemble the backs without tenon joints, using only ties and screws, but in this case there is some danger. The fact is that wood reacts differently to loads directed along and across the fibers. A large number of tightening elements weakens the array, the board becomes more fragile and susceptible to cracking, which ultimately affects the condition of the entire structure.
How to make a children's bed with your own hands: drawings with dimensions
First, you should prepare all the necessary materials, which will be discussed below, make the necessary calculations and create a drawing. The quality of future work on creating furniture depends on competently carried out preparatory measures. At this stage, you can calculate everything in detail and take into account important points in installing the crib. A diagram creation plan will help you do everything quickly and correctly:
- Draw a rectangle according to the dimensions of the future frame.
- Show the height of each wall on the drawing.
- It is necessary to place wooden beams in the bottom and walls, which will serve as the ceiling. The optimal distance between them will be 3–5 cm.
- Set the legs to the required height. They should extend down and up from the base as they serve as support.
- The main elements are ready, add to the diagram an image of the upper crossbars lying on top of the wall and fixing it.
- On the drawing, highlight in red the main places of fastening and joining of parts. This will help you navigate the assembly diagram.
If necessary, you can make the frame more interesting and add various decorations and decorative elements to it. It all depends on your imagination. We offer a general construction plan.
Materials and tools
You don't need any special equipment to work. In this case, you can get by with a standard set that is used to make any type of furniture:
To build a diagram you will need a ruler, measuring tape, carpenter's pencil, and paper. Solid wood is the best choice of material.
It is durable and environmentally friendly, which is important for the child’s health. Bars or slats for floors
Hand saw. Electric jigsaw. Corners for attaching the base. It's better to use this method
Wooden joints often break. Screwdriver and set of screws. Hammer with nails, screwdriver, self-tapping screws. Building level.
The procedure for making a bed at home
If you have thought through everything and are well prepared, then it’s time to proceed to the most interesting stage. We begin to build furniture in accordance with the drawing plan.
Step-by-step instructions:
- Transfer the drawing to the wood and make a cut according to the marks. You will receive the required parts for assembly.
- Sand the wood with sandpaper and cover it with a layer of impregnation.
- Let dry.
- Create a frame by connecting 4 legs together using wooden boards and fastening them with metal holders and screws.
- Place a ceiling of beams at the bottom, which will serve as a support for the mattress.
- Also attach beam railings to the side walls.
- Place a crossbar on top of the beams, which will secure the frame together.
- Strengthen all joints of parts with metal ties.
Congratulations, your baby's crib is ready!
Required Tools
Before you begin, you should prepare all the necessary tools:
- Screwdriver with drills of different diameters.
- Bolts, self-tapping screws.
- A hacksaw for wood.
- A utility knife for cutting drywall.
- A ruler, a simple pencil, a square for marking.
- Adhesive for wooden surfaces.
- Sandpaper.
- Slats or slats for the bottom.
Standard sizes of children's beds, rules for replacing furniture
It turns out that in order to make a bed for a baby yourself, you need the simplest tools, which are probably available in every home.
Screwdriver
Self-tapping screws
Wood hacksaw
Stationery knife
Measuring tools Wood glue Sandpaper Bottom slats
Decor options
The good thing about a house bed is that it can be easily decorated with a canopy. By sewing two or three different sets of fabric curtains, you can change the appearance of this piece of furniture beyond recognition.
If she stands opposite the window and bright sunlight wakes up the child earlier than necessary, a canopy made of dense opaque material will come in handy. If the cape is only to decorate the bed, you can choose any material you like.
A narrow long curtain woven using the macrame method can also serve as a decorative element. It will also make your sleeping area more comfortable.
However, you can do without fabric curtains altogether. And so that the structure does not look empty and boring, it is worth decorating it with soft toys, garlands of paper letters that make up the child’s name, hanging a dream catcher or a beautiful trinket with tassels or pom-poms from the top beam.
You can create an atmosphere of mystery and at the same time comfort by wrapping the vertical supports and cross beams with an LED garland with light bulbs in the form of stars and hanging three-dimensional clouds cut out of paper from the ceiling. The design will be complemented by wallpaper depicting the night sky.
Older children who often read in bed in the evenings will love the lighting option shown in the photo below. Before putting it into practice, it is worth treating the wooden parts of the bed with a fire retardant (a special liquid that prevents fire).
Making a house bed with your own hands is quite simple. In addition, the family budget will not suffer much, even if you buy not only lumber and consumables, but also tools. This is also a creative process, and all family members can participate in it, spending time together doing a useful activity.
Making a canopy for a bed 1:12
For work, we take stretch fabric with small patterns and stripes.
Threads for embroidery floss, for stitching cotton parts. Braided lace, such as on bedding and super glue gel.
We embroider two lines of the ornament, as on a bedspread. Next, cut into two halves.
This fabric is very successful, it did not fray at all. I sew the lace on the inside with a thin stitch.
The stitching should be even and perfect, keep an eye on this.
These will be curtains. In the photo below, see the cardboard covered with the same fabric, everything will be attached to it.
I cut out shaped strips, covered them with stretch fabric and secured them along the edges with gel glue.
I sew the figured overlays to the lid, closing the joints with twisted rope.
You can also put a braid or rope at the bottom. The imagination for this is limitless. The canopy is not washable, so the braid and decor can be safely applied with glue.
First I sewed on the curtains, then the figured stripes.
I sew up the curtains using a needle and thread. Then you can tie a rope with tassels.
Photo below, so that the back of the canopy does not puff up, you can glue a stick or cardboard below.
And here are the promised brushes.
You can decorate with anything. That's what I came up with.
That's it, I hope you enjoyed my tutorial. If you have any questions, ask.
Source
Option 5
Bed with a house on the second tier
Agree, loft beds with a house on the second tier create the feeling of shelter that we loved when we were children. Tucked away in this high sanctuary, children can create their own world and let their imaginations run wild. The staircase is like a traditional ritual, children love the feeling that they are always in the game. The actual function of the bed sometimes takes a backseat. For younger children, the lower level is often a play area. In fact, the loft bed becomes a place for fun during the day or for storing toys, clothes and other items. After a few years, this space on the ground floor becomes a work area. Some mid-height beds have built-in drawers and cabinets. You can get creative with the design; use these instructions with step-by-step photos to make a bed house for your child.
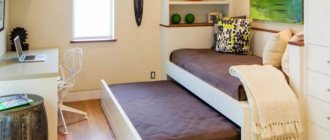
Another very simple version of a crib for a house
Everything is thought out here, a bookcase, drawers for storing toys and a small tunnel for games.
Decor options and colors
The decor of the house bed will depend on the style of the interior and the gender of the child. For a girl, pastel colors are more suitable - mint, pale blue or traditional pink. You can paint the bed in bright, cheerful colors. This option would be appropriate for both girls and boys.
There are many options for decorating beds in the form of houses. You can decorate your sleeping place with garlands in the shape of stars or small balls. Mobiles in the form of clouds or animals can also be used as decoration by attaching them to the top beam of the roof.
It is better to make sure that the design of the bed matches the style of the children's room. The easiest option is to use a canopy of a suitable color and bedding that matches the color scheme.
Designers advise not to use colors that do not combine well when decorating. It is better to think in advance about the possible shades of the house bed. To do this, you should use the color wheel. The most versatile color is white, as it can be combined with many shades. The white bed will fit into any interior. At the same time, it will look most advantageous in a nursery decorated in a Scandinavian style.
Final stage of work
Make a slatted bottom. Screw the transverse ones - short and flat - to two long planks in increments of several centimeters. Special lamellas from a hardware store are also perfect.
In this version, the bottom is inserted into and out of the bed frame, but you can attach them directly to the outer frame.
After finishing the assembly, go over the entire product with a sanding machine. This is not necessary to remove knots, because, in theory, you got rid of them before starting work. Sanding will help hide bad joints.
Treat the wood with approximately three coats of oil or wax. Choose an eco-friendly coating suitable for children's rooms.
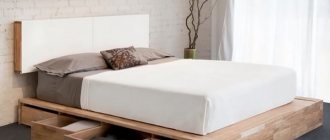
Assembling the bed frame
This bed frame is designed to accommodate a full-size mattress. The design is created in such a way that all parts can be installed manually without the use of screws or glue. The bed is 30cm above the floor and a system of connecting bars divides the bed into 12 support squares. The parts are created from a 3D model for CNC cutting. Using Shopbot Alpha, the bed pieces are cut from two sheets of plywood measuring 10 x 20 x 2 cm. All cuts are made using a 1/4" Shopbot end mill.
After cutting the files on the CNC, you need to sand the edges of the parts by hand to ensure that all parts fit snugly.
Then assemble the bed starting with the center slots. Lay out all the parts and start assembling from the central slots
Carefully insert the five pieces that interlock and hold the center of the bed. Then attach the perimeter using butterfly joints
The last part of the assembly is to cut the outer legs, which connect to each other using couplers at the corners, and mortise and tenon slots to connect to the centers. For a tight fit, tap with a hammer so that the parts lie in the same plane. Bed included! Assembly takes about 15 minutes, and disassembly takes 8. The bed frame is lightweight, and all parts can be disassembled and transported in a sedan car. For stability, use wood glue. Add a mattress and enjoy.
Photo source: www.instructables.com/id/Slotted-Bed/
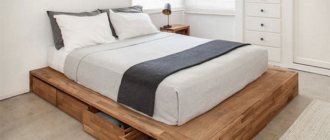
How to make a wooden bed frame
If you already have a mattress, making a wooden frame is not a problem.
Use this tutorial with step-by-step photos and in just a few hours you will have a finished bed frame for your bedroom. Detailed instructions can be read on the website.
Photo source: www.addicted2decorating.com/diy-stained-wood-platform-bed-frame.html
Upholstered platform bed
To make a bed frame with your own hands, it is important to correctly calculate the dimensions. When the measurements are ready, take the longest sides of the bed
Shorter pieces can be placed inside. The frame width is 150 cm. Remove 1.5 cm from each side. The crossbars should be 144cm long. The center support of the 2x4s is 200cm apart, which is less than 8cm from the front and back of the bed for a length of 193cm. All cuts are at a 90 degree angle. There is nothing special here, just measure, draw a line, measure again, draw...then make cuts (circular saw). Once you get into the rhythm, this part goes surprisingly quickly. When you're done cutting, you should end up with the following: 12 1x4 boards 144 cm long, a 2x6 board 200 cm long and one 2x4 block 193 cm long. Read the full instructions on how to assemble and upholster the bed frame on the website. The assembly process is shown in the master class with step-by-step photos.
Photo source: www.instructables.com/id/ReBuilding-a-bed-foundation/
The platform bed, a very popular design today, is an interesting and unique design. A platform support system has an integrated foundation, which will consist of a system of support bars or may include a panel base within the structure
Why is it important? Metal frames that rest on the ground usually have a maximum of two or three thin metal cross supports. This is not adequate support for the mattress
This is where platform frames come in handy with their slats and solid panels that are designed for just that. Modern platform bed designs add a contemporary style to your bedroom. Below in the gallery are several options that you can make yourself.
Step-by-step manufacturing instructions
With minimal experience, the entire preparation and assembly process will take approximately 4-5 hours. A professional will do it even faster. You can cut out the crib parts gradually and assemble the body in parallel. But it is much more convenient to divide the work into two stages.
Preparation of parts
To get started, you should do the following:
- Using a pencil and a square, mark the timber, measuring 4 vertical supports, 2 lower transverse beams, 3 longitudinal roof bases. Depending on the chosen design, also mark the boards that will make up the side walls, roof covering and other elements.
- Cut out the parts using a hacksaw according to the markings.
- For ease of further assembly, you can number the parts.
- After this, where necessary, you should use needle files to make grooves for the tenoned connection or use a drill to drill holes for the dowels. You should not neglect these types of fastenings and nail boards and beams together with nails or twist them with self-tapping screws, as they quickly destroy the structure of the wood.
- Using a sanding machine, carefully process all cuts and surfaces of the boards, without leaving burrs. If you don't have a machine, you can use sandpaper, but this will complicate the work and take more time.
- If the bed model includes colored elements, it’s time to paint them. Also, if desired, at this stage the wooden parts are varnished.
The ends of the bars or planks from which the side parts of the roof will be formed must be cut at an angle of 45 degrees. This is the only way to create a beautiful, neat slope.
Installation
When assembling, proceed as follows:
- First, the supporting structure is assembled. The places where the lower transverse beams are attached to the vertical supports must be reinforced with metal corners with two or more rows of screws on each side. If this is not done, the bed may fall apart under heavy load (jumping, active games). In bunk and attic beds, special attention is also paid to strengthening the “second floor”.
- The next stage is the installation of lamellas. It can be carried out using special plastic fasteners (latt holders), which are nailed or screwed to the longitudinal sections of the beam, the undoubted advantage of which is the absence of squeaks when the load changes. It should be taken into account that the distance between the lamellas should not exceed the width of one lamella, but you should not place them too close to each other either, since this will interfere with the normal ventilation of the mattress.
- After this, the side walls and sides are attached.
- Next they move on to the assembly and installation of drawers and stairs.
- Lastly, the roof is assembled.
All tenon joints should be glued with wood glue and the use of furniture should be started only after it has completely dried. Detailed instructions can be read on the packaging.
Now all that remains is to put on the mattress and make the bed with bed linen.
Materials for children's furniture
The best option for making children's furniture is natural wood or its derivatives. The use of plastic elements is allowed.
You can make children's furniture from cardboard or foam rubber.
Natural wood is the best material for children's furniture.
- This is an environmentally friendly, durable and easy-to-work material.
- The budget option for wood is pine, and the most durable is oak or walnut; you can also use maple or beech.
- Furniture made from natural wood can last for many years.
The most popular materials for the production of any furniture in our time are chipboard or laminated chipboard, but furniture made from these materials is not desirable for a children's room, since chemicals are used in their production.
Plywood is an environmentally friendly material that is easy to work with. The main thing is that the plywood sheets have a thickness of more than one and a half centimeters and the material is resistant to moisture.
Cardboard is a lightweight, inexpensive material that is easy to use. The disadvantage of cardboard is that it is not moisture resistant.
Foam rubber is used to make upholstered furniture for children's rooms. It is a lightweight, safe and budget-friendly material.
Children's bed loft house
Kids love houses, whether it's a tree house or their own bed. Look at a great example of how to make a loft bed for a child with your own hands
This frees up a lot of space for games, and the design will win the heart of any kid. Assembling such a structure is no more difficult than making a regular bunk bed.
Read the detailed instructions on the website, and the step-by-step photos in the gallery will be a good help in implementing this project.
Photo source: www.buildsomething.com/plans/PFD64F9CBEC04520E/KidsClubhouseLoftBed