A beautiful, well-appointed area around the house is as important as its interior and exterior. So that you can walk around the garden with pleasure or relax comfortably inside the yard, you can make a podium from boards on the ground, replacing cold concrete or stone platforms and paths.
Required materials and tools
To make a simple podium bed with your own hands you will need:
- A standard set of tools for cutting, preparing and fastening wood materials (hacksaw, screwdriver, drill, tape measure, level).
- Solid timber with a cross section of 50*50 or 50*100 mm, used to assemble the frame.
- Well-dried durable lumber: plywood for the bottoms of boxes 10 mm thick, chipboard or MDF boards from 16 mm, OSB-3, boards with a thickness from 22 mm.
- A set of fasteners and accessories, including anchors for fixing the frame in the walls, wooden dowels, confirmations with a length of up to 70 mm, self-tapping screws with a cross-section of 4.5 mm, metal corners to strengthen the structure, guides for drawers or a pull-out bed, handles, rollers or wheels.
- Wood glue for coating joint areas or reinforcing fasteners.
Materials for finishing or decoration: carpet, foam rubber, textiles, thin floor coverings, laminated wood boards or laminated wood for facades, varnishes, paints, stains, LED strip.
Taking into account its close location to the floor and constant loads, it is recommended that the bed podium be made from materials with high strength.
Deviation from the specified parameters of slab materials to a lesser extent is not allowed. If possible, the sides or base of the bed are cut from sheets with a thickness of 19 mm or assembled from dry boards.
When working with laminated materials or planning to install a backrest with a soft headboard, additionally prepare a construction hair dryer, tapes, and a furniture stapler with staples.
Create a drawing
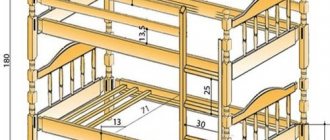
Drawings of the podium bed are drawn up based on exact measurements of the room and the planned dimensions of the mattress. Small rooms are simply covered with a podium into parts with different heights; in other cases, the length of the bed (as well as the dimensions of the drawer with the sleeping bed) is adjusted to the mattress.
The width of the furniture varies from 1.2 to 1.5 m for children’s models, 1.7–1.9 m for double models. The height of models with drawers of any type varies between 40–70 cm.
Deviations in the smaller direction are not recommended; in the larger direction, they are permissible when installing the bed in a room with high ceilings and strengthening the strength of the frame.
Detailed sketches of beds are made on paper or electronically, using online editors or furniture design programs. If you lack experience, you should use ready-made drawings, scrupulously observing the specified indents and gaps. It is also very important to purchase materials of a given thickness.
If it is necessary to change the length or width of the frame, the dimensions of the retractable elements and external facades are simultaneously adjusted.
The intervals between adjacent boxes and the specified gaps must remain unchanged. In particular, the width of the drawer placed under the bed in any case should be 2.5 cm less than the box itself, and the minimum permissible distance from the bottom to the floor is 1 cm.
Drywall installation
There are also nuances here that should not be overlooked:
- Drywall is a fragile material. Even with a reinforced frame, it can crack or become deformed. For the podium, you should take gypsum board sheets of at least 12.5 mm in thickness. The thicker the sheet, the better.
- The top of the podium and steps should be secured with two layers of drywall.
- First, whole sheets are laid, only then are the pieces cut to size and fixed to the frame.
- There should be a distance of about 1 cm from the wall to the sheet of drywall. Drywall tends to absorb moisture, the sheets may become slightly larger in size.
- Foamed polyethylene is laid between the wall and the gypsum board.
- After laying the drywall in one layer, you can begin installing 2 layers.
- The main factor here is the mismatch of the gypsum board seams. To do this, move the second row by 30 cm.
- To lay the second layer of drywall, you need to use PVA glue. It is applied to the sheet in strips with increments of 20 cm.
Scheme for laying the second layer of drywall - After this, the sheet is glued to the first layer and fixed with long screws.
- When cutting the sheet into pieces, be aware of the chamfer. It must be done with a plane.
Chamfering drywall with a plane
When the structure is completely covered with plasterboard, you can begin to reinforce the joints.
Design Features
Depending on the type of frame, there are two manufacturing technologies: a bed on a podium with drawers or with a pull-out mattress. In both cases, they use available building materials and tools that are in the arsenal of every owner.
This means that you can make them yourself. At the same time, the products differ fundamentally not only in installation technology, but also in purpose.
Let's take a closer look at them.
With a sleeping place in a niche
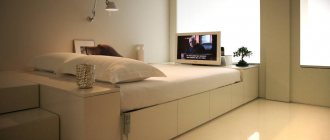
The product is a hollow structure that rises 40-70 cm above the main floor level. In the lower part there is a large cupboard. At night they sleep on it, during the day they hide it in a niche. The upper plane above the pull-out bed is actually a raised floor.
It is usually used to organize:
- recreation areas;
- work or study space;
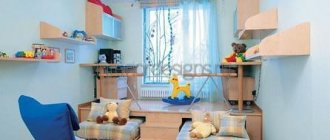
- children's playroom
This allows you to create a “hidden” bedroom in any room without compromising its space. If the shape of the room is elongated, you further zone it and add functionality.
The limitations are the dimensions of the room. A ceiling that is too low creates discomfort for tall people. Mounting the frame in a very small room will also not work. There should always be free space nearby to pull out the shelf with the mattress.
With storage area under the bed
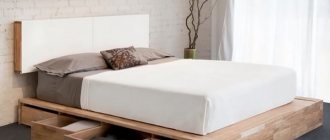
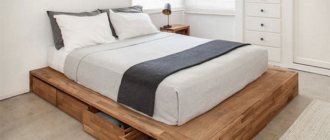
Externally, the bed on the podium with lower drawers is practically no different from the classic one. It is raised a little more above the floor, and in the space below there is a storage system. It allows you to completely replace the cabinet or part of it.
The design is suitable for installation in an apartment of any configuration. If you install it against the wall in the middle of a large room, you will get comfortable, shallow-depth cupboards.
When the size of the house is very limited, the end part of the room is used. In this design, it is not necessary to make long, bulky cabinets. It is enough to divide them lengthwise into two zones: hidden and quick access. Put everyday items in one and seasonal items in the other. Access to the distant niche is limited. She hides under the mattress.
This storage option is great for winter jackets, unclaimed children's toys or clothes that kids have outgrown.
No. 1. What functions are assigned to the podium?
The rapidly growing popularity of podiums is explained by the versatility of this design. The elevation in the apartment can be used for the following purposes :
- masking communications if this cannot be done using other techniques. Often podiums are built in kitchens and bathrooms, allowing you to hide water and sewer pipes. Looking ahead, we note that in this case it is imperative to provide free access to communications;
- space zoning, because the height difference allows you to clearly separate one functional area from another. Relevant for studio apartments and living rooms combined with kitchens;
- rational use of existing space. The podium allows you to divide part of the room space into tiers, and each tier can be used for its own purpose. On a hill you can place any furniture, set up an office or living room, and the space under the podium can be used to store a lot of things. With proper planning of the storage area, you can replace a good half of a massive wardrobe with just one podium, which means there will be more space in the room. Often the space under the pedestal is used to install a pull-out bed;
- space correction . The podium allows you to visually correct the geometry of long narrow rooms. To do this, it is enough to organize an elevation near a short wall, the contour of which will have a round or curved shape;
- podium - instead of furniture . If you put a mattress on it, you get a cozy full-size bed. We have already mentioned the possibility of organizing a spacious dressing room under the podium.
One podium can combine several of the above functions, which is especially appreciated by owners of small apartments. For example, a podium can be used to separate a work area with a desk from the living room, and hide a sleeping area inside, which does not fit in some studio apartments.
Making a podium bed with drawers
Before starting work, it is important to pay attention to the design of the future structure. You can draw a project with a pencil on a piece of paper, or make it in an online editor or specialized program.
When visualizing, gaps, thicknesses of parts and the relative position of all elements are taken into account. This allows you to accurately calculate the amount of materials and avoid inconsistencies during the work process.
Frame
The basis is a beam 50x50 or 50(h)x100. It is used to make racks and load-bearing beams. The supports are placed near the walls and in the space between the cabinets. To ensure strength, you need to maintain a distance between longitudinal guides of no more than 50-60 cm, and between supporting elements of no more than 80-120 cm.
If the structure is located between walls, crossbar guides can be attached to them without supports.
It is important to place the load-bearing elements on the racks from above, and not to attach them to the sides on the corners. To prevent the wood from cracking, smaller diameter holes are drilled for the screws. Rubberized gaskets are installed between the wooden parts at the places where they are attached. They allow you to avoid squeaking during operation.
When you start making a podium bed with drawers with your own hands, do not forget about the stability of the frame. Therefore, after installing the bars, it is imperative to make the bottom trim from plywood or OSB. Cut strips 150-200 mm wide and fasten all the supports with them. In this case, the sheets are screwed to each with at least two self-tapping screws.
This allows you to avoid distortion of the product during use. To increase reliability, all joints are coated with wood glue.
Pull-out sections
The base is assembled from laminated chipboard, thick plywood or furniture panels. The bottom is made of fiberboard. If the cabinets are small or they are not intended for storing heavy things, the bottom is secured from below with nails or self-tapping screws. When a more reliable structure is needed, a groove is made in the side walls with a milling cutter and a fiberboard is inserted into it.
This option is more technologically advanced, but requires a special tool. At home, the groove can be replaced with thin 10x10 mm support rails.
It is better to mount the lower shelves on wheels so that they can be completely rolled out to the side. This will give you access to the cleaning niches. The upper glove boxes are mounted on full extension guides. They need to be installed before facing the frame.
Sheathing
For finishing you can use any materials. Typically, chipboard or painted plywood is installed on the vertical faces. A similar floor covering is laid on the upper part. They cover the entire surface or just the area around the mattress. To fix it, a side about 5 cm high is installed around the perimeter. The plane inside can be solid or consist of a set of lamellas.
If possible, all elements are secured with self-tapping screws from the inside. By pulling out the drawers, you get full access to hidden elements. This means that the screws will not damage the outer surface.
Useful tips
- If you are afraid of making the gaps uneven, then special plastic inserts or ordinary thick nails can help you. They are inserted between adjacent boards, thereby separating them at the same distance from each other. After fastening, the nails can be freely pulled out and placed in another place.
- Some purchased boards may not have the ideal shape. You shouldn’t throw them away right away, as they will be useful in construction. With the help of a clamp and wedges, you can straighten even the most crooked boards and use them as flooring.
- If you hate to cut the last board on the deck, then distribute them so that the width is exactly enough to cover the entire perimeter. To do this, lay all the wood on the joists, but do not fasten it. Be sure to make indents for gaps. This way you can control the width even before the main fastening of the boards.
- When you get a platform that is too large, the boards will have to be butted together at their ends. The joints must be located on the joists. If the width of the latter is too small, then double joists will have to be made in this design.
- If you bought tongue and groove boards, then there are no gaps between them. This negatively affects the speed of drying. To prevent rainwater from accumulating in one place, the boards need to be placed at a slight slope.
- The cut ends at the joints must be impregnated with protective agents so that the boards do not begin to rot due to bad weather or too high humidity.
- If you want to get a perfectly even end, cut the boards only after installation is complete. To do this, you will need to mark the cut line with chalk and carefully run a jigsaw along it. Unnecessary wood was cut away, and the flooring turned out to be perfectly smooth.
Making a podium with a pull-out bed
When developing such a design, special attention should be paid to zoning. If a playroom for children is planned on top, you can start from the dimensions of the mattress. But when you want to place a workspace or relaxation area on the second tier, it is important to consider the size of the future table or sofa. In this case, it is necessary to draw a preliminary design.
Frame
When the sleeping place is in a niche, the base must be more durable - it can withstand the load from furniture and people. The general principles of the design of beams and crossbars are the same as in the version with retractable drawers.
The main differences are the increased cross-section of the load-bearing logs and the pitch of their installation. It is allowed to place bars 50x100(h) on the edge. In this case, in order to avoid tipping over, they must be fastened together with intermediate slats. An alternative option is to install beams with a smaller pitch of 40-50 cm.
It is important to pay increased attention to the overall geometry of the supporting structures. A large cupboard should easily slide into and out of the niche. When calculating its height, the space occupied by the mattress, bed linen and pillows is taken into account.
On the sides, it is necessary to accurately maintain the installation gaps within 1-2 cm and ensure perpendicularity. In this case, focus on the measuring tool, and not on the distance from the walls.
Pull-out section
Its base is assembled from a 50x50 mm bar. A flat sheet of plywood, type-setting lamellas or a ready-made factory base are laid on top. Limiters made of laminated chipboard are screwed to the side, and a façade decorative panel is screwed to the front.
The cabinet moves on furniture wheels. We only need to get linear motion, so we use non-rotary ones. Each of them is designed for a specific load, which is indicated in the technical specifications. It consists of the weight of the following components:
- Base materials.
- Mattress and bed linen.
- Human. 100 kg per single bed, 200 kg for one and a half and double beds.
We multiply the resulting amount by a safety factor equal to 1.4. We divide the result by the number of wheels. We get the load that each one must withstand.
Sheathing
The principles of cladding remain the same. But, if you plan to place the structure in the nursery, you need to pay attention to safety. On a slippery surface, it is easy for a child to fall and get injured. Therefore, carpet is often laid on top.
What is a podium
The podium is a raised part of the floor, has a height of 20 to 50 cm. Thanks to the podium, you can delimit the room space, zone the kitchen from the living room, and thanks to the raised surface you get a box for storing your things.
Advantages of podium beds
Podium beds have recently become popular due to many factors:
- the opportunity to bring originality to the design of an apartment or house;
- significant savings in living space, which is especially important for small apartments;
- relatively small financial investments in the manufacturing process;
- ease of installation;
- functionality.
You can make a podium bed with your own hands in two versions:
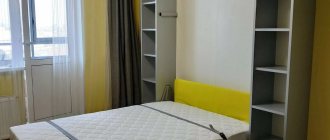
- a sleeping place located on a raised platform and with separate sliding compartments in a niche;
- pull-out mattress, which does not take up much space and is convenient for low ceilings.
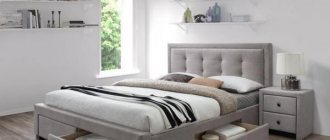
The advantages of this type of bedroom design are that the apartment is immediately transformed and freed from excess furniture. With such a bed, there is no need for large cabinets and shelves, since clothes and other items can now be stored in under-bed drawers.
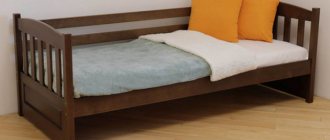
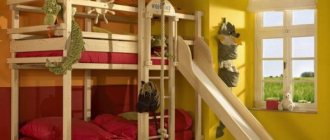
Such sleeping places are ideal for children's rooms, which allows you to put not only bedding in them, but also toys.
Kinds
Podium beds can be divided according to several criteria. First, let's divide them according to shape: round and rectangular designs are considered the most common. However, here everything depends on your imagination.
You can make the podium triangular, polygonal or even intricate in shape. But for this it is necessary to make an appropriate frame, which adds complexity to the matter.
We can talk about such a criterion as the use of a podium. This refers to the location of the sleeping place. It can be located on top of the podium, and additional useful space is represented by a podium, which can be used as storage boxes. The second option is a pull-out bed.
It is also worth mentioning the type of podium: monolithic and frame. The first is made of gypsum block, sand-cement mixture or foam concrete. More often this type is used for kitchens and bathrooms in private homes, since the design is quite heavy and adds additional weight to the floor. Frame podiums are most often used for beds.
The idea is to construct a metal or wooden profile, which is then covered with plywood.
Planning and start of construction
Next you need to start preparing the area. This stage directly depends on the topography and height of the future wooden flooring. If it is planned to be large, then it is recommended to use concrete or screw piles driven into the ground as support points. They need to be placed at the corners of the structure, as well as in the middle.
It is necessary to lay logs on the piles. They will be the support for the future flooring.
Most often, the “deck” is laid directly on the ground, without the use of any piles. Before this, the area must be drained so that the support beams do not begin to rot due to contact with wet soil. All necessary preparatory work is as follows:
- Marking the work area using pegs and stretched cords.
- Excavation of the top layer of earth (turf).
- Compacting and leveling the working area.
- Backfilling with a drainage layer on top.
- Covering the resulting area with geotextiles.
It is worth remembering that if the site has a flat sandy surface, then the main preparatory work can be skipped. You just need to raise the logs a little using concrete blocks.
Preparatory stage of work
Any job requires preparation. And such a thing as making a podium bed with your own hands requires careful preparation. This stage includes:
- making measurements;
- drawing up a design project;
- selection of material;
- base processing;
- preparation of tools.
First you need to take measurements of the room. The dimensions of the podium are determined by the size of the room. We suggest making a rectangular podium across the entire width of the room. Determine the length yourself as far as the dimensions of the room allow.
You also need to take into account the size of the mattress to determine how much free space will remain.
In accordance with the received measurements, we draw up a design project. It includes all stages of work, from the choice of material to the design of the product.
We choose the material. To make the frame you will need strong wooden beams. Laminated chipboard or several sheets of plywood to cover the podium frame. You will also need several chipboards (chipboards) for the side walls of the bed.
The tools you will need are a tape measure, a pencil, a screwdriver, a drill, a hacksaw, a set of screwdrivers, self-tapping screws, a hammer, a construction stapler, and a construction level.
You need to buy material in accordance with the measurements received. In this case, you will not have extra elements or shortage of material. Initial processing is not required, since wooden beams and chipboards are sold ready-made. Processing will occur during work as the material is cut and fastened.
Preparing to create a podium
To create a plasterboard podium:
- Determine the location of the structure.
- Clear the place. Remove objects that interfere with the work process.
- Remove all debris and clean the floor from dust.
- Take the dimensions of the future podium.
- Make markings. Drawing with dimensions of the plasterboard podium frame
- It is imperative to check the flooring for evenness. Whatever the floor, so is the podium. If the floor is uneven, you need to mark the direction of the slope and level it in this place using wooden beams (they should be treated with an anti-corrosion agent).
We make a frame
After the preparatory stage, we begin work. It all starts with the basics. And our work begins with constructing a podium, which will become the basis for the bed and drawers.
- We start by placing the podium. To do this, in accordance with the measurements, draw the height of the fixed beams on the walls, and then check the marks using a building level so that the resulting podium is level.
- Then we take the prepared wooden beams and fasten them to the floor and walls with anchors horizontally.
- Then you need to attach the beams to them vertically, additionally attaching them to the wall.
- The distance between the logs should be no more than 40 cm for structural strength. We also attach wooden beams to the vertical beams on top, duplicating the bottom layer.
- It turns out to be a kind of box. This is the frame of the podium.
- Now you need to determine the location of the mattress on it.
- Depending on the location of the mattress, attach three bars to the base of the podium to secure the slats.
- One should pass strictly in the middle of the proposed mattress, the other two along the right and left edges.
- Then stuff the slats onto special beams - this will be our sleeping place.
- It is also necessary to attach several boards to the base around the perimeter of the mattress to secure the mattress.
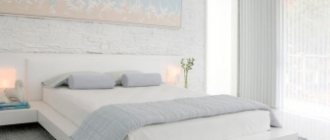
- Along the edge of the frame we attach a slab of plywood or chipboard (depending on the rest of the material for the bed) to the wall and base, which will form the future headboard.
Now you can proceed to the manufacture and fastening of additional parts.
We add details
- In our case, additional parts are drawers. This is a very practical and easy-to-use option. You can also make drawers with hinged doors or shelves. However, we recommend using drawers.
Having made measurements, you can order the finished product and just insert it into the frame. But we suggest making the boxes yourself.
Moreover, it will not take much time and effort. It should be noted that the width of the box should be 2.5 cm less than the box in which it will be located. In accordance with this, we proceed to the manufacture of boxes. We will need a sheet of plywood for the bottom, 3 chipboards for the side walls. We fasten these parts with glue. We take another particle board and attach a handle to it, after which we attach this board to the rest of the box. The box is ready.
Using the scheme described above, make the remaining drawers, the number of which is provided by the existing niches.
To install the drawers you will need several guides. They consist of two parts: the first (two guides) is attached on both sides of the box, and the second (also 2 guides) is attached to the frame. This is done using screws, which usually come complete with guides and screwdrivers.
Final stage
The last stage involves the assembly of all parts of the structure, its final installation and cladding.
In essence, we only have the frame ready. Now we need to do the finishing. For this purpose it is better to use sheets of plywood. Take sheets of plywood prepared to length or cut according to your measurements. Cover the cut with plastic edging. A heat-activated adhesive is applied to one side.
To secure this edge, you need to heat it and press it tightly to the cut of plywood (this can be done using an old iron).
Now we attach the treated plywood sheets to the frame using screws. So it is necessary to cover the entire podium (for the walls of the bed we have already secured particle boards around the perimeter of the mattress, you can also use plywood for the walls). We cover the junction of the podium with the floor with a plinth.
The top of the frame is covered. We repeat these steps in relation to the sides of the frame. Now all that remains is to place the drawers in the appropriate niches and place the mattress in the designated place.
Decoration
The podium bed is ready. We manufactured the frame and main parts, carried out assembly and finishing. Now there is an opportunity to dream up and decorate the resulting product.
Decor that is not provided for in advance in the plan can be done using fabric, carpet, LED strip, etc. So the podium can be covered with carpet, securing it with baseboards; decorate the headboard of the bed with fabric; We glue an LED strip around the perimeter of the podium or drawers or drape it with fabric. Anyone can use such simple decorating techniques; they vary in all directions and techniques that you know.
You can use paper or thread, paint, varnish and other materials to achieve the desired look of the bed.
Things are different with more complex decor. This could be built-in LED lighting or musical equipment, finishing the podium with figured marble beams, etc. Such innovations require planning. They must be displayed in the design project, as they require additional design modifications.
With careful planning, you can realize any idea that comes to mind.
DIY podium in the apartment
There are various ways to build a podium, but the most popular is frame . The result is a lightweight and durable podium. In addition, it is quickly assembled and does not require special skills from the master. First, you will need to decide on the position, size and shape of the podium itself, as well as take measurements of the room. After this, the craftsmen recommend making a drawing, from which you can calculate the exact amount of materials.
You will need:
- mounting angles,
- anchors,
- dowel-nails,
- screws,
- laser level,
- plywood 20 mm,
- cork backing,
- plywood 10 mm,
- polyethylene film,
- timber 50x50 and 30x40 mm.
Using a level, highlight all the contours and mark them with a pencil on the walls. After this, check the diagonals; the error for the curvature of the walls is 5 mm. If it exceeds this value, then the depth of the podium needs to be slightly adjusted.
Polyethylene is then laid on the floor to ensure waterproofing of the structure. A backing is placed on it. After this, 10 mm plywood is laid on the floor. If several sheets are used, then a small gap of 3 millimeters should be left at the joint. This layer is nailed to the floor with dowel nails.
A 50x50 beam needs to be cut into pieces according to your drawing. The resulting logs are laid on supports on top of a layer of plywood.
Advice. Underlay the supports with cork to insulate the wood beams. This way you can get rid of the squeak.
Secure the structure using anchor bolts and angles. After this, plywood with a thickness of 20 millimeters can be laid on it. Do not forget about small technological gaps at the junction of sheets. Screw the plywood to the base with self-tapping screws. This completes the installation of the podium.
Boxes can be made of any shape and type. The simplest option is to fasten two bars with a piece of thin plywood.
If you want to make a podium in your apartment, then think about the topcoat for this interesting design element. It can be laminate or carpet, tiles or parquet. If you want to clearly delimit the room , then use a floor covering that is different from the one that will be in the room. Otherwise, it is better to use similar material.
How to close the podium
Once the installation of the podium and bed frames has been completed, it is possible to begin closing the frame and covering the upper elements. For finishing, sheet material is used that has high strength, for example, OSB boards or plywood.
The cost of a finished plywood structure will be less, however, OSB boards have a more uniform structure, without knots, chips and cavities.
In accordance with the drawing, the necessary pieces of the slab are cut out and screwed to the frame with self-tapping screws. It is recommended to leave a distance of 2-3 mm to prevent possible surface deformation.
If a completely enclosed podium is being installed, then you don’t have to cover the internal structure. For structures that are open on at least one side, the inside is sheathed.
If the podium is planned with drawers, then they are installed inside the frame before the podium is closed. How to make and install drawers will be discussed below. It is recommended to treat the wooden frame and cladding with protective agents against fungus and mold.
How to decorate a podium
When the main work on arranging the flooring is completed, you can begin decorating. Initially, the podium is given the desired color using tinted oils, paints, impregnations or varnishes. It is advisable to use paints and varnishes that do not create a slippery glossy film on the surface of the wood.
If you want to bleach wood, there are suitable ready-made products already created in production.
They can easily be replaced with a solution of slaked lime (only a weak concentration), which will additionally protect the wood from mold.
Did the flat flooring not seem very impressive to you? Then cut round holes between the joists and place flowerpots in them or plant decorative low-growing shrubs.
But you just need to think about such decor in advance, at the stage of creating a drawing of the podium.
Wooden podiums look very impressive, into which shrubs and trees growing on the site are inscribed. When laying the supporting structure, logs are installed around the plants. They just leave free space for their growth and development, and when covering with boards, they make a “window” in the podium.
Under no circumstances should the frame be mounted to the trunk. A tree swaying in the wind can easily damage the decking.
If there are large stones and other natural objects on the site, then you can arrange a flooring, repeating their shape around the perimeter.
Geotextiles that protrude beyond the perimeter of the podium are cut and sprinkled with pebbles. Ornamental plants are planted along the edge, boxes or flowerpots with annual flowers are installed. The high podium is sewn up along the bottom with a board, which is nailed to the ends of the joists.
Wood is not the most durable material for constructing a playground or garden paths on a site. But proper processing of the material will allow the tree to be used for a very long time. And delight with its natural aesthetic appearance and warm, comfortable surface.
Common mistakes at work
Let's look at the mistakes that beginners make when installing a structure:
- if the podium is located near a heating radiator, then it is necessary to provide ventilation holes inside it. They can be located on the partition between the stairs and the pull-out bed or in the vertical wall of the step. If it is possible to move the battery, then it is better to use it and hide the additional pipes in the frame of the structure;
- When installing a structure with a pull-out bed near a window, the risk that a child may fall out of the window increases. It should only be opened for slot ventilation. If possible, make a fence in front of the window from thin chrome pipes or kitchen rails. It is enough to secure 2-3 horizontal pipes at a height of up to 60 cm to protect family members;
- All side cuts and joints must be securely sealed and free of chips and snags.
Podium installation algorithm
To create a durable, functional podium made of plasterboard, work should be performed according to the phased construction of the structure:
- To begin with, you should use dowels to fix the guide profiles on the floor in length, depth, and external length.
- Afterwards, guide profiles are fixed along the walls to the expected height.
- Down along the floor, connecting guide profiles are inserted every 40 cm.
- At the top, at the height of the podium, the guide profiles are also connected by rack profiles. Now wooden beams are inserted into the profiles on the floor, which serve as support for the upper profiles. They should be secured with self-tapping screws. For structural rigidity, a profile is fixed to the wooden support. You will get a kind of column that holds the upper profiles.
- At a height of 40 cm, jumpers are made to connect the “columns” to each other and the profiles on the wall. Jumpers are cut from the profile.
- When the “cube” with lintels and supports is ready, you can start working on the steps.
- To do this, the guide profile should be attached at the distance of the first step.
- The second guide profile will be at the same distance as the width of the step, or this is the main profile of the “cube”.
- Profiles of a certain length (step height) are also attached to the wall.
- All guide profiles are connected. Reinforced supports are installed.
- At the last moment, wires for lighting are installed. They must be of good quality, hidden in corrugation.
Stages of creating a podium from plasterboard or other materials
The frame base is ready. There are rules that must be followed when creating a frame:
- every action should be checked by level;
- each vertical part must be checked by level and plumb;
- the frame should not wobble, creak, or move from side to side. It must be tough and durable;
Drawing with dimensions of a plasterboard podium with built-in cabinets - After installation and inspection of the frame, it can be sheathed with plasterboard.