Installing a door - a lot depends on this seemingly simple operation. A skewed door leaf is not only disappointment and a spoiled mood. These are drafts moving around the house, poor sound insulation and lack of comfort. In the end, it’s just not beautiful, but it can also ruin the most modern and expensive renovation. How to properly hang a door on its hinges and enjoy comfort and silence, and not listen to constant reproaches from loved ones? To do this, you need to be patient, arm yourself with the necessary tools and refresh your memory of the main nuances of the work.
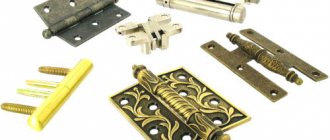
Types of door hinges
Door frame assembly.
To accurately assemble the frame, we will assemble it directly along the door leaf. To do this, you need to assemble the elements of the box on the floor together with the door leaf.
There will be 3 such elements in total. Two vertical strips and one horizontal top. Modern interior doors do not have a lower bar.
We assemble the box along with the canvas.
We lay the door leaf on the frame parts.
Before assembly, you need to decide on which side of the door the hinges will be installed, as well as which side will be the front and which the back. The design of some doors may contain glass inserts that are glossy on one side and matte on the other. Therefore, it is important to decide which side will be glossy and which side will be matte.
Between the box and the canvas you need to set gaps of 3mm and 4mm. MDF plates that come with the door leaf are suitable for this. These plates are 3mm thick and are mainly nailed with metal brackets on the top and bottom of the door leaf. The plates are installed at the manufacturer to protect the ends.
MDF plate 3mm thick.
On the side where the handle will be installed, it is better to set the gap a little larger, about 4mm. This increased gap is necessary to compensate for the expansion of the door when it swells due to increased humidity in the room. Achieving such a gap is quite easy. To do this, you need to stick masking tape onto the MDF plate; it will give the required thickness.
Assembly diagram.
Now we mark on the top horizontal bar the places where we will make the cuts. Then we saw and use a utility knife to remove the excess parts.
We make markings on the top bar of the box.
We make a cut on the top strip of the door frame using a hacksaw. For an even cut, use a miter box.
Use a utility knife or chisel to cut off part of the material.
This way the vertical and horizontal parts of the door frame are joined.
We reassemble the box together with the canvas, setting all the necessary gaps.
We install the hinges in place. They are installed at a distance of 20-25cm from the edge of the door leaf. It is convenient to use overhead loops in the form of a butterfly. Such hinges do not require special mounting cutouts.
Overhead loops.
Mark with a pencil on the door leaf and on the frame the location of the hinges.
Now you can determine the length of the vertical slats of the box. They should protrude from the bottom edge of the door leaf by 10-20mm. In an installed door, this will be the gap between the door and the floor. This gap will depend on what kind of floor covering will be in place of the threshold. If you plan to lay laminate in this place, then the gap can be chosen to be 20mm, but if there is linoleum, then it is better to make the gap smaller.
The gap between the door leaf and the floor.
We disassemble the structure and cut the vertical posts to the required size.
We mark on the canvas and the box where the screws for attaching the hinges will be installed. To do this, place a loop along the mark that was made earlier and use a pencil to outline the holes in the loop.
We mark the places where the screws are attached.
At this stage, you need to pay attention to which part of the loop is attached where. The loop consists of two parts. When folded, the outer and inner parts are clearly visible. The outer part is attached to the frame, and the inner part is attached to the door leaf.
In the previously marked places we drill holes for self-tapping screws. Holes should be drilled with a diameter of 1.5-2mm. If this is not done, then when tightening the screw, the part into which it is screwed may burst.
You can drill without preliminary marking directly along the loop.
After the holes for the hinges are drilled, you can begin assembling the door frame.
We connect the parts, drill holes with a diameter of 1.5-2 mm and tighten the screws.
Drill holes with a diameter of 1.5-2mm
We twist the parts with self-tapping screws.
Let's move on to the next stage.
Stuff the trim
- Using a sharp knife, cut off the foam protruding beyond the plane of the door frame.
- Attach the trim to the frame from the side of the hinges, close to them, and see what kind of gap there is to the inner edge of the box. The same distance must be maintained around the entire perimeter on other trims.
- The joints of the top and side trim strips can be made at an angle of 45 or 90 degrees. If you don’t have a miter saw at hand and you’re installing a door for the first time, it’s better to go with the second option. It's much simpler.
- Install the side strip, pressing it against the hinges, and nail it with nails in increments of 20–25 cm. Do not hammer them in completely and do not forget to first make a hole in the platband with a drill of a smaller diameter than the nail.
- Attach the second side strip and, having maintained the required gap, make a mark with a pencil and cut off the excess to the desired length. Nail the platband with nails as before.
- Try on the top bar, cut it to size and fasten it. Important! It should not lie on the sides, but be between them. In this case, the cut end of the upper casing will be hidden.
- Using the same principle, fill the trim on the other side of the door. If additional strips are installed, then align the edges of the platbands with them. If there are no additions, maintain the same gap around the perimeter of the door frame as on the opposite side.
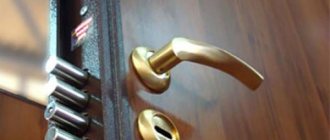
Installing handles, latch or lock on the door.
The handle is most often installed exactly in the middle of the door. Since the height of the door is 2 m, the handle is placed at a height of 1 m. But for ease of use, especially for small children, the height of the handle can be reduced, for example to a height of 95 cm.
Accordingly, the lock is installed at the same height.
Installation of a mortise lock.
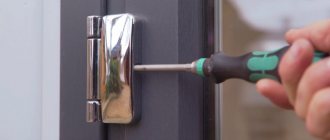
To install the lock accurately, you need to know a little trick.
We attach the lock as shown in the photo below. Be sure to drill holes before screwing in the screws.
We fasten the lock.
Using a utility knife, cut out the laminated covering around the lock. This action should be done carefully and slowly, pressing the knife blade well against the lock. As a result, we get a perfect cutout for the front lock bar.
Using a knife, cut along the contour of the lock.
We tear off the laminated coating.
We mark the place for installing the inside of the lock.
The photo shows the marked location for the interior of the castle.
We drill out a place for the lock.
Use a chisel to remove excess material.
Now you need to mark the place for the lock handle. To do this, we place the lock on the side of the door so that the front plate of the lock is flush with the end plane of the door. Mark with a pencil the location of the handle. Markings for the handle must be done on both sides of the door.
Mark the location for installing the handle shaft.
We drill holes according to the markings on both sides of the door. First on one side, then on the other. Under no circumstances should you drill through the door, as the drill may tear out a lot of material at the exit. Therefore, we install a plywood backing in the opening for the lock to prevent the hole from breaking where the drill exits.
Drill a hole for the handle shaft.
We put the lock in place and fasten it with the screws included in the kit.
Latch insert into the door.
The latch is a little easier to install than the lock. First of all, we drill a hole from the end of the door with a feather drill with a diameter of 24 mm. The latch is installed in such a hole quite tightly, and the front strip of the latch completely covers the hole.
Install the latch.
We install the latch in place and make an incision around its face plate with a stationery knife. Then we take out the latch and, using a chisel and a hammer, make a recess under the front strip of the latch.
Using a chisel, select a recess.
All that remains is to drill a hole for the handle shaft. To make such a hole, we will do the same as when inserting a lock. We place the latch on the side of the door so that its front panel is flush with the end of the door.
Mark the hole for the handle shaft.
Now use a pencil to mark the center of the hole. On the other side of the door we do the same and drill holes on both sides.
We install the latch in place and fasten it with self-tapping screws. Before screwing in the screws, do not forget to drill holes for them with a diameter of 1.5-2mm.
Selecting loops
First, you need to decide on the number of loops needed and their direction. For a double-leaf door, everything is clear: one leaf is fixed on the right hinges, the second on the left. A single-leaf door will take longer. To determine the direction of the hinges, you need to: stand on the opening side of the door; if the hinges are on the right side, then they are right-handed, like the door itself, but if they are on the left side, then of course they are left-handed.
When choosing the number of hinges, be guided by the weight of the door. For the simplest double-leaf interior door, two hinges for each leaf are enough. As for the single-leaf door, it is larger than each of the parts of the double-leaf door, which means its weight is heavier, three hinges should be selected. The front door is also installed on three hinges, sometimes even four.
On a note! When purchasing hinges, be sure to open them: there are many defects, and a bent rod is very common.
When choosing hinges, try to match the design of the entire door. This also applies to screws, but it would be better to purchase self-tapping screws, then you will not need to drill holes for them.
Installing the door frame.
The interior door frame can be installed in two ways: using fastening metal plates or using self-tapping screws with a dowel. The figure below shows these 2 methods at once.
Fastening the door frame with mounting plates.
The use of fastening plates, which are used when installing drywall, is only possible if the walls have not yet been finished. It will be necessary to hollow out small recesses in the wall for the plates, which will then be covered with putty.
Fastening with mounting plates.
The plates are screwed onto the back side of the box using 3x13 self-tapping screws with a press washer.
As you can see in the picture above, the plates are attached in the places where the hinges are installed, opposite the hinges and one plate on top approximately in the middle of the box.
Fastening the door frame with self-tapping screws and dowels.
The fastening method using a self-tapping screw with a dowel involves through-drilling the sides of the box. But so that the heads of the screws are not visible, they are installed in certain places. Two self-tapping screws are installed under the hinges, and one self-tapping screw is installed in the place where the strike plate will be located under the latch tongue.
To hide the screws under the hinges, you need to drill holes with a diameter of 3 mm in advance at the place where the hinges are installed, and then drill them out a little to form a small recess for the head of the screw.
Drill holes for the mounting screw.
In the place where the latch tongue will be located, we simply drill a hole with a diameter of 3 mm. There is no need to make a recess under the screw head. At this point, securing the box with a self-tapping screw will be temporary. After fixing the box with foam, this screw will need to be unscrewed. Then the latch striker will cut in here. In this place, one polyurethane foam is enough to fix the frame, and on the side of the hinges, where the door frame will be loaded with the weight of the door, the fastening will be reinforced with self-tapping screws.
Door frame installation.
- We install the box in the opening.
- Make sure that the inside of the box (towards which the door will open) is flush with the wall.
Align the door frame with the wall.
- We wedge the top strip in the door opening and check its horizontalness with a building level. You can use any scraps of boards or door frame posts as wedges.
The top strip is wedged in the doorway.
- We fasten the vertical stand with self-tapping screws from the hinge side.
- We wedge the stand from the hinge side and check the level in two planes (we apply the level inside the box and on its side).
- We fasten the second rack with one self-tapping screw. We check it with a building level. We also make sure that the distance between the posts at the top is equal to the distance between the posts at the bottom.
- We wedge the second rack.
- We hang the door on the frame. The hinges must first be screwed onto the door. It is convenient to hang the door open and place some kind of lining under its edge.
We install a lining under the edge of the door and hang it on the door frame.
First screw on the top loop, then the bottom.
- We check the installation is correct. An open door in any position should not budge. This indicates that it is installed correctly.
- We close the door and install 3mm thick pads between the door leaf and the frame posts. We also install linings at the top of the door. At this stage, the box stand, which was fastened with one self-tapping screw, may be out of place. The gap between the blade and the stand may be too small or large. In this case, we move the stand to the desired position by unscrewing and tightening the screw and wedge the stand again.
- We fill the gaps between the box and the opening with polyurethane foam.
We use polyurethane foam.
Loop adjustment
Having hung the door, it may turn out that the leaf sits completely on only one hinge; the second has a small gap between the upper and lower parts along the axis, so the upper hinge is pre-attached with two screws. If the gap is up to 1 mm, you can loosen these two screws, move the hinge wing in the desired direction and tighten the remaining screws, then tighten the first two. If the gap is too large, you will have to remove the screws, hammer wooden pegs into the holes after lubricating them with glue, and re-drill the holes, but these will only be two holes, and repeat the adjustment.
That’s all the work, which at first seemed complicated, and there is no need to call a specialist and pay him money, but you can be happy with your work, the main thing is to install all parts of the hinges evenly and do not forget about the gaps. In addition, the tools used are the most common ones found in any household.
Over time, the door leaf may sag and the bottom part will rub; in this case, remove the door leaf from the hinges and place brass or metal washers on the axle. If the door starts to squeak, it means the factory lubricant has dried out, lift the door leaf and drop a couple of drops of oil onto the axle.
Did you like the article? Help others learn about this article by clicking on the social media button!
Insertion of the latch response into the door frame.
This work should be performed after installing the door frame, when the foam has hardened.
- Close the door and mark the edges of the latch tab on the frame post.
We draw marks.
- Now we determine at what distance the tongue is from the edge of the box. To do this, you can use a small sheet of cardboard. We insert the cardboard into the gap between the door leaf and the frame until it rests against the latch tongue. Then mark the edge of the box on the cardboard.
- Open the door, place the cardboard on the post of the box so that the mark on the cardboard coincides with the edge of the post. Mark with a pencil the place where the edge of the tongue will be located.
- We attach the mating part of the latch to the rack according to the previously applied marks. This part must be applied in reverse, as shown in the photo below.
We outline the mating part of the latch.
- We mark with a pencil the installation locations of the screws and outline the inside of the part.
- We drill several holes inside the marked outline and knock out excess material using a chisel and hammer.
We use a chisel.
- We drill holes with a diameter of 1.5 mm in the places where the screws will be installed.
- We mount the mating part of the latch.
- We check how the door closes.
List of required tools
Set of tools for installing wooden entrance doors:
- roulette;
- construction level (preferably laser);
- perforator;
- Bulgarian;
- sledgehammer with hammer;
- drill;
- anchor;
- material for sealing the opening (foam or cement mortar).
Installation of door extensions.
Extensions are installed only if the wall thickness is much greater than the thickness of the door frame. If the wall thickness is 2-3 cm greater, then you can do without additional additions, but you will need telescopic platbands. They are made in the form of a corner and allow you to cover part of the wall. In addition, the box must be adapted for this type of platbands; it must have the necessary grooves.
So, let's set the extras:
- Let's start with the top panel. We measure the doorway from the side where the extension will be installed.
We take measurements.
- Cut the additional strip to the required size.
- We install the extension in place and note how much it needs to be trimmed so that it is flush with the wall.
We make markings on the board.
- Cut the extension to the required size.
We're sawing more.
- We install the extension into the doorway and wedge it.
The extension is installed in the opening and secured with wedges.
- We do the same with the side panels: measure, cut and install in the opening.
The side and top panels are installed.
- We apply foam between the doorway and the extensions. At the junction of the extension and the box, we apply a continuous layer of foam. Thus, when the foam expands, it will tightly press the extension to the box. In all other places, foam should be applied pointwise, in small quantities. This volume of foam will be enough to firmly glue the extensions. If you apply a lot of foam, the foam will squeeze the extensions into the inside of the opening.
We foam the space between the extension and the doorway.
Dimensions and equipment
Depending on the opening method, doors can be folding, sliding or swinging. The latter are the most popular because they are structurally simplest and fairly easy to install. They are presented in a large number of modifications. According to the opening method, the following are distinguished:
- double-leaf and single-leaf;
- left- and right-sided.
The most common sizes of interior doors are 710, 810, 910 and 1010 mm. Double doors - 1340, 1540 and 1840 mm. The standard height of a doorway is 2055-2060 mm, but in fact it may differ upward.
The basic materials you will need are a door leaf, frame and trim.
The fittings include hinges, a handle, a rotary lock and a built-in locking mechanism. If the opening is deep (in a load-bearing wall), then additional additions may be required.
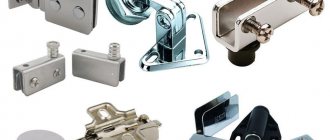
Types of adjustment of fastening devices
What is adjustment and why is it needed? This is the elimination of a problem that arose during the installation of fasteners. Before carrying out it, it is necessary to carry out diagnostics in order to detect the problem. Having established the cause, you should slightly loosen the fastening bolt or tighten it more. Adjustments must be made whenever the doors begin to sag. This procedure has three varieties:
- depth adjustment is needed in rooms with uneven floors; it is necessary to loosen the fasteners or tighten the screw. A regular screwdriver will do just fine for this job;
- horizontal adjustment is required, especially if the floor is uneven, to eliminate the gap formed between the cabinet and the door;
- Vertical adjustment is needed to hang the doors at the desired level. The procedure is systematic: you need to adjust the position of the cabinet doors so that they do not sag.
How to mark up
Before installing furniture hinges, markings are carried out and blanks are made for the subsequent stages of work: drilling and installation of the fastening device. To mark, it is important to know the number of hinges on the door. The answer to this question follows from the weight and size of the cabinets. To support heavy, oversized cabinets, you need 3 or more hinges. Lightweight wall cabinets will support two fastenings. Taking into account the recommendations given in the table will allow you not to worry about the strength of the fasteners.
You need to mark using a level, pencil and tape measure. Compliance with the following order of work will help make accurate calculations:
- fastening devices will be mounted 20-22 mm from the edge;
- the distance of the hinges from the ends of the door should be 70-120 mm;
- If you need to install more than two fasteners, first mark the outermost points, then evenly mark the remaining ones.
To make the marking more accurate, special templates are used. When placing several fasteners, make sure that they are not at the level of the internal elements of the cabinet (ends, shelves).
Correct markup
Having completed the marking, drilling is performed. When assembling furniture yourself, rely on the following recommendations:
- holes for the hinge bowl are drilled along the marking lines on the doors;
- the fastening device is placed in a niche and leveled to 180°;
- mark the installation points of the loops;
- drill the holes that are needed to attach the fastening device to the door;
- the door is aligned where it will be attached. Notes are made on the closet;
- holes are prepared;
- holes are drilled for the strike plate.
Drill with Fostner drill 35 mm in diameter
Start drilling
Finished hole
The end of a job is better than the beginning. We hang the canvas
Before hanging the doors, make sure the door frame is securely secured. If in the previous stages of work you did everything exactly down to the millimeter, then you will not have any problems. The door leaf is simply attached to the fixed hinges.
To ensure proper operation, open and close the doors several times. Make sure the doors do not close on their own. If this happens, then at one of the stages you made a mistake. To fix it, you may need to reinstall the hinges.
If you have installed doors yourself more than once, we will be glad to hear your valuable experience. Leave your comments on this article!