Purchasing high-quality interior doors from reliable manufacturers and their correct installation can save the buyer for a long time from product breakdowns and the need for repairs. But despite taking these measures, violation of operating requirements often leads to a number of problems. In this case, it is possible that adjustment of the hinges of interior doors or their complete replacement may be required.
The need to adjust the hinges of interior doors
The service life of interior doors depends 70–75% on their quality.
The remaining share of influence is distributed among the following factors:
- quality of installation work;
- correctness of the adjustment of hidden hinges;
- compliance of operation with established standards (depending on the material from which the doors are made);
- degree of accuracy in using the structure;
- availability of necessary care;
- lifetime.
The hinge adjustment service ordered from a specialist is often expensive. If minor problems arise, for example, with opening and closing the sash, in many cases you can cope with the situation on your own. This does not require special skills.
This also applies to problems such as:
- subsidence of the door leaf;
- spontaneous opening and closing of the structure;
- touching the bottom of the floor covering, etc.
Advantages and disadvantages of products
Before purchasing accessories, you need to consider in detail its pros and cons. Advantages:
- Safety . The hinges that are hidden inside the door structure cannot be knocked out or cut down. Of course, this factor is more useful for input, but in other cases it is also an advantage.
- Stealth . An important feature for interior doors, since ordinary hinges do not always fit into the interior of the apartment.
- Range . The buyer is presented with various accessories for both light canopies and solid massive canvases.
- Large door opening angle . The vast majority of models allow you to open it so that it becomes parallel to the adjacent wall and does not interfere with the passage.
- Durability . They are made from steel or alloys that are highly wear-resistant. Recessing the mechanism inside the box and canvas also provides additional reliability.
Of course, the products have disadvantages:
- Difficult installation . To install, you need to cut grooves of the desired shape and size inside the box and canvas. Not every craftsman has a tool (mill).
- Price . High-quality components are expensive (from 1800 rubles per piece). You can find cheaper products on the market that cost several times less, but their quality will be appropriate. Cheap parts cannot be adjusted.
- Difficult to dismantle. If you need to remove a door, sometimes you have to completely disassemble and remove the hinges.
- Increased volume . In the canvas itself there is usually enough space for fittings, but in a thin box the depth is sometimes not enough.
Advice
Hidden hinges are suitable if you want to carry out high-quality repairs that will last for many years. It is better not to use them for temporary alterations.
Features of hexagon adjustment
For fastening accessories, incl. and door hinges, hex socket screws are often used.
To adjust the equipment using this tool, you need to perform the following steps:
- Select a hexagon that fits the size of the fastener.
- Insert the tool into the recess of the corresponding fitting element until it stops.
- Apply force and rotate the hexagon. Increase the load until torsion is achieved.
Using a hexagon is more convenient than using a regular screwdriver. In terms of technical characteristics, it is 10 times superior to other similar tools. The main feature of the hexagon is its high torsion rate.
How to adjust loops - instructions
Before you begin adjusting the hinges yourself, you must:
- Find out the cause of the problem. In case of incorrect opening/closing of the door leaf, you should check the vertical position of the elements using a plumb line. To determine the tightness of the fit, it is recommended to place a sheet of paper between the door leaf and the frame.
- Prepare problematic structural elements for upcoming work. It may be necessary to remove the door leaf to gain access to the hinges.
After completing the preparatory work, you can begin the repair. The algorithm of actions depends on the cause of the problems.
Installation of a door structure with hidden fittings
The installation of doors is carried out after the installation of hinge mechanisms. Procedure:
- Install the sash into the frame opening.
- Secure it using a building level and wooden pegs so that it is strictly parallel to the walls and perpendicular to the floor. The door should not be in the closed position, but should be slightly open so that you have access to the hinge assembly.
- Make sure that its halves are located opposite each other, fix the door.
- Connect with a mounting screw.
After connecting all the elements, you can remove the pegs and make sure the installation is correct. If necessary, complete the adjustment and complete the installation by attaching the linings.
Hidden hinges are wonderful fittings that are beneficial for installing interior doors. But their installation is complicated by the fact that it is necessary to cut out hidden holes. The process is not very labor intensive, so following the steps you will get an inconspicuous fastening.
If there is a loose fit
One of the most common breakdowns that occur during the operation of interior doors is sagging of the leaf and its loose fit.
This problem is most relevant for heavy and massive structures. Common causes of a door not fitting tightly:
- distortion that occurs at the joints of the loops;
- insufficient depth of hinges into the door frame.
To eliminate the skew, you must perform the following steps:
- Remove the door leaf from the hinges.
- Remove any remaining foam and decorative elements.
- Identify places of distortion using measuring instruments.
- Secure the embedded beams that serve as supports for the door frame. If they are connected at a 45 degree angle, a horizontal screw should be used to hold them together.
- Strengthen the box by screwing in additional screws.
- Fill the resulting voids with polyurethane foam. It is important to take into account that when dried, its volume increases by 2 times. To avoid deformation of the beams, before using foam, it is recommended to carefully read the instructions for its consumption.
- Install doors and decorative trims.
In order not to damage the door leaf and frame, it is recommended to carry out work with great care.
If the problem arose due to insufficient depth of the hinges into the door frame, you will need to tighten the fixing screws as much as possible.
If this measure turns out to be ineffective, you will need to remove the hinges and deepen the niche.
Attention! If the hinges are unsuitable for further use, they must be replaced. In this case, it is recommended to choose fittings of a larger size than the previous one. If the door leaf has a large mass, it is advisable to install a third (additional) hinge. This will help take the load off the two main ones.
Construction of houses
Hinges are accessories that just a few years ago were an unremarkable unit of one option. Now the situation has changed and this fittings may be different. Hinges are necessary to open and close doorways. There are several options for mounting door hardware, the methods directly depend on the type of door. To carry out this work, you need some skills, a suitable tool and an understanding of a certain sequence of actions. Most often, hidden loops are chosen, since they are almost invisible and thanks to this everything looks more attractive. The insertion of closed loops is available to any craftsman.
Table of contents:
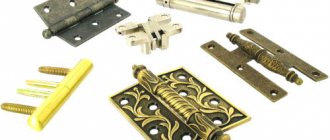
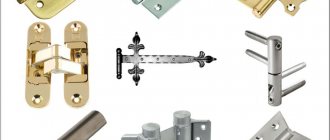
Hinge options for interior doors
There are currently five options for door awnings. Each option has its own specificity and strengths. You can find and purchase the following types of canopies:
- straight or card - simple classic, with special side plates;
- corner - similar to the first, classic canopy with a slight difference in the shape of the plates, most often installed on pendulum structures;
- “invisible” - special mechanisms that are recessed into the door leaf, most often used on expensive doorways;
- eversible - there are no plates, but only pins on a special eversible axis;
- Italian - equipped with a special hinge, installed on European doors.
All interior hanging structures are divided into universal ones and those that have a specific direction: right-handed and left-handed.
As for the loop options, they are:
DIY hidden door hinges
Most often, the invisible version of the loops is a priority, as it allows you to make the object aesthetically attractive. Installation of this fittings is a little more complicated than overhead fittings and also requires more time, but if you wish and have some skill, you can install the hinges quickly and correctly with your own hands.
The advantages of this option are as follows:
- Reliability and safety - thieves will not be able to enter the premises due to the fact that they cut off the hinges, as happens with overhead options; hidden hinges are hidden from outsiders.
- High strength - the product can easily withstand the weight of the structure itself, made of metal or wood material.
- Practicality - products can last for decades with proper care.
- Visual appeal - when the doors are closed, the hinge is not visible, this allows you to maintain the aesthetics of the appearance.
- Wide variety - you can choose canopies that can withstand heavy loads or small designs for closet doors.
The disadvantage of this method is the fact that installation is not easy and requires some effort. In addition, there are a number of weaknesses of this product:
- A hidden canopy is expensive compared to other options. But even among the category of hidden interior structures, you can find those that stand higher or lower. It should be understood that the quality of the hinge directly affects the price of the product.
- Unfortunately, there are a large number of fakes on the market; as a result, you can purchase a low-quality product and lose money
- A noticeable disadvantage is the fact that not every canopy can be disassembled if necessary.
- Due to the large recessing depth, it is not always possible to install this type of canopy.
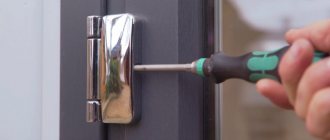
Installing hidden hinges on doors
If you do not delve into the specifics of installing the door structure, then installing the hinges of the hidden version is simple and straightforward: you need to cut a niche and insert the mechanism, then securely fasten it and start using it. But in reality, everything is a little more complicated.
Installing hidden hinges yourself is not entirely easy. It is necessary to stock up on the tools needed to carry out the work. In addition, there is an instruction that describes all the stages; following the recommendations of specialists allows you to install the mechanism efficiently and quickly. The following tools and items are required for installation:
- "invisible loops";
- fastening elements for installation;
- a simple pencil;
- yardstick;
- sharp knife;
- chisel;
- screwdriver;
- screwdriver;
- hammer.
First of all, you need to make a hidden basting. It is important to think about which direction the door will open and at what level the hidden door hinges will be located. This is not at all blindly following the requirements for show; in fact, this will affect the ease of use, durability of the canvas and consumables. To slow down the swinging of doors, experts advise installing special stoppers. In this case, the door will not hit adjacent furniture or the wall.
The number of hinges depends on the characteristics of the door: material, weight, purpose. A classic door requires the installation of two hinges, this is enough. A door made of heavy wood has a different weight, so a couple of hinges will not be enough; three elements need to be installed. Two are installed near the floor and top of the doorway. The third loop is located in the center of the side panel. All attachment points are marked with a pencil. It is necessary to calculate the depth of the excavation in advance.
How to install concealed awnings
As already mentioned, depending on the weight and size of the door, the number of hidden hinges is planned. The markup has specific stages, and they can be displayed in the following order:
- at a distance of twenty to twenty-five centimeters from the top and bottom, a mark is placed for future loops; for convenience, you need to mark with a simple pencil;
- to the future location of the canopies, it is necessary to attach loops and outline their contours;
- when installing the third loop, it is placed strictly in the center, at an equal distance between the first and second;
- two contours are immediately marked, internal for the canopy and external for the lining.
Marking a door, namely a door frame, is considered a difficult task. Like any other process, door marking has its own order and looks like this:
- the accuracy of the door leaf is measured using a building level and secured with wooden wedges;
- now you need to mark the places where the loops will be inserted;
- The loops are outlined with a pencil to indicate their attachment location.
To avoid mistakes, you need to carefully carry out the insertion process. Holes must be made after several checks of the correctness of the future location of the hinged hinges of the hidden version.
How to decide on the choice of invisible loops
The hidden mechanism is a kind of invisible mechanism, equipped with a hinge, equipped with two elements connected by a screw. To make the right choice when purchasing hidden mechanisms, you should listen to the recommendations of experts:
- before purchasing a mechanism, you should study their features; if they are not universal, then you need to decide on the sides of the attachment - right or left;
- if the hinges are inexpensive, then most likely the manufacturer saved on the control mechanism;
- When installing heavy doors, you should not prioritize the issue of savings;
- when installing a door in a new building, it is necessary to purchase a copy with adjustment so that when the house shrinks, it is possible to correct the misalignment of the door, which will happen in any case;
- when installing awnings with adjusting screws, there will be no problems with large objects drifting in - the swing angle of the sash can reach 180 degrees;
- It is necessary to select hinges based on the characteristics of the door.
Door frame: how to install hidden hinges correctly
The first step to install the mechanism is milling. This is the creation of shallow recesses for recessing hinge elements. It is possible to make such connectors yourself using a hammer and chisel. The main requirement for the notch is accuracy and correct size. The depth of the notch depends on the thickness of the loop, and if a shallow one can be widened, it will be very difficult to correct an excessively deep one.
Using a drill, make a recess along the contour outlined with a simple pencil. There is no need to rush; the result depends on the measured actions. It is necessary to make recesses in the sash and in the frame. This work takes no more than forty minutes. The hinges are installed in the cleaned recesses. This involves the following actions:
- the canopy is immersed in a specially made hole, you need to ensure that the part fits tightly and takes its place;
- Recesses are made for the screws with a special tool - a screwdriver;
- You need to insert loops into the resulting recesses and tighten them, you need to make sure that the loop does not skew.
If necessary, it is important to adjust the “invisible” hinges. In this case, you can check the functioning of the door and make sure that the “invisible” hinges are located correctly.
Hidden hinges for doors with your own hands, adjustment
The adjustment features depend on the type and version of the loop. And although there is a wide range of hidden-mount hinges on the market, they all have identical adjustment options and design. To adjust the hinges, you must follow the following steps:
- the cover is removed from the loop, this allows you to expose the adjustment mechanism;
- to change the vertical skew of the door, you should turn the bolt; this manipulation can be done using a special hex key;
- Under the mechanism panel there is a screw with which the surface of the blade is adjusted.
Expensive and complex structures have a complex adjustment mechanism in three directions at once, and this makes it possible to create ideal conditions for operation and quality of service.
It is necessary to avoid the situation when hinges are purchased immediately before installing the product. Such purchases can be made in a hurry and without taking into account many features, which will negatively affect the durability of the door. It is recommended to purchase hinges in parallel with the purchase of the door, in order to take into account its dimensions and weight, and select the color of the hinges. And although they are called hidden and are partially recessed, they are visible when the doors are open, so it is advisable to select a shade.
Also, you should not purchase a mechanism of unknown origin or go for cheapness: hinges ensure reliable opening and closing of the door.
You can make installation easier and faster using a special template. This will help avoid mistakes when basting.
How to hide door hinges, requirements for the mechanism
There are certain requirements for fittings. The main thing is that they must withstand mechanical loads. Since the door material can be different, awnings are divided into three main categories:
- for doors up to sixty kilograms of weight;
- for a one hundred and twenty kilogram door;
- for massive structures weighing up to two hundred and fifty kilograms.
If the door has even more weight, individual structures for fastening are made. There are a number of requirements for hinges:
- they must be durable, reliable, and easy to install;
- the form must be made in such a way that the fastening is as reliable as possible;
- it must be taken into account that during its service life the door can open half a million times, so the material must be appropriate;
- priority is given to the use of hinges made of aluminum, hard plastic or metal - depending on each specific situation;
- parts must be coated with anti-corrosion agents.
If you still have questions about how to make a choice and install hidden hinges with your own hands, watch the video. There you will find answers to all questions. It is possible to install hidden hinges on your own if you follow the recommendations and prepare the necessary tools. The use of such mechanisms will allow you to enjoy the quality and aesthetics of the product.
When opening tightly
The reasons for a tight opening of an interior door may be:
- excessive deepening of loops
- swelling of the door leaf or frame.
In the first case, you will need to adjust the hinges, according to the algorithm of actions described in the previous paragraph, or reinstall the fastening elements.
Swelling of the canvas is a problem typical for wooden structures. To eliminate it, it is necessary to give the door its original geometric shape. The procedure consists of carefully removing part of the solid wood in problem areas using a plane. Then a layer of paint should be applied to the damaged surface.
Installing different models of handles with your own hands
Installation of a stationary handle
It doesn't take much time to install a stationary handle. If the model is overhead, it is simply screwed to the door leaf with self-tapping screws; for this purpose there are holes in the base. The through model involves preparing a hole into which a threaded pin is inserted, and handles are screwed onto it on both sides. If a handle breaks, you simply need to replace it.
Installing the Latch Handle
To work, you will need a drill with a set of feather drills, a tape measure, a pencil, and a chisel.
Latch Handle Installation Tools
The sequence of work is as follows:
- We mark the place for attaching the handle at the selected height (from 80 to 120 cm from the floor). To do this, measure the distance from the square to the front plate and measure it from the edge of the door. At the end of the door at the same height, mark a point in the center.
- Using a drill and a feather drill of the required diameter, we prepare holes for the square and fasteners. You can make one large hole using a crown, but some models have additional screws that secure the structure to the door leaf, and in this case there will be nowhere to attach them.
- Using a chisel, we make a recess for the face plate. We first deepen the point at the end with an awl.
- Using a feather drill with a diameter of approximately 23 mm, we make a hole of the required length for the latch mechanism.
- We put the latch in place and fasten the face plate.
- We install the square pin and screw the handles onto it. Place the decorative base and tighten the locking screw.
Components of a lever handle with a latch
- On the box, we make a hole for the tongue with a chisel (to accurately determine the location, smear the tongue with oil or toothpaste and turn the closed door handle several times). After this, use a chisel to make a recess for the striker plate and fasten it with screws.
Installing a handle-lock
If a mortise lock with a handle is installed, installation is done a little differently:
- At the end of the door we mark the side contour of the lock. To do this, you can simply circle it.
Components of a mortise lock with a lever handle
- Using a drill and a feather drill of the required diameter, we make round holes close to each other. The depth should correspond to the width of the lock. We take out the outline with a chisel, the lock should fit completely into the hole.
- Using a chisel, we recess the face plate.
Recesses in the end of the door for the lock and face plate
- We make holes for handles and a keyhole.
- We install the square pin and screw the handles.
- If the base is a plank, it should be recessed a little.
- The strike plate is mounted in the same way as for the latch handle, only an additional hole is needed for the lock latch.
You can see the process of inserting the handle-lock in more detail in the video.
Installing a handle on a metal door
If you have already installed a lock on a metal door, installing the handle will not be difficult. The installation process will be the same as for a wooden door, you will only need special tools for drilling into metal. A metal drill will do an excellent job with holes up to 20mm; for larger holes you will need, for example, a cone drill.
Installing a handle on a metal door
Installing a double-sided handle on a plastic door
A plastic door is usually already equipped with technological holes for attaching a handle. We disassemble the handle: turn the decorative plug horizontally and unscrew one handle. First, a square with a handle attached to it is installed, and a second handle is attached to the other side. There are mounting bolts above and below the center that need to be tightened. The last step is to turn the plug masking the fastener into a vertical position. You can also install a lock for a plastic door yourself.
Handle for office, balcony and terrace plastic doors
When opening spontaneously
The reason for spontaneous opening/closing of the door may be improper installation of the frame, namely, tilted forward or backward.
To solve the problem, you will need to adjust its position. When opening or closing the door yourself, you should align the frame vertically. In this case, the beam on which the fittings are installed is subject to adjustment. You should also check the hinges for their alignment.
If the box is installed correctly and the fittings are located on the same axis, it is recommended to replace the hinges with new ones. The reason may lie in their wear and tear.
What it is?
Hidden hinges (also called secret hinges) are installed in special holes that are made inside the door frame and leaf. They provide easy, smooth movement and are not visible when the sash is closed.
Attention
Before purchasing components, you need to know in which direction the sash will open. The fittings can be left or right, there is also a universal type that can be installed on either side of the box.
They are also unregulated and adjustable. Adjustment allows you to even out distortions in the door leaf, various gaps that form during long-term use or due to improper installation. You can install in:
- wooden;
- aluminum;
- or steel structures.
Butterflies
“Butterfly” is one of the varieties of overhead one-piece loops.
It is suitable for doors with low weight. This model got its name due to the similarity of its shape to the wings of a butterfly. Professionals call such a loop a card loop. The butterfly can be adjusted in different planes:
- Horizontally. The work is done using the adjusting screw. You should loosen it a little and level the door. It is recommended to alternately loosen and tighten the screw, checking the result each time.
- Back and forth. You need to slightly loosen the fixing screw on the overhead hinge. Then, by tightening and loosening it, you should align the door.
- Vertically. Adjustment is made using the upper and lower screws on the installation pad.
To perform the work efficiently and achieve the desired result, actions must be precise and accurate.
Hidden
Adjusting the hidden hinges of interior doors does not require dismantling the door leaf.
If you start working immediately after detecting a problem, the adjustable gap can be quickly restored to the required level. If you postpone repairs until a later time, the canvas may shift or begin to sag. In this case, it will be much more difficult to fix the problem.
Work is carried out simultaneously in several planes.
To troubleshoot, follow these steps:
- Adjust the canvas in height, setting a certain gap at the bottom and at the same time maintaining it at the top.
- Adjust the door leaf horizontally, aligning the door with the frame.
- Adjust the pressure by turning the adjusting eccentric. As a result of this action, the door leaf should be pressed against the frame along the entire perimeter.
The adjustment size ranges from 1 to 5 millimeters depending on the manufacturer.
Advantages
Metal hidden hinges have a number of advantages compared to other types of hinges.
- Reliable to use. Hidden hinges, thanks to their special design, are practically unbreakable.
- They are not visible. Interior doors with hidden hinges are most often installed where the design of the room requires it. Installed at the entrance, they increase safety, since it is very difficult to get to them and cut them off, like mounted ones.
- Adjustment in three planes is possible after completion of installation and hanging of the door leaf.
Hinges with closer
Adjustment of hinges with a closer is carried out in three directions:
- Vertically - by loosening the fastening elements located in the side parts of the hinge body and aligning them with subsequent fixation.
- Horizontally - using an eccentric located in the central part of the body.
- In depth - by rotating a special screw located in a groove on the body.
The serviceability of interior doors is influenced by multiple factors. They can lead to problems in the operation of the structure. If you start repairs in a timely manner, in most cases the breakdown can be fixed on your own without additional financial costs. This will require a minimum set of tools. But sometimes repairs may not lead to the desired result. In such cases, a complete replacement of the entire door unit is required. To prevent things from going to extreme measures, it is recommended to regularly carry out preventive maintenance of its operation.
What tools are needed for the job?
In order not to be distracted by extraneous factors during the work process, it is recommended to immediately prepare the necessary tools, equipment and materials presented below:
- Pencil for marking.
- Ruler or construction tape.
- Screwdriver and set of screws.
- Drill and cutter.
- Building level.
- Hammer and chisel.
After you have prepared all the specified tools and placed them in the work area, you can begin.