Adding furniture hinges: step-by-step photo instructions
Today I will discuss in detail such a frequently encountered issue as the addition of cup furniture hinges (“frog hinges,” as they are sometimes called). Let's analyze this process using the example of installing a facade on a kitchen box under a sink. This box uses inexpensive, quick-installation hinges with integrated closers.
First we attach the mounting strips. To do this, the loop is disassembled. We mark and set aside the following dimensions from the bottom of the box: 100 mm (center of the lower hinge) and 600 mm (center of the upper hinge). We put pencil marks at these levels.
From them we set aside a perpendicular of 37 mm from which 16 mm in each direction (16+16=32). It is advisable to drill these points with a thin 1 mm drill. I apologize for the quality of the photo. I first screwed the bar, and only then remembered the need to take a photo, which is why the holes have such an unsightly appearance.
Using a pair of self-tapping screws, we attach the mounting strip to the box post. It is advisable not to tighten the screws, as adjustment will be required later.
Now we move on to a more important moment - adding facades.
On the back side of the facade (be sure to decide before marking where bottom is top, and right to left, so that it doesn’t hurt later) we also set aside the above-mentioned 100 and 600 mm from the bottom corner.
I do not remove the protective film from the facade, so as not to damage it later during transportation - do not pay attention to it.
We mark the hole for the cup 21.5-22 mm from the edge. And the holes for fastening the hinge are 24 mm on both sides from the perpendicular and 27 mm from the edge (I forgot to note this size in the photo). We prick these points with an awl.
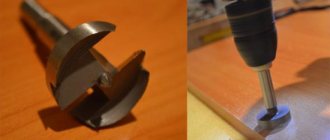
I will dwell on the tool for drilling such holes in a little more detail. It is called a Forstner drill (or cutter). We need a diameter of 35 mm. Pay attention to the central tenon, which ensures that the drill is centered relative to the axis. It can be long (matte drill from Globus) and short (yellow Anchor).
- In the first case, it holds better on the workpiece, that is, the risk of the cutter moving during initial drilling is lower, but the risk of pushing through the front side with this tenon is higher.
- In the second case, tilting during initial drilling (this is true for people who will drill with a simple drill) can lead to the drill breaking off and scratches on the inner surface of the facade, but the risk of pushing through is less.
Personally, I would advise you to look for the second option and ALWAYS practice on unnecessary parts.
Now the drilling process itself. Option one is drilling using a drilling machine (I must say that this is the ideal option). We set the guide, set the center of the workpiece under the center of the drill, and try it on.
Then we drill to a depth that is limited by the stop-limiter. The risk of damage to the facade tends to zero. And the output is these neat holes of the same depth. Moreover, with a minimum amount of dust (pay attention to the vacuum cleaner pipe behind the drill).
Now let's look at a more common (household) drilling option - using a simple drill. This requires great care, but, in general, there is nothing complicated either. During initial drilling, the drill should be held strictly vertically, controlling this process along the circle, which is cut by the scoring knives of the cutter.
As soon as the cutter has penetrated 2-3 mm into the material, it will no longer move to the side, and you can relax a little, but it is advisable to still maintain the angle. As a rule, you need to stop when the cutter goes into the material at the level of its upper platform, but still practice on scraps first. You can drill in several stages, checking the depth with the hinge cup until you reach the desired depth.
The result should be a hole like this for the hinge cup and another couple of 1 mm holes for the mounting screws.
Insert the loops into the holes. To align them with the edge of the facade, we use a long straight object (I have a piece of chipboard, or a second similar façade or a ruler), which supports the hinges in front.
This trick allows you to accurately position the hinge strictly perpendicular to the edge of the facade (this can be clearly seen from the position of the mounting holes that we marked earlier).
We fasten the hinges with a couple more screws.
Now comes the stage of hanging the hinges on the mounting strips.
Here I suffered trying to hold the façade with one hand and also photograph the process)).
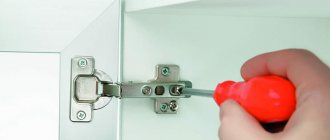
We apply the facade to the installation site (you can put something underneath it or hold it with your foot, as I did) and place the loop on the bar in front and snap the lock into place. If you have simple cheap hinges, then they are also wound from the front, but the hinge body is wound under the screw that is on the bar. By tightening the latter, fixation is made.
The same manipulations are repeated with the remaining loops. In principle, the facade is already fixed.
All that remains is to position it on the sides of the box, that is, to make adjustments. Cup hinges are adjustable in all three planes.
By loosening the screws securing the mounting plate to the box post, we are able to move the façade up/down by 1-2 mm. Then we tighten the screws back.
By tightening and unscrewing the adjusting screw located in the front part of the hinge, we move the facade left and right. In this way, you can tilt the facade in one direction or another (by changing the position of only one hinge or twisting them in different directions).
Finally, by loosening and tightening the rear screw, we move the front back and forth.
As a result, we should end up with something similar. Photo of the final with the facade open.
And with it closed. It can be seen that the edge of the door is parallel to the edge of the frame (that is, the adjustment was carried out correctly).
And finally, let’s figure out how many loops need to be hung on the facade. After all, it is clear that for large doors a pair of hinges will simply not be enough. The quantity depends on the size and weight of the facades. For clarity, I will give this diagram.
Please note that weight can vary greatly depending on the materials used.
What is a Forstner drill?
A cutting tool designed to make a blind hole of a certain diameter for the cups of furniture hinges is officially called a Forstner drill. Made from a head on which two or four sharp tips are located.
In the center of the tool there is a tip intended for centering - it is installed in the intended center of the future hole. The cutting element is located on an axis, which can be mounted in a screwdriver or drill. The required hole depth when drilling with a Forstner drill for wood is about 9 mm. The head diameter varies and is 26, 35 or 40 mm. The cutter is selected according to the size of the fittings being installed
Vertical lift
This type of lifting mechanism is good for high facades, as well as for solid facades.
The mechanism rises above their body. The vertical lift has a soft-closing function and can be locked anywhere. It is used for the upper and lower tiers.
Cost: from 2400 to 5000 rubles.
Folding lift
A folding lift consists of two doors that, like a book, fold up and in half. The peculiarity is that it can be fixed in any position.
These mechanisms are mainly used in linear kitchens. The use of these mechanisms provides good access and visibility, and eliminates contamination of the façade during its constant opening and closing.
Disadvantage: The folding lift cannot be used in a corner kitchen.
Cost: about 4000 rubles.
How to choose a lifting mechanism
When choosing a mechanism for the kitchen, several factors should be taken into account:
- size, weight and shape of facades;
- design features of cabinets;
- ceiling height and the presence of a suspended ceiling, built-in lamps;
- the presence of a cornice, and the degree of overhang above the wall cabinets;
- style in the design of the kitchen set;
- height of household members.
Pull-out fittings
Pull-out fittings ensure easy opening of drawers and optimize the work space as much as possible. Kitchen furniture, living room and bedroom furniture can be equipped with guide structures.
The guide fittings provide a high level of comfort and convenience. Constant improvement of designs has led to the production of a variety of guide systems characterized by high quality and smooth movement.
The user can easily move boxes of different sizes and weights using the guides. Which can be based on a roller or ball mechanism.
The boyard hardware catalog is constantly updated with new types of fasteners, furniture ties, and pull-out fittings. Among the guides, a new group of mechanisms has recently appeared - Reverse guides.
history of the company
The Boyard furniture fittings company registered its trademark in Russia in 2003. At the same time, she began the process of branding at the international level. The choice of the main direction of assortment policy was preceded by a survey of several hundred Russian furniture enterprises.
As a result of the research, the dominant plastic at that time was replaced by metal. Boyard offered the market the first collection of metal door handles. But he offered them to the market at the cost of plastic.
This unique offer ensured Boyard's success. According to the survey results, 96% of furniture manufacturers know Boyard brand fittings, and they know them as quality products.
Mechanical lifts
The most common mechanism is a gas elevator. It smoothly raises and lowers the facade, but does not allow it to be fixed at a certain angle. Peculiarities:
- often fails;
- low cost;
- lack of closers;
- ease of installation.
The price of boyard fittings starts from 50 rubles.
New products
The furniture fittings market competes in technologically advanced, original and functional solutions for kitchen furniture. Therefore, Boyard offered a new solution to the Russian market - a series of lifting mechanisms AeroFlap, AeroLoft, AeroSplit for wall cabinets. This boyard fittings are presented as a collection on the company’s official website.
The collection includes three systems: vertical AeroLoft, folding AeroFlap, folding Split. The Aero line was developed by Boyard together with the leading Italian furniture and accessories factory. The components are made in Europe.
Boyard released the Aero series at the peak of demand for lifting mechanisms among end consumers. Today, design solutions for kitchen furniture are very developed and continue to improve. Aero is an excellent solution for those who want to make their life comfortable and modern.
Popularity of lifting mechanisms
The secret of popularity lies in practicality. In kitchen sets they take up little space, at the same time, they correspond to the spirit of the times.
Aero mechanisms operate not on the basis of already familiar ones, but on the basis of a spring mechanism developed by the best designers in Germany. The spring base ensures dynamic mobility and smooth movements.
In addition, the spring mechanism significantly increases the reliability of the structure and the service life of the lifting mechanisms. It is the spring that makes it possible to fixate at each point of the trajectory of movement.
All Aero mechanisms are made in strict, laconic colors and have a flat and ergonomic shape, both the body itself and the levers. Therefore, the new lifting mechanisms do not draw attention to themselves and do not violate the unity of style, as evidenced by reviews of boyard fittings. The mechanism remains invisible in the interior of the furniture.
Another advantage of lifting mechanisms is their lightness, ease of installation and adjustment. There is an adjustment key in the body of each mechanism, so the buyer can make all the necessary adjustments himself at home.