Every day you purchase a large amount of various bottled liquids, but invariably after consuming it, you send the container to the trash can. You probably haven’t even thought about how you can use a regular plastic lid. But what if it could be useful?
Plastic bottles are a popular type of container in which drinks are sold in stores.
The simplest plastic covers, which we usually do not pay attention to, actually have sufficient strength to create a bright massage mat from them, which is convenient to use for therapeutic and preventive purposes.
They are durable, light and cheap.
You can make such a rug with your own hands in one of three ways, which differ from each other only in the ways of fixing the elements.
A huge number of crafts are created from caps.
Preparing material for work
To use plastic bottles as a path, you first need:
- Wash well from any remaining drink;
- remove all labels so that they do not spoil the appearance in the future;
- Dry all material in the sun.
Also, before starting work, prepare all the necessary material:
- sand or ordinary soil;
- crushed stone;
- shovel;
- bucket;
- garden shears (they are more convenient to use when cutting eggplants, but if you don’t have them, then perhaps use household scissors);
- leveling boards;
- formwork - box.
Having prepared all the tools, you can start working. Let's take a closer look at the main options.
A colorful panel makes an impression
Such types claim to be called a work.
Probably, panels are at the same time the largest and brightest works made from plastic bottle caps. How much work and patience must be shown to make such jewelry! This could be an imitation of a famous painting, a colorful mosaic of fancy patterns, a stylized image in the form of a mosaic, or a still life of individual paintings. For those who decide to do a project of this kind, there is no point in suggesting the plot. Installation of plugs can be done using nails, fishing line, glue and self-tapping screws.
We did a little experiment and made a simple design out of caps in 15 minutes. The following conclusion followed: creating from traffic jams is easy and simple!
Involve your children, who have limitless imagination, in joint creativity. Together and with your own hands you can create your own colorful works.
We hope the following video helps you.
Other options
Coverings made from combinations of plastic lids with broken ceramic tiles look good. The small size of the elements allows you to lay out fancy and extraordinary patterns.
The result is a distinctive path of bright elements. Such garden patchwork will decorate the garden and place accents on the site.
The designs can be varied with metal lids. And adherents of eco-design will love the paths made from wine corks. Cork is a noble material with unique properties.
Health track made from different caps
Homemade massage paths in the garden have become quite popular. Children and adults love them. After all, walking barefoot on a textured surface is not only pleasant, but also useful. For such paths you will need a cement base on which various materials are laid.
Lids from juices, glass jars, corks, buttons, and sticks are suitable.
All this stuff is sorted by color and size. Then a sketch is developed. Here you can play not only with color and texture, but also with the styling method. Covers placed on the end will create a convex surface, while those glued with the recess down will give a smoother surface.
Conclusion
To all that has been said, all that remains to be added is that lids are not waste or garbage. This is a universal material that can be reused, creating unusual and useful things , while protecting nature from pollution. These colorful caps can be used to create baby toys and rattles, garden furniture and interior decoration.
After reading this article, you learned how to use caps from PET bottles for the garden and cottage, making a variety of crafts and decorations with your own hands.
Other decorations for garden and home
In a private house or gazebo on a personal plot, you can make unusual curtains from multi-colored corks. They will perfectly highlight the Provence style interior and also create a cheerful mood.
Making such curtains is very easy. The main thing is to choose the right palette in accordance with your interior.
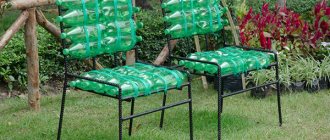
Or how about some new light, comfortable, compact and mobile garden furniture? Craftsmen use the lids to make original and creative chairs , and also decorate tables in unusual ways.
Also, don't be so quick to throw away corks if you have small children. This is great entertainment for kids, which develops fine motor skills and also develops color perception.
Invite your little one to sort the corks by color - you will be surprised how much this activity will captivate your child.
You can also assemble a frame from wooden slats in the shape of a flower or a funny animal and fill it with colored caps from PET bottles - you will get an unusual decoration for your garden plot, which will certainly attract the attention of everyone around you.
If you prefer bright colors and unusual design solutions, pay attention to the fact that the lids make unusual and original lampshades .
Making such an element with your own hands is quite simple. The main thing is to design the frame and select the lids of the required shade.
Practicality, convenience and functionality are the main criteria that the design of a country house must meet. Surely, somewhere in your barn you have an old kitchen sofa collecting dust, which is a shame to throw away, and difficult to turn into something worthwhile. Try making a fun rug out of plastic lids that will bring life back to old furniture .
You can also make unusual pots or plant pots from bright plastic lids. Simply cover the base with colored corks.
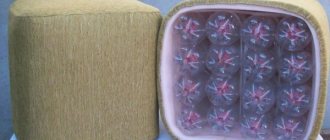
Assembling lids into a general composition
When the preliminary layout is ready, you can begin assembly. For it you will need a strong thick fishing line and several small metal washers. Such that they fit in the lid.
Each row of covers must be taken separately and a common fishing line must be threaded through the holes, stringing the parts together like beads. If you have a thick fishing line, you will not need any needle; the tip will easily pass through the prepared holes
On each side of the row, the fishing line is fixed on a washer. Try not to give the thread any slack, otherwise the parts will “walk” across the rug. And the washer will definitely prevent the line from coming off; simple knots are not so reliable
When you have collected all the rows in one direction, start fastening them together in the other. The algorithm is the same - thread the fishing line and fix it at the beginning and end of the row on the washer, not forgetting about the tension
In order not to disrupt the design you have thought out, number the rows before assembling. The most convenient way to do this is with a marker on the bottom of the outer covers.
The author made an inscription on the rug from the caps and used the finished product in the bathhouse. It is pleasant to stand on such a rug with bare feet. Without a doubt, a similar design will be useful in the hallway. You can even put wet shoes on it
Despite the fact that the mosaic elements are very small, the rug will be durable. It is able to withstand heavy loads.
What do you think of the idea? And one more interesting point: the reverse side of the mat can have a massage effect on the feet. Here is an example of such use in a short video:
Watch this video on YouTube
And note - in this case the author used a different method to attach the covers: they are glued to the base. Which option did you like better? We are waiting for your comments and opinions. And if you have your own experience in making products from plastic lids, share it in our “Not a Woman’s Business” section!
PHOTO: YouTube channel “Yury Kleschev”
Path made of plastic bottles: master class
To make it, collect enough bottles. Then cut off the bottoms from them.
The place where the garden path will be is filled with sand, which is leveled and moistened. Then the bottoms of the bottles are pressed into the sand. If you are lucky enough to collect bottles of different colors, you can lay out a multi-colored pattern, it will look more fun. If you place caps in between the bottles, you will get a more solid and unified panel.
Now we put boards on our path and trample on them well in order to compact it as best as possible. Children will complete this task with special pleasure. That's it, the path is ready. Now your territory is special and unique. The envy of neighbors and passers-by is guaranteed.
On the Internet you can also find a master class on laying out paths from bottoms in video format.
A few more ideas...
Toys made from bottles are just your imagination, which you can literally make into reality with your own hands. You can use any paints. The shape depends on preference. It is not necessary to take small bottles; for example, you can make a Santa Claus from a five-liter bottle (you can make a beard from plastic spoons). Lids can also become a Christmas tree decoration. We have selected several ideas.
We offer you to make Christmas tree decorations with your own hands from plastic bottles!
For a long time now we have been waiting for the New Year holidays, when all our most cherished dreams come true. Therefore, it is worth thinking about such pleasant chores as: choosing the right outfit, creating a festive atmosphere and decorating the Christmas tree.
Many needlewomen love to create Christmas tree decorations with their own hands, so I often use the simplest materials to create a new masterpiece: paper, felt, plastic bottles, etc. Combining them with sparkles, tinsel and bright decor, you can create an unusual and elegant Christmas tree decoration.
Due to the fact that these are very easy to make, you can create more than one Christmas tree decoration with your own hands that will delight you and your loved ones. In order to make a craft you will need:
- 2 plastic bottles;
- paints or markers;
- multi-colored ribbons;
- Double-sided tape;
- paint brush;
- stationery knife.
Process of creation:
- First of all, you need to cut out the bottom of each bottle. These blanks will be needed to make one toy.
- Now we take brushes and paint and draw a snowflake on the inside of each blank.
- After this, you can put tinsel, confetti, decorative balls or sparkles into the toy.
- Then we connect the two parts together using double-sided tape.
- To hide uneven lines, you will need a ribbon that matches the color of the paint you are using. It's best if you wrap the ribbon in several layers and tie it in the shape of a bow. This way you will complete the top of the toy.
- Now the craft is almost ready and you can secure it with a paper clip, which must be bent into the shape of a hook.
Despite the fact that such toys are considered the easiest to make, they open up great prospects for your imagination. This is a great way to teach your child new ways to decorate and create their own New Year's masterpiece.
How to make it yourself at the dacha
Corks can be laid in different ways:
- face up (resulting in a flat surface);
- ribs up (this path can be used instead of a massager);
- the inside side up (the coating is textured).
The latter option is only suitable for small areas under a canopy. Otherwise, during rainfall, water and dirt will accumulate in the recesses of the plugs. And such an uneven surface is difficult to care for.
This material will introduce you to the varieties of crafts made from tin cans.
Mosaic laying scheme
This is the most creative part of the job. Before you start paving, you need to decide exactly what your path should look like. You can lay out the lids in even rows, regardless of color. The result is a colorful scattering of colored highlights in your garden. This path attracts the eye and looks impressive.
But if you want something more extraordinary, choose a pattern for your path yourself. Cross stitch patterns will help you with this. Paths with colored geometric patterns look good. If you are confident in your abilities, you can choose more difficult drawings. Some summer residents create real story panels under their feet in their garden. It is at the dacha that such decorations are popular.
Tools and materials
Despite the cheapness of the material, the approach to creating tracks from corks must be serious. Sometimes it is advised to simply level the ground before laying cork mosaics and start creating by sticking the caps directly into the ground or a layer of sand.
This type of carpet will not last long. Not only will the lids not last long and will begin to fly out one after another, but also the grass will hasten to grow between them. It’s better to spend more time, but do everything well.
You will need:
- lids of different colors;
- cement;
- sand;
- construction or ceramic tile adhesive;
- wooden blocks and boards for formwork.
To build a path you need:
- determine the area of the path and make markings;
- remove turf and topsoil;
- dig a trench 10 cm deep;
- drive supports along the edge of the recess;
- make wooden formwork, and the nails need to be driven in from the inside of the structure;
- install spacers for reliability (the optimal distance between them is 1 m);
- fill in a layer of crushed stone, gravel, broken brick;
- prepare a solution of cement and sand (4:1) and add one part of glue to it, the mass should be of medium consistency;
- pour a small amount of solution onto the prepared area;
- quickly lay the covers according to the chosen pattern, lightly press them into the cement;
- the solution should almost completely cover the lids;
- After the cement has hardened, walk over the top layer with a stiff brush to remove excess cement.
The mortar hardens quickly, especially in hot weather, and laying the mosaic takes a long time. Do not fill the entire path with cement. Work by sector. Break your drawing into parts or conditional squares and fill in small areas.
You may also be interested in tire craft ideas for the garden.
Advantages of garden paths
- The coating performs an aesthetic function without sacrificing a practical one.
- The material does not require material investments.
- Plastic tolerates temperature changes well.
- Such paths do not lose their aesthetic appearance for quite a long time.
- Paths made from unusual mosaics are easy to repair: any cover can always be replaced.
Disadvantages and methods to combat them
But such paths are not ideal; they have serious drawbacks. But knowing in advance what difficulties may arise with them, you can easily avoid them.
- Plastic paths made from lids become very slippery after rain. Such coverings should not be installed on central paths. Their place is in the garden and near recreation areas.
- An icy path becomes dangerous. If you need to walk on it in winter, it is better to combine a mosaic of plastic covers with designs made of cement, ceramics or wood.
What is remarkable about the paving slabs of the old city?
Photo of the diagram for laying diamond paving slabs: .
Here you can watch a video of laying sand paving slabs.
Do children like these products (review)
A massage mat is a wonderful tool for the prevention and treatment of flat feet in children. In addition, classes on it can be turned into an exciting game, which every child will certainly enjoy.
Conventionally, the foot can be divided into several sections, each of which is responsible for a specific organ. The protrusions on the orthopedic mat stimulate these areas.
The protrusions can also stimulate the child’s immunity and brain activity. There is also a segment on the foot near the heel that is responsible for a good mood, therefore, exercising on a mat can also stimulate a child’s good mood.
In children, such a product, first of all, helps to form the correct arch of the foot; at a young age, the bones are easier to correct. An orthopedic mat is also useful for children who have suffered from rickets, as well as for the prevention of scoliosis, which is much more difficult to treat in older children. Exercising on such a mat is also useful for adults - it stimulates blood circulation and tones the body as a whole, this way you can prevent varicose veins and relieve fatigue.
Orthopedic mats that are sold in stores are a bit short, and in order for a child to run on such a path, you will have to buy several and put them in one line. It’s easy to make a massage mat with your own hands—you just need to use your imagination.
The making itself can be turned into a fun game, in addition, it will save mom from unnecessary expenses.
We often throw away plastic bottles with caps without thinking, but they are also great for massage.
So, for the next version of the orthopedic mat we will need:
- plastic bottle caps (quantity and color at your discretion);
- base made of carpet or thick fabric;
- an awl and thick thread or fishing line.
Mat made of plastic caps
In any creative process, the main thing is to use your imagination, however, there are some simple tips that are worth following. If you decide to learn how to make a massage mat for children with your own hands, then you need to choose one of two manufacturing methods, when the relief elements are:
- sewn on top to the base;
- fall asleep between layers of fabric.
Let's look at the second method first. This product is safer. The child walks on a fabric base, under which the texture of massage particles is felt. The baby will not be tempted to tear off small objects and put them in his mouth.
This thing can have any shape. The easiest way is to make a regular rectangle or square. If you have sewing experience, make curly options in the form of vegetables, fruits, butterflies, ladybug, sun, clouds and any other object. Both the base and the decor can be embossed.
Take the fabric base and sew it into a bag. It would be good if the bottom was taken tighter. Make the upper part on which they will walk from calico. You cannot use material such as gauze that is too thin: the filler will break through it. To make a rectangular rug with filler, you need the following:
- You can gradually sprinkle the cereal in strips along the narrow side of the mat and stitch it in after 5-10 cm.
- To make squares or rectangles with different alternating internal relief, you should first sew long pockets from the bottom to the top of the “bag”, filling them with cereals, beans, balls and other small elements, stitching the fabric in a perpendicular direction.
Do-it-yourself massage mats are made in the same ways as mentioned above. The only difference is the shape of the base. Here a long strip is taken, but its width can be quite narrow, for example, corresponding to the width of the child’s legs placed at shoulder level. The younger the child, the narrower the path can be made. Over time it can be expanded. In any case, it is better to proceed from the materials that are available.
A do-it-yourself massage mat is always made carefully and with love, so creating it yourself or ordering it, you can be sure that your baby will definitely like the product.
Usually, kids first test it for strength, investigate whether something can be disconnected, torn off, and then enjoy the proposed activities: walk, walk, jump over a bridge, a puddle, a stone, etc. The main thing is to interest the child and play out different options skits, then the boring “need” will turn into a pleasant “want”.
So, you have read that DIY massage mats for kindergarten or home are quite simple to make. Any materials that have a different textured surface are used. Choose the idea you like and start creating your own original tool for healing.
Instructions for creating a rug
Here we will talk about a massage mat that will be useful for all family members. One evening is enough for you to create an unusual decoration for your home that will also be good for your health. A little patience and attentiveness - and your unusual massager is ready.
You can make it in any shape, or you can think over the shape, size and even design of the product in advance.
Here's what you'll need:
- a large number of plastic covers;
- awl for making holes;
- strong fishing line.
make holes on the sides Now imagine what your rug will look like.
Lay out a pattern on the floor and fix it in any way (sketch or photograph).
Place the lined corks in a snake pattern on the fishing line according to the pattern, row by row.
The result should be a long “snake”. Then select the covers of the first row and place them on the fishing line in the others - located oppositely.
So, having collected the first row, they move on to collecting the second, and then the third. All that remains is to tighten the ends and secure them securely. You can use the diagram provided, or you can try to create an original drawing yourself.
Area of use of a mat made of caps and corks
Because plastic is not afraid of water, does not rot, or rust, it is used in wet areas: a bathroom or toilet. You can make a massage mat with a children's pattern, and then your child will be happy to use it.
Carpet with a children's pattern
First way
- rigid base made of plywood, chipboard or thick cardboard;
- glue;
- covers.
Everything is very simple. Lubricate the lids with glue and place them on the base. For reliability, press them with a heavy press, you can use books.
They are bright, colorful, retain color for a long time, durable and, most importantly, affordable.
To make the carpet brighter and more interesting, use the patterns offered on the Internet to create beautiful patterns or entire paintings.
They allow you to create any ornament, create exclusive pictures on benches and tables, etc.
Advice! Involve your friends in collecting caps, this will speed up the process. To make the search even more interesting, distribute the lids by color, let everyone collect lids of a certain color - arrange a competition.
Children will take up this with particular enthusiasm.
Third way
This mechanism for creating a mat involves attaching the covers directly to the base itself.
Make holes in the bottom of the lid and sew them directly to the fabric or cardboard base.
Depending on whether you chose thick fabric, cardboard or plywood, you will also have to choose the method of fastening. This can be either thread or fishing line, or ordinary self-tapping screws.
Instead of fastening with thread or fishing line, you can fix the modules to the plywood base with self-tapping screws.
However, in addition to these methods, you can use a much more interesting idea for playing with your child. If your baby loves purees in soft packaging, then take a close look at the lids. They have an amazing ability to be attached to each other without any additional materials at hand, like a mosaic.
Since plastic is not afraid of water, does not rot, and does not corrode, it is used in damp rooms: a bathroom or toilet.
Attention! Never allow your child to play with such covers alone. He must always be supervised.
The manufacturer himself reports that by removing the cap from the food packaging, it can be used as a component of the construction set, with the help of which you can create not only various figures, but also toys. This may be due to the hexagonal shape of the lid, on each side of which there are grooves of two and three recesses with a diameter of 3 centimeters and a thickness of 2 centimeters.
You can make a massage mat with a child's design, and then your child will be happy to use it.
Additional Information! A child may find this activity uninteresting due to the fact that at a very early age it is difficult for a child to consciously, on his own, assemble a figure. He is more likely to throw lids all over the house. But in this case, you can independently create an educational mat for your baby with any pattern.
By creating a rug from lids, the child develops not only fine motor skills of the hands, visual attention, learns colors and shapes, but also receives a foot massage.
The product is durable and beautiful.
Since plastic does not rot or corrode, it can be used in the bathroom and toilet without fear of moisture.
The mat is not afraid of exposure to moisture, and is not damaged by putrefactive bacteria and rodents.
But still, the main advantage of this product is its beneficial effect on a person’s well-being, since, as is known, active points accumulate in our feet, massaging which can have a beneficial effect on the condition of the internal organs. Stimulating blood circulation helps relieve pain and fatigue.
Walking on such a mat is the best way to prevent flat feet.
Performing exercises on such a mat for 3-5 minutes a day in the morning and evening allows the child to strengthen the feet, form the correct arch and a beautiful gait. Exercises for your baby can be done in a playful way. A rug made, for example, in the shape of a favorite cartoon character that is interesting to the child will especially lift his spirits.
The material for its manufacture costs practically nothing.
As has already become clear, making a massage mat from plastic covers is very simple. There will be no significant financial or time expenditure required from you.
Foot massage should be considered as a special health procedure for both adults and children, allowing their body to develop correctly.
Do-it-yourself massage mats are an excellent alternative to industrial designs.
To summarize everything that was said earlier, we can note the fact that sometimes the lids cease to be waste and the contents of the trash can. Plastic is a universal material, and it can be reused, creating not just unusual, but also truly useful things. With the help of such caps you can create toys, interior items and even decorative furniture.
It is important that at the same time you still protect the environment from dangerous pollution.
Second way
Using this method, you can create a double-sided rug that can also be used as a regular rug.
This is an option for making a double-sided track, which is used as a massage mat or as a regular rug.
- an awl or a thick needle;
- thick fishing line;
- solid base;
- covers.
Holes are made on the sides into which fishing line, wire or strong thread is threaded.
It is preferable that the elements are fixed using fishing line.
Initially, you need to create a pattern on a dense base by arranging the lids accordingly. Use an awl to create holes in the sides of each lid. Using fishing line, connect the covers together. It is almost invisible, and therefore the product will look neat.
The fishing line is practically invisible against the background of the caps, and, consequently, the product itself looks neater.
Helpful advice! To make it easier to create holes in the lid, first place them in hot water.
Such a rug can be of any shape, it all depends on the imagination and the idea itself.