Decorating a ceremony is a delicate and troublesome task. There are tasks that are best left to professionals. And some elements can be made with your own hands, for example, beautiful decoration of a champagne bottle for a wedding. There are many techniques, some beyond the capabilities of a beginner. But you can find a beautiful and original design for the bride and groom on the Internet or come up with ideas yourself.
Bottle decor for the interior of the living room and children's room
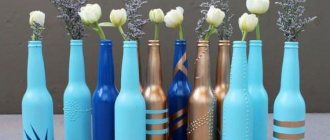
For the interior of a living room or children's room, it is best to use outdoor decor.
Such items can be used both as a separate decorative element and, for example, as a flower vase. DIY bottle decor is gaining more and more popularity. There are many lessons and master classes online on how to create unique interior items from bottles. They are used as decoration to create chandeliers, lamps, candlesticks, vases and flowerpots. Once you wrap an unusually shaped bottle with ropes or threads or paint it with acrylic paints, it immediately takes on an original look and becomes a stylish decoration for various interiors.
Halloween Bottle Decor
Works made with contour paints using the dot painting technique also look impressive in interiors. And if you add stained glass paints, the contour painting turns into stained glass. Mosaic lovers can be encouraged to decorate bottles using eggshells or pieces of colored magazines.
Bottles decorated with semolina look very elegant in a classic living room. This is not the easiest decor option; training will be required to achieve precision in applying the design. But the end result will surprise you with its openwork and curls.
How to decorate bottles with paint and glue
Bottles decorated with multi-colored glass beads or beads made of other materials look very stylish and original. A bottle with rhinestones and feathers will give a vintage-style interior a finished look.
Transparent bottles with flowers and leaves inside also look interesting. Filled with formaldehyde, they float inside and create a floating impression.
Decor of bottles with stained glass paint
White bottles for the interiorDecoupage bottles with newspapersBottle decor with grape bunchesBottles decorated with sparkles in the living room interiorBottle decor with salt
Decoupage bottles
Decoupage bottles with white napkinsPainting bottles to look like flowers
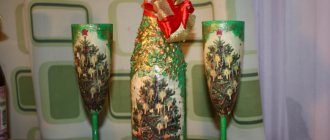
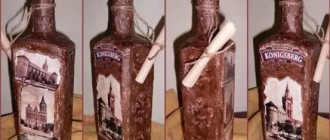
Decoupage of a champagne bottle for the New Year 2022 “Santa Claus’s House”
We offer another interesting option on how to decorate a bottle of champagne with your own hands for the New Year 2022 using the decoupage technique. For decoration you will need ordinary napkins, but with the image of Santa Claus. If you wish, you can come up with your own plot.
Materials:
- priming;
- acrylic paints;
- napkins;
- acrylic lacquer;
- Styrofoam;
- hot glue, PVA.
Master Class:
- We remove all labels from the bottle and be sure to degrease the surface before decorating.
- Now prime the bottle with white acrylic paint using a small piece of foam rubber or sponge.
- Cut out the desired fragment from the napkin and separate the bottom layer; for work you will only need the top layer of paint.
- The place on the bottle where we will apply the image is lightly rubbed with sandpaper, then we apply PVA glue.
- Place the cut out fragment with the pattern down on the bag or file, sprinkle it with water, and straighten the resulting wrinkles.
- We attach the file with a napkin to the bottle, carefully iron it, then remove the file, let the picture dry and cover it with acrylic varnish.
- We cut the foam into small pieces and glue it around the picture, that is, we make a window.
- Mix the putty with PVA glue and make a chimney on the neck of the bottle. We simply apply the composition to the neck and squeeze out the brickwork with thread.
- We make a mixture of PVA glue and plain water. We dip napkins into it and randomly apply it to the bottle, and in the end we get snow walls.
- Using hot glue we make an ice roof for the house.
- Now we paint the pipe and window brown, and the walls and ice roof white. Finally, for shine, we cover everything with acrylic varnish.
For better adhesion of the primer to the glass surface, make the first layer thin, dry it well and apply the second layer. The pipe can be made from salt dough.
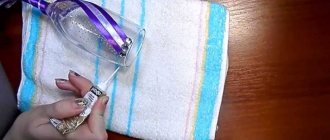
Decorating with stockings
The surface is also degreased, but instead of fabric, a stocking is put on the surface of the bottle, which must be soaked with glue.
The stocking can be pulled up to the level of the neck, or completely cover the container with it along with the stopper.
Moreover, it is not necessary for the nylon to lie flat; it will look interesting if you make chaotic folds on the surface.
After the glue has completely dried, white acrylic paint is used as an intermediate coating. The paint must be completely dry.
The next step is to draw the image from a napkin. The rest of the bottle's surface is repainted in a different shade.
The photo shows how fabulous the bottles look with decor made using decoupage technology.
What you need for work
As a material, you can use almost any decor that can be found in every home on the eve of the holiday:
- New Year's tinsel and serpentine;
- costume jewelry;
- corrugated and colored paper;
- New Year themed paper napkins;
- sweets in beautiful wrappers;
- special covers for bottles that you can sew with your own hands;
- satin ribbons;
- sparkles and other decor.
You also need to prepare tools and supplies:
- glue;
- scissors;
- threads;
- acrylic paints and primer;
- tassels;
- glitter;
- foam sponge;
- colored, shiny and corrugated paper;
- pieces of fabric;
- ribbons.
Decorating a bottle of champagne for a wedding
There are many ways to decorate a bottle with your own hands.
Simple ways to decorate: A general step before starting work is to remove stickers and labels with your own hands.
To do this you will need:
- foam sponge;
- wire sponge;
- a bowl of warm water;
- alcohol;
- napkin.
Use a sponge soaked in warm water to dampen all stickers. Wait 5-10 minutes, wipe with a damp sponge again. Usually, after this, paper labels easily “pull away” from the glass. If there are fragments of glue and labels left, rub them with a metal sponge. After removing the stickers, wipe dry with a cloth. Wipe with a swab dipped in any alcohol-containing liquid and let dry.
Simple design of a bottle of champagne for a wedding
Equipment:
ready-made stickers.
This method of decorating champagne with your own hands is the easiest.
Buy ready-made champagne stickers at the wedding salon; when choosing, focus on the main color scheme of the banquet hall. Remove them from the cardboard base and carefully glue them onto the bottle. Self-adhesive stickers. This method is indispensable if in the wedding bustle you simply forgot about this element of the celebration, and there is simply no time left for complex bottle decoration. A lot of time is always allocated for preparing decorations for a wedding, but the beauty of this work is seen in the little things.
Decorating a champagne bottle for a wedding in Yin Yang style
Equipment:
- satin ribbons 1-1.5 cm wide, black and white;
- PVA glue;
- brush;
- a little white lace or organza.
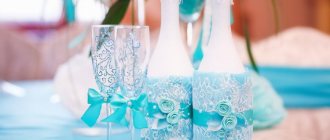
Apply glue to the bottle you prepared yourself with a brush. After that, we press the tip of the tape below with one hand, and with the other we begin to unwind the roll of tape, winding it in a circle with a slight “overlap” (so that the edge of the top layer overlaps the bottom layer by 1-2 mm). You can glue the tape straight or slightly at an angle, diagonally. We decorate one bottle with white ribbon, the second with black. From a small amount of lace or white organza, you can make a “veil” for a white bottle-bride.
The decor is very simple and laconic, a budget option, because you don’t have to order bottles for a wedding from famous designers. The more props and decorations you make for the wedding with your own hands, the more pleasant it will be for the young people - it will become clear that they prepared for the celebration especially carefully, that is, they spent not only money and time, but also invested their own labor. This design option is suitable for those who have little time to prepare for the wedding, but definitely want to do something with their own hands. After all, this is how the traditions of a young family interact with each other and act as one team are born.
Decorating a champagne bottle with decoupage elements
Equipment:
- a roll of white three-ply paper;
- PVA glue;
- brush;
- a can of gold-colored spray paint;
- any thin ribbon of golden or yellow color;
Using your hands, carefully separate the toilet paper into layers. Lubricate the surface of the bottle with glue quite liberally, wrap the bottle in one layer with one of three layers of paper up to the neck
Press the paper gently but firmly onto the glass. Leave to dry
The glue will cause the paper to “bump” a little and create a bizarre relief, a “skin effect.” So a bottle with a label from “the darkest and dampest cellars of Burgundy” will end up at a wedding. After complete drying, lubricate the surface with glue again and wrap the bottle with a second layer of paper. Leave until completely dry. Do the same with the third layer.
After complete drying, wrap the remaining paper around the neck and fix it on it (to prevent paint from getting in). Spray paint from a can with your own hands, cover the paper with the first layer of paint, let it dry, repeat painting one or two more times. This method of decoration creates the effect of natural leather cases. Once completely dry, remove the protective paper and tie a bow at the neck to your liking. You can also use silver paint. This is a hint at the long-term nature of the marriage - the desire to live to see the golden age or to invite family and friends to a wedding called the silver wedding.
How to decorate with glitter?
An original and elegant bottle for the New Year can be decorated not only with pieces of fabric or themed napkins, but also with shining sparkles. This simple component can give the base a very bright and festive look, which will elegantly emphasize the holiday atmosphere.
Along with glitter, you can use other decorative components. In a single combination, they will make wonderful bottle decorations. Let's consider what positions should be used to decorate such an interesting New Year's homemade product:
- spray can with golden paint;
- glitter;
- adhesive composition (ordinary PVA glue will be sufficient).
Let's consider the correct sequence of decorative design of a bottle using the listed components.
- At the first stage, it is advisable to carefully prepare the workplace for all creative manipulations. The table on which the bottle will be decorated must be covered with newspapers. You should do the same with the nearby area so that it is not stained with golden paint.
- Next, take a bottle. You can remove paper labels and stickers from it, or you can leave it. Different masters act differently. If you decide to remove the labels, it is important to remove all remaining adhesive on the glass walls, otherwise they will be visible on the gold paint.
- The bottle will need to be covered with a continuous layer of beautiful golden paint. After this, you should wait until it is completely dry. Until this moment, you cannot begin further manipulations, otherwise the craft can be ruined.
- As soon as the golden layer on the bottle has completely set and becomes completely dry, the surface of the workpiece will need to be completely coated with a layer of PVA adhesive solution. To make applying this component as convenient as possible, it is recommended to use a brush.
- After this, the prepared bottle, coated with glue, is sprinkled with glitter. They should be beautifully distributed over the surface of the bottle to make it more aesthetically pleasing.
Using a similar scheme, you can decorate the bottle with rhinestones. The only difference in the decoration technique will be in the features of fixing the decorations. For each shiny pebble you will need to select a specific place on the prepared vessel. As a result, you can form a very beautiful pattern, designed in a New Year's theme.
How to decorate bottles for a wedding
Very often, recently, newlyweds use the services of designers who design a festive bottle to order. The couple themselves can come up with a concept that suits them completely.
But it will be much more interesting to decorate bottles for a wedding with your own hands, because in this process it is important to put your soul and desire to fulfill what they symbolize.
To do this, in order not to think for a long time, you can look at photos of decorating bottles for a wedding on the Internet. You can either choose a suitable design or come up with something of your own based on other people’s ideas.
Most often, wedding bottles are decorated with:
- polymer clay flowers;
- photographs of the newlyweds;
- engraving;
- elements of handicraft.
Flowers made from polymer clay are considered one of the most interesting, and most importantly, suitable ways to decorate a bottle. Thus, decorating champagne bottles for a wedding will strongly resemble the bride's outfit and will pair beautifully with the wedding dress at the event.
The only thing is that such decoration is very popular, so more and more newlyweds are resorting to other decoration methods.
Photos of the newlyweds are another good way to decorate bottles. In this way, you can take photographs from the shooting of a “love story” or other photo shoots, or early photographs of the couple.
These don't have to be pre-holiday photos at all. It is best to choose those pictures that resemble the most interesting moments in the life of a couple even before marriage.
In a holiday bag
In order to festively decorate a bottle of champagne for the New Year, you don’t have to fuss with its design. You can make an excellent decoration with your own hands using fabric in the form of a colorful magic bag, into which your sparkling wine can then easily be hidden. This option is also perfect as a gift for anyone. So, let's start our design business.
To make it you will need:
- fleece in red, beige and white;
- white and red threads of dense quality;
- needle;
- black acrylic paints;
- thin brush;
- scissors;
- satin ribbon or decorative rope;
- a simple pencil;
- white sheet of paper.
Progress:
- To get started, we need to create a pattern for our future bag. To do this, first of all, we take measurements from our bottle of champagne in order to subsequently transfer them to a white sheet of paper.
- We transfer our paper patterns onto red fleece fabric and cut them out using scissors. Let's put aside the details of the bag for a while and start making a pattern for Santa Claus's face in order to subsequently decorate our New Year's product. To do this, we take a beige fleece fabric for the face, and a white one for the beard, mustache and the edge of the supposed hat. Looking at the photo, we create patterns and sew them using a sewing machine to one part of the bag. From a small red piece of fleece we will make a nose for our fairy-tale hero, and using acrylic black paints and a thin brush we will add eyes.
- We sew the decorated part of the bag with its second half. So our beautiful elegant decoration for the New Year 2022 is ready, which should be in sight of all members of your family. And since this work is done with your own hands, it is worth appreciating and extolling.
Our selection of colorful photo ideas will inspire you to new fruitful thoughts and you will create the same beauty.
If you know how to crochet, then you have a great chance to make wonderful New Year decorations not only for the Christmas tree, home, but also for the table.
Decoration from the inside
If you plan to bring to life the idea of decorating the bottle from the inside, then you need to choose a container with transparent glass and a non-standard shape.
A bottle decorated with various irregularities on its surface looks interesting.
Paint with an acrylic base of any color is poured into the prepared bottle for decoration.
The contents of the vessel are shaken so that the paint evenly covers its walls.
After this, the bottle is turned upside down and left in this state for some time until the excess paint pours out of the bottle.
If, however, the walls are not evenly covered with a layer of paint, then the procedure must be repeated several times.
Necessary materials
To understand what materials will be needed in the process of decorating a bottle, you need to decide on the decoration method. This can be a simple design with tinsel, sparkles, serpentine and other New Year's attributes. To fix them, you don’t need additional accessories; you just need to beautifully wrap the garlands around the bottle or tie them with a bow. Champagne decorated in this way will look good on the table during a noisy festive feast or corporate party.
Another way to quickly decorate a bottle will require you to purchase special thermal stickers (custom labels) with thematic designs and wishes.
The original labels are removed from the vessel by dipping in heated water.
Very often, paints and decoupage techniques are used for decoration. Both of these options are considered the most classic. To create the outer “clothes” of champagne using these techniques you will need:
- acrylic paints;
- special contours;
- brush;
- thematic drawings and stencils;
- napkins;
- PVA glue;
- water-based varnish;
- additional decorations: beads, ribbons, wreaths.
If you decide that your bottle will have beautiful New Year's wreaths on it, you should purchase the following materials to create them:
- wire;
- designer paper;
- artificial or natural spruce branches;
- dry flowers;
- walnuts;
- tangerines;
- dried fruits;
- satin ribbons;
- cord;
- lace fabric.
A wreath created from these materials will itself be a highlight in the design of sparkling wine. For greater solemnity, it is recommended to first wrap the bottle with foil or any decorative paper (for example, corrugated) and put a wreath on top of it.
The finishing touch will be decorating the wreath with a transparent pendant or satin bow.
If you love crafts, you can make special pockets for drinks.
To create them you will need:
- fabric of neutral tone (beige, creme brulee); It is recommended to choose natural materials such as linen, cotton, felt, and if they are unavailable, you can use any fabric that is at hand;
- thick threads (decorative, interspersed with lurex);
- needles or sewing machine;
- a pattern made independently based on the parameters of the bottle;
- decorative elements: buttons, beads, ribbons, stickers, lace, rhinestones, sequins.
Pockets can not be sewn, but knitted or crocheted in the form of a pullover, a Snow Maiden dress, or a Santa Claus outfit. You can also complement these outfits with knitted winter accessories: a hat and scarf. Based on your skills and imagination, knitted items can be made in the form of the symbol of the year, a snowman and other characters.
To create knitted decorative patterns you will need:
- knitting needles – No. 1,2,3;
- hooks – No. 1,2;
- acrylic yarn of different colors (green, red, white, brown);
- knitting patterns.
You can also decorate a holiday bottle with a drink in other ways.
Let us give some interesting examples.
- Decorative cord. Additional tools you will need: glue, lace elements, beads, buttons, decorative figures, fur.
- Sparkles. You will need glue. The decoration can cover the entire bottle or be applied in stencils to certain areas of the champagne.
- An aerosol can. For a more festive design, you can apply paint using appliqués and stencils.
- Rice napkins. It is better if they are translucent and with thematic patterns.
- Decorative stones. They must be placed in a fantasy order on a prepared base - ribbons, painted glass, corrugated paper.
- Newspapers. Clippings in foreign languages, made in beautiful fonts, will look original.
- Rain. Suitable for additional decoration and creating a truly New Year's mood.
- Figures made of polymer clay. This material, like no other, provides limitless opportunity for creativity. You can make snowflakes, figures of snowmen, Santa Claus, owls, Christmas trees and many others from clay. Such decor will make a bottle of champagne a real masterpiece.
Wedding couple
It is already difficult to imagine that there would not be a beautifully decorated bottle on the holiday table. The bride and groom are the main decoration of the festive bottles at the wedding. Such decorated vessels are left until the first anniversary or when a child is born, because you don’t want an ordinary bottle of champagne on the shelf. Therefore, the bride and her bridesmaids strive to decorate such wedding paraphernalia as best as possible. So, in this master class we will decorate a bottle in the form of a bride and groom.
What we need for registration:
- satin ribbon, width 4 cm, white;
- white satin ribbon 0.6 cm wide;
- the trim is dark blue;
- scissors;
- ruler;
- pencil;
- glue;
- white guipure;
- white stretch guipure;
- white half beads;
- glue rhinestones;
- two bottles of champagne.
We'll make the first bottle in the shape of a groom. First make a white shirt with a collar. To do this, measure the length of a wide white ribbon from the bottle. Now fold it in half, but so that one edge is lower than the other. Using an iron, iron it thoroughly. This is what we have made of the collar, which we attach to the bottle and glue it, as shown in the photo below. We take a ruler and mark the center, mark it with a pencil.
Next, glue a wide white ribbon under the collar, the ends of which are secured in the center. We take the string and cut it to the required length, put it on the bottle and knit a tie. The resulting tail of the tie should be cut off. We measure another strip of tape and decorate the white ribbon from top to bottom from back to front. We do this several more times, imitating a jacket. When we reach the flat part of the bottle, the side should be secured. And so we wrap the entire bottle in a circle, but periodically we put the tape on the glue. We lower the side and glue it. We make buttons from white beads on the resulting vertical ribbon. We made the groom.
Now let's start making a bottle for the young one. Like the groom, we will have a bride made of ribbons. We find the center of the bottle and now, using a white ribbon, which we have already measured to the required length, we begin to make the neckline area. We glue the ribbons at the desired angle of 45 degrees. This is how we design the entire corset of our bride, it’s better to go to the middle. And then we take a wide white tape and carefully cover the remaining part with it. We decorate the wide ribbon with stretch guipure. We cut out flowers and leaves from guipure. When we get the required number of decorative elements, we begin gluing them from the front. Next, glue a ribbon on top of the bottle in the form of a bow under the flowers, but so that it looks out from under them. We decorate this thin ribbon with half beads, and cut out guipure flowers with rhinestones.
We cut out two stripes from a wide ribbon and form them into a bow, one part should be larger than the other. We decorate the middle with blue trim, the middle of which is covered with rhinestones. Now we take the tape and glue a thin white ribbon in the middle so that on each side the tape is 10 centimeters longer than the tape. We tie the ends into a knot and glue the bow to it. We run scissors along the tape to create curls. The bow needs to be put on two bottles, and now our wedding champagne is ready.
You can decorate the glasses of the bride and groom in the same way. And on the bottles add a fluffy skirt made of satin fabric for the bride, and a cylinder made of cardboard and satin ribbons for the groom.
Decorating with tissue paper
Why not use this wonderful material to decorate a bottle of champagne for the New Year 2022! Simple, fast and beautiful. Let's study and do!
To work you will need:
- Cigarette paper;
- Paper glue;
- Thermal gun;
- Palm paper leaves;
- Candies.
Progress
- Then, using glue, glue one candy to each square, strictly in the center.
- We wrap the ends of the paper square from the base to the top. We do this with all the squares with candies.
- Moving from bottom to top, apply glue to the square from the back side and glue it to the champagne bottle. Thus, in a circle, in a checkerboard pattern, we cover the entire surface of the container.
- Now we take paper leaves, roll them into a circle (the diameter should be equal to the neck of the bottle), and glue them together.
- Attach the resulting bundle to the neck of the bottle. The product is ready!
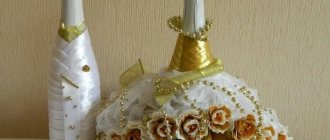
DIY wedding champagne bottle decoration in gold tones
If the prospect of working with acrylic paints does not cause much excitement, then it is better to get acquainted with a simpler technique using paints in aerosol cans.
The next master class is dedicated to decorating wedding champagne bottles with your own hands for a golden or autumn wedding.
We buy two bottles of champagne of any type and manufacturer. You can even take different types of drinks. The main thing is that the bottles are of the same type in appearance.
The only tools we need are a heat gun and tweezers. But for materials you will have to go to a specialized store for needlewomen. There you will need to purchase champagne-colored satin fabric measuring 30*350 and peach-colored fabric measuring 40*250. You will also need 1 m of peach satin ribbon and 15 cm of champagne color. Buy white beads of various sizes there.
To paint bottles, we purchase golden-colored paint in an aerosol can.
Before decorating the bottles, remove the factory labels. This can be done using a soap solution or a stationery knife.
After this, degrease the glass by wiping it with alcohol. When the alcohol evaporates, we begin coloring.
Shake the aerosol can vigorously. We place the container with paint at a distance of 40 cm from the surface to be treated. We begin to spray the golden solution, carefully turning the bottle itself.
Keep in mind that when working with an aerosol, drops of paint will fly apart. It is better to work outside or cover the work surface with newspapers. You also need to build a cardboard wall behind the work surface to avoid painting the walls.
After the first staining, leave the bottles to dry for 15 minutes.
In the meantime, let's start making decorative roses. To do this, we cut the pieces of fabric into long strips 5 cm wide. The result should be 8 peach-colored strips 25 cm long and 6 champagne-colored strips 35 cm long.
We burn the edges of the resulting ribbons with a lit candle to prevent the threads from fraying.
Each strip must be folded in half and connected securely. They can be easily stitched on a machine or simply sewn by hand. It will be easier for someone to use a heat gun.
We begin to form roses from voluminous ribbons. First, twist the edge and secure it with glue.
We continue to twist the fabric, not forgetting to treat the edge of the base with glue. Using this method, we twist the entire strip.
The result should be 8 peach roses and 6 more voluminous light ones.
We begin decorating the dried bottles by gluing ribbons. First, glue a wide, light satin ribbon at an angle, as shown in the figure. On top of it you need to attach a narrower peach one.
In this way, you can cover defects and uneven edges of the foil.
Now you can move on to attaching the roses themselves. To do this, apply glue to the base of the flower and attach it to the surface of the bottle in the right place.
Think about the order and angle to place all the buds.
Let's move on to decorating the bottle with beads.
Scatter them over the entire empty surface, along the neck.
Place small beads on some of the buds, as well as a large bead on the joint of the ribbons at the neck.
Our wedding champagne is ready.
If desired, the bottles can be tied with a light transparent bow.
You can decorate glasses and ring cushions to match the golden bottles. This design of wedding paraphernalia will fit perfectly into a peach, gold or autumn wedding.
But even if you choose a different color scheme for the holiday, you can easily replace gold with a suitable shade, and also choose contrasting or shading ribbons for roses.
A bottle of champagne as a Christmas tree
So, the costumes are ready, Father Frost and the Snow Maiden are there, what else do we need for the holiday? Christmas trees! And a bottle of champagne (with our help, of course) will cope brilliantly with this role:
A bottle of champagne will successfully cope with the role of a New Year's tree. A Christmas tree decoration for a bottle can be sewn, knitted, made from natural or artificial fir branches, scraps, candies - the possibilities are inexhaustible.
A bottle in a Christmas tree costume is almost unrecognizable. More ideas for “Christmas tree” decor:
- Christmas tree bottle
- Christmas tree that has no needles
- DIY Christmas trees: ideas for every taste
All of the above options have only one drawback: they are quite labor-intensive. It will not be possible to make such packaging or decoration for a bottle five minutes before the holiday. What ideas are there for those who are very busy, don’t like to do handicrafts, or have received an invitation to visit on the eve of a holiday?
Popular decor options
There are no strict rules on how to decorate a table and the necessary accessories. The design of wedding bottles should suit the overall concept of the holiday. For magnificent ceremonies in a classic style, decorating with gold sparkles, ribbons, and flowers is suitable. A youth holiday in nature, stylized as Provence or a theme party, will be decorated with painted bottles, decorated with jute cord or dressed up in tailored costumes. Before decorating begins, labels are removed from the surface of the glass so that the surface is smooth and neat.
When choosing holiday elements, you can show your imagination. Don’t be afraid that over time, dust will accumulate on the decor and it will lose its attractiveness. For cleaning, use a vacuum cleaner, hair dryer or soft damp cloth.
The main ways to decorate champagne include:
- Decoration with spray paints. The decor can be done by the young people themselves. The cleaned surface of the glass is evenly covered with paint of one or several colors. Next, the necks are tied with ribbons, strands, and braid. This method requires minimal time and money.
- A bottle of champagne can be decorated with a photograph of the newlyweds. It can be stored even after the drink is drunk. Not just any photo is suitable for pasting. The photo should be clear, with the faces of the young people clearly visible. It is advisable that the bride and groom smile on it. The selected image can be taken to a specialized organization, where the image is transferred to self-adhesive film. The presence of a sticky layer makes it easy to stick the picture to the glass. Photos can also be printed on paper and fixed to glass with transparent tape. To give the image solemnity, it is framed and words of congratulations, the names of the newlyweds and the wedding date are added.
- The most relevant today is the decoration of champagne in the “bride and groom” style. Wedding dresses are sewn or knitted onto bottles. Robes can be an imitation of the real costumes of the young people: made of the same materials, in a similar color scheme. Sometimes special corrugated paper is chosen for clothes. A man's bottle is dressed up in a jacket or vest, and there is always a tie or bow tie made from ribbons. To sew a jacket, you can use velvet, brocade, or woolen fabric. The outfit for a woman's bottle is made of lace, organza, and ribbons. The dress is made in white, but any pastel shades are acceptable. An alternative option for making wedding champagne costumes is to glue multi-colored satin ribbons onto the bottle, from which the bride and groom's outfit is made.
- Some creative couples who are organizing their wedding celebration with a themed party may choose folk ones for champagne rather than traditional embroidered dresses of the newlyweds. Ancient Russian robes, which are very beautiful, are very popular. If the party is held in an oriental style, then the outfits can be in the form of a kimono. Some young people take into account their own interests or professions when choosing bottle decor. For example, a woman’s bottle may be in a white coat or a teacher’s suit, while a man’s bottle may be in a military uniform, a sailor’s suit or an athlete’s suit. Such accessories will definitely be remembered by guests; they will be special and unique.
- A separate type of decoration is the production of flowers, rings, and hearts from polymer clay. Modeling requires special materials, knowledge of technology, and skills. Polymer clay is used in white, pink, golden, and silver colors. Cleaned bottles are previously uniformly painted with aerosol or acrylic paints. The stucco decoration is glued on top of the paint to obtain the intended pattern. Decorated bottles look very elegant and are suitable for a luxurious celebration.
You shouldn’t put off arranging champagne for your wedding until the last days before the holidays. With a lot of time left, you can create more complex, stylish decor.
Marine style
In folk style
Bride and groom
With photo
New Year bottle design options
Snowmen, Christmas trees, cheerful children on skis - there are many motifs of napkins for New Year's decoupage, choose according to your taste
Since preparations are underway for the New Year, Christmas motifs should be present in the equipment. The most popular material for work is three-layer paper napkins, with New Year's drawings or photos. In addition to these you will also need:
- PVA glue, if there is no special one for decoupage;
- acrylic paint (in this case white);
- acrylic varnish, preferably transparent;
- nail polish remover (always on hand);
- cotton pads;
- red and green ribbons, each 1 m long and 0.5 m wide;
- dry sea salt (the grind should be fine);
- brush for varnish and glue;
- sponge or paint brush;
- paper and scissors;
- rubber spatula;
- container with water.
Prepare everything you need to decoupage a bottle and get to work
When all the auxiliary materials and tools are prepared, you should pick up a wine bottle, and it will be even more interesting if it comes with contents. An alternative would be to decoupage a bottle of vodka for the New Year.
Decoupage of champagne for the New Year with romantic notes
Champagne decor in vintage style
Choosing the design of bottles according to the type of bride and groom
So-called “wedding bottles” with champagne or another drink are table decor that is gaining popularity. Glasses of the bride and groom are also added to them. And even if the newlyweds are not at the table, it is immediately clear where their place is, since the design itself shows the honorable place of the heroes of the occasion.
- The simplest way is to spray paint champagne. To do this, remove the sticker (leave the foil), wash off the remaining glue and work on a dry surface. It’s easy to stain the decor with spray paint, so it’s better to work outdoors in calm weather, laying newspapers under the souvenir. On top of the painted surface, you can tie the bottles with ribbons and bows and stick on accessories.
- For handicraft lovers, sewing clothes with feminine and masculine attributes will be easy. This is easy to do, but do not rush to wrap glass containers with fabric. It is better to sew the veil, skirt and jacket separately, and then wrap or champagne and carefully secure with glue (liquid nails, a glue gun, but superglue leaves stains). At the same time, you should not give personality traits (lips, eyes) to the container, only gender differences in the form of clothes.
- Light decor in the form of ribbons and headdresses is the simplest option. For a bride, making a veil from translucent or lace fabric is easy. It is also recommended to wrap the base of the bottle with a white guipure or lace strip. Summer black or blue satin - for “Him”, you can build a butterfly on the neck. Both bottles are tied at the bottom with wide golden ribbons, as a symbol of wedding rings. You can make a hat for “him” based on a Kinder Surprise egg case or a small lid.
- Volumetric decor - coins, stones, artificial flower petals and other wedding-themed decorations. Roses and flowers made from polymer clay require time and perseverance, but it's worth it! It is better if the stucco decoration is the same color as the base - white or golden.
- French decorating style or decoupage is a unique technique using special napkins. Postcards or photos with thematic designs are recommended as inserts, from which the top layer is removed when soaked. You can find a lot in craft stores.
- You can buy stickers and wedding-themed decor or make your own appliques using any adhesive base for needlework.
You can write the names of the newlyweds on the bottles
French decorating style or decoupage is a unique technique of wrapping with special napkins. Postcards, photos, thematic drawings are recommended as inserts, from which the top layer is removed when soaked. Their surface is varnished. You can find a lot in craft stores.
Decorating champagne with candies
Pineapple decor
The traditional combination of chocolates and sparkling wine can be arranged as one whole composition. We invite you to make New Year's champagne-pineapple.
To make a pineapple from sweets and champagne for the New Year with your own hands you will need:
- sparkling wine of your choice;
- wide paper tape;
- scissors;
- round chocolates in yellow packaging;
- hot glue gun;
- decorative bow or ribbon;
- green corrugated paper;
- paper for packaging.
How to decorate a bottle of champagne for the New Year in this style:
1. The wide part must first be covered with paper tape. This simple action will increase the adhesion force of the candies to the surface.
2. We attach each candy to the walls using adhesive. The first row starts from the bottom. The rows are formed in the same way until the neck begins.
3. Thin strips are cut from corrugated paper, symbolizing the top of the pineapple. The ends of the paper can be twisted by pressing them against the sharp part of the scissors and pulling them through.
- All that remains is to decorate and pack a beautiful gift of sweets and champagne. Wrap everything in wrapping paper and tie a nice bow on top.
Decor in the form of a Christmas tree
Another easy-to-execute way to decorate a gift from a bottle of champagne and sweets.
For the Christmas tree you will need:
- glue gun;
- a sparkling wine;
- green tinsel;
- round shaped candy;
- decorative bow;
- beads
The sequence of actions on how to make a Christmas tree from champagne and sweets:
1. First of all, you need to wrap the tinsel around the champagne. The edges of the tinsel are fixed with glue.
2. How to decorate a bottle of champagne with sweets? By slightly moving the strips of tinsel apart, you can use glue to fix each one separately.
- In this option there are no clear layouts of the candies; the most important thing is the organic appearance of the finished composition.
3. The finished champagne bottle Christmas tree is decorated with a decorative bow at the neck and beads wrapped around it.
Decorating bottles for a wedding with your own hands: champagne for the bride and groom
The bride and groom at a wedding can be not only at the table, but also on the table. Of course, we mean decorated champagne. You can make a bottle bride and groom with your own hands using bias tape or ribbon. For two bottles you will need the following materials and tools:
- 10 m of white bias tape;
- 8 m of blue or black bias tape;
- 4 m of bias cream binding;
- 10 cm white lace;
- 3 m of wide lace, bow or piece of tulle;
- glue in a pencil (super glue moment);
- scissors;
- decorative ornaments;
- cardboard for hats.
Below is a step-by-step process for making wedding bottles.
Bottle for a wedding - Bride: step-by-step master class with photos
Just like a real bride, the bottle of champagne in this outfit should be the center of attention, and this requires perfect execution of the job.
Initially, use a marker to draw a straight line in the front center, along which you will need to glue the edges of the tapes. Try on the lace at the neck, cut off the required piece. Spread the bottle with glue and glue the lace. Coating the glass of the bottle, glue the bias tape, cutting off its long part after gluing.
Continue oblique gluing until the middle of the bottle. From the middle, the bias tape is glued in a circle to the very bottom of the bottle. Take a wide bow near the subway, use an iron ruler and a hot soldering iron (a knitting needle heated over a fire) to solder the edges of the bow. It should look like this. Fold it in half and sew with a cast-on stitch. Put the resulting skirt on the bottle, tighten the thread to its size. Remove part of the skirt and follow the same example to make two more skirts.
Determine the place where the skirt will be attached. From its upper part you need to mark a place for two petticoats, coat these places with glue and glue two blanks. Sew golden bias tape to the overskirt. Glue it onto the bride bottle. Fold a piece of a wide bow in half. Using a mug and a hot soldering iron, make a circle (the edges will stick together under the influence of the heat). As shown in the photo, cut out the darts so that the brim of the hat can be glued on.
Make a ring out of cardboard to fit the diameter of the bottle neck. Cut out a circle with teeth for the top of the cap. Bend the teeth, glue the top part of the cap and brim. Glue a white ribbon in a circle on the outside and tie an organza ribbon.
Glue beads to the bride’s “neck” and put on a hat. The bottle-bride is ready for the celebration.
Bottle for a wedding - Groom: step-by-step instructions for working with photos
The bride is ready, now let's get down to creating the groom. The work is carried out identically to the execution of the bride bottle.
First, fold the white ribbon in half and try it on the neck of the bottle. Apply glue to one half of the folded tape and glue it to the neck of the bottle so that the upper part can bend. Raise the top of the collar of the first tape, glue another 2-3 rows to the bias underneath it. Measure out the main color of tape to attach to the bottle. Raise the collar and tie a ribbon tie for the groom. Lower the collar and continue gluing the blue ribbons (on top of the tie) onto the bottle. When the narrowed part of the neck ends, cover the bottle in a circle with ribbons to the very bottom.
Glue buttons to the groom's jacket. Decorate the “chest” with a boutonniere. Prepare such parts for making a top hat for the groom. Glue a cylinder out of cardboard. Cover it with ribbons and decorate it to match the jacket. Place the top hat on the bottle and the groom is ready.
A bottle of champagne in a dress made of ribbons
You will need: 11 meters of pink ribbon, 2 meters of silver ribbon, pink bow fabric, thread, needle, scissors and glue.
Master Class
- Glue 2 circles of silver tape diagonally overlapping.
- Apply pink tape diagonally to half of the bottle.
- Apply pink tape in even circles from the middle to the end of the bottle.
- Gather ribbon onto a string for a bow, making a skirt.
- Glue the skirt to the bottle.
- Decorate the side with a silver ribbon bow.
A bottle of champagne in a dress made of ribbons is ready!
Required tools and materials
As a rule, both bottles are decorated in the same style so that pairing appears (after all, this is a wedding, a celebration for two). A simple decoration option is to spray bottles with spray paint. In this case, bottles will look harmonious, where one has a slightly larger size. It can be decorated on top with a small black hat and bow tie.
A smaller bottle will represent the bride: decorate it with a veil or a white skirt made of 2-3 layers of fabric. The skirt can be made from different fabrics:
- organza;
- silk;
- guipure;
- atlas;
- tulle.
Decorating champagne usually does not require a lot of materials, and they are quite inexpensive. So, for work you need to prepare:
- the champagne itself;
- glue;
- decorative paper;
- fabric, lace;
- beads, rhinestones, colored stones;
- paints and brushes;
- polymer clay;
- threads;
- napkins for decoupage and varnish.
Such materials are applicable in those design options that can be handled by anyone without any special decorating skills. Of course, there are more complex methods of decoration, such as engraving. It is better to entrust such actions to professionals who know the nuances of such work.
Decoration with corrugated paper
Corrugated paper, especially festive green, will perfectly decorate your bottle of champagne for the New Year 2022. It’s not at all difficult to do it yourself, especially for beginners, you just need to purchase this material at an office supply store and stock up on some details for further New Year’s decor. As you can see in the photo, these can be golden ribbons that play the role of securing paper, bells, flowers, gift ribbons in all their variety, beads and much more, collected in a specific festive composition. So let's get started.
To work you need:
- corrugated paper (any color);
- a bottle of champagne;
- gold thin ribbon;
- gift ribbon (different colors);
- floral paper;
- ready-made gift bows;
- scotch;
- all kinds of decorations on hand.
Progress:
- Grab a bottle of champagne and get to work. First you need to design the neck and stopper. To do this, carefully wrap them with a small piece of corrugated paper. To prevent the paper from opening, we secure it with tape.
- We do similar work with the rest of our product, wrapping it with the same material, and for fixation we use a piece of gold gift ribbon.
- The final stage. To do this, you need to decorate the sparkling wine with a New Year's decorative composition, which you can make from anything. Let's say, as in our case, these are bells, ready-made gift bows, beads, rain, artificial flowers (you can replace them with small Christmas balls), transparent colored floral paper.
Such beauty, made with your own hands, can be placed not only under the tree for the New Year 2022, but also presented as a gift to loved ones. They will certainly appreciate it. In order to make several souvenir copies, you should check out our video tutorial, which will provide you with another great idea.
Engraving on bottles
For true lovers of luxury, an excellent option for bottle design is glass engraving. But here you cannot do without the help of a professional. Only a master will be able to apply any pattern you choose, regardless of complexity. Even simple and small patterns will look great on dark green glass.
With this decor you will add luxury and aristocracy to the bottle.
The choice of bottle decoration depends on the personal wishes of the newlyweds. Some people choose patterns in the form of angels, curls, rings, doves, etc. Any version of the design looks great, and you can choose engraving in silver or gold.
But modern experts can offer you images in other shades, even transparent ones.
What materials are traditionally used to decorate a wedding bottle?
It is advisable to decorate both bottles using the same technique so that the paired combination can be seen.
For example, if it's just white spray painting, you can buy one larger bottle and decorate it with a homemade hat and a bow tie for the neck. Then a smaller bottle may have a white veil or skirt with 2-3 rows of flounces.
They can be gathered with elastic or sewn from a beautiful and light white fabric, gathered with a drawstring:
- tulle;
- atlas;
- silk;
- organza;
- tulle;
- veil;
- guipure;
- lace;
- embossed ribbon.
More attention is paid to the design of the “female” bottle; the “male” half of the table decoration looks more restrained. Modest decor can be sophisticated if you think through every detail.
You can spy on other people's ideas or make something from scrap materials that no one has ever had before, when you have such a desire.
Advice. The design of wedding glasses and bottles should not be taken lightly. These attributes will be in full view, so there is another opportunity to surprise your guests.
If the wedding is non-alcoholic, you can arrange any fizzy drink in a beautiful bottle. Some people want to decorate a bottle of cognac or other strong drink. The basis of the decoration is the same - wedding theme:
- he and she;
- rings;
- hearts;
- color;
- elements of the bride's outfit.
You can use beads and stones with a flat base (for gluing), sparkles and beads, small artificial flowers and fragments of jewelry.
If you are ready to do the work yourself, do not put this part of the wedding props on the back burner. It may take longer than expected. To choose something creative and unconventional when you don’t have your own ideas, look at the topic of decorating wedding bottles with your own hands, master classes and step-by-step explanations.
Of course, such a wedding attribute can be bought ready-made or offered to a craftsman to make it to order.
This won’t surprise anyone today, but where is the guarantee that your guests didn’t celebrate another wedding at a table with exactly the same decor? It can get awkward when asked, whose champagne is it? Therefore, it is better to choose something original so that no one around you has this.
An order for a craftsman will cost 2-3 times more, but it’s not even a matter of saving, although everything can be done from scrap materials. No one can put as much warmth into decorating your wedding as the bride and groom themselves or their loved ones.
Important! You can vary the color of the decor of wedding bottles with your own hands, but it should not bring disharmony to the overall design of the festive feast. If this is a wedding in lilac, gold or turquoise tones, then it is better to complement a white bottle of champagne with decor in the agreed upon range.
The original decoration can be made in duplicate and sold to guests at an impromptu auction. Or offer a souvenir as a prize in the most beautiful or original competitions.
Master classes on decor
Decorating bottles using clay, ribbons, paints and other materials will require certain skills. It is advisable to start preparing long before the celebration in order to have time to think through the decor, select materials and, possibly, make several trial options. It may not turn out very neatly the first time, but don’t be upset. The main thing is to stock up on the necessary materials and follow the ready-made instructions.
Decoration with ribbons and beads
Decorating champagne for a wedding with your own hands using beads, ribbons, and rhinestones is relatively easy. You will need:
- satin ribbons of one or more colors;
- any superglue or glue gun;
- scissors, tailor's yardstick;
- additional decor (optional).
A set of wedding bottles connected by ribbons is called “bulls”. There is a hypothesis that this name arose in ancient times, when newlyweds were given a bull and a cow tied by the horns.
Sequencing:
- Cut the tape to the required length and apply a little glue to its end. You need to start decorating bottles from the neck, gradually going down.
- The next tier is made of ribbon slightly longer than the previous one. Secure the ends with glue, positioning them so that the right edge slightly covers the left.
- Repeat the turns 3-5 times, depending on the width of the ribbon and the intended decor.
- After moving to the flat part of the bottle, cut the pieces of tape to the same length. Connect the ends to the back of the champagne. Upon completion of the work, mask the joint with another even piece.
The decor of satin ribbons can be complemented with beads, lace, rhinestones, and feathers. Decorations that contrast with the color of the main design look impressive. For example, a red bow on the “bride’s dress”, a white bow tie on the “groom’s suit”. And lace and brocade will add sophistication to the entire composition. Bottles decorated in this way can be complemented with glasses decorated with the same materials.
Velvet suits
Such “clothes” for the bride and groom’s wedding bottles can replicate the style and colors of the newlyweds’ suits. It is not necessary to use this particular fabric, but velvet will make the decor luxurious and elegant. It is not easy to work with - the edges crumble very easily. When cutting, you should add significant seam allowances so that there is guaranteed to be enough material to decorate champagne bottles.
To create an original composition you do not need to have tailoring skills. Theoretically, to designate each of the newlyweds, it is enough to put a veil and some kind of skirt on one of the bottles of champagne, and tie a tie or build an imitation jacket on the second. But a full suit made of velvet with elements of fabrics similar to the material of wedding dresses looks much more impressive. For example, the “bride” is decorated with tulle, organza, pieces of lace, and the “groom” is given a ribbon tie, small tailcoat buttons, or a paper hat is made.
Necessary materials:
- elastic velvet, threads, needle, scissors;
- paper (graph paper or several sheets of squared paper);
- pencil, tailor's chalk or thin-edged bar of soap;
- additional elements (optional).
It is advisable to work with elastic material, since ordinary velvet will require more attention and skills. The threads should match the color of the fabric. Step-by-step instructions for creating “velvet” bottles:
- Make a pattern. It can be found on thematic resources and printed or constructed independently on graph paper.
- Transfer the pattern to the wrong side of the velvet using chalk or a piece of soap. You shouldn’t draw with a regular pencil or pen, they will leave marks that are too invisible.
- Cut out. You need to cut the velvet very carefully, slightly stretching the fabric. Seam allowances are required.
- Sew the blank. This can be done by hand or on a sewing machine. You should get a case that follows the shape of champagne. The bottom edge must be hemmed or overcast to prevent the material from fraying.
- Put the finished suit on the bottle. The bottom can be secured with glue. You shouldn’t be too zealous, a couple of drops is enough, since in the future the “suits” will have to be removed in order to uncork the bottles.
The finished “clothes” are optionally decorated with additional elements. The “groom” can wear a tie or a funny bow tie made of starched fabric or paper. Decorate the “bride” with a veil, flowers, and rhinestones. Even if you are planning a themed wedding, it is better to design the costumes close to the traditional version, so that later you can figure out whose bottle is whose.
Traditionally, the groom's bottle is uncorked a year after the wedding, and the bride's champagne is opened after the birth of her first child.
Polymer clay flowers
If the wedding bottle is decorated with clay flowers, the work will require certain skills and at least a little artistic talent. It is advisable to choose two or three different colors or shades so as not to create excessive diversity. To work, you will need polymer clay, gloves to protect your hands, and an oven in which the finished decor is baked.
How to decorate bottles with clay flowers:
- Carry out each plant very carefully, creating petal by petal. Make twigs and leaves separately too, and then combine them into a single composition.
- When the result satisfies the master, all the elements need to be placed in the oven, laid out on a flat base (a baking sheet will do). Usually flowers are baked at 110–130 degrees, but the temperature and cooking time depend on the characteristics of the material (indicated on the packaging).
- Attach the finished parts to the bottle using glue. The composition can be diversified with decor made using a different technique. Acrylic paint, ribbons, and decoupage are suitable as backgrounds.
Overheating of decorative clay will lead to discoloration and increased fragility of the petals, so you need to carefully monitor the baking time in the oven. For those who are doing this kind of modeling for the first time, it would be a good idea to watch a thematic video and make a few trial attempts.
After baking the clay, the oven must be washed and ventilated.
Decoupage technique
This method involves applying scraps or cut pieces of paper sheets with selected designs to the surface, a kind of “advanced” version of appliqué. The main advantage of this method is the ability to create an artistic masterpiece even without special education or drawing ability. Suitable materials include painted paper napkins, photographs, special decoupage cards (sold in craft stores), magazine clippings, and printed pictures. For test samples of decor, it is better to choose ordinary paper napkins.
The paper for decoupage should be thin. If you plan to use photos or other printed pictures, they should be applied to a regular, almost transparent base. The photo paper will not lie neatly enough or will not stick to the bottle at all.
In addition to drawings or photos, to decoupage bottles of champagne for a wedding you will need:
- glue - special or regular construction PVA;
- primer - acrylic composition for application under the paper layer;
- varnish - finishing coat;
- paints are an optional element; they can be useful for drawing individual fragments;
- sponges and brushes for applying primer and varnish.
The glass surface of the bottle does not absorb moisture, so applying a primer to which the paper will stick is necessary. As an alternative, you can use construction compounds for similar purposes, aerosols, varnishes, paints, and artistic primers for glass. A convenient option is a colorless varnish in an aerosol can, which can then be used to finish champagne bottles for a wedding.
Operating procedure:
- Clean the surface and degrease the bottles. Apply a thin layer of varnish or other primer. This is done with a brush or sponge.
- Dry the primer naturally, without using a hair dryer or high temperature, so that the varnish does not drip. After complete drying, apply another layer.
- Select paper fragments with drawings of flowers, butterflies, and thematic pictures. Stick them on the surface of the bottle. Wrinkles may appear along the edges of the paper; carefully smooth them out with the hard side of a sponge or a sheet of thick paper folded several times.
- After the paper decor has completely dried, cover it with a finishing layer of transparent varnish. To securely fix the application, you will need several layers, but each subsequent one can be applied only after the previous one has dried.
- When the last layer of finishing coating is ready, you can additionally decorate the bottle with rhinestones, beads, feathers, sequins, or paint bright accents with paints.
If an acrylic composition is used as a primer, you must remember that it dries in about half an hour. But for a few more days the soil will not be very strong, so it is advisable to have enough time left for the acrylic to adhere well to the surface of the bottle. Aerosols and other chemical compounds may have a strong odor. You should not work with them indoors. Minimal consequences - headache, nausea. For safety, you should apply the varnish outdoors (balcony, street).
Painting with paints
Painted champagne looks original and in its simplest form does not even require artistic abilities. It is enough to simply apply a layer of paint evenly to match the overall wedding design and complement the decor with various beads, ribbons, and feathers. Another simple option is to paint the bottle with stained glass paints. To do this, it is not necessary to make a background; a golden outline for stained glass looks very impressive on dark green glass.
Materials:
- stained glass paints, including opaque outline;
- marker or glass marker to match the outline;
- acetone for cleaning brushes.
First, the selected design is applied to the bottle with a marker, then the contours are drawn. After the paint has dried, traces of the marker should be washed off with warm soapy water. Then bright light shades are applied to the surface: dark colors are difficult to see on the green glass of the bottle. Small details can be done using a toothpick or a pointed match. Another option is to scratch the dry paint with a needle. Stained glass compounds are easily washed off with acetone, so any blemish can be corrected.
Types of decor for wedding bottles
Designing and decorating champagne bottles for a wedding can be done using several methods.
Types of decor:
- ribbons;
- photos;
- polymer clay;
- fabric trim;
- engraving;
- decoupage;
- paints;
- rhinestones.
Before carrying out it is necessary to prepare all the tools, as well as the bottle itself. The surface must be cleaned of labels and thoroughly degreased. This will help achieve high quality results.
Note. When decorating, it is recommended to adhere to the general style of the hall in which the celebration is taking place.