A wedding is one of the most important and exciting events in life. When decorating a formal hall, close attention is paid to every detail, including the attributes of the festive table. 2 brightly decorated bottles of champagne are a must for those who stick to tradition. You can decorate the bottles yourself with a little effort and imagination. There are several ways to decorate.
Without exaggeration, we can say that the most exciting event in life is a wedding.
Types of decor for wedding bottles
Designing and decorating champagne bottles for a wedding can be done using several methods.
Types of decor:
- ribbons;
- photos;
- polymer clay;
- fabric trim;
- engraving;
- decoupage;
- paints;
- rhinestones.
Much of the decor can be created with your own hands, including the original design of bottles for a wedding.
Before carrying out it is necessary to prepare all the tools, as well as the bottle itself. The surface must be cleaned of labels and thoroughly degreased. This will help achieve high quality results.
Everyone wants every banquet decoration to be creative and delightful.
Note. When decorating, it is recommended to adhere to the general style of the hall in which the celebration is taking place.
How to decorate champagne for a wedding with engraving
Perhaps not everyone can do this work with their own hands. Engraving on glass requires a special machine, so in this case a professional will do everything in the best possible way. The main thing is to decide on the pattern, image, inscription and the master will create an exclusive, impeccable decor. Engraving is an original design for wedding glasses and bottles; you can add decorations with flowers, ribbons, beads and bows with your own hands.
What shape of container should I choose?
Champagne bottles are distinguished by the fact that they practically follow the shape of the human body. Therefore, they are convenient to use for decorating figurines of the bride and groom.
From ordinary bottles of champagne you can make a real exclusive that will be the center of attention at your wedding.
Some people use containers with other drinks. For example, cognac can be selected in accordance with the image of the figure of the bride and groom. Elongated bottles with a narrow neck are suitable for decorating a lady. A rectangular or pyramidal vessel is useful when decorating a man. Containers with vodka, martini, and vermouth are selected using similar criteria.
Advice. When choosing an alcoholic drink, it is recommended to select bottles that resemble the outline of the young person’s body. Wide, voluminous containers are suitable for the groom, and narrow ones with an elongated neck are suitable for the bride.
Paired decoupage
There is another way to decoupage champagne for a wedding using the kanzashi technique. The principle is similar, only satin ribbons of different colors are used. For example, the bottles of the bride and groom can be wrapped with black and white ribbons, respectively. But containers with decor matched to the colors of the wedding celebration will look more elegant. The groom bottle is decorated in the classic way:
- the neck is wrapped in a herringbone pattern;
- the wide part is decorated with even winding;
- a bow tie or tie is put on the neck;
- attach a boutonniere and buttons (beads).
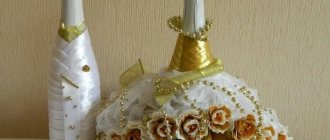
The bottle bride is dressed up in a tulle or lace skirt. The lower edge is decorated with lush flowers. You can hang a necklace of beads on the neck. Hats are made from textiles or cardboard, and they can also be bought ready-made. A bowler hat will suit the “groom”, and an elegant wide-brimmed hat or veil will suit the “bride”.
Wedding champagne bottle: trim with ribbons
Using satin ribbons is a simple and optimal budget option. This method of decoration is characterized by fairly simple steps and helps to create a bright and unique decoration for the holiday table.
There are many interesting wedding traditions, including two untouched bottles of sparkling drink.
Tools:
- ribbons of several shades;
- glue;
- scissors;
- lace;
- elements of additional decor (flowers, rhinestones, beads).
Attention! Bottles must be thoroughly cleaned of contaminants - dust, greasy marks, stains.
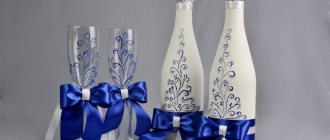
Pasting begins from the neck where the foil ends. The required piece of tape is glued to the bottle, the excess is cut off. The second layer is glued slightly overlapping the first. This way you can make 3-4 layers. It is recommended to use a white ribbon, then you will get an imitation of the groom's shirt. For subsequent decoration, it is better to take a ribbon of a different shade - black, blue, gold. The entire surface is covered in a similar way. You can place a piece of ribbon in the center to act as a tie. The bottle for the groom is ready. Lace is useful as an additional decor.
Just to the left of the neck there is a small flower made of white ribbon - a boutonniere.
The bottle for the bride is made of white ribbons. The registration process is carried out according to the steps described above. The lid is covered with a small piece of lace, which is a veil. In the belt area you can add a bow or ribbon flowers. Decorate the neck itself with beads or rhinestones.
Groom
Let's start with the groom. He needs to make a “shirt” with a collar. Therefore, we measure the required length of the white wide tape from the bottle. Fold the ribbon in half so that one edge is lower than the other, and fasten with needles.
Using an iron, we smooth the stripe and the “collar” of the shirt.
We attach the “collar” to the bottle with glue.
Using a metal ruler, mark the center and draw a line with a pencil.
We glue a wide white ribbon under the collar, securing the ends of the ribbon in the center.
Using dark blue bias tape, we “tie” a tie and put it on the shirt.
Cut off the “tail” from the tie.
Now let's start attaching the bias tape. We measure the tape to the required length, cut it with scissors and glue it to the bottle.
Using the line as a guide, glue the bias tape.
We reach the flat part of the bottle and secure the “side” in order to lower it down in the future.
We wrap the bottle in a circular motion to the bottom, periodically securing the tape with glue.
We lower the “side” and glue it.
We imitate buttons by gluing white half-beads to the “side”.
“The Groom” is ready, now let’s move on to the “Bride.”
Decorating bottles of the bride and groom with velvet
Velvet fabric has a special sophistication. The process of creating velvet vessel costumes is more simplified. This will allow you to create original jewelry in a short time.
This indispensable attribute of the wedding ceremony is specially decorated and sealed so that they remain intact.
Tools:
- velvet in several shades;
- cardboard;
- pencil;
- scissors;
- glue;
- threads;
- needle;
- lace;
- white tulle;
- additional decor.
To create costumes you will need patterns. The pattern is drawn on cardboard according to the shape of the bottle itself. It can be made from two parts, and the edges are sewn from the wrong side. The cape for the bride's bottle is made of white fabric, for the groom - blue, purple, black (at personal discretion).
According to tradition, the newlyweds must take them with them from the wedding table.
Tulle is useful when creating a veil for the bride. As an additional decoration, the rim of the cork can be covered with rhinestones. Decorate the surface of the container with lace inserts, flowers or bows. To decorate a man's vessel, rhinestones, several lace inserts, and ribbon flowers are suitable. A small piece of tulle can be tied around the neck. You will get a magnificent butterfly.
You will have to drink the contents of these, in fact, holiday souvenirs much later.
Addition. Instead of velvet, guipure, satin, and silk are also used.
DIY decor master class
You don't have to have any special skills or talent to create a real work of art. The main thing is to have desire, imagination and free time. Select decorative elements taking into account the theme of the celebration, as well as color design and your own imagination. But first, we recommend that you carefully study video master classes online or attend real courses on creating unique jewelry. Specialists will help you decorate the containers on the festive table with your own hands, making it as solemn and unique as possible.
Satin ribbons
The shiny satin ribbon on the bottle looks especially bright. It is beautiful both as a canvas and as a detail. In addition, it is perfect for decorating wedding containers. Moreover, such decor does not have to be black and white. It is quite possible to use ribbons of other delicate shades. To do this you will need:
- satin ribbon;
- decor;
- lace;
- rhinestones;
- scissors.
To begin, measure and cut the required amount of tape. Apply only a small amount of glue. Then cover the surface, starting from the neck, and gradually go down. Do this as carefully as possible; we recommend gluing the tape in several layers. Mask the joints with another tape. As soon as the champagne is ready, you can safely put it on the gala table.
Bows, contrasting fabrics, brocade and lace also look great in such a situation.
Velvet suits
Velvet looks especially luxurious. This material has excellent stretch, which makes it possible to create mini bottle outfits from it. Velvet can be any color, but it is best to use white fabric for the bride's suit and black for the groom. If you choose a themed, not quite standard wedding, then try to demonstrate this in the decor.
Classic black and white
If you decide to have a classic wedding, we recommend creating black and white bottle decor. This way you will complement the decoration of the celebration. To do this, you can use any type of fabric, just try to stick to a certain style. Choose materials only in black and white. At the same time, you can complement the decor with white artificial pearls or black beads.
Champagne Bride
A wedding is the brightest and most unforgettable celebration. The majority of ceremonial decorations can be made independently. This does not require any talent or skill. Even if you want to decorate bottles at an event in a special way, you don’t have to worry that you won’t succeed. We recommend using bottle decor in the form of a married couple’s outfits.
Regarding the bride, we recommend using a white tulle skirt, a lace corset and velvet elements, also in white. From classic champagne containers you can create a real masterpiece. This exclusive item will become the center of attention at your event. We recommend that the young couple devote the maximum amount of free time to creating a festive atmosphere.
Champagne Groom
Table decor is only gaining popularity every year. Therefore, we advise you not only to decorate the bottle in the form of a groom’s suit, you can make a whole set from a bottle and a couple of glasses.
Regarding the design of the container in the form of a groom, we recommend using black and white fabric and complement the decor with several pearls. This way you can imitate the buttons on the groom's suit. If you want to make the bottle as festive as possible, complement the costume with a boutonniere made of fresh or artificial flowers.
Polymer clay flowers
Polymer clay helps in creating delicate and realistic buds. You can either buy such flowers in a specialized store or make them yourself.
There are no uniform requirements on how best to decorate bottles for a wedding; it depends on the wishes of the newlyweds and the taste of those who decorate them.
Tools:
- clay;
- talc;
- latex gloves;
- stationery knife;
- rolling pin;
- varnish for polymer clay;
- toothpicks;
- dye;
- brushes;
- water;
- soft sponge;
- degreaser.
Callas are one of the easiest creation options. This method is suitable for beginners in working with polymer.
When working, you should use gloves to protect the delicate skin of your hands.
Reference. It is recommended to lightly sprinkle the clay itself with talc to avoid the adhesion of dust and small specks.
It is recommended to divide the working material into small identical pieces. They are rolled into sausages, from which a ball is formed. The resulting ball can be cut into two equal halves to create small flowers. The ball must be kneaded to obtain a round plate. It is necessary to carefully monitor the thickness - too thin petals can quickly break. One corner of the plate is slightly stretched and bent. The lower half is folded overlapping each other. The petal is ready. A toothpick is inserted into the center, which must be covered a little with clay in advance and painted in the required color.
The result is fixed with varnish.
When all the flowers are ready, you can start decorating the bottle. Remove the label from the surface of the container with warm water. After drying, the bottle should be treated with a degreaser. The vessel itself is painted in the desired color. The stems are painted with green paint and flowers are glued around them. For additional decoration, rhinestones or beads, ribbons, and tulle are suitable.
Floral decoration of champagne bottles for a wedding will quickly attract the attention of guests.
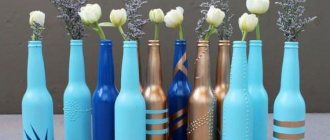
Bottle design in gold tones
It is very fashionable now to paint champagne bottles with acrylic paints. But this is very long and requires preparation. There is an excellent alternative - spray cans with coloring compounds. And if the wedding is planned for autumn, a bottle of champagne with a design in golden tones that repeats the shade of foliage will look very beautiful on the newlyweds’ table.
You don’t need anything special - the only tools you need are tweezers and a glue gun. You choose the shade of the fabric yourself. Champagne and gold color combinations look beautiful. It is better to take at least 1 meter of the main tape, and the additional one can be 15-30 centimeters. And you also need to buy aerosol paint.
Remove all labels from the bottles using a knife or soapy water. Degrease the glass (it is fashionable to wipe it with alcohol). You need to wait until everything is dry, after which you can apply paint. We place the aerosol at a distance of 40-45 centimeters from the bottle and spray the composition.
It is better to do all the work outside, because the splashes will fly around. Or you can make fencing out of cardboard to cover the walls of your home.
Cover the bottles with the first layer and leave for 15-20 minutes. When everything is dry, repeat the procedure 3 more times. But you need to focus on the paint itself and the resulting result - it happens that the shade does not appear immediately or, on the contrary, looks great after the second time.
While the bottle is drying, you can make decorations. Cut the fabric into strips 5 centimeters wide. We make 8 strips from a small piece and 6 strips from the main piece of fabric. It is better to take the length about 30-35 centimeters. If necessary, lightly burn the edges of the ribbons so that the threads do not fall out of them.
- DIY polymer clay jewelry: master classes with photos
DIY decorative candles: master classes with photos
Decorating a vase: ideas and master classes on how to make a vase with your own hands (80+ photos)
Fold the strips in half and sew them together. We begin to make roses by twisting the fabric along the edges and fixing them with glue.
Meanwhile the bottle dried up. We glue a light, wide tape on it at an angle, and a narrower one on top. We attach the roses and decorate with beads. This type of decor is labor-intensive, but the result will be excellent!
Photos of young people
Many newlyweds use personal photographs to decorate their bottles. This decor option has gained wide popularity recently. Photos are used instead of labels. In order to place the desired photo on the surface, it is recommended to print it on thin paper. The design is carried out with special care. You will need to think about the photo format, its location, and additional decorations.
Inscriptions with wishes (if the bottle is presented from guests), indicating the names of the spouses, the date and time of registration are suitable as decoration.
The vessel itself needs to be prepared for the technological process. The label is removed with warm water and the surface is degreased. The surface can be painted and a photo can be placed in the center. Small rhinestones will come in handy when creating a frame. The neck can be decorated with a ribbon bow, flowers, and a veil and a man’s hat (for example, a paper top hat) can be placed on the lid.
There are a lot of options for how to decorate this table souvenir.
Attention! Many specialized salons provide services for printing labels with the required image. This sticker will be a smart alternative to the real one.
Decorating with stockings
The surface is also degreased, but instead of fabric, a stocking is put on the surface of the bottle, which must be soaked with glue.
The stocking can be pulled up to the level of the neck, or completely cover the container with it along with the stopper.
Moreover, it is not necessary for the nylon to lie flat; it will look interesting if you make chaotic folds on the surface.
After the glue has completely dried, white acrylic paint is used as an intermediate coating. The paint must be completely dry.
The next step is to draw the image from a napkin. The rest of the bottle's surface is repainted in a different shade.
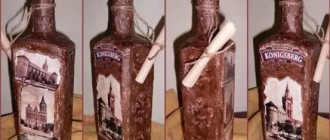
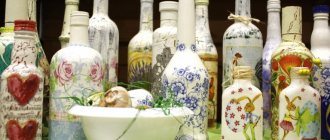
The photo shows how fabulous the bottles look with decor made using decoupage technology.
Engraving
This method is durable. Engraved inscriptions and images will not lose their attractiveness even several years after the celebration. It is recommended to entrust the decoration to a glass specialist in order not to damage the bottles and to obtain high-quality images.
For decoration, you can use drawings or inscriptions.
The image itself can be either glossy or matte. When choosing a suitable shade for engraving, you should pay special attention to color combinations. For example, on dark bottles images of a golden or silver palette will look especially impressive and attractive.
Engraving on bottles has many advantages compared to the decoration methods described above.
This design is almost impossible to damage or spoil. If minor dirt or buildup occurs, the bottles can be gently rinsed in cool water. The liquid does not have a negative effect on the drawing. In addition, it is worth highlighting its versatility: champagne decorated with engraving will be appropriate at any wedding, regardless of the style.
Decor of bottles using original techniques.
Decoration from the inside
If you plan to bring to life the idea of decorating the bottle from the inside, then you need to choose a container with transparent glass and a non-standard shape.
A bottle decorated with various irregularities on its surface looks interesting.
Paint with an acrylic base of any color is poured into the prepared bottle for decoration.
The contents of the vessel are shaken so that the paint evenly covers its walls.
After this, the bottle is turned upside down and left in this state for some time until the excess paint pours out of the bottle.
If, however, the walls are not evenly covered with a layer of paint, then the procedure must be repeated several times.
Decor using decoupage technique
The decoupage technique is widely used in the design of various household items and decor. You can also use this decoration method when decorating champagne.
If both the bride and groom have experience in making things with their own hands, you can prepare a surprise for each other.
Tools:
- napkins with themed patterns;
- degreaser;
- soft sponge;
- brushes;
- primer;
- sandpaper;
- acrylic lacquer;
- paints.
Advice. Photos of the newlyweds are also used instead of napkins.
The initial stage is preparation. Bottles must be cleaned of paper labels and wiped thoroughly. Degrease the surface with alcohol. It is recommended to remove the foil from the cork itself.
Primer treatment will help create a suitable background and prepare the surface for further work.
A soft sponge will be useful when processing. The primer must be applied evenly, using patting movements. After the first layer has dried, a second layer is applied. The component must dry thoroughly. After drying, the surface is carefully sanded with fine-grain sandpaper to obtain an even coating.
The required design is cut out from the napkins.
When cutting, you should step back a few centimeters from the ornament. The picture is applied to the selected area and treated with glue. When working with glue, all folds and irregularities are carefully smoothed out. After drying, the edges can be lightly sanded to eliminate any defects and smooth out the contour. Finally – varnish treatment.
Required tools and materials
As a rule, both bottles are decorated in the same style so that pairing appears (after all, this is a wedding, a celebration for two). A simple decoration option is to spray bottles with spray paint. In this case, bottles will look harmonious, where one has a slightly larger size. It can be decorated on top with a small black hat and bow tie.
A smaller bottle will represent the bride: decorate it with a veil or a white skirt made of 2-3 layers of fabric. The skirt can be made from different fabrics:
- organza;
- silk;
- guipure;
- atlas;
- tulle.
Decorating champagne usually does not require a lot of materials, and they are quite inexpensive. So, for work you need to prepare:
- the champagne itself;
- glue;
- decorative paper;
- fabric, lace;
- beads, rhinestones, colored stones;
- paints and brushes;
- polymer clay;
- threads;
- napkins for decoupage and varnish.
Such materials are applicable in those design options that can be handled by anyone without any special decorating skills. Of course, there are more complex methods of decoration, such as engraving. It is better to entrust such actions to professionals who know the nuances of such work.
Painting with paints
The use of paint is one of the most lightweight decorative options. The choice of colors and patterns allows you to create a bright and unusual decoration for the festive table.
Tools:
- soft sponge;
- degreaser;
- paint (preferably in cans);
- unnecessary newspapers;
- gloves;
- stencils for applying drawings or inscriptions.
The surface of the vessel is cleaned of labels, foil and traces of glue, and degreased.
Spread newspapers on the work table to prevent dirt and streaks. The paint application process is carried out with gloves.
Attention! It is recommended to work outdoors or in a well-ventilated area.
After the background has dried, you can begin painting. If you do not have the necessary skills, you should use stencils. When finished, the bottle must be thoroughly dried.
The result can be sealed with varnish.
Ideas
Champagne decor allows you not to limit your imagination at both an unusual and classic wedding. Bottles become a highlight, a decoration, and one of the main accessories of the holiday.
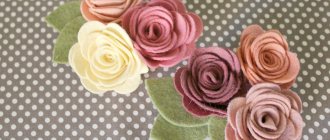
Often in their design they use motifs from the newlyweds’ costumes - the groom is dressed in a formal suit, the bride in a lace dress. A fresh, interesting option is to decorate the alcohol with fresh flowers, echoing the bride’s bouquet. It looks very romantic, gentle, but, unfortunately, such decor is extremely short-lived. An alternative is artificial flowers made of felt, paper, or polymer clay. Bright and touching, they will never fade, just like the love of spouses.
A colorful wedding encourages the champagne not to be in the classic green and gold bottle, but in a more appropriate design. Foil, fabric or paint of the desired color will add the necessary bright accents to the festive table, setting the guests in the right mood.
Polymer clay flowers
Delicate flowers, almost like real ones, but at the same time strong and durable - a wonderful option for decorating special champagne. For craftswomen who know how to create such a miracle on their own, this is also an opportunity to demonstrate their talents to all guests.
However, you can buy ready-made products in the desired color at any craft store. They also sell leaves, twigs, berries and anything else you want to use in decoration. In addition to the flowers themselves, you will need aerosol paint of the required color, usually white, Moment glue and additional decorative elements from lace to rhinestones.
Paint is an optional step, but it makes it easier to stick everything you need on it. We advise you to prepare the bottle for decoration - remove the label, dry it, check the evenness of the glass and coat it with paint. By the way, here you can already play with the design. For example, glue (most importantly, not very durable glue) paper pieces of the original shape onto the glass surface. After you remove them, a perfectly smooth and unusual pattern will remain on the painted surface.
Next, think over the sketch and draw with a pencil the points where you are going to glue the flowers. Now start fixing the buds on the glass. This is where “Moment” or any other quick-setting glue comes in handy.
Advice! If the flowers are too voluminous and bright, then it is better to leave the remaining space between them empty. If decor of a modest design is glued, then the voids can be decorated with ribbons, rhinestones, and beads.
Photos of the newlyweds
Your happy laughing faces on the label along with the date of the celebration or any other inscription is an original design option that will not leave anyone indifferent. This champagne looks great both at a classic wedding and at a themed one, for example, if you design the labels in the form of a movie poster or a “Wanted” poster.
Making a creative image yourself is easy if you know Photoshop. If a popular image editor is not available to you, you will have to turn to a specialist for help. It is necessary to print labels on thin paper, and then transfer it to glass using the decoupage technique. Remember that the bottle is also pre-prepared before this - cleaned, degreased, dried.
Engraving
For lovers of luxury, decorating champagne with glass engraving would be a great idea. A good master will be able to apply almost any pattern, regardless of its complexity. Even simple and thin openwork lines look great on dark green glass, giving the bottle a flair of aristocracy.
Which drawing or inscription should I choose? It depends solely on your wishes - the names of the newlyweds, vows of fidelity, images of doves, angels, rings, hearts. Any pattern looks great: either a rather restrained one, with a small number of lines, or a stunning one with a riot of curls.
You should not think that the design must be gold or silver in color - a professional engraver can create a colored, transparent, absolutely any masterpiece. Of course, before choosing a master, you should look at his work. It's best to do this in a workshop to get a full idea of what your order will look like.
Decoupage of bottles and glasses
This design method is gaining increasing popularity, as it combines ease of execution and chic results. It is used not only to decorate bottles, but also to decorate newlyweds’ glasses.
Decoupage is the gluing of paper elements onto a glass surface treated with acrylic. The paper must be thin; for example, napkins with the desired pattern are suitable - delicate flowers, hearts, angels or something more original.
Before starting work, remove the label from the bottle, degrease it with alcohol and dry it. Our master class will help you create an original design and enjoy the creative process.
Next, you need a primer for a smooth and uniform surface. You can do it in two ways - buy a special primer for glass in a specialized store or prepare a mixture yourself from acrylic, water and PVA glue. Then apply the mixture to the glass in a thin layer. You can do this with a brush, but it is much more convenient to use a foam sponge. After drying, add the next layer of acrylic.
When the surface is completely dry, we begin gluing the paper elements - in this case, glue can be used either special for decoupage (sold in any craft store), or regular PVA or even a glue stick. The wrinkles that inevitably appear along the edges must be carefully smoothed out with a piece of sandpaper, but be careful, because the napkins are easily torn.
At the end, secure the resulting decor with transparent acrylic varnish. It will have to be applied in several layers, and each one only after the previous one has completely dried.
So, the bottle is ready. Now you can decorate it with sparkles, rhinestones, feathers or any other additional decor. The decoupage technique looks gentle, festive, and allows you to realize almost any fantasy.
Decor with rhinestones and bows
This option can be used either as a single design or in addition to the methods described above. Rhinestones are useful when decorating with ribbons or painting; bows are used in the design of the neck and complement outfits for bottles made of ribbons or fabric.
When decorating bottles only with rhinestones, it is recommended to clean the surface of labels and degrease.
For more comfortable work, contours for gluing are outlined with paint. It is recommended to prepare in advance sketches of the drawings that will decorate the festive champagne.
Lace bottle decorator
In most cases, the lace is secured over the satin trim with ribbons. A pink or red lace heart on white satin will look great. But this is not the only way to design using lace. It looks incredible on top of decoupage. Especially if not the entire surface is finished with it, but only single patterns are made. Lace can be used to complement a photo composition or engraving. There are two main methods of use: ribbons and pieces.
Champagne lace decoration
Sometimes bottles are decorated with beaded compositions, gradually laid out in thin rows. But the work is quite labor-intensive and requires patience and experience.
Tips for Beginners
Before starting any type of work, it is important to check the quality of all materials, since at some stages the work cannot be reversed. And it will be very unfortunate to find dried glue or other unusable material. The workplace should be well lit so that all the smallest details can be easily seen, especially in jobs where there are a large number of them.
Sometimes the process gets very boring, especially when there are small, monotonous parts and movements. I want to finish it quickly, which can cause mistakes and irregularities. For any type of work, you must wear gloves and cover the table with a disposable tablecloth or protective film. Great care should be taken when choosing tools and materials. Of course, you want to save money, but low-quality, cheap materials can have completely different properties. So before purchasing, it is better to read the truthful reviews and buying tips.
3.7/5 — (3 votes)