Simple round stool
To make an original wooden stool with a round lid you need:
- Before you make a simple stool from wood with your own hands using a hacksaw and a set of chisels, you will need to mark the bars.
- Cut out blanks for legs and connecting jumpers, on which it is necessary to provide protrusions.
- Connect the frame elements using the technology used when assembling a square stool with your own hands from wood.
- Mark with a compass a circle corresponding to the diameter of the lid on a sheet of thick plywood, a monolithic board or a package assembled from several plates.
- Cut the workpiece with a hacksaw or jigsaw, and then process the edges with an abrasive tool.
- Place the cover on the base and finish the surfaces.
A simple round stool is a very comfortable piece of furniture.
For country houses, they use the technology of manufacturing round stools of a simplified design. Instead of separate legs, use 2 sheets of plywood or chipboard with connecting grooves. The supports are joined at right angles, and then a round lid is attached on top using wooden pins and adhesive. To increase rigidity, screws and metal corners are installed.
Manufacturing procedure
Is it difficult and how to make a stool with your own hands? First you need to decide on the drawing and choose the optimal design. The next stage is preparing the material for manufacturing. Wood, chipboard or plywood must be dried and checked for defects
Then the workplace is set up, special attention is paid to lighting
As an example, we can consider how to make a stool from chipboard.
Production stages:
Sheet marking. This is necessary for the formation of blanks. Beginners are recommended to make patterns from paper or thick cardboard. This way you can avoid sizing errors.
It is important to consider the kerf width tolerances. Formation of blanks. The optimal tool is an electric jigsaw
The edges need to be sanded with sandpaper or a sanding machine. Fastening components. Depending on the design, you can use the slotting method, joining with furniture corners or using wooden tenons. If the structure is made of wood with your own hands, you can use confirmations. This screw fastener secures various components well and improves stability. Painting and varnishing. The finishing surface can be matte or glossy. If it is important to preserve the original texture, use translucent or transparent varnishes. Acrylic compounds are most often used. Additions. Often special shock absorbers are installed on the legs. They minimize the appearance of scratches on the floor and reduce noise when moving furniture.
Features of making chairs from pipes
If you choose a suitable material for manufacturing, it is better to make chairs from a 20 by 20 mm profile pipe. The wall thickness of this profile is 1-1.5 mm, resulting in a durable and not too heavy structure.
On the other hand, using a thin-walled metal pipe brings additional difficulties:
- Due to the thinness of the walls, carbon dioxide or plasma welding will be required, and some practice with welding seams will be required before attempting to make chairs from pipe;
- You will need to assemble the individual parts into a finished frame using clamps or any other similar tool;
- In addition to the profiled metal pipe, you will need at least steel angles, bolts, nuts, fasteners, everything necessary for attaching the seat, armrests and backrest.
Advice! It is clear that in this case the seating furniture is not made for the garage, but for the interior of an apartment or house. You always want to make your design more attractive and elegant, so if possible, when choosing a suitable model, it is advisable to abandon straight angular shapes and transitions.
Only a seamless metal tube can be bent without any problems
The most difficult chairs to make are those made from round pipes. It is known from practice that a misaligned connection of round profiles is not always strong enough, so you should also use mechanical fasteners - bolts and nuts. Therefore, if possible, it is better to use a profile of a round, rectangular or square shape, in this case at least the design will not be spoiled by protruding nuts.
Decoration
If we talk about decorating stools, there are a lot of ideas that will allow you to turn them into something unique and interesting. Ideas for decorating such products can be divided into 3 large categories:
- woodworking;
- use of various types of pillows;
- the use of various types of capes.
If we talk about the first category, then a very popular type of decoration is the creation of antique stools. For this purpose, there is a special coating for wood, as well as its special processing. Carved models of this type, which are made by professionals, have a fairly high price. But it is not always possible to make such a stool yourself.
But the use of various kinds of pillows is one of the most commonly used methods of decorating such furniture. In addition to the fact that various original pillows make the stool truly unique and interesting, it is also soft and comfortable. After all, often the problem with any stool is that you can’t sit on it for a long time due to the hard surface. And so this problem is solved, and you can enjoy sitting on such a beautiful chair. Another decoration option is the use of various capes. Well, here everything is limited only by the imagination of the owner of such furniture and his financial capabilities. As you can see, today there are many options for decorating wooden stools made with your own hands.
Tools and materials
So, in order to make a wooden chair yourself, you need to prepare a number of tools and materials. If we talk about tools, we should name:
- plane;
- Circular Saw;
- drill;
- screwdriver;
- wood hacksaw;
- milling cutter;
- roulette;
- pencil;
- clamps.
If we talk about materials, then you will need to have on hand:
- screws;
- furniture glue;
- sandpaper;
- stain or drying oil;
- masking tape;
- cardboard for stencil;
- dowel or lumber.
Here it should be understood that the choice of wood and the final processing technique will determine the ability of the chair to cope with the effects of natural factors, its stability, reliability and ability to withstand physical stress. For some reason, many people choose chipboard to create a chair, although this material is completely unsuitable for chairs. And especially for garden-type models. The reason is simple - extremely low resistance to moisture. And the strength of chipboard models will be lower than that of solid wood or timber models.
But natural wood, although not the most affordable material, is environmentally friendly and completely harmless. It will be the best solution if you want to make homemade chairs with your own hands. Before starting work, you should inspect the boards and bars for defects - cracks and knots. After this, the material is polished, protective materials are applied to it, and assembly is performed. If we talk about wood, then it would be best to take alder, ash, birch, and oak for such purposes.
There are two reasons here. The first is the presence of an unusual fiber pattern. The second is the high wear resistance of a product made from these materials. And the durability of such products will be high. The only drawback will be deformation under the influence of moisture and low resistance to fire. And one more important point that should also be prepared is drawings and diagrams. This issue should be decided when it is already known what material the furniture will be made from. There are several options to solve this problem:
- make a drawing with your own hand, which will indicate the dimensions and features of this chair;
- do it on a computer;
- download the finished version on one of the specialized sites.
Which option is better to choose will depend on your drawing and computer skills.
From 3 to 5
The version of the supporting structure of the stool, shown on the right in the figure, allows, on the one hand, to get rid of the rather labor-intensive and responsible cutting of long, even grooves, which is especially important when working with a hand saw. On the other hand, it allows you to get legs of a rather bizarre shape without a significant increase in material waste, because workpieces are marked with minimal technological gaps on a board 200-250 mm wide.
The “highlight” here is that 2 of the 3 parts of the previous design (namely, the legs) “halve” lengthwise. The base is assembled in a cross (diagram at the top right) similar to the previous one. option, i.e. with gluing all connections:
- Drill holes for self-tapping screws; You don't have to select holes for the fastener heads.
- Dry assembly is carried out and, if necessary, parts are adjusted.
- Inject 3-4 drops of glue into the holes under the fasteners and spread it inside with a thin splinter.
- Apply glue to the mating surfaces.
- Maintain parts until the glue sticks to visible surfaces.
- The entire assembly is assembled quickly and tightly using hardware.
Also pay attention to the side surface, marked with the letter A. Before installing the seat, you can put on it a round shell, rolled from thin fiberboard. The shell is installed using glue and small hardware (screws, nails). After assembling and finishing the entire product, the shell can be decorated, incl. very impressive stucco molding from polymer clay and get a truly luxurious stool.
4 parts
Stools-benches of a box-shaped design made of 4 boards (a seat, 2 side panels-legs and a vertical longitudinal insert-support beam, on the left in the figure) are widely known and have been described many times. However, such a stool is simple and cheap only in appearance: for proper strength and reliability, its parts need to be cut from a block of durable wood or chipboard with a thickness of 40 mm and a width of 250 mm. Both materials are not cheap; scraps suitable for a stool most often do not go to waste, and it is not easy to find them for sale or in your own pantry.
Stools made from scrap materials
Meanwhile, a utility and work stool-bench can be made literally from scrap materials, scraps of timber from 30x30 and plywood from 2.5 mm as follows, on the right in the figure:
- Sections of timber are welded into panels (leg blanks) end-to-end with glue, as described below;
- One side of each panel is covered with plywood under pressure (compression with clamps);
- Cut out corner grooves in the leg blanks for the same beam and use a chisel to select holes for the screed from the same beam;
- Cover the front sides of the legs with plywood in the same way as in step 2;
- Assemble the supporting box of the stool using glue and self-tapping screws;
- The seat is attached, which in this case can be made of plywood from 6 mm or boards from 12 mm. You can simply install the seat on the glue; all operating loads are already taken care of by the box.
Tips for safe use
When using any lifting mechanisms, it is important to remember several rules:
- Before installing the structure, make sure it is suitable. Inspect for damage, loose fasteners and damaged rubber parts and supports.
- Place the product on a flat surface.
- If you are working on the site, check that there are no holes or stones under the legs.
- Follow the manufacturer's installation recommendations. Extension ladders, for example, need to be installed at an angle of about 75 degrees.
In the assembled product, check all fasteners, clamps and adjusters
It is necessary that everything is tightly latched and closed. Please pay attention to the maximum permissible weight for the product. If there are no rubberized pads on the steps, try to work in non-slip shoes. Store the stepladder according to the manufacturer's recommendations.
To learn how to make a ladder chair with your own hands, watch this video.
Other decor ideas
If there is a tapestry on the cover with an image in its middle, you can place a floral pattern with flowers. Due to the fact that the combinations of shades look dim, this option will not be pretentious, but stylish.
The seats can be decorated with embroidery on the cover. A large flower made using the satin stitch technique will look nice like a tapestry. An interesting option is an ornament along the perimeter or an abstract type of picture. They use strong, non-fading threads that will not wear out due to frequent washing.
Knowing how to make a wooden stool with your own hands, you can create beautiful furniture and save money.
Scope of use
Due to their reliability, stools with a metal frame are used in various fields.
- At home, such products are appropriate in the kitchen, dining room, hallway, etc.
- Bar models can often be found in restaurants and cafes.
- Industrial premises are often equipped with such seating items.
- Beautiful and wear-resistant products are ideal for offices, train stations, shopping centers, airports and other public places.
- Fans of outdoor activities will be happy to take with them a folding version of a metal stool.
- You can also equip a cozy corner in the garden or open veranda, but it is worth considering that not all models are designed for the street.
What do you need for work?
Regardless of the type of structure being manufactured, work must always begin with a drawing of the future project. It is advisable to consider several options so that you have something to compare with and ultimately choose one. The preparatory stage does not end here. You also need to take care of the tools.
Woodworking tools
So, to make a stool you need to prepare the following:
- softwood boards;
- furniture stapler;
- set of self-tapping screws;
- seat upholstery material;
- PVA glue for working with wood;
- sandpaper with different grain sizes;
- hand saw or jigsaw;
- plane;
- screwdriver and electric drill;
- safety glasses and work gloves.
Hand wooden plane
Be sure to prepare paint and varnish materials and decorative finishing products. It is also necessary to purchase various stencils, rollers and brushes for painting the finished product. Once everything you need is at hand, you can get to work.
Manufacturing
As mentioned above, there is nothing particularly difficult about making your own inexpensive but attractive chipboard stool. The main thing is to first draw up detailed drawings and indicate on them all the dimensions of the future structure. Having such an “action plan” in hand will make your work much easier and more convenient, because at any moment you will be able to check whether you are doing everything correctly.
Preparation and cutting of material
The first stage of making a stool from chipboard yourself will be preparing and sawing the specified material that imitates wood. Different craftsmen use different tools for this, but an electric jigsaw is considered more convenient and practical - it’s easier to work with. It is advisable to use a tool with short teeth. The jigsaw should work at the highest speed - this is the only way all the cuts will be clean and even.
Having at hand a template (a detailed drawing with all the details) of the future stool, you can proceed to its creation. The paper or cardboard blank must be attached to the wood boards and outlined with a pencil. This way, it will be easier for you to cut out all the parts efficiently and accurately. All small irregularities remaining after cutting should be removed using sandpaper or sandpaper.
The cut bars must be carefully polished and tried on each other. Sanding is especially important if small households will use homemade furniture in the future. Having prepared all the necessary parts for the future structure, you can move on to the final stage before assembly - drilling all the necessary holes. Make sure that they are all at the same level.
Assembly
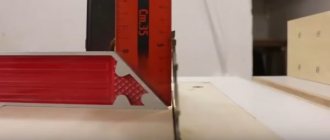
When all the parts are cut and prepared, you can begin to directly assemble the stool. Before you start assembling the furniture structure, you need to treat all cut edges with a special ribbon. It should be selected in accordance with the color of the material itself. Ribbons of contrasting colors are also appropriate.
The tape should be applied to the edges of the legs and seats, and then glued using a hot iron. The latter should be applied quickly, making short movements. The heated tape must be pressed down with a clean rag. The glue located on the back side of the applied coating sets almost immediately - it will not heat up or cool down for a long time.
All parts of the stool must be assembled using screws and confirmations. Some craftsmen first glue all the parts and then fasten them with self-tapping screws - it’s easier that way. The seat of the resulting stool can be made soft by installing foam rubber and upholstery.
Decoration
The stool will look more attractive if you equip it with padding and upholstery. The upholstery of such furniture can be oilcloth, woven or leatherette. Each master chooses the best option himself. Foam rubber is often used as filling.
Real kitchen
Now we have classic stools for the kitchen. During use, they suffer more than others, so their design is carried out according to all the rules of strength: a rigid beam frame, capable of withstanding all operating loads, and a seat that must be held firmly in place, but in such a way that, if necessary, it can be easily repaired or replace. Therefore, the seat of a kitchen stool is made of panel boards from cohesive planks (see below) and attached to biscuit stands or directly to the frame on dowels.
Drawings of a classic kitchen stool
The option with breadcrumbs is shown in rice; pos. A – its general diagram and names of its components. The advantage of this design is the low requirements for the quality of the seat shield. By installing a pair of crackers on each drawer (this will not reduce the overall strength of the product), you can make the seat out of separate boards, and on the original 4 crackers - with plywood or chipboard.
The procedure for checking the evenness of pairs when assembling a stool
Pay attention to the drawers, these are not just boards, they are all over the furniture, and not only in furniture. In general, a drawer is a part that properly distributes loads in an assembly unit and is itself capable of bearing the load. Drawers can be found in the still, pipelines, etc., which have nothing to do with furniture.
Also pay attention to pos. E, it shows a way to check the evenness of pairs of legs using diagonals; it is basically the same as checking the squareness of the foundation. When assembling a classic stool, the evenness of the pairs is checked three times, see fig. right: in pairs assembled separately (left pose and red lines), between pairs (orange lines on the central pose) and the overall rectangularity of the frame (brown lines in the center). The seat is installed only after complete check of levelness; filing the legs of a finished stool is complete unprofessionalism.
Below in Fig. – drawings of a stool for the kitchen with a seat mounted on dowels. This design is less labor-intensive and material-intensive, because operations for the manufacture and installation of crackers are eliminated, but the seat panel must be firmly solidified, see below. If the frames are installed on the legs, they should not reach the floor by 20-40 mm, so as not to scratch it.
Drawings of a kitchen stool with frames on legs
Note: cuts of tenons at 45 degrees in both cases are made with the same frame hacksaw. A fixed miter box (device for sawing at an angle) at fixed angles of 90, 45 and 60 degrees costs no more than 50 rubles.
How to join boards into a shield
The boards that will now be the plots of the set (package) are usually joined into boards with glue using special clips - weims, top left in Fig. In weims, small additionally secured shields, like for the seat of a stool, can be simply joined together end-to-end. Large panels, say, for a table top or the side of a cabinet, are joined together (middle row from left to right) with a tongue and groove, in a rebate, on dowels, dowels (lamellas) and other methods.
Methods for joining shields from boards
In handicraft work, clamps are sometimes replaced with various homemade devices on the same principle (compressing the set with pairs of wedges), at the top right, and now more and more often with large F-shaped clamps. In this case, a rather labor-intensive preparation of the plots is necessary for consolidation using methods a, c or d. However, there is still no guarantee that the set, when compressed, if it does not rear up all like an accordion, will go in a wave, because It is impossible to achieve absolutely precise mating of wooden parts under load due to the low local strength of the wood.
However, there is a way to attach the shield to the seat of a stool end-to-end, completely even and without complex devices, this is the so-called. twisted rim with cheek liners; its diagram is given below in Fig. Step-by-step bonding of the shield in a twisted wire is carried out as follows:
- The lower (according to the diagram) plywood cheek is placed on the table;
- The table with the cheek is covered with plastic film;
- Glue is applied to the edges of the plots and kept until tack-free or according to the glue instructions;
- The plots are placed on the lower cheek on top of the film and, if possible, squeezed tightly with your hands;
- Wrap the set in film;
- Apply the upper cheek;
- The entire package is carefully, without lifting or turning over, moved to the edge of the table so that some part of the set hangs above the floor;
- Begin winding the cord, applying the turns as tightly as possible, but not too tightly;
- When the bag is wrapped about 1/3 or more, it can be removed from the table and wound by weight;
- The ends of the cord are tied;
- Insert wedges under the winding, tapping with a mallet. You need 4 wedges, they are inserted evenly from 4 sides (2 from above and 2 from below), tapping alternately;
- When the wedges pull all the turns of the winding tightly evenly, the bag is left until the glue dries completely;
- After the glue has dried, the winding, cheeks and film are removed, and the set is cut to size.
The cross section of the wedges does not have to be rectangular; it is possible to use round sticks cut obliquely; There is only one condition - the wedges need to be smooth. It is advisable to use a slippery propylene cord; packaging twine will do. The thickness of the wedges is determined based on existing experience. If there is none, then the package is first assembled dry, without glue, and the thickness of the wedges is selected so that they fit completely under the winding, pulling its turns tightly.
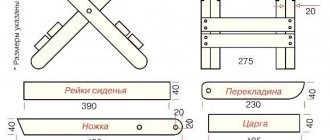
Drawing of a wooden stool
As usual, at the very beginning we need to draw our future stool on a piece of paper, with all sizes and shapes. Since we will be making the product according to our sample, its drawing will look like this. We purchase dry timber Let's immediately make a reservation about the timber and slats, you need to buy them in the store, already processed and definitely from the dryer. You can find out whether the slats are dry or not from the store salesperson; as a rule, you can find them in a hardware store. And one more thing, the length of the slats and the length of the timber in the store will differ from the one we need. Don't worry, you'll just need to calculate according to the dimensions above and then cut them to the size you need.
And one more thing, if you are already planning to make a stool with your own hands, then make a set of 4-5 pieces at once. The only adjustment will be in the amount of material needed for the required number of stools.
Gluing the shields
Let's get started, first we need to glue the shield for our seat. To do this, take 9 slats and place them on a flat surface, width apart from each other, and apply PVA glue to one side of each slats. We tighten them tightly with clamps, as shown in the photo. Making the legs While the glue dries, let's start making the legs. In principle, we won’t have to do a lot of work at this stage; we need to make a cut on the legs of our stool for beauty. To do this, all the legs need to be trimmed (sawed off) to the net size, namely: 4.5X4.5×45 cm. This will be our net size in length, but not yet in width and thickness, we’ll get to that a little later.
In order to make a beautiful cut, you need to measure 20 cm from the bottom of the leg to the middle and make the cut thickness 1.5 cm, this is done something like this:
And we trim (saw off) along the entire length. That is, it turns out that at the bottom of the leg the size will be 3x3 cm and smoothly towards the middle it will change to its initial size of 4.5x4.5 cm. In the end it will be as shown in the photo.
Manufacturing and assembly of the product frame
To manufacture and assemble the frame, you need to make 8 drawers, otherwise the drawers are called stability diameters, 4 drawers to the top of the frame and 4 to the middle. We take our slats and cut them to length, that is, we need to cut 8 drawers of 21 cm each. Then we take the legs and make through holes in them using a screwdriver and a wood drill, the drill should be 8 mm in diameter. at the same moment we attach the drawer.
It turns out that we have a through hole in the leg, and the drill enters the side by 2-3 cm. The side must be applied first from the top, and then to the middle. Next, we smear the chops with glue and hammer them with a mallet one by one into each leg and drawer, in the end you should get a frame like this.
We disassemble the panels and polish the irregularities. Now we disassemble our glued panel and prepare it for the seat. First, we trim the shield to a size of 35x35x2.5 cm. After trimming, we take a manual grinding machine and put an 80 belt on it, sand our shield a little, removing rough irregularities and dried glue, that’s what we’re talking about:
As soon as the rough irregularities are sanded, you need to put on a tape number 120 and sand it clean. If chips or unevenness still remain, then putty and after the putty has dried, sand again, thereby you will get a perfectly smooth and clean seat, something like this.
Gluing the seat to the frame Now we will glue our seat to the frame. To do this, take the frame and apply glue to the upper part of the end along the entire length. We measure 5 cm on the seat on all sides and measure it with a pencil and apply it along the marked lines of the seat to the top of the frame. You can also fix it either with clamps, or put something heavy on top. You need to wait 24 hours until it dries completely. Carrying out paint and varnish work Well, now you can move on to varnishing, painting or staining (at your discretion). To do this, first take sandpaper number 180 and manually process the stool with your own hands, remove the remains of dried glue and minor irregularities, and bring the product to perfection! Afterwards, if you are going to varnish, take the varnish and mix thoroughly and, if necessary, add solvent 646.
We apply a thin layer of varnish to the product, we recommend using a quick-drying varnish, otherwise such varnish is called (nitro). We wait 2-3 hours, take sandpaper No. 180 and remove the pile raised after varnishing, this pile looks like this:
But don't get carried away, as you can remove the varnish from the product. Then we open it with varnish a second time, at this stage the pile will not rise significantly, but still go through it a little with sandpaper and remove the rest of the raised pile. And with the third layer we complete the varnishing; at this step there is no need to remove the lint. Final photo Our DIY wooden stool is ready, enjoy it to your health!
Types of structures
Based on the type of construction of stools on a metal frame, there are 2 groups: stationary and folding.
The first type is characterized by high reliability.
If you save every centimeter of space, then you should think about buying folding stools. As if by magic, additional seats will appear at the table. And then they can be hidden again in a closet or pantry. An unpleasant surprise can be a breakdown of the mechanism if the permissible load is exceeded. Typically, folding models are designed to carry less weight than stationary ones.
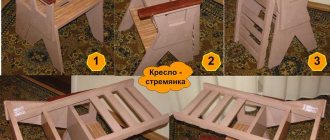
DIY transformable stepladder chair.
THIS IS FANTASTICALLY USEFUL FURNITURE
Let's consider making your own transformable chair, which is very practical for household use and which, with a slight movement of the hand, folds out into a stepladder, ladder or shelf and back. Below in the gallery are drawings and photos of a master class on making such a chair with your own hands.
This chair, originally designed by Benjamin Franklin, was created for libraries. But later, due to its incredible usefulness, this transformable chair became very popular in ordinary American families. One such thing replaces three, a chair, a shelf and a ladder. Very practical in small apartments or dorm rooms.
Drawings and master class
Preparing for work
Before starting work, you should create a drawing of the stool. When drawing up a sketch of a future structure, you should immediately apply all the necessary parameters.
It is absolutely not necessary to carry out a drawing in strict compliance with all the laws of drawing. It will be enough to draw the diagram by hand. The main thing is that the master himself can understand how and what needs to be done.
You can use the drawing diagrams available on the relevant websites.
For beginners who are getting down to business for the first time, let us explain a few specific terms:
- drawers - wooden scraps that fasten the legs of the structure;
- leg - an element that gives stability to the stool. It is located at the bottom of the legs and holds them together;
- “crackers” - corners made of metal or wood, located in the inner corners of the stool under the seat.
When drawing up sketches, be sure to clearly indicate not only the external dimensions of the stool, but also the parameters of all internal elements.
Stools on a metal frame - features and advantages
The design of the stool has remained virtually unchanged since its inception. It consists of support and seat components. The latter can be soft (which is much more convenient) or hard. Most models are equipped with a special device that makes it possible to adjust the height and perform rotation around its axis. Folding products are in particular demand. With their help, it is possible to properly organize space in a cramped room.
A special feature of models with a metal frame is the ability to hold a load of up to 150 kg without deformation.
Their main advantages make up an impressive list.
- Ordinary care.
- Beautiful shapes.
- Durability.
- Reasonable price.
- Thanks to the protective coating, they are highly resistant to moisture.
- Versatility.
- The use of removable covers will allow you to frequently make changes to the design.
- The weight in most cases is less than that of products made from solid wood.
It is correct to remember the disadvantages.
A stool on a metal frame does not look very good in the usual design, and also in such directions as eco and Provence style. For these interior solutions, forged structures are better suited.
Metal legs can damage the floor covering, so they must be equipped with rubber or plastic caps.
Sometimes when contacting iron parts, a sitting person may feel discomfort. This is especially true when it is cool outside. An original fabric cover will help correct the situation.