MDF cannot be called a very cheap material, but given its naturalness, it is quite possible to characterize it that way. This is a fairly universal “tool” that can be used in a variety of ways. If we consider the material as a finishing material for arranging arches, then it has its own advantages, which will be discussed further.
Choosing arches from MDF
We will also consider how you can finish MDF arches with your own hands: what is needed for this and how the procedure is performed.
MDF and arched structure
As we have already found out, interior arches made of MDF will be relatively inexpensive. This is largely possible thanks to the wide range and high competition in the building materials market.
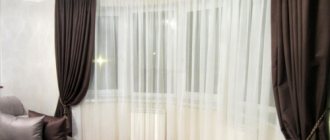
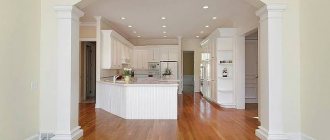
Beautiful arch
An important advantage of MFD is the strength and uniformity of the wood structure. The result is a durable and reliable material. The products are free of defects. And the decorative qualities of the material are also at their best. As a result, we get a material that is very attractive in all respects, which can be effectively used for finishing MDF arches.
At the same time, this design can be complemented with a variety of interior styles.
Description
Arched interior structures made of MDF are popular. The fact is that this finishing of openings has some advantages over other options. The advantages of use include:
- external attractiveness of the material;
- variety of textures and colors;
- the ability to make an arch of any desired shape;
- acceptable price;
- relatively simple installation (you can assemble it yourself);
- environmental friendliness and safety;
- high wear resistance.
Advice! Consumers have the opportunity to purchase ready-made standard kits for making arches (they are suitable for standard openings) or order their production according to their dimensions.
Decorative finishing
The popularity of arched structures made of MDF is due, among other things, to the variety of their decorative designs. Possible options:
- lamination with polymer film. This is the most inexpensive finishing method; the film can have a wide variety of patterns, including those imitating the surfaces of natural materials;
- The use of special paint and varnish coatings makes it possible to choose almost any color option. Perfectly suited for modern interiors;
- bases covered with natural veneer can be additionally varnished. This finishing option will fit perfectly into a classic interior.
More about arches
An arch is an architectural element invented long ago that plays a decorative and functional role. As far as we know, they first appeared in the architecture of the Ancient East. The Latin word "arca" is translated as "arc". The design became most famous in Ancient Rome, Egypt and Greece. At that time, arches were used to decorate palaces and temples.
But through time, the shapes and characteristic curves of the arches have passed unchanged. New technologies and materials have been added to this. But what remains is the use of such a solution to create a particularly attractive interior.
How to solve the corner problem?
All arch models can be divided into two types:
- no corner fillers;
- with corner fillers.
The option with corner elements is intended for mounting an arched structure into existing openings of a standard rectangular shape. To install an arch without corner fillers, you must first take care of arranging the arched opening, if there is none.
This problem can be solved in two ways: carefully cut out the upper part of the partition according to the shape of the future arched structure or sew up the corners by constructing an arch using profiles and drywall. However, this option is only suitable for openings of sufficient height.
It should also be taken into account that further finishing will be required (putty, re-gluing or complete re-gluing of wallpaper, painting or repainting the walls, etc.).
To avoid all these problems, it is still better to purchase a model with ready-made corner fillers.
The photo shows a couple of examples of arches with corner fillers
Arched features
MDF is a popular material for finishing door arches. This is largely due to its excellent characteristics, as well as its natural appearance and content. Thus, a special atmosphere is created in the interior.
At the same time, door arches made of MDF or any other material not only smooth out the corners of the living space, but also play an important functional role. Such a design can visually separate a single space or, conversely, unite rooms that are completely different in their functional purpose.
Features of typical arches
Standard arch models are quite universal, and their choice is so wide that ordering an individual version for standard openings simply does not make sense. Their installation is easy to do with your own hands using a basic set of tools.
Ready-made arches have a modular design consisting of several elements, which allows them to be installed in any standard opening. The standard kit usually includes:
- two arched arcs;
- four platbands;
- two or four locks;
- vault panels;
- two side panels.
Standard set of arched kit
As additional elements that allow you to adjust the depth of the arched opening (thickness of the wall panels and vault), manufacturers offer special arch expanders and intermediate plates of the same color range as the main structure.
Mandatory parameters for the correct selection and subsequent trouble-free installation of the arch with your own hands are the height, width and depth of the opening.
Installation of an interior arch
Introduction
Installing an interior arch in a doorway instead of a door is an excellent option to free up the space in the room needed to open the door.
Arch instead of a door
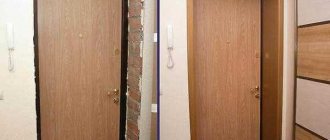
Speaking about interior arches, I will immediately note that two options for arch construction are practiced. The first option is to buy a ready-made arch, for example a ready-made MDF arch with natural wood veneer from the door factory https://rumaks.ru/ and install it in the opening.
The second option is to make an arch from plasterboard. Then putty it together with the walls and paint it in the desired color or use any other finish.
If the first version of the finished arch does not require repair work. The finished arch can be installed in a renovated room by carefully removing the door. Then the second option, a plasterboard arch, will require painting work and is done during the general renovation of the room.
Installation of a finished arch in an opening
Typically, ready-made arches are available in three sizes:
- Arch 70 cm. Designed for installation in an opening 700 – 860 mm wide;
- At 80 cm, milking the arches 800 - 960 mm;
- An 80 cm arch can be equipped with a vault expander (50 cm), which will allow it to be expanded to an opening of 1260 mm.
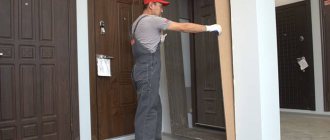
To install the finished arch in the doorway, it must be free and clean. Finishing work on the walls of the opening must be completed.
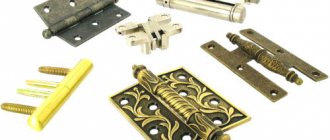
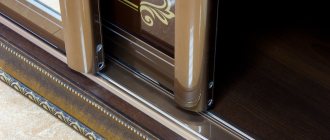
- The arch is supplied disassembled. Installation of the arch begins with the installation of its upper corner elements (1). They are screwed to the wall on one side of the opening. The corner elements are connected to each other using a dowel.
A furniture dowel is a short wooden cylinder with a diameter of 10 mm.
- Decorative elements (3) are attached to the upper corner part with dowels.
- Next, the side trims (4) are installed. It also serves as a fastening for the internal filling plates of the arch. For these purposes they have a groove.
- When installing side trims, the groove must remain free. The side trims are fastened with liquid nails or self-tapping screws.
- The internal filling plates are cut to a width 12 mm greater than the width of the opening. The length of the plates is measured locally.
- After cutting, the inner plates are inserted into the groove of the side trims and the top element.
- Similarly, but in the reverse order, the second side of the arch is assembled. Now the side trims are inserted with grooves into the inner plates.
- The heads of the screws, as when assembling furniture, are closed with plugs in the color of the veneer of the arch.
DIY arch installation
Once upon a time, window, door and other types of openings between rooms were completed with wedging arched vaults with a keystone at the top. This was due to the fact that the lintels of buildings made of brick and stone in those days could not be made straight, since reinforced concrete or rolled steel beams and purlins had not yet been invented at the time of construction. Their widespread use in construction began only at the beginning of the twentieth century after mass factory production.
Nowadays, the installation of interior arches either on the facades or inside the premises of new and reconstructed old buildings is called “retro” style, and their use indicates the refined taste of the owner.
Choosing your arch
Before using an arched system, you should decide on its configuration, manufacturing method, and materials for formation. Photos of designs and options for various arches are widely presented on the Internet. This is so that everyone can choose its appearance according to their financial capabilities and taste preferences.
Making and installing an arch in a doorway with your own hands can be done in two ways:
- purchasing from one of the construction stores in Kursk or companies in the city engaged in the distribution of a unique designer for arches made of MDF (laminated, pressed chipboard), natural wood of decorative species (oak, ash, acacia and the like), stamped plastic PVC semi-finished products;
- construction of arched openings using load-bearing wooden and metal elements and frames, as well as sheet finishing materials - plasterboard, plastic, fiberboard and particleboard, plywood, sometimes hard cardboard, self-adhesive film with various imitation patterns for final finishing.
Custom installation methods
The first method is quite capable of being handled by any, even completely unskilled, performer. With all its advantages and attractive appearance, the disadvantages are the fairly high cost of components, as well as the requirements for compliance with standards such as the height and width of the opening, which must comply with the installed modules. Typically, how to install an arch in a doorway, the installation diagram and assembly features are indicated in the instructions and contained in the documentation included with the purchase.
Important: it is strictly forbidden to increase the width of the openings, as this will most likely cause an emergency collapse of the actual reinforced concrete or metal linear lintel and the overlying part of the wall resting on it.
The second method requires the ability to use hand and power tools, such as:
- hacksaws for wood and metal;
- construction knife;
- jigsaw;
- electric drill;
- screwdriver;
- roulette;
- water and bubble levels;
- plumb line;
- stepladder, ladder or scaffolding;
- spatulas for putty;
- primer brush;
- an aluminum rail-rule, exceeding the width of the opening by 30.40 cm for leveling and checking the installation of the side walls in the plane of the wall.
General Considerations
The external side walls, internal walls of the opening (slopes), and a strong vault are installed on a specially prepared wooden or metal frame. It should be taken into account that the arch strip must be made of a material of a minimum thickness that allows the bending of such common materials for this purpose as plasterboard, plywood, plastic sheets or rigid cardboard to form a round or elliptical configuration. At the same time, they must be sufficiently resistant to mechanical damage that may occur, for example, when moving furniture.
Step-by-step instructions in enlarged form
Installing an interior arch is not such a detailed and complicated process that you couldn’t handle it yourself. In general terms it is:
- removing the door leaf and disassembling the frame (if any);
- measuring work;
- drawing a sketch drawing and drawing up a specification - an element-by-element selection with dimensions and other parameters required for the purchase of components;
- procurement of materials and bringing them into a condition suitable for installation (horizontal and vertical components of the internal frame, racks, platbands, internal side walls, strips forming an arched vault);
- arrangement and fastening of the frame in the opening;
- attaching parts prepared for assembly to the frame with self-tapping screws;
- priming, puttying, sanding and other preparation of the mounted arch for finishing;
- painting or pasting with self-adhesive film (manual lamination) of finished products.
Installing a door arch: video
The manufacture and installation of an arch in a doorway or any other type can be easily done by hand, and if implemented, it will delight family members and visiting guests for a long time, being a source of pride for a job well done. With this video, installing a door arch will become much easier.
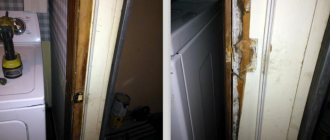
Installation of slopes using the adhesive method
If preference is given to the glue method, then you should familiarize yourself with the tips for installing the front door and MDF slopes. Work algorithm:
- First of all, for the glue method, you need to plaster the slopes.
- It is recommended to treat the prepared surface with a primer. After priming, the surface must be waited until completely dry.
- Install beacon profiles according to level. To install profiles on slopes, apply a solution and level the beacons in all directions. Give the solution time to set.
- The solution is applied to the slopes and leveled along the beacons with a spatula. After the manipulations, the slopes should be left for 2 days until the solution completely sets.
- The inside of the part is coated with glue and pressed to the surface.
- When all the elements are installed, the resulting joints are sealed or covered with overlays.
Important! After completing all the manipulations, you can proceed to the exterior decoration of the door structure. For this purpose, it is possible to cover the surface with platbands or level the surface using putty. On the Internet there are photos, videos and reviews that describe in detail the entire step-by-step process of the frame and glue method.
How to install the Palermo arch with your own hands
You may have already heard about. They are recommended by many construction companies and are in demand among most consumers. The article will not talk about how to technically correctly assemble and install the Palermo arch at home with your own hands, but what needs to be done before starting its installation.
Features of the Palermo arches
Let's start with the fact that this type of construction work is quite labor-intensive and complex. If you have already decided to do this, then get ready for serious tests. Arched openings "Palermo" will fit into almost any room design; they have a wide variety of designs and a huge palette of colors. The material for the manufacture of such arches are MDF sheets with various coatings. For example, arches can be veneered. Veneer is a thin sheet of wood (made from natural wood). Arches in an apartment can be covered with oak, walnut and even mahogany veneer. Often there are MDF arches covered with laminated polyvinyl chloride (PVC) film. If you remember, plastic windows are made from PVC.
Before you begin assembling and installing the arch, you need to carefully prepare the doorway between the rooms where the Palermo will be installed. The height of the opening with an installed arch should be within 2-2.2 m, while the width ranges from 0.6 m to 1.5 m. If you have a huge opening, then to install arches in a doorway of large width (for example, about 2-3 m) you will need a special design - an arch expander. This element is installed at the top and is somewhat similar to a regular door trim. The thickness of the arch should not exceed 250 mm.
Arch frame in the opening
The opening must be made of metal profiles or wooden beams. For example, a PP metal profile 60x27 mm is suitable. Attach the top profile horizontally. In order for the profile to lie flat, you need to use a building level. Only after this will you be able to correctly and technically install vertical profiles, again using a building level or plumb line. It should be remembered that profiles, both horizontal and vertical, must be installed exactly in their planes. Over the entire height, both the width and height of the doorway should be the same! To measure the width of the opening, use a ruler. In principle, after these procedures you will be able to begin assembling and installing the Palermo arch itself.
vote
Article rating
Application options
Instruction 1: finishing with decorative plaster
| Illustrations | Stages of finishing work |
| Applying plaster . Ready-made Venetian plaster is applied to the pre-primed surface. |
Our task is to create a relief during application. We form protrusions on the relief with a trowel.
Instruction 2: facing with decorative stone
| Illustrations | Cladding stages |
| Preparing the stone . After purchase, decorative stone is washed in clean water and dried. |
Construction device
Before installing an arch in a doorway with your own hands, you need to decide on the shape and features of the structure. The designs differ in the radius of the arc, the height of the rise, and the shape of the vaulted part. The vault is supported by a pair of vertical supports. Sometimes they are designed in the form of columns. When designing, the thickness of wall structures and span dimensions are taken into account. It also matters whether you plan to install the door. If it is assumed, the arched frame must be reinforced with additional stiffeners.
Having decided on the shape and taking measurements, you can draw a design drawing. For a vault, especially one with a complex shape, it is worth preparing in advance a template from which the parts will be cut.
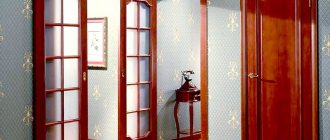
Arch and its cladding
MDF panel for doors
Just recently, the arches in my house were nondescript and had long since lost their appearance, as they were covered with wallpaper that had already faded slightly. Deciding to correct this issue, I began to look for the necessary materials and my eyes settled on MDF panels. This decision was driven not only by the excellent strength properties of the material, but also by extensive design ideas. Many manufacturers offered the most incredible colors and geometric shapes with which to decorate the arch structure.
In addition to the great resemblance to natural wood, panels can be of several types:
- Laminated - thanks to the top coating, both the strength of the product and its similarity to natural material increase
- Veneered - using a press, the board is connected to a small layer of wood and is subsequently varnished. It is because of this that the cost of veneered material is higher, because thanks to this manufacturing process it becomes more durable and resistant to damage
If you decide to design an arch using these panels, then you need to know that the opening should be protected from targeted impacts. Although the panels are less durable than natural wood, with low traffic the arch can retain its appearance for 5-7 years. Although, as one of my friends said, after a while it will still fade a little under the influence of sunlight. But most likely, after all this time, you will also think about updating the cosmetic renovation in the rooms where these arches will be located. Remember that paneling cannot be done if the opening is strongly rounded, since the material does not have such flexibility. The installation of the elements itself should occur in two ways: either you will glue it using an adhesive solution, or install it using a sheathing device. You need to think about the second option in advance, since installing the frame will steal some centimeters from the height and width of the passage between the rooms.
Conclusion
The process of installing MDF arches is generally quite simple and does not take much time, especially for structures with corner fillings. The only thing is that you must follow a certain sequence of actions, and also perform the work very carefully and carefully.
Otherwise, the parts may be damaged during the cutting process, or the structure will look untidy after assembly. See the video in this article for more information. If you have any difficulties in the process of assembling the arch or some points are not completely clear, ask questions in the comments, and I will be happy to answer you.
Did you like the article? Subscribe to our Yandex.Zen channel
How to install an MDF arch in a doorway yourself?
My parents ordered an excellent MDF arch; they refused to install it, relying on us.
Now how do we install this arch? At the beginning of the answer, I would like to write that the opening under the arch should be the same thickness; for this, most likely, you will have to level the walls under the arch.
The second thing I would like to note is that there are hundreds of types of arches, I don’t know which one you have.
Assembly and installation of one arch costs from 1,500 rubles, it is better to contact the specialists.
Arches are ordered according to the opening, and if your parents did not do this, then big problems may arise (cutting the opening, or, conversely, reducing it in length and height).
I'll try to describe something general.
Let's unpack the arch and look at its completeness.
Installation of an MDF arch begins with gluing the arch arch.
The set should include wooden furniture “chops”; there are holes on the two halves of the arch; we place the chops on PVA glue and connect the halves of the arches.
There are two vaults, one is attached on one side of the opening, the other on the opposite, give time for the glue to dry.
If desired, you can coat the ends of the vaults with the same PVA, it will be more reliable.
Let's go further, at the end of the arch arches there are exactly the same holes as on the arch, we insert choppers into them, coat them with PVA and connect them to the fastening of the arch cornices (should be included in the kit).
Then we measure the thickness of the opening.
Knowing the thickness of the opening, we prepare for sawing the inner plates, mark and saw off the excess, it is important to note here: make the inner plate a centimeter wider than the thickness of the opening, this is important.
You can saw off an MDF plate with a hacksaw, but the teeth must be fine.
Draw a line with a marker and saw strictly along it; there should be no “waves” or “slopes”.
Now we continue to work with the arch arch.
Pay attention to the inside of the arch, there is a groove inside, you also need to insert an MDF plate into it, take the shortest one from the kit.
Most often, this plate is longer than we need, we simply insert it into the groove, mark it with a marker and saw off to length (I’m talking about the plate that covers the arch of the ceiling from the inside in the opening, leave a few millimeters more, they will fit into the groove of the cornice).
Naturally, then we coat the groove with the same PVA and glue the plate.
We connect the two parts of the arch.
Next, we insert the arch into the opening and catch the zero.
The vault, like the other elements of the MDF arch, is secured in the opening with “liquid nails”.
And then everything is simple, we attach the platbands to the already installed vault, mark the size along the length and saw them off.
The platbands also have grooves along the entire length, these are for the internal filling plates, we insert the plates and saw them off, but we take into account one very important point: the length of the plates should be one centimeter longer than the platband.
At the end of the platbands there are already familiar holes.
Glue the hole into the hole and attach the trim to the cornices.
At the last stage, we insert the internal filling plate into the groove of the casing, and naturally coat it with the same PVA.
In general, that’s it, an arch is a children’s construction set, if you have basic skills, I don’t even know who, a person “with hands,” I’ll say so, then you can assemble the arch without any problems.
I forgot to write, it would be nice to buy clamps,
Some tips
Decorating an arch in an apartment is a process that is carried out after the main work has been completed. The fact is that such structures are made from different materials using different technologies. The resulting architectural element serves to decorate the entire interior, giving it some individuality. We must not forget that cladding can play not only a decorative role, but also perform a protective function.
A few tips to help achieve the desired effect:
- The easiest way to decorate an arch in an apartment with your own hands is to highlight the arched opening with the desired color. Often shades are selected that will contrast with the walls. Thus, it is possible to obtain a completed design with a minimum of effort. This method can be used for other materials.
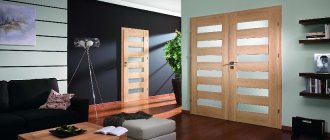
- Decorating material can be matched to existing colors. For example, if the cladding of interior arches is done with MDF panels, then it is advisable to combine them with closely spaced door leaves.
- The design can be decorated using various embossing and patterned ribbons that correspond to the general direction of the design.
- Nowadays stucco molding is becoming increasingly popular. Indeed, this is an excellent option that allows you to highlight an interior decorated in a classic style.
- The mosaic looks quite unique. Its use requires experience in installation. But if everything is done flawlessly, the effect will be amazing.
MDF arch: types and structure, tools and materials, assembly
MDF is a relatively new material on our market, however, it has already become widespread. Moreover, it began to be actively used not only in the furniture industry, but also in construction. In particular, recently this material is often used for arranging arches; in fact, this article is devoted to this topic.
Below I will tell you in detail how to install an MDF arch with your own hands, and I will also introduce you to some secrets that will allow you to cope with this task quickly and without any effort.
What tool will you need for the job?
Depending on what material the arch will be finished with, you may need different tools:
- putty knife;
- screwdriver;
- brush or roller;
- foam sponge;
- hacksaw or grinder;
- sandpaper;
- measuring instruments;
- stationery knife;
- hammer;
- chisel;
- building level.
To finish the arch you will need simple and affordable tools