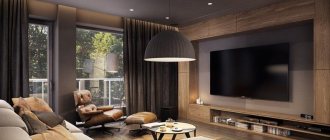
Home renovation is a good and interesting business, but expensive and troublesome. To reduce costs, there are various recommendations, secrets and even tricks that will help you save not only money, but also nerve cells. One of the most budget-friendly, simple and at the same time creative ways is wall painting. We are not talking about simple painting in a single color, but about creating interesting compositions using geometric shapes, interesting patterns and other details.
ReRooms will tell you about the 20 most interesting ways to paint walls that will help transform your interior. We will show that painting walls can be completely different from what you are accustomed to perceive.
Stripes
Stripes not only decorate the room, making the atmosphere more dynamic, but also help hide architectural flaws. To create the same interior as in the photo, you will need masking tape and paint of your favorite shade.
A little theory:
1. Horizontal stripes will help visually expand the space, but at the same time slightly lower the ceiling.
2. Vertical stripes raise the ceiling and visually make the space higher than it actually is.
The stripes can be of different shades, different widths - as your imagination dictates. When choosing a pattern, proceed from the characteristics of the room.
Photo:
1/2
Photo: bigcommerce.com
2/2
Briefly about the main thing
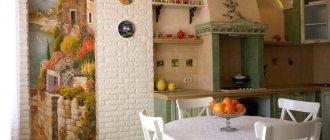
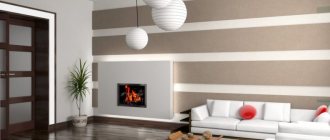
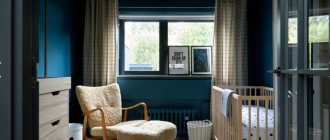
If you want to create a stylish interior in your hallway, you can’t do without paintings. They complete a room of any size, give it a personal touch and create a positive backdrop.
Properly selected canvases not only improve your mood, they can influence the perception of space, make a narrow corridor wider, and low ceilings higher. The color palette of the image adds coziness to the interior or, conversely, refreshes it.
To choose a painting, you need to trust your inner voice, taking into account the style of the hallway, the proportions of the wall and canvas, the material and texture of the frame. Don't forget about additional lighting and the potential of the mirror.
A variety of canvases are suitable for decorating a hallway: handwritten and embroidered, posters, frescoes and panels, modular options. If the style of the canvas is determined by the interior style, then the plot should be positive. It is worth abandoning dark themes; Abstract drawings will also not decorate every interior.
Feng Shui experts do not object to this approach, but supplement it with their own considerations. According to Eastern teachings, images of moving water, plants, as well as still lifes in rich colors will be useful for the entrance area.
Chevron (zigzags)
Chevron in the interior is a truly bold solution for creative people. Decorate one wall with this pattern and paint the others a neutral color to prevent your apartment from turning into the Mad Hatter's home. Chevron is best used in the living room.
The geometry of this pattern simultaneously feels great energy and playfulness, harmony and ease. To achieve this effect, use the chevron zonally and in moderation, carefully selecting the colors and width of the pattern.
Photo:
1/2
Photo:
2/2
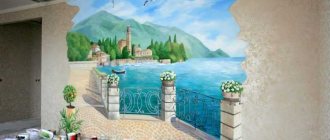
"Sgraffito" technique
A labor-intensive, skill-requiring, but incredibly beautiful way of decorating walls is “sgraffito.” At the preparatory stage, the surface to be decorated is putty in a couple of layers. The color of the bottom layer should be different from the top. After drying, the top layer is scraped off with a sharp tool according to a pre-selected pattern, obtaining an original pattern.
To create a multi-colored “sgraffito” you should use several layers of putty and scratch them to different depths.
More materials will be required for such finishing than usual. The first layer of putty should be about 8 mm, each subsequent layer should be at least 5 mm.
Herringbone
Another cool pattern that is somewhat similar to a chevron. But he is not so dynamic and catchy. The obvious advantage of this type of decor is its brevity and ease of perception. A striking geometric design can add expressiveness to any room without it ever becoming dull or outdated. This pattern is suitable for any style, as it finds a place in both vintage, minimalist and industrial spaces.
Photo:
1/2
Photo:
2/2
We glue the tape
We put on construction clothing (things that you wear at home), apply marks with a tape measure and a pencil to the places where the tape will be. Then we glue the tape with a slight stretch so that the line is smooth and not a wave.
The surface of this wall is paintable wallpaper from the developer. They are embossed and are not so easy to cover from paint with tape.
The person on top holds the beginning of the tape, unwinds it and gives it to the person below, who finds the mark with a pencil and sticks the tape there, so we get one line.
Knowing where the line should be, we very easily and quickly (in about 40 minutes) covered the entire wall with tape.
Finally, using any flat and soft object, we press the edges of our tape so that it is secured as tightly as possible. It is important for us that not a single drop of paint penetrates under the tape:
Cobweb
Don't be afraid, we are not talking about real cobwebs or scary spiders that evoke the gloomy atmosphere of ancient castles. With our pattern it's the other way around. If you choose bright mother-of-pearl colors, the interior of the room will acquire a mischievous and original atmosphere.
How to make such a pattern? Choose a base color (it can be anything, either bright or pastel), paint the wall with it, then chaotically place strips of masking tape and cover the wall with a different color. By removing the tape, you will get an original and creative wall that will delight your eyes!
Photo:
1/2
Photo:
2/2
What is interior painting?
First, let's figure out what interior painting actually is, and then find out what you need to learn how to create interior paintings yourself.
First of all, I would like to note that any painting in the interior is designed to create a certain mood and evoke some feelings and emotions in you, as well as place some accents in the room, at home or in the office.
Based on the name, we can conclude that interior painting is specially painted paintings for a living or working space, that is, for their interior. The main differences between such painting and classical painting are as follows:
- such paintings, as a rule, are painted on medium and large-sized canvases;
You can purchase high-quality canvases at competitive prices in my store if you want to get a quality product and not waste time searching! I leave a link to the canvas catalog - https://nyshop.pro/product-category/canvases/
- Just like the canvas, the details of the painting are most often large and prominent. Many paintings also have abundant decoration and may include not only paint, but also gold leaf, texture paste and other materials;
- The paint colors of such paintings are usually calm, not aggressive - pastel and not very bright;
- The subjects are also not complicated: large and beautiful flowers, with large ones depicted, exotic birds, flowers.
Thus, you must understand that interior paintings are works that should ideally suit your apartment in color, image, and size.
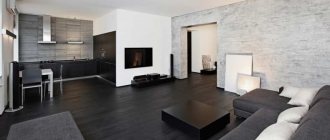
Geometric figures
Today this is one of the most popular and favorite ways to decorate walls. Geometric shapes are universal, so they can fit into any interior, regardless of style. Spectacular squares, triangles and rectangles will take pride of place in the design of the room. The undeniable advantages of this method of wall decoration are simplicity, elegance, dynamics and rhythm. If you want to create a modern atmosphere, geometric shapes are perfect for this, becoming either a laconic background or a bright accent.
Photo:
1/3
Photo:
2/3
Photo:
3/3
Art Deco in the hallway
“What is easy to change in the hallway decor with your own hands? Start introducing art deco in lighting fixtures"
This method of decoration can rather be called a set of useful tips for improving the decor in the hallway. Some style elements can only be organically fit into a pre-prepared space. What is easy to change in the hallway decor with your own hands? Start introducing art deco into lighting fixtures. Replace simple lamps with an extravagant chandelier or equally unusual sconces. The hallway will become atmospheric.
Art Deco style lamps in the hallway
An excellent representative of the direction is the horseshoe. Real forged items can be found at flea markets. They are treated with an anti-corrosion compound and mounted above the door. A forged grille, which is installed on the wall near the shoe shelf, can revive the interior. This solution is not only aesthetically pleasing, but also practical, as it allows you to protect the wall surface from dirt.
Metal products are an integral part of the art deco style
Naturally, art deco is great in mirrors. It can appear in the form of one full-sized accessory, enclosed in a wide baguette, or scattered across the walls in mirror strips.
Large mirror in a wide frame in art deco style
Often in esoteric shops you can see dream catchers, Chinese, African, Venetian masks and other carnival and cult props. It looks quite appropriate in art deco interiors.
Ombre
To create a trendy gradient, use colors that are one shade apart from each other. Shades that fade and blur, smoothly flowing into each other are an unusual solution for wall decoration. We are accustomed to the fact that walls should be painted in one color that lies perfectly on the surface. But don't be like everyone else and experiment with design.
Ombre can be done with either a soft, barely noticeable transition or a pronounced one. To experiment, create an ombre look using waves or stripes, where each segment is a different tone. To give the interior a complete look, use the same pattern in the decorative elements.
Photo:
1/2
Photo:
2/2
Plot and style
When choosing paintings for the hallway, one takes into account not only the area of the room and the prevailing color palette. Both light shades and its plot make a work of art positive; designers recommend choosing a theme based on the following rules:
- Dark themes with natural disasters and war scenes, as well as destroyed (even picturesque) buildings and broken things should be avoided. Subconsciously, such images cause a negative reaction.
Combination of frame and furniture color Source stroyka-gid.ru
- It is worth abandoning images of older people, even if it is a reproduction of a world-class painting. The same goes for drawings with a lot of details - they belong in the living room or office.
- Abstract drawings are also not suitable for everyone. They often cause the nervous system to tense up rather than relax, as is the case with classical landscapes and still lifes.
Lilac abstraction Source i2.wp.com
Paintings are a very diverse and flexible accessory to use. They are easy to match to a particular style if you remember the following rules:
- Classic design. In the spacious hallway there will be luxurious reproductions of paintings by Russian and foreign masters from different eras. Sea and forest landscapes, city sketches, portraits of people and images of animals are welcome. Graphic drawings also look good.
In a classic style Source i.pinimg.com
- Minimalism and modern laconic styles (Scandinavian, loft). Abstract subjects and graphic (often monochrome) images of trees, objects, and city landscapes look good here. Vivid designs, such as birds or flowers, are also possible - it all depends on the context.
In Scandinavian style Source cdn6.roomble.com
- Country styles. For Provence and country, the most acceptable natural motifs are images of birds and animals, rural landscapes, flowers, and household utensils. The palette of designs is slightly muted, and frames are chosen to match it - simple, wooden, perhaps with an antique effect.
With French charm Source evg-crystal.ru
- Country estate style (English). The respectable and elegant style of a country house will help you create paintings depicting hunting scenes, still lifes with trophies, horses and dogs. Classic paintings would also be appropriate; they are enclosed in characteristic wooden frames covered with patina and gilding.
Elegance itself Source opora-stroy.ru
- Pop Art. All kinds of posters, photographs and stylized reproductions in the spirit of the unforgettable Andrew Warhol or the no less significant representative of modern art Roy Lichtenstein are suitable. The absence of frames will add a fashionable touch to the composition.
Pop art Source homify.com
The effect of an underpainted wall
It is believed that if paint strokes and transitions between colors are visible on the wall, this is a flaw that spoils the entire interior of the room. But this is far from true. This effect, on the contrary, can decorate your room. Do you want an interior that’s not like everyone else’s? Then take note of this method and feel free to implement it in your room. Moreover, repeating this effect on your own will not be difficult. If you want a loft-style room with unusual walls, then this option will suit you one hundred percent.
Photo:
1/2
Photo:
2/2
The role of paintings: mood and correction of space
Based on how carefully and in detail the interior of the hallway is designed, the guests’ opinion about the inhabitants of the home is formed. But still, the main role of artistic paintings is to create a good mood. They are needed to please the eye and evoke positive emotions. If you want to look at the canvas again and again, then the main goal has been achieved.
The entrance area can be simply decorated, and that’s good. And you can further adjust the space if the paintings in the hallway on the wall are selected in the right way.
Modular painting in eco-style Source design-homes.ru
So, when choosing, it is important to balance the size of the room and the future decor. If the hallway is modest in size, it is better to decorate the walls with several small paintings. They will fit perfectly into the setting and will be perceived as parts of the whole, especially if you take care of the same (or matching style) frames.
If you want to raise the ceiling, opt for narrower, vertical patterns. A large-scale canvas will make a small room even more cramped and visually reduce the height of the ceilings. In addition, it is difficult to evaluate it when viewing it from a distance of a meter and a half. The lucky ones who have a spacious hallway have a wider choice of suitable sizes and ways of placing paintings.
Costume collection Source i.pinimg.com
In addition to choosing the right size, correction methods using paintings include the following methods:
- Taking into account the color palette of the canvas. Warm (red, yellow, brown) shades create coziness, but at the same time visually narrow the space. Cool (blue, white, green) shades have the opposite effect: they expand and refresh the interior.
In warm colors Source aviarydecor.com
- Using the contrast effect. On dark walls, a composition of small light canvases looks good (the opposite is also true). The hallway receives additional structuring, which is perceived by the subconscious as calming.
- Using Feng Shui methods. In the Eastern tradition, the presence of a mirror is considered important. Its location should contribute to the correct flow of qi energy, the same applies to the plot of the paintings. The relative position of these objects is allowed, in which the canvas is reflected in the mirror. Followers of the teaching claim that if the plot is chosen correctly, it will attract harmony and success to the house.
Strictly according to Feng Shui Source www.initial.com.ua
- Using a mirror. Even if you are not a follower of oriental practices and the placement of paintings in the hallway according to Feng Shui, the canvas reflected in the mirror creates a volume effect, which will not hurt in a cramped corridor.
- Most corridors suffer from a lack of natural light, so it would be correct to organize lighting for paintings. This can be either special LED lighting or regular wall sconces. To prevent the image from fading, it is protected with anti-reflective glass.
Loft in the interior Source static0.abitant.com
See also: Catalog of companies that specialize in the production of finishing materials and glazing
Partial painting
Do you need something bright, but you don’t want to completely paint the walls or are you afraid that the interior will turn out to be too catchy and provocative? Don’t give up on rich colors for fear of overloading the interior. Simply choose the wall you would like to paint and begin the creative process. An interesting option is to paint not only one of the walls, but also the ceiling (in whole or in part). If you choose bright accessories or textiles, you will be guaranteed an atmosphere of eternal summer.
Photo:
1/3
Photo:
2/3
Photo:
3/3
Vinyl stickers in hallway decor
This method of decorating a space is the simplest and is limited to two stages of action:
- Determining the theme of the stickers.
- Choosing a color palette.
There is absolutely no hassle with the last point. Any shade that harmonizes with the background of the walls or the color of the furniture will do. This does not mean at all that the stickers should be identical to the interior paints, but they should not sharply contrast with them.
The color of vinyl stickers should match the color scheme of the interior
The subject matter is somewhat more complicated. You'll have to think about it here. Look around. For example, the surface of the walls is decorated with wallpaper with a floral print. What can you add to the decor of such a hallway with your own hands? Of course, butterflies! Chic, bright, with sparkles on the wings, butterflies. They will really fit perfectly into the interior and greatly enliven it. For monotonous wallpaper you will need something more ambitious. Stickers should either set the overall tone or create some kind of landscape. The same approach will be needed for monochrome painted walls.
Stickers in a contrasting color are ideal for plain walls.
With the help of stickers you can visualize your dreams in the hallway. If you wanted to visit India, then themed stickers with the image of the Taj Mahal or some Hindu theme would be very useful.
Indian Style Vinyl Sticker
Thematic design ideas can be not only dreams, but also memories. In the latter version, the central place will be taken by photographs that are integrated into vinyl stickers. The decor turns out to be very unusual, one might say exclusive.
Photos are excellent solutions for hallway decor
The use of vinyl stickers allows you to transform your hallway efficiently and inexpensively. It will take you no more than two hours to do everything.
With the help of vinyl stickers you can quickly transform any interior
Stamps (stencil)
It is not at all necessary to have the skills of an artist: if you want to depict something on the wall or create a complex ornament, use templates. Today it is not difficult to buy a ready-made template made of plastic or durable film. If you don't want to buy anything, you can easily find amazing templates online and print them on thick paper. Don't want to print? It's okay, there is another option: draw some simple pattern on a piece of cardboard. As you can see, the usual process of painting walls can be turned into a fun, creative game.
Don't know what to paint on the wall? It all depends on your preferences and the overall style of the room. As interesting accents, you can draw: - geometric or floral patterns, - drawings, - letters, words or whole text.
Photo:
1/2
Photo:
2/2
DIY patterns on the wall
DIY stencils for wall decor
Decorating your home is one of the ways to give the room an individual style and unique image. There are many ways to achieve this, but wall decor using stencils is becoming increasingly popular due to their availability and ease of use. Such an ornament highlights one zone without overloading the entire space. A skillfully selected pattern will emphasize the style of the room, make an accent where necessary, and create a special mood. The article will talk about how to make a stencil for wall decor with your own hands and how to work with it correctly.
The stencil design is universal. It can be applied not only to walls, but also safely used for the floor, fireplace or windows. Everything is limited solely by the imagination of the owner of the premises.
Types of stencils
Plain. The most common type, one tone of paint is taken and applied to the wall. Simple, fast, beautiful.
Multicolor. Creating a real drawing, with many shades. This type requires a certain skill and patience, since you need to make a lot of stencils and paint the surface, placing one on top of the other. The important thing here is not to get confused by them.
Volumetric stencils for wall decor. The stencil is applied using putty, 1-3 mm thick. Despite the ease of application, it looks very beautiful and unusual, creating the impression of a velvety surface.
Anti-stencil or reverse stencil. It is called so because the surface is painted not inside the stencil, but outside it, creating a backlit effect. Ideal for muted bedroom colors.
Stencil selection
Of course, the stencil should be chosen based on the general style of the room in which the ornament is created. Since there is no arguing about tastes, advising the choice of one or another stencil is a thankless task. However, it is worth giving a few general recommendations.
- Accuracy to a large number of details. A beautiful drawing on the wall can turn into something like graffiti if you get too carried away with decorating the room. Laconicism is a trend that is always in fashion.
- One room - one type of ornament. Butterflies do not go well with geometric patterns, and damask patterns lose their charm when surrounded by trees and flowers.
- No excessively small details. Firstly, they are difficult to paint, and secondly, from a distance they can look sloppy, just like paint stains.
- The more jumpers and lines there are in the stencil, the more beautiful and clear the picture will be after application.
Samples of stencils for wall decor
Choosing a location for the stencil
As is the case with the choice of the type of pattern or ornament itself, it is impossible to give clear recommendations that a stencil will be appropriate in one corner and inappropriate in another. Only a sense of beauty will tell you where it is best to place the pattern.
To begin with, you can make small stencils for wall decoration and decorate the places next to the switches with ornaments. Typically, patterns around mirrors, above the table or near the bedside tables fit well into the design of the room.
How to make a stencil with your own hands
The market is replete with a huge number of ready-made stencils for wall decoration, for every taste and budget. Almost every hardware store, especially large retail chains of building materials, offer a wide range of ornaments and designs. But a drawing created by yourself will be even more valuable.
To make your own stencil you will need the following tools:
- original drawing;
- stencil material (film, plastic, cardboard);
- stationery knife;
- marker, pencil;
- scotch;
- glass (or other) surface on which it is convenient to cut a stencil.
First of all, you need to decide on the pattern according to which the stencil will be made. Those who have artistic abilities can design and draw it themselves. Those who are not lucky enough to have a talent for drawing, having figured out what style they would like to decorate the walls or ceiling in, can search for a suitable image on the Internet and print it on a printer. If the drawing is large, divide it into parts, and then fasten the parts together with tape.
The next step is choosing the material for the stencil. It can be simple paper or cardboard, self-adhesive film or thin plastic, depending on the type and size of the ornament. To simplify the task, you can contact any advertising agency, where they will help you create a stencil based on the image and print it.
To transfer the ornament to the material, you need to use carbon paper, or, if transparent plastic is used for the stencil, simply trace it along the contour with a marker. To prevent the design from “moving away”, it is attached to the stencil with tape or paper clips.
When the drawing is transferred, in some cases it is necessary to finalize it by drawing the lines and jumpers along which it is cut. If the stencil is depicted on paper or cardboard, then it is better to cover it with tape on both sides or laminate it so that the paint does not absorb and the jumpers do not curl. This will extend the life of the stencil.
It is important to cut the stencils in such a way that there are no cuts or burrs, otherwise the final design will look untidy. Another subtlety - all small parts must be attached to larger ones, otherwise they will disappear when cutting out. Only the areas that will be painted are cut out. To do this, use a stationery knife or blade, and place glass (or any other hard material that you don’t mind cutting) under the stencil, then the cut lines will be clearer and smoother.
Working with a stencil
- stencil;
- stencil glue;
- brush, roller or sponge for applying paint;
- acrylic or spray paint.
First of all, you need to prepare the surface on which the stencil will be applied. Clean it from dust and dirt, if you can wash it, if not, wipe it with a clean dry cloth or vacuum it.
The second step is applying markings. If possible, it is better to use a level, with it you will be confident that the drawing will not be skewed or crookedly applied. The extreme points for the stencil are marked with a pencil in order to attach it evenly in the future.
It is recommended to practice first before seriously applying a drawing to the wall. This can be done on a piece of wallpaper or large Whatman paper. A preliminary sample will allow you to practice the application technique and choose the color of the ornament. It is advisable to make several options in different shades, and try on how each of them will look in the future, attaching the resulting pattern to the wall.
Also, ready-made reusable stencils for wall decor are available for sale. They are made of polymer film, which is easy to clean and does not tear, allowing you to train on paper the required number of times.
Aerosol glue
In order to fix the stencil on the wall, it is best to use a special aerosol glue. It leaves absolutely no marks, and when using it, you don’t have to worry about the wallpaper or paint coming off the wall along with the stencil. The glue is sprayed in an even layer onto the stencil, which is then carefully pressed against the surface, especially in areas of thin bridges.
What is important to know about working with glue:
- on different surfaces it holds the stencil differently; the smoother the surface, the better the adhesive properties of the glue;
- after removing the stencil, the glue does not remain on the wall;
- glue is applied to the stencil and provides maximum adhesion to it;
- after washing the stencil, the glue can retain its adhesive properties, so if you plan to reuse it, you don’t have to completely wash off the glue;
- the larger and heavier the stencil, the more difficult it is to hold it only with glue; in such cases, you may need “safety net” in the form of masking tape;
- it does not prevent paint from flowing under the stencil.
Coloring
Coloring is a fuss-free activity.
It is recommended to use acrylic paint for stencils; it dries quickly and is suitable for all types of surfaces. The paint is applied using a brush, sponge or roller. It is important that when working with a stencil, there should be a minimum amount of paint to eliminate the possibility of leakage.
When working with a brush, it is held directly perpendicular to the wall, the paint is applied using the padding method, to prevent lint or paint from getting behind the stencil.
If coloring is done with a sponge, then it is better to make the first prints on another sheet of paper, this will remove excess paint.
When working with a roller, you need to ensure that the paint is distributed evenly, especially in the corners and small parts of the stencil. It is more convenient for them to work with large stencils.
To spray spray paint, the can should be held at a distance of approximately 30 cm from the wall. The surface may need to be additionally protected from accidental paint spilling outside the stencil.
The saturation of the drawing with color occurs gradually, in several passes. If its boundaries are not clear enough, they are drawn with a thin brush after removing the stencil.
Creating a three-dimensional drawing
To apply a three-dimensional pattern, you will need a special acrylic putty. It is applied using a spatula, carefully layer by layer until it reaches the desired thickness. A volumetric pattern is usually achieved with a thickness of 1-3 mm. A couple of minutes after application, when the putty has already set but has not completely hardened, the stencil must be carefully removed so as not to damage the ornament. If the layer is not very even, it’s okay; after the putty has completely dried, it can be easily leveled using fine sandpaper. Then the drawing can be painted or tinted.
When the job is completed, the stencil should be washed and dried, if possible, for reuse.
Mistakes you can avoid
The most common mistakes that happen when working with a stencil are:
- stencil offset;
- paint leakage.
To avoid such troubles, you need to securely fasten the stencil; aerosol glue is an ideal assistant here. And also take a minimum amount of paint. Accuracy and patience will undoubtedly help achieve the perfect result.
Practice shows that those who have studied the stencil manufacturing technology and carefully read the instructions for use and coloring are always satisfied with the result.
Stencils for wall decor photo
Stencils for decorating kitchen walls
Articles on the topic Patterns on wallpaper - original do-it-yourself decor
The design of a room is best demonstrated in the details. Correctly placed accents will help give the interior of the room uniqueness and a certain chic.
Using a roller, you can apply a variety of patterns to the surface of the wall, giving the room an unusual look.
To express your individuality, a great way is to decorate your walls.
To do this, you don’t have to hire a designer and spend huge amounts of money, because you can make patterns with your own hands. All you need is to be patient and use your imagination. You can decorate the walls of rooms not only alone, but with the whole family - it's a lot of fun!
Ways to decorate walls
Stencil of a pattern for the wall.
You can decorate your walls in many ways. It all depends on your wishes and creative capabilities. The most commonly used methods are:
- paint drawing;
- applique;
- removable elements.
To decide, you need to become more familiar with each approach.
Return to contents
Drawing with paint
This method involves the use of paints to create a unique pattern or ornament on the walls of the room. It is not necessary to tear off the wallpaper and plaster the walls. Modern wallpaper is good because you can draw on it without any problems, and if you get tired of the drawing, you can easily repaint it . Vinyl wallpaper and fabric wallpaper lend themselves well to painting.
Even in ancient times, the ceilings and walls of palaces and temples were painted with frescoes and paintings. Today you can borrow this idea to decorate your own home. If you are good at drawing, you can use your talent to paint wallpaper. To do this, you will need water-based paints, preferably acrylic or latex, brushes and imagination. If in doubt, draw the outlines of your future masterpiece with a pencil or practice on old wallpaper.
You can apply paint to the wallpaper using a special spray paint can.
For those who do not have special artistic talent, you can use stencils. What is needed for this:
- cardboard;
- image of the pattern;
- scissors or stationery knife;
- brushes;
- paints;
- masking tape.
Find a design or pattern that you like on the Internet and print it on paper. Then glue it onto cardboard and cut out along the outline. Use masking tape to glue the cardboard to the wallpaper and start decorating. Then let it dry a little and carefully remove the stencil. You can also simply trace the stencil with a pencil and paint the pattern without a stencil, but only if you are sure that you will not go beyond the outline of the drawing.
To cover the walls with a continuous pattern, you can purchase a special roller. His video is covered with bumps depicting patterns: animals, plants, abstract ornaments. All you have to do is dip it in paint and run it along the wall.
Return to contents
Application on the walls
With the help of simple applications you can transform even the most boring room.
Besides paint, there is another way to apply patterns to walls. You can make wallpaper with ornaments yourself. To do this, draw a pattern on the back side of the wallpaper that has not yet been pasted and cut it out with a blade. The wall must be prepared in advance: paint it one color or make multi-colored spots and splashes.
You can entrust this task to the child so that all family members are involved in this important process. When the paint has dried, apply new wallpaper with an embedded pattern. Walls decorated in this way will look very beautiful and unusual.
If the wallpaper is already pasted, use available materials. You can paste pieces of other wallpaper, fabrics, photographs or various pictures directly onto the walls, from which you can create a wonderful collage. You can also buy special wall stickers in the store.
Coffee beans, cereals, buttons, ropes, beads, sticks, straws or even dried flowers will look very interesting and unusual. From these items you can create various compositions that will become a highlight in your interior design. To attach them to the wallpaper, it is better to use a gun with transparent hot glue.
Return to contents
Removable elements
For those who do not want to take risks or like frequent changes, you can use removable wall decor elements. These can be various wooden, glass, metal or plastic ornaments that are attached to the walls using hooks or nails.
You can frame pieces of fabric, newspaper clippings, photographs and drawings, embroidery or other items and hang them on the wall. Small mirrors inserted into homemade frames look interesting. If such massive elements do not fit into the overall design concept, you can do without frames by attaching drawings or pieces of fabric to cardboard or thin plywood.
This method of decorating walls is good because the decorative elements can be changed, and the wallpaper will not be damaged one bit, with the exception of the holes for fasteners. In addition, volumetric compositions look very impressive.
The final design of the room depends on your choice. Don’t be afraid to experiment, but don’t get too carried away so that after your creativity you won’t have to redo the renovation.
How to draw patterns on the walls with your own hands
If you already know how to draw patterns on walls using a stencil, it’s time to learn a couple more simple methods.
If the surface is smoothly painted, it can be decorated by stamping and rolling. In this case, everything is limited only by the author’s imagination - the color of the drawing, its direction and size can be absolutely any. It is better to use paint of medium thickness for applying patterns on the wall using these methods.
How to apply a pattern to a wall using stamping
The most common way to apply patterns to walls with your own hands is stamping using fabric. How to make patterns on walls using this method? The fabric for stamping is crumpled, soaked in paint, the excess of which is removed. Trimming blows are applied to the surface to be painted with equal force. If the "configuration" of the crumpled fabric is not changed, the patterns will be the same, but the fabric swab can be intercepted, and then the pattern will change with each blow.
Stamping can be done using a regular plastic bag. For this you will need several of them so that you can change them as needed. Different plastics will give different results, so experimentation can help you determine which bag is right for the job.
When stamped with a bag, the pattern turns out to be angular. If necessary, you can smooth out this effect. To do this, carefully move the flute over the painted surface.
For stamping, you can use improvised materials, but there are also special stamps and rollers. with which you can get identical designs or geometric patterns. They are made industrially from soft rubber or plastic. A rubber or plastic plate of the required size and shape with a cut-out pattern is glued onto a tube or wooden float used for grouting, with a perfectly flat surface. Otherwise, the stamp will not completely adhere to the surface. This stamp is easy to use. In the process of applying a pattern to a wall, you need to soak it in paint, press it to the surface and immediately remove it - the pattern or design will remain on the wall.
Look at the photo - the patterns on the wall with your own hands using the stamping method look very original:
How to make knurled patterns for wall decor with your own hands
How to make a pattern on the wall with your own hands using the knurling method? This technique is much more complex than stamping. It requires extreme accuracy from the master, since the pattern is rolled in only one direction.
On large surfaces, knurling is usually not used, since it is associated with certain difficulties, but under borders, using this technique, you can depict, for example, falling folds of fabric.
If knurling is done using fabric, a roller of any diameter and about 25 cm long is made from it, the ends of which are stitched or tied together.
You can make several rollers to make it more convenient to work. They should all be made from the same fabric and have no seams. Makeshift tools should be kept in a clean container. If the roller is dirty, do not use it, as the wall will also be dirty.
Before making patterns on the wall by knurling, it is first recommended to trim the surface to be treated - the finish in this case will resemble fabric.
Knurling is done with both hands, and adjacent walls may be dirty. Therefore, before starting work, you should cover them with newspapers, film or seal them with masking tape. It is enough to protect 15 cm of the adjacent surface. The paint is applied to the area to be finished from top to bottom in strips that are rolled overlapping, starting from one of the upper corners of the wall.
You can create beautiful patterns for DIY wall decor if you use fabric with a textured pattern to make rollers. The pattern applied using matting looks impressive. Patterns can also be made in different colors.
Each subsequent color is applied to the surface after the previous one has completely dried.
For knurling, you can use a special roller. They are available in two types - without a tank and with a tank. Like a conventional tool, knurling rollers are fixed in the machine and rotate freely around an axis. In this case, you need a machine designed to simultaneously fasten two rollers, one of which should be smooth, and the second with a pattern. The rollers should fit tightly against each other so that a smooth roller dipped in paint evenly applies the color to the patterned roller. The roller with the pattern is pressed to the surface, passed from top to bottom, and the desired pattern remains on the wall.
The smooth roller should be periodically wetted with paint. A tool with a reservoir is convenient in this regard - paint is poured into it, which is enough to paint large surfaces. The color is taken from the reservoir using a special feed roller, which supplies the coloring composition to the roller with the pattern.
The force of pressing the tool on the wall depends on the increase or decrease in the amount of paint. It is rolled from top to bottom so that the strips lie vertically on the surface. The first knurling is made along a line marked along the marked cord.
It is necessary to ensure that the roller is pressed against the wall at the same point each time. To do this, you can make a mark in the form of a dash on the instrument itself.
Don't miss more on this topic
- Replacing an socket with your own hands Replacing an socket is necessary in cases when the old one stops performing its functions or is simply broken.…
- Decorating doors with your own hands Decorating interior doors with your own hands: ideas You are not going to spend a large amount, but want to refresh...
- Do-it-yourself installation of fire protection for an air duct Before you begin installing fire protection for an air duct, you need to complete preparatory work. All duct flange connections...
- Repairing a toilet cistern with your own hands It’s good when everything works properly, but what to do if one fine day you…
Paintings
Unlike the previous method, here you can and should draw something yourself. If you love to draw and brushes and paints are your best friends, then feel like Van Gogh or Picasso while painting a masterpiece of fine art on your wall. Well, if you are not friends with them at all, do not despair. Invite a professional artist to do this, who will draw you whatever your heart desires - from the simplest geometric shapes to entire compositions. The main thing is not to overdo it with the chosen motif and organically fit it into the design of the room.
Photo: shopify.com
1/2
Photo:
2/2
Using a roller
Decorative rollers for painting walls can be purchased at any hardware store. They are easy to use, durable, functional, and often come with several attachments. The mark left by such a roller can imitate the pattern of an animal skin, a floral pattern, be geometric or abstract.
You can make a decorative roller with your own hands by wrapping the surface of a regular attachment with thick threads, a piece of fabric or mesh. Knitted fabric, pieces of foam or leather, and plastic bags are used. The effect of bursting soap bubbles remains after a foam roller with holes, similar to a fur coat - from a fleecy one.
Watercolor stains
As children, we all loved to draw simple patterns, mixing all the colors of the palette and pouring water on the resulting stains. The young artists in us were screaming. Feel like a child again by transferring children's drawings to the walls of your room. To make the interior seem even brighter and more original, add textiles of the same color as on the walls.
Photo:
1/3
Photo:
2/3
Photo:
3/3
Main advantages
- Low price;
- Easy to make at home;
- Repeated use;
- Huge assortment;
- Patterns will highlight the features of the interior or hide defects.
Drips
Does your soul require change and something bright? A wall covered in colorful streaks from ceiling to floor will help you with this. Thanks to this method, the wall will turn into a real art object that can be seen on the streets of the city. The advantage of this type of decoration is that it is self-sufficient, that is, you do not have to additionally decorate the space, since the colorful drips are magnificent in themselves.
How to achieve this effect? Choose a base color for the background (usually neutral and discreet shades), and a contrasting color for the drips. Feel free to pour paint on the walls so that it flows down freely. To complement such an interior, several decorative items can be decorated in the same style.
Photo: agsia.com
How to choose a painting: 6 subtleties of the process
Size is not the only thing that influences the choice of canvas. It is equally important to take into account points that will affect the result and overall impression. When choosing a painting, take into account the following nuances:
- Trusting your inner voice. If you are afraid of making the wrong choice, focus on your inner feelings. It is important whether you have internal acceptance or, conversely, non-acceptance of the art object.
The plot with the balcony Source homeli.ru
- Pictures in frames look harmonious if their size is proportional to the size of the wall. In general, the exhibition should not occupy more than a third of the free space. In a cramped corridor, it is better to limit yourself to one or three frames, which are placed at eye level.
Home gallery Source i.pinimg.com
- The canvases are selected according to the style of the room. The components of the right painting are not only the right colors, but also the right theme.
When space is tight Source lixmebel.com
- The decoration details of the hallway should be positive, and the same applies to the color scheme of the paintings. It is worth abandoning dark shades and gray (“dirty”) blurry images if this does not play into the style.
- To create coziness, it is not necessary to use only muted shades. The desired mood will also be supported by richer tones: green, yellow, lilac, diluted with white.
In contemporary style Source cdn.incollect.com
- The color, style and texture of the frame are of great importance. It’s good if the frame of the picture is combined with other interior elements, maintaining the unity of style. If you plan to hang several pictures, it is better to choose frames from the same material. This rule can be broken if you know how to combine different frames with each other.
For lovers of abstract painting Source i.pinimg.com
Like clockwork
Another way for those who like to draw for the soul and lift their spirits. Use your walls as an artistic canvas and use big, bold strokes to fill a monochromatic space. Feel like an artist who works in impressionist technique! It’s impossible to do something wrong because there are no strict rules. So choose your favorite colors and go ahead.
Photo: abigailahern.com
Openwork pattern using a tablecloth
A budget-friendly, quick and effective way to decorate a wall is a homemade stencil made from a rubber kitchen tablecloth, tulle or napkin. There are many advantages to this finish. The tablecloth costs a penny, but can be used repeatedly. The algorithm for applying the pattern can be done even by an amateur finisher.
- The wall surface is primed and, after drying, covered with the first layer of putty.
- A stencil is attached to the wet solution.
- The top of the tablecloth is covered with a second layer of putty and smoothed tightly with a roller.
- The stencil is removed and the pattern is allowed to dry.
- The surface of the wall is lightly sanded with sandpaper, covered with primer and tinted.
To transfer the image with greater accuracy, the top layer of putty is made thicker or mixed with a small amount of PVA glue. It is important to create a smooth transition between the flat surface of the wall and the relief; the edges of the pattern are blurred with a slightly damp sponge.
If relief is not needed, the tablecloth can be used as a stencil for painting.
Color splashes
This option is suitable not only for walls, but also for the ceiling - the composition will look much more colorful and original. Take more paint onto the brush and splash it in different directions. Then the renovation will not be so boring, but will become a real holiday (and help you relax). This effect will not only transform the interior of the room, but will also mask the architectural imperfections of the surfaces.
Photo: clementinehfg.com/
Painting a pencil drawing
When painting, water-based paints and a palette are used to combine shades. First of all, a transparent layer is applied, due to which the color distribution is ensured. The entire picture is gradually filled with color spots. It is not recommended to use bright colors at this stage. It is recommended to draw objects located in the foreground as clearly as possible. Small details should be painted after applying the main drawing; thin brushes are used when carrying out the work.
Along the curve
Painting walls in several colors is not an easy task because it requires care and precision. We are used to the fact that the line between colors should be perfectly even, like a ruler. Or is it still not quite even?
Forget about boring rules and give free rein to your imagination. This method will give the interior freshness and originality. To make the design even more classy, each zone of the same color can be decorated with various accessories (for example, paintings or photographs framed to match the color of the walls).
Photo:
1/2
Photo:
2/2
How to decorate a wall in the hallway: the right choice of finish
If in a modern small apartment it is not always possible to adequately decorate the corridor, then in a country house you can use all your strength. There is a real opportunity to creatively design a utilitarian room. But in every case it is necessary to remember the rules and take into account the recommendations of professional specialists. The same goes for the hallway.
What to consider when choosing wall decoration:
- The size of the room and its shape;
- The location of the hallway in relation to other rooms;
- Are there small children or beloved pets in the house?
- Decoration of the entire house or apartment;
- What does his hallway mean to the owner?
When choosing wall finishes, you should take into account both the size of the hallway and its features.
Before you start decorating, you need to think about the functionality of the room. Maybe the hallway will serve certain duties or become a simple transition between rooms.
If space in the hallway allows, you can install shelving or open chests of drawers to store small and necessary parts.
The walls can be decorated with drawings or architectural elements. Hang up family albums or art collections, souvenirs from friends, or things you brought back from vacation. You can use a variety of things to decorate the walls in the hallway, and everything will look beautiful and original.
Colorful waves
Do you like to relax by the sea and splash in the azure waves? Then transfer your love directly to the walls of your room. Such waves can be painted both in similar colors and in contrasting ones. This option will look especially cool in a children's room or living room. Under the brightest wave color, choose an accent of the same color, such as textiles.
Photo: decorationmaison.info
Inscriptions
Love inspirational quotes that energize you to do great things? Great! Many people hang up such phrases, designed as posters, or simply look at them on their phone screens. It's time to take it to the next level. Using a stencil, write your favorite phrase on the wall - and it will always be in your sight, as if to say: get out of bed, great things are ahead of us!
Photo: hirespace.com
Decoration with a spatula and trowel
By experimenting with the size and frequency of strokes, as well as the nature of hand movement when applying putty, you can create dozens of original textures. The most popular are arcs, waves, fish scales, etc.
Using a trowel and a spatula, it is easy to create the most traditional options for applying decorative plaster: “grotto”, “bark beetle”, “ottocento”, etc.
Color blocks
Using this method, Lego constructors will appear on your walls. Or imagine that you are playing Tetris and the game seems to come to life and move into your room. Miracles and that's it. Experiment with colors, shapes and sizes of blocks, because there are tons of options for combining them. These can be either bright rectangular blocks that are separated from each other by a frame along the contour, or delicate light shades that will create a gradient. Imagine!
Photo:
1/2
Photo:
2/2
Sponging
Another budget option for transforming walls yourself is to print using a washcloth. The sponge is lightly dipped in paint and pressed lightly onto a plain base. In order for the texture to be viewed as clearly as possible, it is important to follow a few simple rules:
- Before painting, the wall is leveled, cleaned and degreased.
- The base color is allowed to dry completely.
- The sponge is pre-soaked in water or, when working with oil paints, in a solvent.
- After applying paint to the sponge, remove the excess by blotting it with a napkin.
If during work there is a streak or drip somewhere, after complete drying it can be easily masked with the color of the base.
Polka dots
Do you want something light and mischievous? Then peas are perfect for you. You can use both large and small circles, on the entire wall or just emphasizing some part of it, multi-colored or plain. Combine several of the options listed above - and your room will turn into one of the installations of the famous avant-garde Japanese artist Yayoi Kusama. This print can be used in any room and in any style - no restrictions.
Photo:
1/3
Photo:
2/3
Photo: shopify.com
3/3
Dripping
Dripping is a spraying technique that came into design from painting. It is actively used in bold interiors with rich colors.
By experimenting with the size of the drops, the density of their application and the number of shades used, you can create a bright, picturesque accent covering the entire wall.
For inspiration, look to the work of the Abstract Expressionists, who added sand, crushed glass and other materials to paint to create dense, textured canvases.