- Common Problems
- Hull repair
- Failure of fittings for internal filling
- How to update wardrobe doors
- Updating the appearance of the wardrobe
Restoring a wardrobe with your own hands will give you the opportunity to save on the purchase of this useful interior detail. An old or broken cabinet can be repaired and updated without much difficulty. The most common cause of breakdowns is considered to be door malfunctions, and restorations are the loss of the surface's appearance. Now we will look at several options on how to update an old wardrobe with your own hands and fix existing problems.
Common Problems
Before you repair your wardrobe and update its appearance, you should understand the type of damage. Among the most common we highlight the following:
- damage to the cabinet body or internal partitions;
- failure of fittings for internal filling;
- failure of the roller system and door closers;
- loss of aesthetic and commercial appearance of both the entire product and its individual elements;
In all these cases, it is quite possible to repair the wardrobe yourself, for which you will need components and tools.
guide defects
During operation, the parts of the wardrobe are subject to serious wear. Defects appear that can prevent the mechanism from working properly, but also spoil the appearance of the doors - distortions, sagging, loose closure. This spoils the appearance of the product.
If adjusting the rollers or redecorating the guides by tightening the screws does not save the situation, then it is necessary:
- Purchase a new set of guides (top and bottom);
- Dismantle the old system (remove the doors, unscrew the old guides);
- Mark the drilling locations for new components;
- Drill the required holes;
- Tightly screw the guides onto which the cabinet doors will be installed;
- Adjust the height and direction of the wheels, check how securely the stoppers are fastened.
Hull repair
First of all, remove the cabinet doors, then, if necessary, remove the lower and upper guides. Next, you may need either complete or partial disassembly of the housing - to fix it, they often use either an eccentric tie or so-called Euroscrews, which must be unscrewed. If necessary, you need to order additional sets of fasteners.
If the case has mechanical damage, the panel will have to be replaced. By the way, it is recommended to buy components for sliding wardrobes in advance in those sets that will be needed.
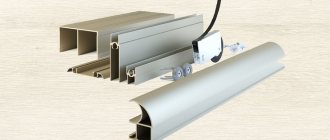
Accessories for wardrobes
Accessories for wardrobes
Laminated chipboard panels are most often used to repair the body. You can replace the entire panel, or you can replace only a part, if the design allows it. In any case, you should carefully adjust the dimensions to the existing furniture format.
Knowing how to fix a wardrobe, you will not encounter serious problems. You should pay attention to the correct installation of the doors - first install the body using a level, then install the doors and achieve the correct location by adjusting the screws on the rollers.
dirt in the grooves of the guides
Over time, dust, wool, lumps of dirt, and threads accumulate in the grooves of the lower guides along which the doors “run,” subsequently preventing the smooth movement of the rollers.
guides
You need to fix this problem as follows:
- Take a hook or screwdriver and remove the largest accumulations;
- Clean up the residue with a vacuum cleaner.
To prevent new blockages, it is recommended to carry out preventative cleaning at least once a month.
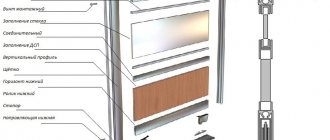
How to update wardrobe doors
In principle, mechanical problems (loose closure, play, difficulties in moving) are a reason to completely update the part. You can even completely replace them by choosing suitable sliding doors for your wardrobe. You should focus on the dimensions of the models, since the doors only fit the size of the cabinet itself. If the furniture is made to order, you will have to order parts and call a measurer.
Before you repair the wardrobe doors, you should eliminate the other furniture problems described above. Next, we remove the doors and install new ones. We begin the installation by attaching the guides, first of all the top track is attached. It is necessary to fasten the track with self-tapping screws, making holes in the case every 50-60 mm.
Installation of the upper profile
Next we work on the bottom track, but do not fix it, but only mark the places for the screws. Repairing a wardrobe door with your own hands involves a precisely calibrated level - we do the fastening after installation.
We attach rollers to the door leaf and insert the door into the guides, checking how the door moves along the tracks. There should not be too much play or difficulty in moving. Using a mounting level, we achieve a perfectly vertical position of the part. Once this is achieved, we fasten the lower track in its existing position, taking into account the vertical.
Sliding systems for sliding wardrobes are quite heavy, so before final fastening you should check the vertical level of the entire cabinet.
Options for breakdowns and solutions
If the door is out of order, do not rush to contact highly paid craftsmen. In a large number of cases, you can identify the cause of the breakdown and eliminate it yourself.
Most often, wardrobe repairs at home are required because this piece of furniture:
- frame elements break;
- mechanical components fail: guides, rollers are broken, hinges are torn from the facade or side wall. Very often it is necessary to repair a sliding wardrobe by replacing rollers;
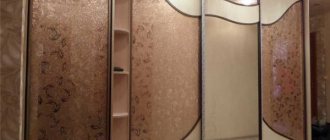
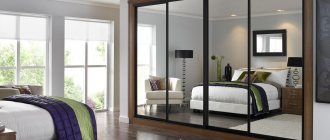
- glass or mirror is damaged. In the manufacture of premium sliding wardrobes, mirrored facades are often used. It is quite possible to damage them if used carelessly.
Frame elements
If one of the elements of its frame breaks during use, for example, a scratch appears on a shelf, it can be restored. To do this, you will need to dismantle the old hinges, remove the shelf, sand it and cover it with paint and varnish in the area of the immediate defect. If an internal accessory, such as a hanger, fittings or a leg, has become unusable, then the broken part will need to be replaced. It is often necessary to replace mirrors in wardrobes.
Frame elements
A simple metal corner will help strengthen the cabinet frame
Mechanical components
Repairing a wardrobe with your own hands is quite possible if you clearly identify the cause of the problem. Let us describe the main mechanical components, damage to which leads to malfunctions in the operation of the model.
Contamination of grooves in guides
Often repairs are required due to clogged grooves in the guides. This problem entails difficulties when moving the cabinet doors to the side. The problem can be resolved by cleaning the bottom guide groove with a medium-hard cloth. If necessary, it can be moistened in a soap solution.
Preventive measures (timely removal of dust and dirt) will allow you to use the sliding system for as long as possible without any problems.
Over time, dirt may accumulate in the guides, which can be easily removed with a soft cloth.
Incorrect installation of guides
If the guides are installed incorrectly, even premium sliding wardrobes may need repairs. Over time, the doors will have to be moved to the side less smoothly. They may also fall out of the guides, as the roller will slip out. You will have to remove the doors and then the tracks to install them correctly.
Correct installation of guides
Doors not closing tightly
If some time after assembly the doors no longer close tightly, you will need to determine the cause of this problem. Perhaps the structure is overcrowded with things and some item of clothing simply prevents the door from closing. Check the contents of the cabinet. If these fears are not confirmed, a thorough repair of the sliding doors will be required.
The doors may not fit tightly against the side wall due to a broken latch. If the stopper falls out or moves, you should return it to its place. For the best result, it is worth placing it on durable glue, strengthening the adhesion using a press.
Stopper
Installing the stopper
Misadjustment of rollers
When using premium sliding wardrobes with three doors, it is important to monitor the quality of the rollers. Without timely adjustments, they can quickly become unusable. If a gap appears, peel off the buffer tape in the corner of the facade, and then turn the screw clockwise. This will eliminate the gap at the bottom. If the gap is at the top, then the screw is turned counterclockwise.
Creak when door moves
Creaks and other noises when the door moves indicate a bent roller that will need to be replaced. You can do this yourself, the main thing is to select a replacement part with similar operational parameters.
But before replacing the roller, you should try to solve the problem with a few drops of machine oil. Perhaps by dropping them into the mechanism you will solve the problem and will not have to purchase new expensive parts.
Roller failure
If a roller is damaged during use of furniture, you need to replace it, since this unit cannot be repaired. Remove the door, and the type of sliding system will determine the specifics of this operation.
| Work sequence | Type of sliding system | |
| Aluminum | Steel | |
| Removing the door leaf from the guides | Lift the door and remove the lower wheels from the guide. Next, slide the lower part towards you and pull the blade out of the upper profile. | Sliding systems of this type almost always have special locks on a mechanism with a wheel on the back side of the facade. In some models, it is enough to turn the lever, in others - move it to the side. After this, the facade can be removed from the guides. |
| Inspection of the wheel and dismantling the roller | Turn the screw at the bottom of the facade from the end side using a hexagon. | When unscrewing the mounting screws, do not forget to hold the door frame, as it may move apart. |
| Installing a new roller | The same hexagon will help to secure the new roller in place of the old one. | The new roller mechanism is tightened with a hexagon, holding the door frames. |
It is better to dismantle the door leaf with a partner, because when it is lifted, the spring mechanism in the lower rollers pushes the wheel outward. You will need to hold it carefully.
Roller system elements
Replacing the mirror part
Often, during operation, mirrors in a 3-door wardrobe are damaged. If the mirror insert of the facade is damaged, you will need to disassemble its frame. It is made either of aluminum and fixed with four screws located at the end of the doors under the dust brush, or made of steel and fixed with four roller mechanisms located on the back of the doors.
To repair a wardrobe and replace a mirror, you will need a screwdriver or screwdriver. The first thing to do is to remove the door, which will require disconnecting the stopper. Only after the door has been removed and placed in a horizontal position can you begin to replace the mirror.
The work should be done slowly, since replacing a mirror in a closet is a painstaking process. Door assembly after repairs, which involve replacing the mirror, should be carried out in the reverse order.
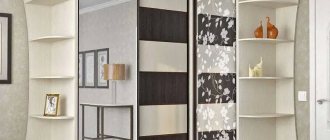
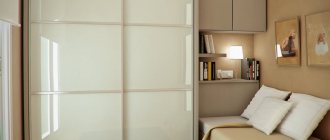
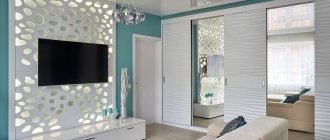
Updating the appearance of the wardrobe
Other options for repairing wardrobe doors with your own hands include general painting of furniture. It is advisable to use acrylic paints for these purposes. This allows you to significantly update the entire appearance of the cabinet - for painting it is simply disassembled according to the above algorithms. Before painting, it is necessary to sand the surface and apply a primer to it. You can use various design coloring options - it depends on your personal preferences. Or you can order a ready-made case in a new design. At the door, if you are not satisfied with the filling, you can replace it by first calculating all the dimensions of the inserts.
Now you know how to update your wardrobe without calling a specialist. This is not the most difficult job if you follow the rules and follow all the rules. Such furniture requires regular maintenance - this will allow you to save on purchasing new options.
fix it yourself or get professional help
Do-it-yourself repairs will be appropriate if:
- The damage is minor or only parts can be adjusted;
- The warranty expired a long time ago;
- The owner has the tools, the appropriate skills, and a place to carry out the work.
In other cases, it is better to trust the professionals. Thanks to specialized tools and free access to materials, this will take little time. The cost of services depends on the scale of the repair. At the same time, manufacturing defects and adjustments are carried out free of charge within the warranty!
How to repair an old chipboard cabinet, types of repair
Renewal, modernization, restoration of cabinet furniture involves different types of work, one way or another related to the repair and replacement of failed furniture components and parts. But all of the above repairs require a different approach, different costs and hand tools.
Repairing a cabinet made of chipboard means eliminating all faults in the form of sagging or torn-off facades, replacing torn out fittings on shelves and drawers. And also adjust hinges that are out of adjustment, tighten fasteners on loose sides, eliminate distortions and deflections on shelves and drawers. If this is a wardrobe, then door repair involves cleaning the guide tracks from debris, minor repairs or replacing jammed running parts and rollers. To do this, you will need ordinary hand tools for assembling furniture. And also, possibly, new hinges, guides to replace old ones that have failed. Based on the condition of the chipboard parts, you can make a decision - restore and update the existing ones or order new ones.
Door rollers are out of order
You can replace the rollers if during use they have changed their shape or worn out (the door sags or slides off).
To do this you need:
- Buy a set of new rollers;
- Remove the compartment doors from the guides;
- Unscrew the old rollers;
- Using a screwdriver, install a new set and return the doors to their place.
It is necessary to “run in” the doors in order to, if necessary, adjust the height of each wheel.
Main causes of failure
First, the user needs to identify the main causes of the breakdown. Often, the door of a chipboard cabinet cannot be torn out just like that. To do this, you need to make special efforts, and if the hinges fly out, they need to be urgently dismantled.
Reference! Inspect the scene of the accident to see if there is any damage to the cabinet in the form of material chips or scratches. If there are any, then you need to solve the problem of not only torn hinges, but also repair the cabinet itself.
Installation in this case is only possible if you have a number of repair tools.
The reasons for this incident may be:
- low-quality manufacturing materials;
- improper operation of furniture equipment;
- low mechanical strength characteristic of chipboard material;
Hinges are special panels that are attached to the cabinet. Fastening is carried out using self-tapping screws. This can also become a problem for repairs and cause breakdowns.
The fasteners themselves, presented in the form of self-tapping screws, hold up perfectly. But if, under mechanical stress, the cabinet door gives way and the fastening element falls off, it can take with it part of the material from which the door itself is made.
Don't miss: Glass door for baths and saunas: dimensions and installation
Of course, this becomes a problem, because now you can’t screw the screws into their original place. How then to install the cabinet door?
The doors do not fit tightly to the sides of the cabinet and do not close tightly.
The main reason for doors not closing tightly is that the doors do not fit tightly to the frame. This is a consequence of the stoppers not being clearly fixed in the lower guides. It is located in a groove near the edge of the guide; the roller wheel slides into it, thanks to which the door is fixed. By lightly tapping the tool, you need to adjust the stopper to the right place. You can use a screwdriver to tighten loose screws. The main thing is to make sure that the door does not start to roll back. The appearance of squeaks while the door moves is a signal that the rollers have begun to become dirty.
Necessary:
- Clean the guides from dust and dirt;
- Lubricate the moving parts of the roller with special oil (apply a small amount to the roller axis);
- Roll the door several times to distribute the oil evenly.
Stages of restoration using painting
Before studying a master class on painting clothes storage products, it is recommended to carry out preparatory work on wood. These include cleaning and sanding the old coating
It is important to achieve a smooth surface so that when painting the brush applies the composition evenly
For small areas, use sandpaper; for larger areas, use a sander. The final stage of preparation always involves using the finest grain sandpaper.
As soon as work with defects is completed, decorators advise moving on to primer. This stage is no less important than the painting itself. It is necessary to restore an old cabinet with your own hands with high quality, so primer will be an excellent solution: it will hide all the cracks and fill the pores. In addition, the coating treated with primer will absorb less of the coloring composition.
After waiting for the product to dry completely, we restore the cabinet using paint:
- unscrew all the fittings that will prevent the brush from penetrating into narrow places;
- those elements that cannot be removed are sealed with masking tape to preserve their original appearance;
- When painting wood, it is better to use special acrylic compounds - they adhere better to the surface and create a protective layer of film. Pour the paint into the roller container and get to work;
- First we process all the internal elements: shelves, compartments, mezzanines. After this, we proceed to painting the facades, as shown in the photo;
- After the first layer has dried, apply a second, and if necessary, a third layer of paint. This is necessary to achieve color brightness and complete coverage of all gaps;
- The dried cabinet must be opened with varnish in several stages.
Restoration experts advise you to use your imagination and make the cabinet not in a single color, but add several colors to the facades. The simplest option is geometric shapes. To do this, use masking tape to cover some part of the facade and paint the remaining area a different color. For originality, you can decorate the cabinet in a contrasting design.
Removing old coating
Sanding parts
Chips are repaired with putty
Surface primer
Painting parts
Varnish coating
How to decorate at home
To restore a product yourself, you should choose the technique you like and follow the rules of the procedure.
Decoupage
To use this method, it is recommended to do the following:
- Sand the surface of the cabinet and coat it with several layers of primer.
- Place the napkins on the cabinet and think about their placement.
- Moisten a cloth with water and apply to the surface. Carefully smooth out all wrinkles.
- Use a thin brush and special glue to treat the paper.
- After the layer has dried, cover the surface with varnish.
Decorative plaster
To use this technique, follow these rules:
- The composition should be applied to the restored product.
- To imitate the desired texture, the cabinet is painted in a shade that is close to the color of the plaster.
- Contrasting coloring will help achieve a craquelure effect.
- Decorative plaster should be applied with a brush or spatula.
Fabric decor
To decorate a closet with fabric, it is recommended to use different textures. Smooth silk will fit perfectly into an elegant interior, and coarse linen will complement the Provence style. A classic product can be achieved using lace. Regular PVA glue will help to apply textile elements to the cabinet.
Furniture restoration styles
To decorate such decorations, interesting and very expensive materials are often used that will last for many years. A distinctive feature of this style are various geometric patterns. They use bright colors for the interior, which at the end of the work are diluted with lighter and softer tones.
This style is mainly used only on wooden surfaces. It involves gluing cut-out figures and patterns, finishing them if necessary. A common and original way in this style is to use napkins with patterns and secure them with acrylic varnish in several layers.
- Covering with regular self-adhesive film
The name speaks for itself; various patterns are created using self-adhesive film. Stencils are often used. One of the easiest and most effective ways to restore old wooden surfaces.
This interesting method, on the contrary, emphasizes the antiquity of your furniture using a special craquelure that creates cracks on the surface. The main thing in this style is to create deeper and wider cracks; for this it is necessary to apply thicker layers.
When starting work, inspect the location of your furniture, what colors and tones should be chosen.
Let's talk in more detail about the last method.
Wooden cabinets dry out, causing cracks to form. Our job is not to hide, but, on the contrary, to give beauty and elegance to the cracks. There is a huge variety of varnishes now. It’s up to you to choose the color that suits your interior. Once you have chosen the desired color, you need to prepare for work.
The main advantage of restoration at home is that the bulky cabinet does not have to be taken outside its abode.
If you still doubt whether you made the right choice in the direction of this style, you can experiment on some small wooden things. Only the surface should be wooden and preferably antiqued, for a more convincing effect.
The second plus is that you watch the whole process yourself and it’s easy to make any changes.
Materials for decorating the surface of an old cabinet:
- acrylic paint;
- craquelure varnish;
- matte acrylic.
When restoring a cabinet without the help of specialists, you estimate the cost of the work, which also has a positive effect on your budget.
The main thing is to approach all the work creatively and then your closet will take on a newer and brighter life.
Tools for restoring the cabinet surface:
- brushes (different sizes);
- pieces of fabric without fine lint;
- container for diluting the product.
Only creative people can cope with such work, since they need to choose the right tones, shapes, and more.
To quickly dry the surface, you can use a hair dryer, but it also helps to increase cracks.
When purchasing materials, be sure to check their quality. The varnish should be quite liquid. When applying, do not shake the bottle under any circumstances, otherwise subsequent application will be of poor quality if there are bubbles.
They use bright colors, which at the end of the work are diluted with lighter and softer tones.
Do-it-yourself cabinet restoration consists of the following steps:
- replacing cabinet fittings;
- cleaning old cabinets;
- necessary repairs;
- decoration in craquelure style.
Wooden cabinets dry out, causing cracks to form.
You can check how dry the furniture is with your finger; if it sticks slightly but leaves no marks, the surface is ready.
Replacing doors
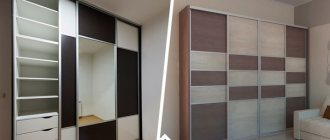
A complete replacement of sliding doors makes sense if the design has completely fallen into disrepair or does not correspond to modern design trends.
For a global rework you need:
- Decide on a design. Choose a more modern material - glossy and mirror surfaces visually increase the space; you can use a combined option. You can select a design using a large number of photographs on the Internet;
- decide on the sizes. If the cabinet has a non-standard size, the guides and horizontal profile must be trimmed;
- purchase or order from the workshop all the necessary components and equip the place;
- prepare all the details. Carry out cutting and drilling;
- assemble the structure and install it in place of the old one.