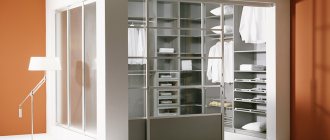
The front of any wardrobe is sliding doors. They are the ones who shape the appearance of the furniture. Finished products are produced in certain sizes and do not always meet the needs of homeowners. For someone who has already dealt with making furniture at home, it is much more profitable to make a sliding wardrobe yourself according to your own dimensions. After the cabinet body is ready, the most important phase of the work begins - assembling and installing the doors for the sliding wardrobe with your own hands.
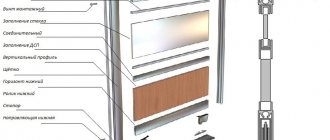
Components of sliding wardrobe doors
Materials and sizes
The dimensions of the door leaves depend on the length and width of the cabinet opening, the size of the sliding system components and the number of doors. Typically, 2 or 3 sliding doors are placed in the opening. You can make their exact calculation according to our instructions.
The length and height of the opening is the basis for calculating doors
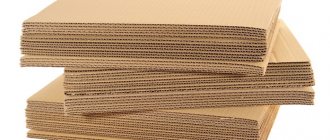
An extensive range of products for furniture manufacturing will make it possible to select everything necessary for the production of doors according to individual drawings and detailing. Aluminum profiles are used for the canvas frame and guide rails. The materials for filling door frames are usually mirrors, chipboard and MDF sheets. In some cases, craftsmen use decorative plywood, sometimes they create canvases from laminated parquet.
Expert opinion
Alexander Didenko
Furniture assembler at Mabaks
Often one of the doors is made completely mirrored, and the other panel is made blank. In combined frame fillings, mirrors are combined with other materials. The advantage of assembling doors with your own hands is that the master can beautifully arrange the fragments of the frame filling in one order or another.
Preparing door assembly
How well the doors for the sliding wardrobe will be made depends on how the preparation of furniture assembly is organized. It is necessary to purchase materials and prepare tools.
Materials
- Draw up a specification of parts, moving parts and hardware (screws), focusing on calculations with drawings.
- Do this for one door.
- The quantity of all components should be doubled or tripled depending on the number of sliding wardrobe doors. Theoretically, there could be more doors, but in practice this is impractical.
Based on the specifications, purchase all parts. There are times when, when planning to install one type of sliding system, they find a slightly different design on sale.
To prevent this from happening, you should do it in reverse order. First, study the range of component parts and assemblies, and include their parameters in the basic data for calculating cabinet door rails. After that, according to the finished specification, purchase everything you need.
It should be noted that large shopping centers equip their departments with cutting equipment. In order not to suffer at home with marking and processing materials, you can do it all in the store. Door leaves will be cut from sheets of mirrors, chipboard and MDF, and an aluminum profile of the required length will be prepared. Cutting silicone sealant and schlegel yourself is not difficult.
Tool
If you still decide to make the doors completely yourself, then you need to prepare the following tools:
- tape measure, metal ruler and square,
- drill-driver,
- jigsaw,
- metal hacksaw,
- screw driver,
- level and plumb,
- scissors and cutter (construction knife).
Sliding wardrobe from toly23
Forum member toly23 decided to get a wardrobe instead of a formal cabinet. After monitoring the market, my wife and I came to the conclusion that it was better to make the cabinet ourselves. The sketch was drawn by my wife, the design is complicated: not only shelves and a hanger for outerwear, but also several drawers of different sizes. To avoid having to redo it, toly23 calculated all the dimensions and selected the fittings taking into account the gap under the door system.
toly23 FORUMHOUSE Member
I specifically looked for handles (measured by height) that were low and didn’t even catch when closing the mirrored door. The drawer in the right section is a pull-out drawer for bedding, it pulls out perfectly and doesn’t get caught in the doors. I found a calculation of doors for cabinets on the Internet, and I managed to make everything myself.
The cabinet is full - with a base, sides and top, with three doors, the middle one is mirrored, the side one slides in, as the child loves to frolic with the ball. Unlike the previous case, the parts were cut out independently, and improvised tools, clamps and a glass cutter were used for direct cutting.
The forum member ordered the doors from a furniture company, with an aluminum frame. The total cost was around 18 thousand. If you look at catalogs of ready-made models with similar functionality, the savings become obvious.
toly23 began the step-by-step assembly with the frame - first the frame and the top shelf, then the vertical racks and shelves in the compartments, installation of the hanging rod, assembly of the drawers. The final stage was the installation of a door system with a middle mirror door, which was carried out after the installation of the cabinet in the nursery.
Petrovich 32 also made itself a sliding wardrobe of a similar design. It further complicated the task - it also has a mezzanine compartment that can be closed separately from the main compartment. The product has successfully passed the strength test for the sixth year without any complaints.
Step-by-step instructions for assembling sliding doors
- The cabinet opening guards are checked for correct horizontal and vertical position using a level and plumb line. Deviations are eliminated. (link: DIY wardrobe)
- Aluminum profiles are marked with a tape measure and a marker into the required sections.
- Cut the profiles with an ordinary hacksaw for metal. Make very carefully so that the cuts are strictly perpendicular to the longitudinal axes of the aluminum parts.
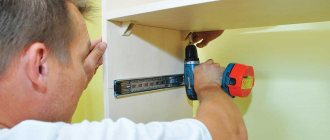
- Mounting holes are drilled in the frame racks from the outside. Two holes are made at the bottom - one for fastening to the lower frame bar, the other for fastening the rolling mechanism (roller). One hole is made on top for installing a self-tapping screw.
- Install the upper and lower guide strips. Using a narrow drill, drill holes through the profiles in the cabinet slabs. Then the rails are secured with self-tapping screws and a screwdriver.
- Spring stoppers are inserted into the groove of the bottom bar on both sides.
- Mirrors of the required size are cut out with a glass cutter or entrusted with this work to a master.
- Sheets of laminated chipboard or MDF are marked with a marker.
- The canvas is cut out with a jigsaw. If possible, it is better to do this with a band saw or circular saw.
- A silicone tape is placed with a groove around the perimeter of the finished filling. At corner joints, excess silicone is cut off with scissors.
- One rack is fastened with a self-tapping screw to the top bar of the frame.
- A canvas or mirror is inserted into the corner of the frame.
- Attach the bottom bar to the side handle so that the blade fits tightly into the groove.
- After this, the frame is closed by installing a second rack.
- Before final tightening of the screws, the brackets of the upper horizontal rollers are inserted under their caps. The fasteners are tightened with a wrench.
- Set screws secure the two lower support rollers into the groove of the lower frame rail.
- The buffer tape (schlegel) is pulled into the side grooves of the racks, after first removing the protective strip from the self-adhesive base.
- Schlegel closes the mounting holes. The top and bottom of the schlegel can be secured with special clamps.
- In the case of assembling a combined filling, the upper, middle and lower strips are attached to one rack.
- Fragments of filling are inserted into the grooves of the frame from the side.
- Then the second stand is attached to the transverse bars.
Door installation
First place the door on the internal rails. The second door is installed on the outer path. If there are three sliding fences, then two of them are placed on rollers on the internal tracks, and the third door is placed on the external rails. You can do the opposite, but in the first version the facade of the sliding wardrobe will look more beautiful.
Installation is carried out in the following order:
- the door is rolled with horizontal rollers into the opening of the upper guide rail
- press the support rollers with your hands, bending the springs,
- the rollers are installed on the lower guide bar,
- If there are violations of the correct movement of the sliding system, the mechanisms are adjusted.
Photo
If you have already mastered making doors and want new feats, we suggest looking at other options:
Types of door fastenings
In addition to the rail type of fastening of door panels, there are suspended structures and accordion doors.
Hanging mount
The hanging system is that the cabinet doors are suspended from the upper guide profile. The rollers of the canvas move in a horizontal groove of a duralumin strip fixed to the top plate of the built-in wardrobe. The bottom of the sliding fence can be free or have plastic tabs that slide along the track of the bottom guide bar.
The suspension is used for small cabinets in utility rooms. The leaves are made from cheap materials for lightweight doors. The design of this type of fastening does not imply intensive use. The advantage of the suspension system is ease of installation and low cost of the materials used.
Top roller sliding door system
Harmonic
The system resembles the operating principle of window shutters. Narrow canvases are connected to each other by piano hinges. The bottom and top of the doors are equipped with horizontal rollers that move in the grooves of the guide strips. Accordions are convenient to install in built-in wardrobes.
The advantage of this type of fastening of canvases is that by sliding the “shutters” apart you immediately gain access to the entire contents of the cabinet volume. Sheets of any durable material are used to fill door frames. Canvases made from laminate flooring panels can add a unique twist to the interior of any room.
If you have the desire and a little experience working with tools, manufacturing and assembling sliding doors for a sliding wardrobe will not seem out of reach. Carrying out such work independently will make a significant contribution to the accumulation of experience in the manufacture of furniture of decent quality.
Component manufacturers
It is not difficult to purchase components for assembling a cabinet door today. Just look at the price list of any specialized store.
Range of profiles
Inexpensive but good component options include Slider-Volkhovets products, complemented by Italian accessories, as well as guides, rollers and other wardrobe parts from Herkules and Rollan. Take a closer look at Framir products - they are quite durable and made of aluminum profiles of the correct geometry.
The leading manufacturers of accessories for sliding wardrobes include the following companies:
- Absolute: provide consumers with lightweight and high-strength structures; There are four types of profiles with different shapes and finishes; another significant advantage of such products is ease of installation;
- Divendoor - fairly inexpensive and elegant steel components for bronze, silver, gold, wood;
- Stanley - reliable products with almost ideal performance characteristics;
- Raumplus: German quality at affordable prices; The warranty covers all components down to the last screw;
- Komandor: another successful tandem of quality and reliability; warranty up to 30 years;
- Ramtrack: In the global market, products from Canada are the standard of quality; This company was no exception; their steel products with durable anti-corrosion coating can be called a quality standard in all respects
Components for sliding wardrobes are less known on the Russian market, but this does not affect their quality in any way:
- Geze Rollan: silent wheels, durable profile, long warranty; but these products, unfortunately, are expensive
- Ducase: the manufacturer claims that their components can last up to 27 years, 100,000 opening-closing cycles; however, these products only have a 12 month warranty
- Laredo: Value for money is almost perfect and they look very decent