When organizing a play space for your daughter, you should achieve maximum realism in the imaginary world, because this way the child will have a much more interesting time. Dolls, like people, need clothing and housing. The latter must be decorated in accordance with all the rules, including including a certain set of furniture. Set items are easy to purchase, but you can save a lot of money if you understand, for example, how to make a doll cabinet with your own hands. To do this, you don’t need to look for anything outside the house; all materials can be found on your farm. If you involve a child in the furniture making process, such a product will be valued much more than the purchased one.
Materials and tools
A doll closet can easily be created from what is in any home. Most often, ordinary cardboard is used for this, which is glued together in several layers to impart rigidity. Corrugated cardboard is more durable - furniture made from such material will last longer. It's even easier to build a closet from a shoe box, which is a ready-made base . All that remains is to glue the shelves, drawers and doors to it. If dad wants to approach the process of making a doll cabinet with his own hands thoroughly, he can use scraps of plywood. Such a product will be strong, durable and will closely resemble real furniture.
To make a cabinet for small dolls, you can even use ordinary juice boxes.
To make your doll closet beautiful, you may need additional materials:
- thick white paper;
- colored paper;
- matchboxes;
- paints;
- glue;
- toothpicks;
- wire, paper clips;
- barbell stick;
- braid, beads, buttons and other decorative elements.
If the doll cabinet is made of plywood, you will need furniture hinges, handles, and screws. Tools you will need are a hacksaw, pliers, and screwdrivers. If the cabinet is made of cardboard, you will need scissors, a stationery knife, a large needle, Moment glue, and tape.
To make the product more realistic, it is better to use real door hinges and furniture handles. Miniature copies of these parts can be purchased at any craft department.
Corrugated cardboard
Thick white paper Colored paper
Matchboxes
Braid, ribbons, beads, buttons for decoration
How to make a cabinet with legs
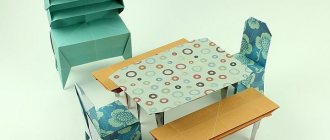
If desired, more substantial furniture of this type can be made for a child, but at the same time a fairly simple design. In this case, you will need boxes to assemble a doll cabinet with your own hands:
- narrow long (for example, from shoes);
- three small ones, the total width of which should be equal to the length of the large box.
You need to remove the lid from the shoe box and cut off the short sides. Also, this element should be shortened by a third. The long box itself needs to be placed on the table and two small ones glued inside it so that they touch the walls. The remaining part of the lid should be cut in half. The resulting doors need to be glued back into the box above the two compartments made at the previous stage so that 1/3 of the cabinet remains free.
Next, the finished toy should be placed vertically on the table. Then you need to insert the third small box, bottom down, into the bottom of the cabinet, without using glue. The result is a large drawer.
Design dimensions
The doll's wardrobe differs from the real one only in size. It also has shelves, drawers, and a clothes rail. It is important to consider the location of the furniture. If the doll has its own house, the size of the closet should correspond to it. Heavy bulky plywood structures can only be placed on the floor.
It is also necessary to consider what kind of children's toy the furniture is made for. The height of the cabinet for Barbie and Monster High, which are now particularly popular, will be about 28–30 cm. The largest doll is Anabelle, she will require an option with a height of 40–45 cm. In the latter case, it is recommended to use a boot box or small household appliances.
To establish product parameters, you can measure doll clothes. The section where the bar will be for it should be 3 cm higher. The width of the furniture is calculated depending on the planned number of compartments, as well as the space allocated for it.
Creating cabinet furniture with your own hands, from choosing materials to assembly
For Barbie and Monster High
For Anabel
Matchbox chest of drawers
This is the easiest way to create a bedside table or chest of drawers for dolls.
The chest of drawers can be used to store jewelry, small items of clothing or shoes. The process of creating a chest of drawers is extremely simple: you just need to glue several boxes together and cover them with beautiful paper. You can glue beads or buttons as handles.
You can also make a rack from matchboxes by gluing them together.
Creating furniture for dolls is a very interesting and exciting process. It is best to involve the child himself in decorating furniture so that he can feel like a designer. You can make a wardrobe for doll clothes from anything.
Sketch development
Most often, wardrobes for Barbie dolls are made to be spacious, since she has a large number of things and clothes. Usually 2 compartments are enough, it is also recommended to make several shelves and drawers. You can create a wardrobe for dolls of any design:
- A wardrobe is furniture for storing dresses, it has one or two compartments, a hanging bar, and shelves.
- A regular wardrobe should only have shelves and drawers for clothes, as well as 2 or 3 doors.
- A sliding wardrobe with sliding doors - it can be equipped with shelves, a section with a crossbar, a mezzanine, and a rod for storing clothes.
The design can be open and include a floor clothes hanger or a panel with hooks. The choice of doll cabinet design depends on the interior design of the room where it will be located. It is important that the color of the product is in harmony with the surrounding environment - just like in real life. A closet for a doll's bedroom should be painted in soft colors: pastel, green, beige. If the item is planned to be placed in a mini-hallway, it is advisable that it have mirrored facades.
If the furniture is made of plywood or cardboard, you must first create a drawing or sketch. You will need to cut out the following parts:
- the largest rectangle is the back part, it is cut to the size of the cabinet;
- 2 sidewall parts - according to the dimensions of the height and depth of the product;
- top and bottom - along the width and depth of the cabinet;
- 2 fragments for doors - represent halves of the rear part.
When preparing parts, it is advisable to immediately determine the areas where the shelves will be located. On the sides in these places you need to make grooves for inserting them or holes for attaching the wire. The legs are made from a roll of paper, glued and cut into small pieces.
Main cabinet parts
Chiffonier
Regular wardrobe
Filling the internal space
Now you need to make shelves and hangers so that you can hang clothes in the closet. To do this, you can use thick cardboard or parts of another box.
To make shelves, cut out blanks that are wider and 1 cm longer than the internal space. Excess material is folded in such a way as to form sides. Excess material is carefully cut out at the corners with scissors. The sides are carefully glued to the cabinet walls. It is better to turn the outer side of the shelf down and glue it too. You can make several such shelves.
From small boxes you can make drawers . Handles need to be attached to them. You can use the same technology as for external cabinet doors. Original handles can be made from large beads that are glued to the outer surface of the box.
The nuances of manufacturing different design models
Depending on the materials used, the process of creating furniture may differ slightly. In order for the item to turn out to be of high quality, you need to study the question of how to make a wardrobe for dolls correctly. This includes the order in which parts are created and the process of assembling a piece of furniture. The set can be made from the following materials: cardboard, newspaper tubes, plywood.
From cardboard
The easiest way to make furniture is from boxes. It is recommended to find one that closes with four valves. In this case, all that remains is to do the internal filling. Short valves should be cut off. If you place the box on its side, the long pieces can be used as cabinet doors. Then you will need to glue a hanger rod inside and decorate the resulting piece of furniture. If necessary, you can build an internal partition and shelves on the left or right side of it.
It's a little more difficult to make a cabinet from pieces of cardboard. You can use any material, but dense or corrugated is better. If this is not the case, you will have to cut out all the parts in 2 pieces and then glue them together. To achieve maximum strength, the resulting fragments must be placed under a press for 2 days. If this is not done, the parts may become deformed from moisture. It is especially important to strengthen the side walls, since they bear the heaviest load.
Tips for creating creative DIY furniture at home
The easiest way to assemble finished parts is with glue. In order for the doll cabinet to last as long as possible, all fragments should be additionally strengthened. To do this, before gluing the parts in pairs, you need to lay two pieces of soft wire, preferably copper, between them. This is especially important for future shelves.
Assembling a cabinet from pieces of cardboard is not easy:
- First, it is recommended to build a compartment with shelves. To do this, on the side parts you need to draw the places where they will be located.
- Having attached the blanks to them, you need to mark the places where the wire will pass, and then make neat holes in them with an awl.
- Coat the edges of the shelves with glue, attach them to the side parts of the cabinet, thread the wire through the holes and press firmly, fix it on the back side, twisting it and cutting off the excess ends.
- After all the shelves are secured, stick another piece of cardboard on the side. Additional fragments are needed to hide the wire and make the sides stronger. Pieces of wire should be laid inside to secure the parts on the bottom and top of the cabinet.
- In the same way, make another side part for the second compartment. Attach it to the elements with shelves using a stick - this will be a hanger bar.
- Secure the bottom by coating the lower ribs with glue and passing a wire through it. If the cabinet has no legs, you don’t need to cover it from the bottom with another piece of paper.
- Then secure the top part by gluing a piece of cardboard.
- After this you need to attach the back of the cabinet.
- If the cardboard has not been previously decorated, then the next step will be gluing the product from the inside. To do this, it is better to use napkins or soft paper for decoupage.
- Then you need to attach the doors. They should first be covered with paper and handles attached to them. If the doors will open, you need to secure them on small hinges, screwing them with wire or small screws.
You can make a wardrobe with sliding doors. To do this, you need to glue a round stick on top and bottom, then place the doors, and attach 2 more sticks in front of them.
From newspaper tubes
There is an unusual option for making a doll cabinet from old newspapers. Since you first need to create a base, such a product will take a lot of time. In addition to the main material, you need to prepare cardboard, decorative paper for external decoration, scissors, wire and a hot glue gun.
First you need to make blanks - tubes from newspapers. They are rolled up and secured with tape. Next, the process of creating a cabinet can be carried out in one of two ways. The simplest one is to glue the tubes onto cardboard, which will increase its strength and hardness. The manufacturing method is similar to that used for ordinary cardboard: parts are cut out, covered with newspapers and joined together. For this option, the tubes are made thicker.
Types of furniture staplers, their features and scope of application
You can also build a doll cabinet from thinner newspaper tubes, using them as vines. The parts are connected in any way, but the easiest way is with simple plain weave. A dense base is obtained, from which parts are then cut out. To increase strength, wooden slats are attached to the corners of the cabinet from the inside.
To make the product look beautiful, the tubes must be painted or covered with colored paper before weaving.
From plywood
The most difficult thing to make is a cabinet made of plywood. The parts are cut out the same: top, bottom, 2 side parts, back wall, partition and shelves. To more firmly connect the fragments to each other, when preparing the elements, you need to make 2 protrusions on each side, and slots at the fastening points. Such grooves can be made through or half the thickness of the plywood. In the first case, you will need to paste the finished item on the outside to hide the joints.
On the side walls in those areas where there will be shelves, you can make not slots for protrusions, but continuous grooves.
If you cut the parts correctly, the assembly process will be simple. It’s like working with a construction set, only the side ribs need to be lubricated with “Moment” or hot glue from a hot glue gun. The doors are attached to small hinges using screws. If their ends have come out, then you need to remove them with pliers and cover these places with decorations.
Assembly
After the preparatory work on cutting out the blanks is completed, you can begin assembly. The frame of the product is glued from the side, top and bottom planes. Fix the structure with the back wall. If necessary, the parts are compressed with a clamp and dried after each stage. Then the shelves are installed. They can be glued or inserted into slots. For the second option, cuts are made in advance on the vertical walls and in the shelves themselves according to the thickness of the parts. It is necessary to ensure that they are located strictly perpendicular to the walls. Next, the pull-out shelves are glued together and inserted. The bar can be made from paper, rolled into a thin roll, or a stick of suitable size can be used. The doors are glued into a small cardboard wardrobe for a Barbie doll, but it is better to hang the doors on a plywood product with real hinges. We roll a thin strip of paper into a tight roll and fix it with glue - we get legs. They can also be replaced with plywood squares or rectangles.
Another option is an origami paper cabinet for dolls. To make it you will need several squares of paper; you can watch the detailed master class in the video.
Collecting parts is based on the principle of a puzzle
Decoration
The resulting doll cabinet most often looks ugly and therefore needs to be decorated. It is covered with old wallpaper, napkins, colored paper or fabric on top. You can use the decoupage technique, cover the product with acrylic paints, or come up with a different design, showing your own imagination.
Rhinestones, sequins, sparkles, and foil are used for decoration. Beads will look good as decoration for pens. Girls love to decorate their toys with lace, elegant braid, and flowers.
The cardboard base can get wet from paint or a large amount of glue, as a result of which the structure is deformed.
It is better to cover the internal surfaces with paper in advance before assembling the finished product. The hanger holder, which is made from a stick or long skewer, should be coated with acrylic paint. Hangers can be made from paper clips, and if the doll is large, then from wire. You need to add a mirror to one door, which would look ideal as a piece of foil.
Handles are attached at the last moment. They are usually made from wire, which is bent to the required shape, covered with paper or wrapped with braid. For handles, you can also use large beads, buttons, lotto barrels, and small chess pawns.
Making a beautiful wardrobe item for dolls is not difficult. The simplest version of a locker can be created in literally half an hour. It will also be useful to involve your child in work - this will help develop his imagination and teach him to be neat.
Master class on creating a wardrobe for Barbie
Wooden wardrobe for a doll
This cabinet can be made in just 30 minutes. At the same time, it will look very beautiful.
Required tools and materials:
- wooden pieces or thick cardboard (3 pieces with a size of 15 by 4 cm, and 2 pieces with a size of 5 by 4 cm);
- kebab stick;
- glue;
- scissors;
- drill;
- wire or paper clips;
- elements for decoration.
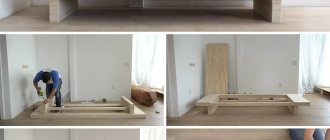
Stages of work:
Lay out all the prepared tools and materials on a table or convenient surface, and then start creating the craft.
- Build a small rectangular box. To do this, use pieces of wood or thick cardboard. Take a larger piece (this will be the bottom). Glue pieces measuring 15 by 4 cm on two sides, and pieces measuring 4 by 5 cm on two sides.
- Cut 2 long strips and attach them to the box in a vertical position. Make one hole at the top.
- Attach the barbell. Make it from a kebab stick. Pass it through the holes you made. You can put shoe accessories in the box, and hang clothes on the bar.
- The final touch is the creation of hangers. The best material for creating them is paper clips. Thick wire that needs to be twisted will also work. Divide the copper wire into lengths of 19-20 cm. Connect the ends so that they begin to overlap each other exactly in the center. Twist the loose ends and bend them into a hook. Make a few more hangers in the same way. Finally, the hangers are decorated with decorative elements - ribbons, beads, rhinestones, etc.
- You can decorate the closet itself. Cover it with designer or colored paper, paint it with bright colors, and decorate it with scrapbooking elements. Give free rein to your imagination!
You might be interested in an article about decorating a children's room for a boy. Read about which wallpaper is best to choose for a nursery here.
We also offer a useful article on how to decorate walls with wood panels.