Every girl dreams of a wonderful toy house, which will be furnished with household items, furniture, and accessories. In specialized children's departments you can find everything you need, but you will have to shell out a tidy sum. It is for this reason that some parents are wondering how to make a bed for dolls themselves. The process does not require much time and effort; the work uses available materials, simple devices and decor. If you wish, you can use detailed master classes with photographs and diagrams.
Doll furniture made of plywood for girls. Cradle for baby doll and crib for Barbie
If you want your child to give you a little break from time to time, you can do this by giving him an activity that he will enjoy. For girls, for example, this could be a game of dolls, which can be expanded with additional items. You can assemble a doll's crib yourself using available material - plywood. In this article we will offer several options along with drawings, so in your free time you will only have to transfer them to a template and cut them out using a jigsaw.
We make a cradle and a bed for a doll with our own hands from plywood
Below you will learn how to make a cradle for a doll and a regular crib. The first differs from the second in the possibility of its swinging. There is nothing complicated in either the first or second case; you will need a minimum of materials and tools, as well as some patience. The price of crafts will be minimal, and much cheaper than in the store.
Manufacturing process
Creating beds for dolls is an interesting process that opens up a wide field for the implementation of original creative ideas. There are plenty of step-by-step instructions online to help you get the job done right. The choice of a suitable model and design should be made together with the child. Novice craftsmen will be able to make cardboard structures, shoe boxes, popsicle sticks and plywood with their own hands.
From cardboard
A simple but elegant bed for Barbie doll can be made from ordinary corrugated cardboard. In addition to the main material, you will need: album sheets, wire, tape, pieces of fabric, scissors, glue. The whole process is carried out according to the instructions:
- The desired bed model is schematically depicted on a sheet of paper. Design parameters depend on wrist size.
- Based on the finished template, the necessary elements are cut out of cardboard and their side edges are glued together.
- Two pieces of wire 50 cm long are laid on pieces of cardboard, fixed with tape and the surface is filled with glue. The workpiece is placed under a vice until completely dry.
- The elements of the body and head are pierced with an awl, and wire is threaded into the resulting holes. The fastening points are coated with glue.
- Pieces of wire are tied on the reverse side, and the long ends are cut off.
Popular crib models for children of different ages
At the final stage, the cardboard doll bed is covered with viscose, paper or fabric napkins. The sleeping place will become even more attractive with decoration in the form of floral appliqués. Miniature bedding will add realism to the product: mattress, pillows, blanket.
Plywood doll cradle No. 1
To make the design you will need:
- standard sheet of wooden plywood 4 mm thick;
- hand jigsaw;
- pencil;
- glue "liquid nails".
Before making the model, decide where it will stand and adjust its dimensions. Its dimensions are as follows:
- cradle height – 105 mm;
- length – 130 mm;
- width – 125 mm.
Advice: it is not necessary to completely copy the model, it is just a blank that can be significantly changed thanks to your imagination.
Crib details
Let's look at the workflow in as much detail as possible:
- At the first stage, cut out the bottom of the structure, the length of which will be 120 mm and the width 65 mm. At the same time, do not forget to leave protrusions 50 mm long and 10 mm wide on each side in order to use them to connect the bottom with other parts.
The bottom of the doll's cradle is made of plywood with protrusions for assembly
Tip: first cut out a large rectangle along with the protrusions, the size will be 130x75 mm, then remove unnecessary material from the sides.
DIY drawings of doll furniture made of plywood - footboard and headboard of a crib for a doll
- Make the foot of the crib and its headboard, for which use the drawing.
The general dimensions will be:
- headboard height – 105 mm, footboard – 95 mm;
- at the widest point the width of the parts will be 125 mm;
You should have the following details: on the left - the head of the doll's crib, on the right - the footboard
- Now we will make the side parts of the cradle. To do this, measure the length of each part - 120 mm, the height in the high part is 45 mm and in the narrow part 35 mm. Don’t forget to also make mounting slots for installing the bottom - 5 mm each;
Sidewalls for the crib - rectangular holes inside should first be drilled with a drill and then finished with a file
- Connect the sides of the cradle to the bottom;
- Reinstall the footboard and headboard of the crib;
- Take wood glue and carefully go over all the joints;
- Use wood putty to finish the surface of the plywood inside and outside the resulting structure;
- Choose the appropriate color for the doll's crib and paint everything with acrylic paints.
Design options
Furniture for a favorite doll should be liked by the child and be environmentally friendly.
This item combines ease of use, colorful, elegant design, and reliability. A doll bed can follow the shape of a real one, but you can create a fancy shape, which will be even more interesting. There are several types of beds. The choice of a specific model depends on the material of manufacture, the size of the play area, and the child’s preferences. In addition, you need to know the size and number of dolls for which the sleeping bed is intended. Toy cribs can be divided into several types:
- single seat model;
- double;
- lullaby;
- two-tier;
- with a cabinet, changing table;
- with linen box, chest of drawers;
- with canopy, mobile;
- pull-out model with an extra bed;
- sofa;
- transformer.
Depending on the type of bed frame, it can be:
- with two side panels and supporting walls;
- only with a headboard (hinged backrest);
- on legs.
To create an exclusive model, you can play with the shape:
- square, rectangle;
- circle, oval;
- fantasy figure;
- corner model, triangle (for a sofa).
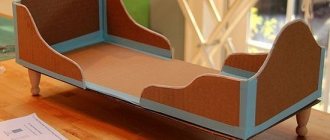
Plywood doll bed No. 2
If you have small children, you are certainly a regular at stores where you can find a wide range of different toys for them. Including children's furniture, which almost every girl dreams of.
But it should be recognized that the products offered do not always correspond to what you need:
- size does not fit;
- product quality leaves much to be desired;
- the appearance of the structure is too pretentious and somewhat strange.
However, you shouldn’t be upset about this, since you can make a gift for your daughter literally in an evening or two with your own hands. She will probably like the option proposed below and will make her child happy for a very long time. In addition, you can always easily change tired bedding for new ones.
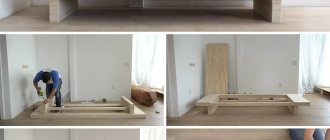
Frame
We invite you to put aside social networks, computer toys, news and focus on the universal model of a children's doll bed. You can set its dimensions yourself using the template below, or use already proven ones.
In our case, they are suitable for both Barbie and medium-sized dolls.
- Make a wooden frame from plywood (for example, birch) consisting of 3 or 4 layers. The frame consists of three parts - a berth and two backrests;
The photo shows details of a doll's crib made of plywood.
Tip: cut out the parts carefully, and then be sure to sand the edges to remove any remaining burrs that could injure the child.
- Connect the resulting elements together and you will have a frame;
- Draw something on the back; you can use a ready-made template if you don’t have such abilities. Invite your child to take part in this himself, he will be interested. Use gouache, which should then be varnished; you can replace it with waterproof acrylic paints, which are now not a problem to purchase in office supplies;
- Secure the frame parts with glue or liquid nails.
DIY crib for a doll made of plywood in a few evenings
Finishing
The next item is the mattress, pillow and blanket, which should look real. You will need:
- foam rubber - 2 pieces for a sleeping place and a pillow;
- fabric - choose a non-flowing and non-slip material, for example, regular calico is great. It is easy to process along the edges; simply remove the outer threads after trimming.
| Preparation | Cut: · 2 pieces for the pillow; · 1 – for a sheet (its width is 2 times larger than the mattress, and its length is the same); · 2 pieces for a blanket. |
| Fixing the mattress | 1. Place the mattress on the cradle frame; 2. Place the sheet in the middle; 3. Wrap it directly over the wooden base; 4. Sew the bottom with a regular stitch. In this case, the mattress will be securely fixed. |
| Pillow | 1. Place the pillow fabric right sides together; 2. Sew along the edges, not forgetting to leave room for inserting foam; 3. Turn the pillowcase inside out, stuff and sew up the insertion area. |
| Blanket | What should be done: · sew 2 pieces together; · turn them inside out, you will get a neat rectangle; · decorate the center with something, for example, embroidery. |
Tip: for beauty, you can trim the pillow around the edge with an organza ribbon.
If you follow these recommendations, then you can make your own doll crib in a few evenings, which in appearance is practically no different from real models. As in the first case, you can use the entire template or add other details to it, making it much more interesting and better.
Basic sewing rules
After choosing old things that will become the basis, you need to make patterns and get down to business. To do this you need to know the basic rules:
- be sure to overcast the edges of cut fabrics;
- sew products only inside out;
- choose thin threads No. 40;
- make patterns according to the height of the baby doll, bed.
Important!
To the dimensions of the pattern you need to add 3 cm for seams.
We present a size chart of the most popular types of dolls.
| View | Standard toy size (height cm) | Length of sheets, duvet cover cm |
| Barbie | 27-29 | 30 |
| Big doll | 45-50 | 52-53 |
| Average | 33-40 | 42-43 |
| Small | 25-30 | 30-33 |
| Baby Bon | 43-45 | 47 |
Using this table, draw the pattern, adding another 3 cm to it for the crotch seam.
Now let's take a closer look at the different textile details.
Beautiful embroidered handmade bed linen for dolls
How to sew a pillowcase
Select the desired size of fabric, cut out two parts from the fabric, sew around the perimeter, leaving about a 10 cm gap
Fill the future pillow with ball filler
This is one of the most difficult parts. The catch, first of all, is the small proportions. The doll pillowcase will turn out to be quite small, so you need to work carefully.
We sew up the connector with hidden stitches and get a small pad
We will sew a standard pillowcase with a turn up. Measure out the square (rectangle) of the required parameters and make the appropriate marks.
Centering the design, cut out the fabric for the pillowcase, take a ruffle or braid, step back 1-2 mm from the edging of the ornament and adjust it inward
Apply the future scent on top about 30% of the width of the pad, bend the edge
Advice!
The pillow should be 3 cm larger on all sides than the space occupied by the baby doll's head.
Turn it over and, focusing on the contour, grind the part, retreating 1-2 mm
We also sew the wrong side of the pillowcase along the perimeter, focusing on the outline of the ornament, and first bend the bottom edge
Next, put marks similar to the first dimensions. The third segment should be equal to 1/3 of the full measurements.
We overcast the internal seams, turn them inside out, sew on beautiful buttons and make loops for them
Now cut out the resulting segment, sew a gap to the main part (which was 1/3 of the pillow). Then fold the resulting rectangle (or square) in half and sew on both sides. The pillowcase is ready.
sheet
We make a sheet, add 5 cm to the size of the mattress on each side, bend the edges
With this subject things are easiest. The sheet should be 2-3 cm larger than the doll's bed (depending on the height of the bed).
All you have to do is measure the dimensions of the bed, cut a rectangle of the appropriate size, and hem it around the perimeter.
If desired, you can add ruffles and fringe.
Do I need a duvet cover?
Selecting fabrics for making a patchwork quilt
The question of a duvet cover often arises here. Is it needed? The answer depends on the blanket you have. If it is tight, a cover will come in handy. If it is thin, this part of the textile is superfluous.
We cut out the central part of the blanket - some beautiful block, embroidery, an interesting fragment
We edge strips around the perimeter of the picture
It is best to get a winter blanket by making a cover for it, and a summer blanket that does not require this detail.
The duvet cover must match the size of the duvet. Measure it and make a pattern according to the measurements obtained. It is best to make a case with a lock on the side or a slot on one side.
Cut a strip from another fabric, make two squares and cut them diagonally
Sew a 3 mm allowance around the perimeter
Align the edges, assuming a 7 mm allowance
Measure two identical rectangles. Fold it in half and sew both sides. Leave the third stitched or sew a lock there.
We take two squares from another fabric with a side of 25 cm, cut them diagonally, stitch them on the sides
Sew a very thin lace trim around the perimeter
Important!
The slot is left along the width of the product, the zipper is inserted along the length.
We take a very thin padding polyester to fill the blanket and make a “sandwich” of fabrics
We make a stitch along all the contours and an additional seam next to the lace braid
Now you can sew bedding for your doll yourself. If desired, they can be decorated with additional elements.
We come up with options for stitching different fragments of the blanket
We make an edging along the contours with a stitch, which will create a bulge
These can be stripes, stickers, embroidery, stones, rhinestones - anything that can be found in the house. Don't forget to consult with your child which decoration he or she will like best.
Beautiful ready-made bedding set for a doll's crib, made by yourself
Conclusion
What can you say about the above models? They are quite simple to make, even though they look very similar to the real thing. Most likely, the child will like them, and he will play with them much more often than with purchased options.
These original models will certainly meet all environmental requirements, so you will not need to worry about the health of your baby. The video in this article will provide additional information on the above topic. If you have questions about the article, we will be happy to answer them in the comments.
Source
Material selection
Children's toys must meet the following requirements: safety, durability, attractive appearance. Proper doll furniture, made by yourself, must be well processed and not have sharp, protruding elements or small parts. Select the material for doll furniture, taking into account your skills in working with tools, the size of the doll, and the age of the child.
Tree
Ideal option: environmentally friendly, durable, aesthetic.
However, not everyone can make such furniture. To make it you will need furniture boards up to 1 cm thick, a jigsaw, and a screwdriver. And, of course, woodworking skills. Here you won’t be able to do it “by eye”: first you need to make a pattern from cardboard, adjust the parts to size, and then transfer the drawing to wood.
Attention! The wooden product must be carefully sanded so that the child does not plant a splinter.
Unfinished furniture is beautiful in its own right.
You can varnish it or paint it.
The shape of the furniture depends on the needs of the owner: it is interesting to place the baby doll in a cradle to rock him to sleep.
If there are several dolls and little space, a bunk bed will come in handy.
And not only your children, but also your grandchildren will put dolls in a durable wooden crib.
Plywood
Plywood cribs are inferior to wooden cribs in strength, but they are lighter and easier to manufacture.
Parts of doll furniture made of plywood, including beds, can be joined into a groove. To do this, you need to develop a diagram of the product, carefully observe all dimensions and cut it out to the nearest millimeter. But independently assembling such furniture will captivate the child no less than playing.
It is easier to place the parts on self-tapping screws.
Even an untreated plywood crib can become a decoration for a dollhouse if you cut out patterns with a jigsaw.
Finished furniture can be painted in any color with water-based acrylic paint.
Cardboard
Anyone can make a cardboard crib. To do this, you only need rigid corrugated cardboard, scissors and decorating material.
The simplest cardboard bed is suitable as a “camping” option. It is very easy to make: the backs, base and side walls are connected into a groove. When disassembled, it takes up very little space.
If you cover the crib with colored paper or beautiful fabric, it will look quite decent.
For constant use, a more serious design is needed. Using tape, glue and paper for decoration, you can make a two-tier model.
There is no need to cut anything if there is a box with a lid. Covered with fabric, it looks like a neatly made bed.
It is not advisable to use particleboard. Chipboard crumbles at the cut points and breaks if used carelessly.
Practical bed for Baby Bon
Baby Bon dolls are so naturalistic that they also need real furniture - practical and comfortable.
Materials:
- plywood sheet;
- pencil, ruler;
- saw;
- textile;
- pieces of padding polyester and foam rubber;
- decorations (lace, braid, beads, etc.)
Instructions:
- According to the size of the doll, we cut out the base of the crib on plywood.
- We mark the backs of the bed, as well as 4 parts that will fasten them to the base.
- We make slots in the base corresponding to the length of the fasteners.
- We place the base on the fastenings.
- Connect with the backs.
- We cut out the mattress according to the size of the crib, sew it together, laying foam rubber.
- I'm making a pillow and a blanket with padding made of padding polyester.
- We cut out the bedspread and decorate it with braid and lace with beads.
- We make a sheet and make the bed. The sleeping place for Baby Bon is ready.
The frame of the crib can be coated with spray paint. This will give the craft a special personality.