Mothers of little girls are well aware of the situation when, when purchasing a doll, a house and its furniture must be a mandatory set for it.
Ready-made doll housing is not a cheap pleasure, but all parents want to please their princess. So why not make furniture for Barbie dolls with your own hands?
This activity has practically the same advantages:
- Uniqueness of design;
- Development of creative thinking;
- The child’s interests in the process of creating parts;
- Time spent together;
- Communication and expression of thoughts by a child.
The only disadvantage is that it is a labor-intensive and painstaking task that requires a lot of time and concentration.
Necessary material and tools for work
To complete the craft, there will be plenty of material in any home, because DIY children’s furniture for dolls does not require special or expensive things.
Material used as base:Of course, after practicing on a simplified version, over time you can tackle more complex designs, but for beginners in this business, and especially for children, this is more than enough.
- Paper and cardboard products (egg trays, match boxes, shoe boxes, other boxes, sheets of cardboard);
- Plastic products (bottles, containers);
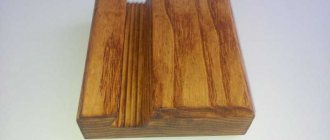
- Plywood;
- Wire;
- Any fabric, leather;
- Wooden sticks;
- Threads;
- Details for decoration (beads, buttons, ribbons, paints, clothespins).
Basic working tools:
- Scissors;
- Glue;
- Ruler;
- Pencil;
- Stapler;
- Needle;
- Thread;
- Scotch;
- Other (depending on the material and complexity of the products).
Interior arrangement
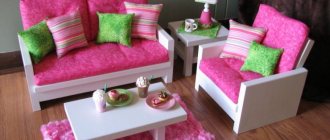
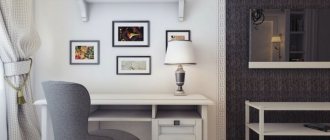
Before you make a room for dolls, you must think about the interior. At the next stage, you can begin to furnish the house with furniture. It is most convenient to place a crib in the corner, which is covered with bed linen. Pads are placed on top, you can put a toy for the doll. There are chairs and a table around the room.
In order to diversify the interior, you can hang a board on the wall, which is previously decorated with stickers. The board can be made of thick fabric. An organizer with stationery is placed on the table; you can find all this and purchase it in online stores for children's dolls. There you will even find small books for toys. All these little things will allow you to create a single whole - a real room. You can hang stickers in the shape of donuts on the wall. The room should be decorated with flowers made of corrugated paper. You can make such crafts yourself. A basket of toys should be placed in the corner. The ideal house is ready.
Process planning
In order for everything to work out perfectly and meet the girl’s expectations, it is advisable to organize each stage of the work in detail:
- Number and design of elements;
- Dimensions;
- Decide how to make drawings of furniture for dolls, with your own hands or take ready-made ones from the Internet;
- Select the material from which the parts will be made;
- Prepare the base for the furniture (draw a template on cardboard or plywood, cut it out);
- Connect the structure;
- Take care of the exterior design (paint, seal, attach decorative elements)
Preparing everything you need
In order to make a doll room, you need to prepare:
- cardboard box;
- scrapbooking paper;
- glue;
- hot glue;
- cotton wool
To make the room look more realistic, you should ensure there are miniature chairs and a table. It is important to have toy pencils, books, stickers, notebooks and stickers available. You can order such miniatures online.
Sintepon and cotton wool are perfect for filling. For bed linen, you should prepare a piece of beautiful fabric. And instead of a glue stick, you can use PVA glue. For wallpaper and flooring, scrapbooking paper with appropriate dimensions will be used.
The main interior items in the house
Do-it-yourself furniture for dolls, made of cardboard, is one of the most accessible and cheapest options, and it is also the easiest to work with, but its disadvantage is its fragility, in which it is much inferior to plywood.
The main piece of furniture in any doll house is the bed, so you can start with that.
Material for execution:
- Carton boxes;
- Plywood sheets.
- Draw out the details on the sheet according to the size of the doll (standard 160*75 mm);
- Cut and secure with glue or stapler;
- Complete the design with fabric or colored paper;
- Add bed linen, pillows, blanket.
Easy to make furniture for dolls with your own hands, as well as another mandatory element not only for girls, but also for Barbie - a wardrobe.
It can be made from cardboard, or from a box, which will become a finished frame.
To do this, it is enough to cut out the doors; you can use matchboxes as additional shelves; a tube or wire can be used for the crossbar; the hangers themselves can be twisted from it.
Glue foil – a mirror – onto the entire length of the inside of the door. The handles are made of beads or long glass beads (beads), before covering the cabinet with fabric, self-adhesive paper or decorating it with paints. The front side can be decorated with an ornament made of paints, sequins or threads.
Gluing them into a furniture blank is no longer difficult. If desired, it can be covered with colored paper, but the original will produce a very self-sufficient and beautiful product.Of course, the task can be complicated by making a cabinet with paper tubes. Then all sides of the product are made exclusively from newspaper twists, which is the most painstaking process.
Doll wardrobe
DIY wardrobe. master classes: 370 photos + drawings
You will need: plywood 4 mm thick, white wood paint, cabinetry veneer, carbon paper, sheets of paper, pencil, ruler, jigsaw, jigsaw blade for straight and radial cuts, glue, sandpaper, brushes and sponges for painting, scissors, screwdriver, construction knife, 2 wooden sticks, furniture fittings (hanger hooks, 3 handles, self-tapping screws, 4 hinges).
Master Class
- Draw a sketch of the cabinet.
- Draw each detail on paper.
- Cabinet parts: 2 side walls and 2 rectangular parts for them, roof, bottom, back wall, partition, 2 shelves, drawer module, 2 doors and 2 patterned parts for them, 4 figured legs, upper horizon (shaped part), drawer (bottom, back, 2 sides, front panel and a rectangular part for it).
- Cabinet size: height 34 cm, width 22 cm, depth 9 cm.
- Transfer the cabinet parts onto the plywood using carbon paper.
- Use a jigsaw to cut out every detail of the future cabinet.
- Sand each piece of the cabinet with sandpaper.
- Glue the redwood veneer to the cabinet sides, drawer fronts and cabinet doors, then leave to dry.
- Paint the patterned pieces for the cabinet doors, the rectangle for the drawer and 2 rectangles for the side walls with white paint, then wait until dry and glue them on as decoration.
- Paint the 4 curly legs with white paint and leave to dry.
- Glue the 2 sides, the back wall of the cabinet and the legs as shown in the photo and leave to dry.
- Glue the box parts together.
- Glue the roof and the upper figured horizon.
- Glue the partition inside the cabinet, visually dividing it in half.
- Glue 2 shelves as shown in the image.
- Glue a wooden stick as a pipe for things.
- Make hangers from pieces of wood and hooks.
- Paint the inside of the cabinet, hangers, top horizon and inside of the drawer with white paint, then leave to dry.
- Attach handles to drawer and cabinet doors.
- Screw the hinges to the cabinet and attach the cabinet doors.
The plywood doll closet is ready!
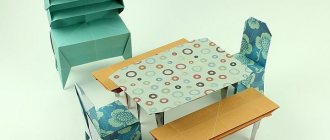
Table and chair
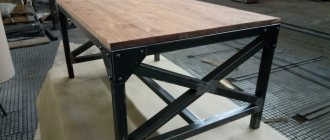
You can use plywood for the table. This is a more labor-intensive process than working with cardboard, but as a result of the effort, the product comes out quite practical.
Instructions for implementation:
- Using a compass and a jigsaw, draw and cut out a circle (two for a coffee table), legs;
- Glue;
- Cover with varnish or paint.
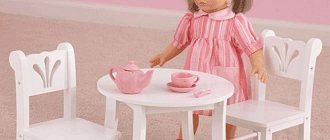
The base for the chair can be wire, which can be twisted into a convenient shape, or you can use other objects such as boxes, cardboard, clothespins, ice cream sticks.
The height of a standard chair is approximately 40 mm, with a backrest - 75 mm.
Household items
You can also come up with different options for toy products and household items. For example, mold fruits and vegetables from hardening soft plasticine. Make boxes of washing powder or oatmeal from thin cardboard and advertising clippings from magazines.
What would a house be without cleaning equipment? We invite you to try making a broom for Barbie's house.
The manufacturing technique is extremely simple:
- Take an old toothbrush and use pliers to separate the bristled head from the handle.
- Now sand the cut area to avoid damaging children's hands.
- Next, using a glue gun, attach a thin stick to the back of the cleaning head.
Voila, the broom for Barbie's house is ready!
Dresser or dressing table
It is very convenient to cut from a small box, where the cabinet is about 7 cm, the wall for the mirror is 16 cm, the width is 8 cm. Connect everything by gluing foil as a mirror and handles with beads. Decorate according to your desire and imagination.
Another simplified version of a chest of drawers is glued matchboxes. All children will like it because it has drawers.
It is enough to glue the boxes tightly to each other, or you can additionally attach a cardboard frame. Cover with wallpaper, napkins or other decor.
Wire bed
Making a jewelry box. DIY box: how to make it. detailed master classes
You will need: copper wire with a diameter of 1.2 and 0.4 mm (thick and thin), a ruler, wire cutters, pliers, super glue, tulle fabric or mesh, threads, a needle, scissors, a sheet of paper, a simple pencil, beads of 2 sizes , doll bedding set, doll, golden spray paint (optional).
Master Class
- Draw a sketch of the bed.
- Bed size: length 20 cm, width 10 cm, headboard height 10 cm, footboard height 8 cm.
- Bend a rectangle measuring 21x11cm from thick wire.
- Form two semicircular parts from thick wire - a headboard and a footboard with a height of 15 and 13 cm. These dimensions include the height of the headboard and footboard, the length of the legs is 4 cm and a 1 cm allowance.
- Secure the rectangle-lounger with several turns of thin wire.
- Attach the headboard and footboard pieces to the corners of the rectangle with thin wire, as shown in the image.
- Prepare 2 pieces of thick wire 28 cm long and make curls on different sides with pliers.
- Prepare 2 pieces of thick wire 18 cm long and also make curls with pliers.
- Screw on 4 pieces of thick curled wire with thin wire as a bed frame.
- Twist 2 shaped pieces from thick wire and attach with thin wire, decorating the headboard and foot of the bed.
- Sew tulle to the bed frame on all sides as a mesh.
- Glue 2 beads as crib legs.
- If desired, spray paint the bed with gold-colored paint and leave to dry.
- Make the bed with a set of bedding.
The bed for the doll made of copper wire is ready! I recommend watching this video!
How to make a bunk bed for dolls
Watch this video on YouTube
Other furniture contents
A photo of do-it-yourself furniture for dolls will help you decide on those interior items that your daughter needs for her ideal house.
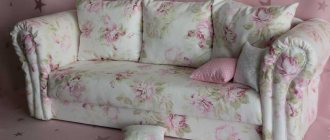
A sofa made from small kitchen sponges, a kitchen wall made from cardboard blocks, a sink made from the bottom of a plastic cup or miniature plate, a faucet made from a plastic straw, etc. can serve as a complement to the decor.
Household appliances:
- Microwave – sharpener, with a removable lid;
- Refrigerator – tea box;
- TV – a matchbox with a picture pasted on;
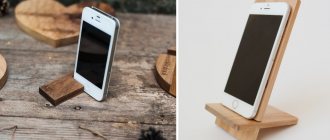
- A floor lamp or lamp - a tube and an old wooden spool of thread.
The variety of ideas is huge, the main thing is desire, and the materials will be found on your own. Encourage your little housewife to create furniture, then these items will be filled not only with new creative thoughts, but also with great love.
How to determine size
Doll beds, wardrobes, chairs and sets are human furniture in miniature. Therefore, to determine its size, it is enough to take the dimensions of real furniture and reduce them several times. How long depends on the size of the doll itself.
Let's say the doll is 20 cm tall. The average height of a person is 170 cm. If you divide it by the height of the doll, you get 8.5 - that’s how many times you need to reduce real furniture.
Browse through the catalogs and choose a sofa that you like. Find out its dimensions and “adjust” them to your doll. As a result, you will get a beautiful, proportional sofa that looks like it came from the kingdom of the elves.