Furniture made from paper using the origami technique is convenient for furnishing ready-made doll houses or homemade roomboxes. It is difficult to find a more affordable and, at the same time, effective way to create toys. Paper models bring aesthetic pleasure to the child, while simultaneously developing his talents, intelligence and creative thinking. And the fact that the furniture turns out to be durable and functional is an additional bonus that fuels interest in it. Some furnishings will be useful for adults, for example, practical multi-tiered chests of drawers, in which you can put any small thing: from stationery to jewelry.
How to make a paper house for paper dolls with your own hands?
There are many options for making a paper doll house. First of all, thin cardboard or thick album sheets can be used for these purposes.
Instructions for making a paper house:
- We will make housing out of shoe boxes. You need to take the box and use a cardboard sheet to divide it into two parts.
- You will get two floors. Now you can start making windows. Draw the outline of the window and cut it out into the box.
- Now cover the frame of the house with wallpaper or self-adhesive paper. You can make the facade look like wood.
- Now start finishing the inside of the house. You can paint it with paints or cover it with colored paper. Gift wrapping looks great.
make a paper house for paper dolls with your own hands
make a paper house for paper dolls with your own hands
make a paper house for paper dolls with your own hands
make a paper house for paper dolls with your own hands
Table
The main disadvantage of purchased toy furniture is the price. However, no one guarantees that the doll table and bed will not break from too much pressure or an accidental fall. For daily children's games, it is better to make your own furnishings using the most “waste” material - paper. If such furniture is torn, it will not be difficult to replace it with new one. And to extend the service life of a paper product, it is better to take durable craft packaging for it. In addition, it has a shade of natural wood, looks stylish and holds folds well.
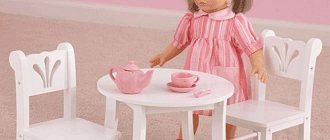
The best place to start furnishing is the table. You can come up with a lot of different scenes with it. The table should be proportional to the doll for which it is being made, but items that are too large become flimsy and quickly deform. The optimal square for a toy is 15 x 15 cm.
The simplest diagram of a paper table:
Step-by-step instruction:
- Fold the square sheet in half. Let's reveal.
- We bend the sides to the central axis outlined in step 1.
- Fold the top and bottom edges towards the middle. Let's straighten it out.
- We open the lower part, folding it along the diagonals indicated by the dotted line.
- Press the trapezoidal valve.
- Repeat steps 4 and 5 for the top half of the figure.
- We straighten the triangular “pocket” from the inside and flatten it, giving it a square shape. Repeat the same action for the remaining three sides.
- We fold the lower right square along the dotted lines indicated in the diagram. Open from the center outwards, forming the basic “Bird” shape.
- We do the same with the remaining three squares.
- Turn the product over to the front side.
All that remains is to form the table legs. There are two ways to do this: lower the bottom half of the Bird and fold it 90° or bend the corners. The diagram shows the first option.
Dollhouse in a notebook for paper dolls: print the template
For paper dolls, you can make a house in a notebook. It is very comfortable. Moreover, the notebook takes up very little space. The template is shown below.
Dollhouse in a notebook for paper dolls: print the template
Dollhouse in a notebook for paper dolls: print the template
Dollhouse in a notebook for paper dolls: print the template
Summing up the production of doll furniture
A small or large dollhouse will be filled with joy with the help of furniture made by the hands of loving parents. Playing with such a “house” will bring pleasure to a child, who will believe that his parents are a bit of a wizard, and perhaps he himself will want to learn the skill.
Sources
- https://FB.ru/article/314728/kak-sdelat-mebel-iz-bumagi-svoimi-rukami
- https://heaclub.ru/domik-i-mebel-dlya-kukol-svoimi-rukami-iz-kartona-shema-vykrojka-foto-kak-sdelat-krovat-divan-shkaf-stol-stulya-kreslo-kuhnyu- holodilnik-plitu-kolyasku-dlya-kukol-iz-kartona-svoimi-rukami
- https://oz90.ru/4969-mebel-dlya-kukolnogo-domika-svoimi-rukami-dekor.html
- https://proffstroygroup.ru/dekor/kukolnaya-mebel-svoimi-rukami.html
- https://stroychik.ru/raznoe/mebel-dlya-kukol-svoimi-rukami
- https://CozyBlog.ru/dekor/mebel-iz-kartona.html
- https://miazar.ru/origami/kak-sdelat-shkaf-iz-bumagi-origami/
[collapse]
Paper doll furniture for cutting - kitchen
You can make a paper kitchen using the origami technique or from matchboxes. It's quite simple.
Instructions for making a kitchen set:
- The easiest way to make a set is from matchboxes. The inside pulls out like a drawer in a closet.
- Glue several matchboxes end to end. You will get a smooth tabletop. Glue a few more boxes to it from below.
- If you wish, you can make a hole for the microwave or a shelf for dishes.
Paper doll furniture for cutting - kitchen
Advantages of origami technique
The main advantage of origami is that working in this technique involves limited use of materials. The absence or minimal use of glue and other improvised means in this technique greatly facilitates the work and also guarantees the cleanliness of the workplace. Fans of origami are also attracted by the simplicity of the forms and method of execution.
Paper doll furniture for cutting - bedroom
A bedroom can consist of several pieces of furniture:
- Closet
- Bed
- Dressing table
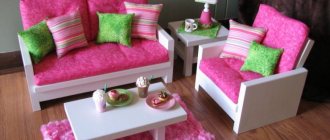
- Armchairs
This is all made in the same color scheme. Samples are presented below.
Paper doll furniture for cutting - bedroom
Paper doll furniture for cutting - bedroom
What available tools and materials may be useful?
To create doll furniture and decorate the interior of a toy house, the following will be useful:
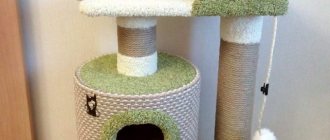
- matchboxes - they will become drawers of chests of drawers, desks, dressing tables, cabinets, chests of drawers for linen;
- cigarette packs – suitable for equipping Barbie’s dressing room and storing her boots;
- shoe boxes - these will make beds, tables, cabinets for large dolls;
- boxes of baby cereal, perfume, and other cosmetics;
- colored plastic bottles, yogurt cups;
- soft foam sponges, viscose napkins;
- pieces of plywood, fiberboard, wood cuts, boards;
- scraps of fabric, leather, gauze;
- plastic “eggs” from Kinder surprises;
- remnants of wire, chains, foil;
- sewing, knitting threads, laces;
- metal tin cans;
- paper, cardboard, wallpaper, PVA glue;
- tape, colored self-adhesive film;
- polystyrene foam, plasticine, polymer clay;
- gouache, acrylic, nail polish;
- beads, buttons, LED lights.
With minimal skills in wood carving, sewing by hand or on a machine, embroidery, it is easy to create incredible doll crafts.
Paper doll cabinet for cutting
There are many options for paper doll cabinets. These are beautiful sliding wardrobes or ordinary wardrobes.
Instructions for making a three-dimensional cardboard cabinet:
- Take a sheet of cardboard and cut out a shape according to the diagram. Glue the seams together and you will have a box.
- Now you can attach doors to this box. They can be hinged or hinged.
- Glue foil to the door, this is a kind of imitation of a mirror.
- Now attach the transverse partitions, these will be the shelves. If desired, paint or cover the cabinet with self-adhesive tape.
Paper doll cabinet for cutting
Paper doll cabinet for cutting
Piano
This model can also be used as a desk. If you take a square for it, measuring at least 21x21 cm and stop at step 6, you will get a decoration-house for a puppet show.
Step-by-step instruction:
- Connect the top and bottom edges of the square sheet.
- We mark the center of the figure.
- We add the right and left sides to it.
- We make folds along the dotted lines. We open both parts from the inside according to the arrows.
- Flatten the resulting folds.
- We get a decorative house. However, we don’t stop at this point and continue assembling the piano. Raise the central part of the workpiece.
- Bend down the top edge.
- We fold the sides at right angles.
- We give the central part a horizontal position. Paste on a pre-printed image of the keys.
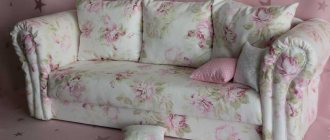
Paper doll bed for cutting
The most important part of a doll's bedroom is the bed. It can be made from cardboard. If desired, you can use fabric to make the stock.
Instructions:
- Select your favorite sample online. Cut out the outlines and paste them into your notebook.
- If you want a voluminous bedroom, you will have to cut out the parts and glue them together.
- After this, you can decorate or cover the bedroom with self-adhesive tape. But you can simply print a beautiful color image.
Paper doll bed for cutting
Step-by-step instruction
To ensure that production goes quickly and is not accompanied by problems, there are step-by-step instructions; a master class on cardboard furniture consists of a step-by-step description of each action. It begins with the creation of a drawing, followed by the formation of parts and their strengthening. The final stage is the assembly of furniture. Each of the stages must be considered separately.
Create a drawing
The first thing you need to do is make a drawing of the furniture. To begin with, draw it on a regular A4 sheet so that you can see a smaller version. In such a sketch, it is important to write down all the dimensions and respect the scaling. If you have the skill to work in special programs that allow you to develop product models, you should use them.
The first drawing must show the product in a general three-dimensional form. Next, you need to draw a projection of the furniture with a top, side, and rear view separately. The next step is to depict the details of the product: each detail must be drawn separately.
When the drawing is ready, it must be transferred to sheets of cardboard:
- Using a tape measure and a long ruler, draw on the surface of the raw material with a pencil, measuring the required dimensions;
- For work, you may need a square so that the corners of the future furniture are even in the drawing;
- When drawing on thin cardboard, try not to leave scratches with a pencil, and when making furniture from corrugated cardboard, draw clear and deep lines;
- It is necessary to cut out parts in compliance with all indentations and possible distance margins.
You can use ready-made patterns or come up with your own product that meets specific sizes and preferences.
Forming parts
It is worth noting that when cutting out parts there should be no visible bends. If the work is done on a box of household appliances, it is better to cut on smooth edges. From six-layer cardboard you can make your own furniture of increased strength, for example, a shelf for shoes or books.
The details of the product are formed using a sharp stationery knife. Craftsmen advise using a construction knife if you plan to work with multi-layered raw materials. As the knife becomes dull, its blade is replaced. A dull knife will not be able to cut the required part smoothly and along the contour - you will have to redo the pattern.
Depending on the type of furniture assembly, parts may be:
- Plug-in;
- Glued;
- Stackable.
The latter option involves gradually increasing the cardboard to achieve optimal thickness. This move will further strengthen the model, preventing it from sagging under loads. It is beneficial to use cardboard sleeves in the design - special tubes with a high density. They are suitable for the production of furniture legs, as well as for assembling structures in an original style. For example, a chair made of cardboard tubes looks creative and can support a person’s weight.
Plug-in
Glued
Building up
Strengthening structures
Each part must be processed after cutting with a knife. This happens in the following way:
- Cleaning up. The cut edges of the module must be sanded. This technique will give them smoothness and prepare them for further processing;
- Pasting. Kraft paper is used for this. It must be torn by hand, and then carefully glued over the edges using PVA glue. You can apply paper to the entire surface, which creates additional reinforcement.
Furniture assembled using grooves will be durable and reliable. In the photo below you can see the principle of making such furniture: during the cutting process, oblong holes are additionally outlined, which are subsequently cut out. An additional structure is inserted into the grooves, which fastens the frame on both sides. Thanks to this, the furniture becomes stronger.
Stiffening ribs are often used, which additionally secure the base of the furniture. Using them, you can independently strengthen a cardboard tabletop, a shoe shelf, or a bookcase. The stiffening ribs and grooves must be coated with glue. By strengthening the structure, you won’t have to worry about the durability of the furniture in the future.
Sand the surface
Cover the surface with kraft paper
Build process
All prepared parts are glued together using a glue gun or Moment glue. If assembly is carried out using grooves, they are also glued for strength. It is recommended to repair all unevenness on the surface of thick cardboard using putty - it will not leave marks, and the excess will be hidden under the finish.
Parts that require gluing in layers must be placed under a press. Books or other heavy objects are good for this. After gluing, they are left for several hours, or better yet, for the whole day, until completely dry. All resulting ribs must be masked using craft paper. Carefully paste over the resulting corners to give them roundness. Next up is the small matter - decoration. There are several options:
- Decoupage - pasting with napkins;
- Painting with acrylic composition;
- Wallpapering;
- Using self-adhesive film;
- Decorating with mixtures.
Finished furniture can be used for its intended purpose within a day after production. Anyone can make furniture from cardboard with their own hands; how to find patterns and diagrams will be discussed below.
Apply glue to the coating
Pressing the elements
We putty cracks
Cover with kraft paper
Making decor
Paper doll bits for cutting out
Of course, without such little things as perfume, shelves, vases, flowers, the room looks uncomfortable. These little things make the doll's home cozy and lived-in.
Paper doll bits for cutting out
Paper doll bits for cutting out
Paper doll bits for cutting out
As you can see, in order to captivate a child, it is not necessary to buy him expensive toys. A paper house with a doll would be an excellent alternative.
Modular stool-table
Fold 154 green and 43 yellow modules.
Assembly diagram:
- Collect a strip: 2 green modules in odd rows, 1 yellow module in even rows. Total 23 yellow. and 26 green.
- Close the strip into a ring.
- Collect a circle: 6 green in rows 1 and 2, 12 in row 3.
- 4 – 18, 5 – 18, but on the other side.
- Glue the circle to the ring.
- Assemble 4 legs similar to the ring. Each one requires 12 green and 5 yellow.
- Glue the legs to the base.
- Turn the craft over.
Editor's voice Irakli The Lord of Paper Sheets You can place a small soft toy on such a stool or use it as a stand for various small things.
Chair in traditional technique:
Approximate Dimensions
Before you think about how to make a table for dolls yourself and from what material, you need to decide on the dimensions. You need to start from the height of the doll itself and the size of the house. The interior will look beautiful if all the furniture is approximately the same scale and style.
The easiest way to make all objects proportionally the same is to calculate the scale. You need to divide the average height of a person by the size of the doll. You will get a number by which you will subsequently need to divide all the real sizes of the furniture to get the doll sizes.
For example, the height of a doll is 20 cm. We divide the average height of a person 175 cm by 20 cm = 8.75. The actual dimensions of human furniture must be divided by this number to obtain the dimensions of doll furniture.
On average, dolls have a size from 7.5 to 15 cm. If the doll for which this or that piece of furniture is made fits these parameters, you can use the following sizes:
Master class No. 1
Let's start furnishing the doll's home with an armchair. It's easy to make: please note that the dimensions are shown in the photo. All you have to do is transfer them onto cardboard. We specifically do not provide chair templates, since it is made based on the personal considerations of the child or parent who is involved in the process of creating furniture.
Cut out the parts you see in the photo from cardboard and get to work. To create a chair seat, use square blanks. Their number depends on the thickness of the cardboard used. Place a stack of cardboards together and glue them together.
Attach the seat to the back of the chair, glue it to the bottom.
Lubricate the front part of the seat with glue and attach the plug piece. It is a rectangle with rising bed elements. Now between the back and front of the chair there are supports on which cylindrical beds will be placed.
Secure the cylinders of the beds and hide the sides under the cardboard.
The chair is ready! To avoid leaving the furniture in this condition, cover it with a beautiful fabric or secure it with decorative paper.
Please note: if the child is small, the paper will become a short-lived cover for the chair.