The more comfortable and beautiful the furniture, the more pleasant it is to relax on it. And, by the way, some options for furniture products can significantly decorate the interior, giving it individuality and completeness. One of these types of furniture is a rocking chair. It was invented a long time ago, but so far designers have not been able to find a worthy replacement for it, characterized by the same convenience. Such a chair is by no means cheap, but you can go the other way - a DIY rocking chair made of plywood will save a lot of budget money.
DIY rocking chair made of plywood
Benefits of working independently
The most important advantage of a DIY plywood chair is its price, which is much lower than the store price. In addition, hand-made chairs are in no way inferior to expensive factory ones, and sometimes even better - more original and reliable.
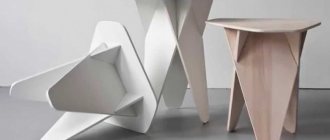
In the world of furniture design, there are famous names of designers who have made a name for themselves by making furniture from plywood.
Such designs are mainly made for country houses, as recreational items. The average cost of one product does not exceed 6 thousand rubles. By making a chair from plywood, you can not only create a high-quality piece of furniture, save money, but also get great pleasure from the work.
The main task of designer furniture is to delight consumers with its informal forms.
How to choose material and design
Modern models of rocking chairs are made from various materials, each of which has its own characteristics:
- Wood. Furniture made from various types of wood looks stylish, it is durable and reliable. The surface must be treated with a finishing protective compound.
- Sheets of plywood. The material is easy and comfortable to work with, it can take any shape, and is also suitable for the manufacture of small elements. However, it is better not to place such rocking chairs outside.
- Profile pipes. It is better to make individual parts from them, rather than the entire structure. The material is durable and easy to work with.
- Plastic pipes. A practical, budget-friendly and reliable option, the material is lightweight and easy to process.
- Rattan and wicker. The result is beautiful designer products, but the weaving technology is quite complex, and high-quality material for manufacturing is not easy to find.
- Metal. Processing parts will require skills and experience from the master. Metal chairs are durable and resistant to external influences.
Tips from the experts:
- Coniferous woods are the most comfortable when assembling furniture yourself, as they are easily amenable to any type of processing. However, they quickly react to humidity and swell, so rockers made of spruce, pine or alder must be treated with special protective solutions.
- Furniture can also be made from expensive and denser species, for example, oak, beech or ash. In this case, you can be sure of the strength and durability of the structure, since these types of trees do not have large pores.
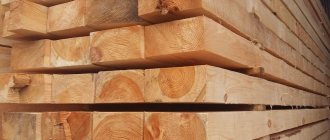
- To create swinging products, it is better to use well-dried first grade wood blanks. If the chair is assembled from damp material, the entire structure may become deformed and deteriorate over time.
- The choice of material is often determined by the location where the rocking chair will be located. An outdoor structure (for a dacha or veranda) must have additional protection in the form of treating all surfaces with antiseptic agents that can minimize the effects of snow, rain and frost.
- Summer cottage products should not be covered with textiles and covers should not be placed on the body, otherwise the fabric may become damp and rot. In this case, it is better to use removable pillows and blankets.
- Wood can be combined with metal to create an even more durable structure. In this case, the frame should be metal, and the seat itself should be wooden.
- It is better to choose plywood sheets with good ductility for manufacturing; they are more convenient to process.
What types of designer chair designs are there?
There may be hundreds and even thousands of design options, but they all come down to different variations of the 2 most popular models:
- Rocking chair;
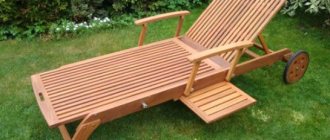
A rocking chair made of plywood with your own hands is an excellent option for relaxing in the country, in a country house, or just in nature.
- An original chair with stool-type legs.
Don’t be afraid to experiment; as a result, you will get a comfortable, beautiful and original item for decorating your garden or summer cottage.
Given the necessary designs and minimal experience working with plywood sheets, both options will be easy to manufacture. True, a rocking chair can make you suffer when cutting out a template, plus the veneering stage will be difficult and time-consuming. Below are two detailed instructions for making a rocking chair from plywood and the original three-legged model.
Tips for selecting and preparing plywood sheets
It is better to pre-treat the sheets with special non-toxic protective agents before manufacturing.
Step-by-step instructions for performing a model on three legs
It is better to start making chairs from plywood by carefully studying and calculating a drawing, which you can sketch yourself or find on the Internet.
Overall dimensions of the chair.
As an example, we take a drawing of a round chair made of spherical plywood. The model is distinguished by its original design and ease of execution. It is better to take a birch leaf. For high-quality cutting, you need to prepare a template.
Drawing of the front legs of the chair.
The drawing is redrawn on graph paper, then applied and traced along the contour.
Drawing of chair parts with dimensions.
After a high-quality redrawing of the drawing, you need to cut out the elements with careful movements, while using the material sparingly.
If you rarely cut plywood, practice on an unnecessary piece, so you will not only get used to the jigsaw, but also decide on the cutting speed.
After cutting, you must carefully cut out all the elements with a jigsaw without damaging their structure.
During cutting, the movement of the jigsaw should be as smooth as possible - without acceleration or settings. Each jerk or stop will certainly leave a mark, and then you will have to sweat with it while polishing the cut area.
The cut areas must be treated with sandpaper to remove excess roughness and prevent chipping and delamination during assembly.
Use different numbers of abrasive pads depending on the size of the defects.
First, use special products with an antiseptic effect. Then comes the treatment with wood glue. This point is needed to prevent parts from scattering during assembly.
Pre-clean the surface from dust and dirt. Check the moisture content of the plywood, it should be completely dry.
Holes for screws and fastening points should be drilled according to the drawing diagram. Self-tapping screws should not be smaller or larger than the product; protrusion of any parts is unacceptable.
In order not to waste time sealing up “ugly” heads, use self-tapping screws with decorative heads.
After the assembly stage, protruding screws should be filled with putty. Coat the frame with varnish and let dry.
The number of layers of varnish must be at least two.
To give a brown tint, the plywood sheet should be treated with stain. Afterwards you can make the upholstery of the seat and armrests.
For example, in the form of a soft pillow.
DIY wooden chair with backrest
If you have successfully completed the manufacture of a stool, we suggest making a “full-fledged” wooden chair with your own hands. For such a product, you can already choose more solid wood - oak or walnut, for example. In addition to lumber, you will need screws, wood glue, the tools described above and a cutter. If it is not possible to work on a machine, use a set of chisels and a hammer. For tinting you can use the same stain.
Below is a table describing the number and sizes of parts needed to make a chair with a backrest. At first glance, it seems that there are too many of them (especially when compared with a stool), but such a chair will turn out to be very comfortable and will serve for many decades.
Which design to choose for a bathroom with toilet - more details
To make the task easier for you, we have prepared a visual plan for subsequent assembly with numbered parts. In the future, to create your own exclusive furniture, you will have to make a drawing of a wooden chair yourself.
Progress:
- You should always start sawing from the legs, no matter what kind of chair you make. Cut two pieces 38mm thick, 75mm wide and 1075mm high.
- Measure and locate the attachment points for the horizontal jumpers.
- Make two front legs - they will be shorter than the back ones. Height 420 cm.
- Sand the parts using a sander.
- Make markings and use a milling cutter (chisels) to select grooves for joining the legs and jumpers. Cut the upper ends so that you get a low pyramid.
- Make 2 horizontal and 5 vertical jumpers 475 mm long - these will make up the backrest.
- Make grooves in the horizontal elements.
- Form tenons in parts #3 4, 5 and 6.
- Bevel the top of element #3 from the middle to the edges.
- Make a rough assembly of the back (without glue), adjusting the tongue-and-groove joints.
- If everything is done correctly, disassemble the back, coat all attachment points with wood glue, assemble back and clamp with clamps.
- The hardest part is making the side inserts. One of them includes the upper arch part No. 7, the lower crossbar No. 8, 5 slats No. 9 and 10.
- Cut out blanks for these elements and for arched lintels No. 11.
- Since all the arched elements are the same size, to make the task easier, you can make a template from MDF.
- Sand all parts.
- Mark and select the grooves on the arched elements - the tenons of planks No. 9 and 10 will be inserted into them.
- Using the template, draw a fillet to get 4 identical parts.
- Make tenons in planks No. 9 and 10.
- Place markings on the upper ends and cut them out, fitting them flush with a cutter. To make the tenons on the tops, first use a rabbet bit.
- On all arched parts and elements No. 12 and 13, cut off the tenons on the miter side.
- Roughly assemble the side inserts.
- Glue the connections and secure with clamps.
- After the glue has dried, reinforce the attachment points with screws.
- Close the holes for fasteners with decorative plugs.
- Planks No. 16 are designed to support the seat. Screw them with screws to the crossbars No. 18, having previously drilled sockets for them.
- All that remains is to collect all the pieces together. First, glue elements No. 11, 12 and 19 to the rear leg.
- Turn over and insert the tenons into the grooves of the second long leg. Secure with clamps and screw in the screws.
- Glue the side elements of the drawer and the side inserts to the finished back.
- Glue the arched lintel and the front side of the drawer with the legs.
- Place the resulting structure onto the sidewall spikes.
- Install the clamps, but do not tighten them all the way - check the squareness of the structure first. To do this, use a square, place a chair on the floor and simply inspect it from all sides, moving away a couple of steps. If everything is smooth, tighten the clamps and screw in the screws.
- Perform a final sanding, smoothing out any rough edges or sharp corners.
- Cover the product with stain and varnish. When using polyurethane varnish, apply it in 2-3 layers. Apply a new layer only after the previous one has completely dried!
- Cover the seat with soft leather or leatherette. First, nail a thick layer of furniture foam to the seat, and after upholstering it, screw the seat to No. 16.
Here you will find design options for a small kitchen
It is recommended to attach felt or rubber pads to the lower back parts of the legs to avoid damaging the floor covering.
Making chairs from wood is a very interesting and creative process, which over time can develop into a useful hobby. Once you learn how to make basic designs, you can diversify the process by adding your own details, using wood carving tools, and combining different materials. Anyone can make wooden furniture, but you can start with an ordinary kitchen stool.
Making a rocking chair from plywood
In this case, as in the previous one, the creation stages begin with a drawing. You can draw it yourself if you have knowledge of product design, or take a ready-made one from the Internet, the main thing is that it contains all the necessary calculations.
An example of a drawing of a future product.
As in the previous case, from the finished drawing, using graph paper, the details of the future rocking chair made of plywood are drawn, in our case these are the side parts (runners).
Drawings for a plywood chair are worked out on special graph paper.
Using a jigsaw, cut out the parts along the pre-circled contours and process the edges with drying oil, then sand them with sandpaper. Treat parts of the product with special antiseptic agents.
How to make it yourself at home from vines?
To make a wicker chair yourself, you need to have weaving skills. This product will delight owners with its light weight, practicality, and ergonomics. A wicker chair will not clutter up the free space and can be placed even in a small room.
Selection of materials
You can weave a piece of furniture from:
- rattan;
- vines (willow, raspberry, bird cherry).
Rattan is a unique plant found in South Asia and Indonesia. In our country it is problematic to buy it. Most often, ready-made products are available for sale, which are highly expensive.
Important: a feature of wicker chairs is the absence of screws and bolts. All elements are attached with glue. Finished furniture must be varnished in several layers to improve performance characteristics
Finished furniture must be varnished in several layers to improve performance characteristics.
If you really want to make a rocking chair from rattan, you can look in stores for its substitute - poly rattan. This material has high technical characteristics, attractive appearance and is easy to use.
Products made from artificial rattan are no different in appearance from natural raw materials.
But as practice shows, people often prefer furniture made from wicker. This material is collected independently with the arrival of the first frosts. Before making furniture, the collected vines are processed:
- The rods are boiled in hot water for at least 10 hours.
- Cleaned thoroughly.
- Dry for 3 days.
- Sorted by diameter. The frame is made from thick rods, and the seat and back are made from thin rods.
Tip: it is better to weave a rocking chair from a wicker into three rods. This will significantly increase the strength and durability of the product.
How to assemble a wicker frame, runners and armrests together?
The design of the wicker model consists of:
- >lower bench;
- seats;
- backrests;
- armrests.
Making a rocking chair from wicker is as follows:
- We prepare the material. 25 long willow twigs (2-3 meters long), three cm in diameter and many thin twigs (1-1.2 m in size), 0.5 cm in diameter.
- The frame is made from thick branches (less often from wooden planks). All parts of the base are fixed with wire or nails.
- The braiding consists of covering the back and seat with tires.
Shinki is braided in an openwork or combined way. Using a special tool (jam), the rods are bent and the frame with the lower seat is fixed. - Now the backrest with cross bars is attached. The legs of the frame are fixed with thin rods on the seat frame and crosspiece.
- The upper part of the backrest is mounted with transverse rods to the seat.
- Next, armrests, supports, and skis are made. The armrests are attached to the frame with special nails. Thin rods are inserted vertically and horizontally into the back of the chair.
- All elements of the chair are attached to the frame with self-tapping screws, and the top is masked with glue and sawdust.
Reference: for the manufacture of runners, willow sticks with a diameter of 3 cm are prepared. The front arcs will consist of two bent parts no more than 1.2 cm long, the rear ones will be straight.
Master class on finishing
As for the finishing of a rocking chair made of wicker, the product must:
- Cover with impregnations against high moisture, insects and fungus.
- Next, choose a suitable shade of stain to give the product a rich color.
- Cover the chair with two layers of waterproof varnish.
All of the above procedures will not only give the product an attractive appearance, but also increase its performance.
It doesn’t matter what materials the rocking chair is made of. Any product needs competent and proper care:
- once a week the piece of furniture is wiped with a damp cloth;
- To protect the chair from scratches and premature wear, it is recommended to put a cover on it;
- Children's furniture must be wiped regularly to prevent harmful germs and bacteria from accumulating on it.
Tip: in nature, next to such a chair, you can put a simple table for a summer house or a table in a gazebo, as well as a folding table for a picnic. In a home environment, neighbors can be a small coffee table or a table for a laptop.
What to pay attention to
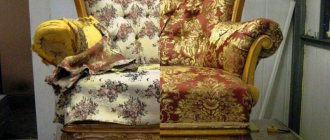
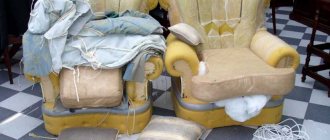
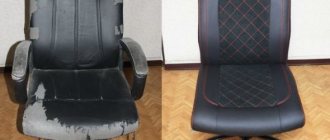
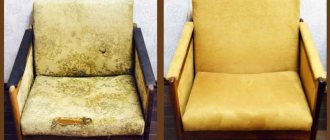
In order to increase comfort, the rocking chair can be upholstered in soft faux leather or velor. First, the back back is upholstered, then the fabric is nailed to the frame of the product with small nails. The edges of the transverse parts are sheathed at the back, and the upper and lower strips at the front. This is done to increase the strength of the product.
As a simpler option, you can make a soft back and seat for the chair.
If you don’t want to deal with complex upholstery or sewing pillows, then you can do it even simpler - make a removable cover. There will be foam rubber (10 mm) inside, and some nice furniture fabric on top.
In this case, the cover can be put on when needed.
You can apply a mosaic or some beautiful design to the outside of the backrest. The main thing is to respect the overall interior design and not to overdo it with bright colors and patterns. An analogue of this design will be a sofa.
Its width is greater, but the production mechanism itself is the same.
Frequently asked questions from beginning furniture makers
Before you start making this or that design, you should familiarize yourself with the list of questions that beginners in this business often have.
How to cut parts?
When cutting longitudinal parts, it is better to use a circular saw, and for transverse parts, an electric jigsaw.
Jigsaw
How to connect parts of the structure?
For connections that carry the main load, you will need to use euroscrews or self-tapping screws. In other cases, the parts are assembled using wooden choppers and glue.
Chopiki
Paint or varnish?
The choice of materials for processing depends on the quality of the wood itself. If the material does not have any defects, it can be treated with stain and then a layer of varnish can be applied. If stains appear on the surface, the wood must first be puttied, coated with a primer, and only then painted.
Wood varnishes come in different shades
How to reduce the consumption of paints and varnishes?
Quite often, during final finishing, the paint is quickly absorbed into the surface, which is why bald spots remain on it. This happens because natural wood has a porous structure. That is why professionals recommend pre-treating it with drying oil.
Drying oil for wood processing
Afterword
This article discusses only two types of plywood chairs, which are the easiest to make for beginners.
To make it yourself for the first time, you need to put in maximum effort, endurance and patience. With a little practice, you can move on to heavier models. A DIY plywood chair is a stylish, original solution that is not inferior in quality to expensive store-bought counterparts!