You won’t be able to make a rocking chair yourself without drawings and some experience. This is due to the fact that the product is quite complex structurally, and it must withstand the load of a person sitting in it. But this is not a reason not to try to acquire such interesting furniture for your home, which not only looks impressive, but also helps you relax well.
What to make it from?
- Vine or rattan;
- Plastic pipes. A DIY rocking chair made from a pipe is also a good option if you don’t have any special skills.
- Metal – it won’t work without experience and skills;
- Plywood;
- Wood – a DIY rocking chair made of wood is one of the most interesting options;
- Profile pipes - more suitable for the manufacture of parts;
Selection of material
A variety of materials are used for making furniture yourself, most often natural wood and plywood, as they are easy to process. A welded or forged metal structure is more difficult to make; its creation will require special tools, usually available only in professional workshops. To make an original bent-glued product from thin veneer, you will also need the appropriate equipment - a steam generator, various matrices, patterns, templates. Sometimes the structure is woven from wicker or rattan; plastic options are suitable for children, since their strength is low.
What is needed for making
- Wood (Any species you like)
- Band-saw
- Plane
- Planer (if available)
- Fraser
- Ball cutters
- Hand saw
- Chisel
- File
- Tape measure and pencil
- Wood glue
- Clamps
- Dowels 10 mm
- Drill 10 mm
- Drill
- Screwdriver
- Screws 40 mm
Manufacturing stages
The following are instructions on how to make a rocking chair.
Step 1: Template
First of all, you will need a template to form the legs of the rocking chair. There are various drawings of a rocking chair, there is one for every taste. You can simply take a piece of wood 15 x 5.0 x 90 cm and cut a bend on one side. As long as the cut is symmetrical, it doesn't matter how big the curve is.
To make the legs you will need 6 pieces of wood that are 3.0 cm wide, 0.8 cm high and 85 cm long. Wood glue is applied to all the pieces, and then they are placed in a jig.
Step 2: Holes
After the blanks have appeared, you need to make grooves into which the tenons from the chair legs will be placed. The grooves should be 5.0 cm from the edge of each leg.
You can use a machine designed for this job. If it is not there, then a chisel and a hammer will do - the result will be the same. With the help of a machine, this is simply done faster and more accurately, but otherwise there is no difference.
Step 3: Spikes
According to the drawings and dimensions, it is necessary to cut 4 pieces of wood 80 x 2.5 x 7 cm for four legs. Using a band saw, one tenon is made for each leg. This tenon should fit into the groove on the legs.
Step 4: Seat Support
Now it's time to add the seat support. Again, mortise and tenon jointing technology will be used to assemble the pieces together.
The seat support is another piece of wood, like the legs. It is necessary to note where the inserts need to be made.
Note!
DIY induction heater ♨️ - reviews of the best manufacturing options. Varieties of homemade device designs + step-by-step master class (160 photos)
Do-it-yourself Gauss cannon: TOP-130 photos of the best ways to create it yourself. Design features + master class for beginners
- DIY clamps - a step-by-step master class for beginners. Schemes for manufacturing different designs + 170 photos
Using a chisel, grooves are made and the seat support is adjusted. All parts are assembled using wood glue and clamps. Then you need to let the glue dry overnight.
Step 5: Front and Rear Support Rails
You need to add support rails to assemble the two sides of the chair. For the front and rear rails, two pieces of wood measuring 60 x 2.5 x 7 cm are used. The front part is assembled using a mortise and tenon, and 10 mm dowels are used for the rear.
Step 6: Back Slats
For the rear part, an 80 x 60 cm frame is used. Several slots are drilled into it on the top and bottom to accommodate the slats. The planks are made from 0.8 x 4.0 73 cm pieces of wood with all edges rounded using a router bit and round chisel.
Step 7: Attaching the Back Planks
Use 10mm dowels and a 10mm drill bit to attach the back to the sides.
Step 8: Seat
A square piece of wood with a thickness of 30 mm is used for the seat. If there is a similar detail from some tabletop, then it will also work quite well. It is advisable that it be made of the same type of wood as the rest of the rocking chair.
The dimensions of the seat are 55 x 60 cm (if the dimensions of the rocking chair are different, then the seat should be proportional to it). Several screws are then used to secure the seat.
Note!
Do-it-yourself electric scooter - a master class with step-by-step instructions for doing it yourself. Tips and simple patterns for beginners + the best photo reviews
- Smokehouse from a gas cylinder - the best master class on making a homemade smokehouse with step-by-step photo diagrams for beginners
Do-it-yourself compressor: TOP-130 photo reviews of finished compressors. Step-by-step instructions + diagrams and drawings
Step 9: Armrest
A curved armrest looks more interesting than a straight one. However, the direct one will be much more convenient. To make it you will need two pieces of wood 50 x 7.0 x 2.5 cm. After they are cut on a band saw, you need to make two grooves to hold the back of the chair.
By making these grooves, there was no longer a need to add support rails at the back. All edges are rounded with a router, then wood glue is applied and secured with dowels. In general, the design of the armrests is simple.
Step 10: You're done
That's all! Now it’s clear how to make a rocking chair with your own hands.
You can use any type of finish that you like best. It also makes sense to varnish or paint the chair.
Types of designs
Rocking chairs can be divided into several categories depending on the purpose of use or the material from which they are made. But there is also a certain classification of such chairs, according to which rocking chairs are divided into several types depending on their design features.
Rocking chair - an important element of the cottage
Table. Types of rocking chairs.
| Type | Description |
| With simple runners | These are chairs that are mounted on runners that have a radius curvature (for example, rocker arms, skis, arches). This is the very first option that began to appear on sale. Such chairs are the easiest to make, but you need to use them carefully - if you swing too much on them, there is a risk of the product tipping over. So in this case, it is important to take into account the location of the center of gravity during manufacturing - it should be located as low as possible. |
| On elliptical skids | Such chairs have a very soft swing, sometimes have small bumpers, and are often equipped with springs or a footrest. By the way, it’s not so easy to make a chair with springs at home. |
| Gliders | This chair has a fixed base, but swings due to the fact that it is equipped with a pendulum mechanism. The design is complex but interesting, but a novice master may not be able to do it. |
| On runners with variable curvature | Such chairs cannot tip over due to the special structure of rather long runners with variable curvature. It’s quite difficult to build a drawing yourself; it’s better to use a ready-made version, but it’s quite possible to make such a chair yourself. |
| Vanka-stanka | Simply put, this is a tumbler chair. Usually placed in the garden and very stable. Here the chair and runners are a single unit. It is almost impossible to turn it over; it always returns to its original position. The drawing is quite complicated, but you can find ready-made options on the Internet. |
Drawings of a simple rocking chair
Conifers
Pine and other softwoods are popular materials for making rocking chairs. However, if you want to make an outdoor rocking chair, then this is not the best option.
Note!
- Do-it-yourself wind generator: TOP-170 photo reviews of finished devices. Detailed DIY instructions for beginners
- Do-it-yourself spot welding - the best master class on making homemade spot welding with step-by-step photo diagrams of do-it-yourself work
- Do-it-yourself tennis table: TOP-150 photos of the best manufacturing ideas. Master class on creating a tennis table at home
Why? Because pine and other soft woods do not withstand weather conditions well. It is worth noting that a rocking chair made of plywood is also not suitable for outdoor use.
Finishing
As for the finishing treatment of the metal frame, to increase its service life it is necessary to prime it and cover it with paints and varnishes in several layers. It is better to paint the product outside in the warm season . Each layer of primer is applied to the product after the previous one has completely dried. As a rule, the primer dries completely within 24 hours . If you chose a gray primer, then after applying the last two layers, the product can be coated with a matte varnish.
You can make stylish and comfortable furniture from metal:
Teak
Teak is one of the best woods for outdoor furniture, better than other woods such as pine, oak or bamboo.
- Teak is durable and elastic because it produces its own oil. It is a hard wood, so it is not easy to dent or scratch it.
- It is completely wind and water resistant, so it can stay outdoors all year round.
- It is difficult to care for and needs to be treated regularly to avoid a 'silver patina'.
- Teak is one of the more expensive options.
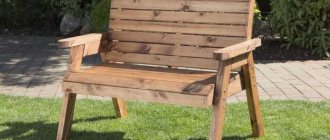
Transformation of an ordinary chair
An ordinary chair can be easily converted into a rocking chair. The first step is to purchase or make runners and take the appropriate measurements to cut the chair legs to the desired height.
Then holes are drilled in the runners where the legs will be attached, and the legs are attached to the runners using wood glue.
How to improve your rocking chair
There is something soothing and relaxing about spending time in a rocking chair. Easy forward and backward movement makes it ideal for reading, chatting, or even taking a quick nap.
If a person has a wooden rocking chair, then he can name a number of its disadvantages - it is not as comfortable or attractive as he would like. However, with a few simple changes, you can transform your rocking chair into a desirable place to relax and read your favorite books.
Possible difficulties and problems
Do not forget to properly test and check the manufactured structure before you begin finishing. The problem may be insufficient swing amplitude. It indicates that the balance is disturbed.
To eliminate this difficulty, you will have to slightly weight the back of the rocker. This can be done by adding an additional crossbar between the runners. For greater effect, use a heavier material.
Paint
While a wooden rocking chair has a natural style that can be very attractive, you can also make it even more cozy by painting it the right shade. A rich, warm color will help make the chair even more attractive for spending time with a good book.
If you want to use the chair in different rooms, then it is better to choose a neutral shade such as chocolate brown, which will go with most other colors.
But if you plan to keep the rocking chair in one place, then it is worth using a color that matches the surrounding decor. An earthy terracotta or brick shade is an ideal choice, but lighter colors such as gold and peach are also viable options.
Add pillows
For a rocking chair to be cozy, it must be comfortable. A wooden seat and back can become a serious test if a person spends a lot of time in the chair.
To make the rocking chair more comfortable, it usually has soft cushions on the seat and back. Rocking chair pads are available in a variety of colors and patterns, so it's easy to find an option that matches the color of the chair.
You can purchase separate cushions for the seat and back, or one long cushion that covers both areas. It is better to choose pillows covered with microfiber material. Not only are they very soft and comfortable, but they are also easy to clean.
If you can’t find the right option that you like and suits the price, then why not make your own pillow using foam rubber and washable fabric. The armrests can also be padded for greater comfort.
Swing principle
Basically, there are three types of rocking chairs, regardless of their modification options: chairs with curved runners, hanging models and pendulum models. Although they have external differences, swinging still occurs according to the principle of a pendulum.
This principle is achieved by shifting the center of gravity. The first swing always occurs with effort, when all subsequent swings occur by inertia, which ultimately gradually weakens.
Pair of accessories
As with any furniture, the right accessories can also help make your rocking chair feel cozier. First, a blanket is placed over the back of the chair. When it's cold, you can wrap yourself in a blanket to keep warm.
It is worth choosing a blanket made from a soft fabric such as fleece, cashmere or chenille. A blanket is selected that matches the chair and its pillows. But if you want to make the room more visually interesting, then it is better to take a contrasting color.
Another accessory that can make a rocking chair more cozy is a rug. A plush rug made from a natural fiber such as cotton or wool is placed under the chair to keep the floor warm and soft underfoot while the person rocks in the chair. Just place the mat so that it does not interfere with the movement of the chair.
Choose the right place
Even with the right color, cushions and accessories, a rocking chair won't be as cozy as it can be if placed in the right place. If the house has a fireplace, then place the chair directly in front of the fireplace. This way you can feel the warmth and, most importantly, comfort from the fire while relaxing or reading on a rocking chair.
You can also place a chair in front of a window with a stunning view to enjoy the scenery. A small alcove with plenty of peace and quiet, and a nearby reading light is another good spot for a rocking chair.
A small table that allows you to place coffee, tea or cocoa without leaving your chair will complement the cozy atmosphere.
Nuances of choosing plywood
Plywood sheets are selected based on the specifics of the project. In this case, you can adhere to the following recommendations:
- For large and visible (external) parts, elite grades of plywood that do not have visible flaws are suitable. Quality will guarantee that chips and cracks will not appear during cutting.
- If you are going to laminate or paint the chair, the luxury material can be replaced with 1st grade plywood. There are a small number of pin-shaped, fused and/or falling knots on its surface; edge defects and closed cracks are possible.
A creative approach to the design of a rocking chair Source kayabaparts.ru