By creating this chair, I have greatly improved my metalworking skills and even learned a little about needlework. I hope this instructable will encourage others to do what they love, even if it's a copy of someone else's design.
Frame assembly
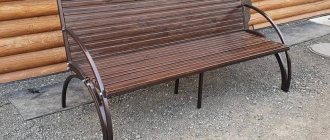
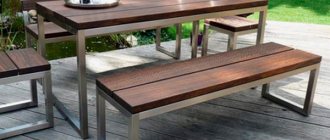
It is better to assemble a metal rocking chair from the sides. To assemble each side, vertical front and rear pillars, a longitudinal beam, and a support ski are laid on the floor. All side elements are welded together. The production of the second side is carried out using the same principle.
After the sides are ready, they are connected to each other by cross rods by welding.
When carrying out welding work, it is necessary to maintain an angle of 90 degrees in butt joints. To do this, it is recommended to use a magnetic square. After welding is completed, all seams must be cleaned.
What to pay attention to
When making furniture from plywood, especially if the process is unfamiliar and is being performed for the first time, you should know several features.
Since the material is quite pliable and subject to deformation, which is actively used to create chairs with curved elements, it is necessary to protect it from moisture and high temperatures.
Garden furniture should be made only from special brands, treated with protective impregnations, and covered with alkyd varnishes with periodic renewal.
Both for decoration and for strengthening the structure, covers and soft upholstery are used, which create an additional tightening function. This is especially important in models in which no fasteners were used during assembly.
Recommendations
When the chair is ready, the only question left is the hanging. Methods for attaching a hanging chair always depend on the type of ceiling. The wooden one requires screwing a metal plate onto self-tapping screws; it can be supplemented with an iron ring. It is better to install an anchor hook with a ring in a concrete ceiling.
If there are voids in the concrete ceiling, then they will initially need to be treated with a chemical anchor , this is a special composition ready for use. After filling the voids, the anchor is screwed in. The chair hangs up only after 2 days. If you have to mount a hanging chair in a room with a suspended ceiling, then you will initially need to remove it (or expose a certain area) and use a long anchor with a threaded coupling. A ring is screwed into the coupling, and then it is hidden under decorative overlays.
Proper care of furniture will significantly extend its service life; it is better to wipe wooden elements with a cloth and polish, and degrease iron elements and coat them with paint and varnish to avoid corrosion or destruction of the metal.
Fabric or thread elements will have to be dried thoroughly.
When planning a location, choose one where there will be a convenient approach to the chair. In the house it should not come into contact with other furniture, but on the street it is better to place it under a canopy or on the veranda. Well, the main requirement for a hanging chair is the ability to swing.
In the next video you will learn how to make a hanging chair for a summer house in 3 hours from improvised materials.
Making the side parts and securing the planks
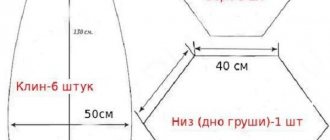
The wicker sidewall resembles a boomerang in appearance. In order to do this, there is the following scheme. A pattern is applied to the plywood sheet and carefully traced along the contours. The template is sawed with an electric jigsaw, and the edges are machined. Don’t forget that we need two sides, so we repeat all the operations again.
Please note that if the rocking chair is made by hand from a profile pipe in the shape of a sofa, then three sides will be required.
This element of the headset can comfortably accommodate two people. Moreover, the central part will be twice as wide as the sides.
The planks for making the chair are fixed on bars. Installation of parts is carried out using self-tapping screws or self-tapping screws. Thus, we get a frame. We cover it with an antiseptic, dry it and varnish it. We mask the fastener caps with plugs that match the color of the product.
Step-by-step instruction
There are several types of interior items made in this way:
- All metal chairs made using artistic forging.
- Tubular products created from aluminum or steel rods by welding.
- A combination of two materials, for example, metal and plastic.
Forging such products requires special skills and equipment. It is almost impossible to do this without skill. The connecting points in the second type are provided by welding or screwing the bolts with a drill.
Structural diagram of a metal rocking chair.
The first stage of design is to develop a drawing. To do this, you need to take the parameters of a regular chair and display them on a piece of paper. Manually draw an oval line at the base of the future chair. This way you can easily calculate the size of this semicircle. The larger radius ensures maximum safety. Then cut out such diagrams and attach these outlines to the original materials.
Then you will need steel rods measuring 20x20 mm. Cut them into 1 m sections each and weld them to the base, following the drawings exactly. Bend the steel following an oval and use a welding machine to connect it to the legs. The frame pitch should be about 6 mm.
Next, you need to place a metal seat with a back on the frame base. It is secured by welding or screw fixation.
Product design
Don't forget to make a drawing indicating the dimensions of the future product. This is necessary before you start cutting out the blanks. The template can be viewed on the website to make your work easier.
If you take on this difficult work yourself, stock up on graph paper, and also try to work accurately. Use an electric jigsaw for cutting. The closer you place elements to one another, the less waste you will end up with.
Rocking chair option:
View 1
View 2
View 3
View 4
View 5
View 6
View 7
During the drawing process, do not forget about the holes for fasteners. We carefully grind the cutouts with a special device. On a thick piece of cardboard we draw a neat grid similar to graph paper. Based on the finished sketch, we draw the necessary details, which we subsequently cut out. Thus, we get patterns for a profiled base. We use them to transfer images onto plywood in the process of making a chair from polypropylene pipes with our own hands.
How to make from PVC pipes?
The lightest in weight will be the option made from polyvinyl chloride pipes. PVC pipes do not react to climatic influences , are resistant to damage, and are easy to work with.
It is better to use a pipe of at least 20. The drawing will help identify design flaws. PVC pipe can be easily cut at home without the use of special discs. It should be understood that when using fittings, the figure will come out square.
To make a round base you will need a lot of bushings; the chair will have a very large diameter. But this problem can also be solved, for example, by bending the pipe under the influence of heat. This can be done using a hair dryer and a round surface. It will be easier to increase the angle of inclination if you pour sand inside the pipe; it will help heat the pipe much faster.
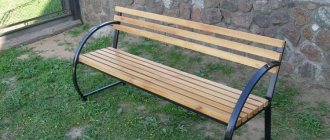
Frame swing
Frame garden swings have a durable, fixed base. This is a more monumental structure than rope structures. Execution options depend on the selected material.
Log
Swings made of logs are very relevant. Although they look cumbersome, they are very original and reliable.
You can hang the seat on U-shaped, L-shaped and A- or X-shaped frames.
The latter are the easiest to make: a supporting crossbar is placed on top of logs fastened with a cross (about 2.5-2.7 m long and 10-15 cm in diameter). The cross is approximately 40-50 cm from the ends of the logs. Threaded spokes (10 mm) are well suited for fastening; after installation, they are secured with nuts on both sides.
The lower ends of the supports are cut at an angle of 45 degrees inward.
Then, on each cross, you need to apply ties in the form of small-diameter logs with a length of 2 to 2.3 m at a level of 30-40 cm from the lower ends.
We place both crosspieces and fasten the third tension beam between them at the same height as the first two, and also fix the supporting beam in the upper grooves. The swing frame made of logs is ready.
All that remains is to put together and hang the bench. The simplest seat is quite easily made on a frame made of 5*7 cm timber, which is covered with a magpie board. The bench parameters are as follows:
- length 150 cm;
- seat depth 50 cm;
- back height 65 cm.
The role of suspensions can be chains, strong ropes, cables, ropes. They are attached to the bench with knots or carabiners. But to attach to the cross beam you will need two large bolts and two eye nuts.
Hanging installation process:
- In the supporting crossbar at the places where the hangers are attached, two holes are drilled from top to bottom, all the way through.
- Bolts are inserted into them, and eye nuts are screwed on from below.
- Ropes or carabiners are threaded into the rings of the eye nuts (if the garden swing is on chains).
If you used not a rounded log, but improvised dead wood trunks, then you get such a brutal option as in the photo.
Next to the large seat, as a combined option, you can hang a single bungee swing on an elongated load-bearing log.
timber
The material is very easy to assemble, so making a wooden swing from timber is not particularly difficult, but skill will not hurt.
To make your own swing from timber you will need the following material:
- four beams 10*10 cm 3 m long for side supports;
- one beam 8*8 cm 2.5 m long per crossbar;
- one edged board 3*10*60 cm for tightening the crosspieces;
- for a bench: approximately 12 linear meters of timber with a section of 4.5 * 5.6 cm; 18 linear meters of boards 2.6*4.6 cm (for cladding); hangers and fastenings.
First of all, we assemble the crosspieces. This is done in the same order and according to the same principle as a garden wooden swing made of logs: we mark, trim, fasten, hang a bench or chair.
On a swing made of timber, it looks great if the crosspieces are framed with thin slats on which you can hang flowerpots with flowers. A light roof would also be appropriate. Interesting options are when it is made as a “house”, like over village wells.
With some imagination, this garden “haven” will be a favorite place for family relaxation. Especially with soft cushions on the bench.
It will be useful to read:
Homemade flower beds made from wooden boards Flower beds are a decoration for any area. If you think about it, they have many functions, but decorativeness is just...
Wooden pallet
Who hasn’t seen wooden lattice stands for various products in stores and warehouses? Everyone saw it. They often remain in summer cottages after the goods have been delivered. But the idea of making a garden swing from it can only come to the mind of a person with a remarkable imagination.
The most important thing is that the pallet is strong and not rotten. You should immediately treat it with antimicrobial and water-repellent agents, paint and dry it.
Here is another quick option for making a garden swing:
A rope, cable, chain or rope is attached to four sides of the pallet and suspended from a support or any frame. Thus, you get either a wide seat where two children can easily fit and rock together on both sides. Or, putting a mattress and a pillow on it, we get almost a cradle.
If there are two pallets, then, by fastening them with corners, we will build a bench that will look great on any frame support.
Board
Two fastened boards can completely replace timber in terms of strength. A version of such a wooden swing is shown in the photo.
The ties are placed between the support boards. Fastenings for suspensions can be fixed both in the top crossbar and on the side in the form of pins or eye nuts.
Features of the material
Features of PVC pipes include:
:
- light weight;
- strength and resistance to stress;
- corrosion resistance;
- ease of work;
- environmental friendliness (subject to compliance with safety regulations);
- safety;
- affordable price.
Working with this material is a real pleasure.