Nowadays, a healthy lifestyle is very common.
And table tennis can be a great way to keep fit while also having fun. At the same time, it is not necessary to sign up for a gym, just get your own tennis table. And in order not to buy expensive equipment, you can always assemble the table yourself.
A little history
The name "Ping Pong" appeared at the end of the 19th century. A number of historians believe that the game owes its appearance to the rainy weather of Foggy Albion, which forced tennis matches to be interrupted.
To be absolutely precise, table tennis and ping-pong are two different sports, but in everyday speech they are very often used as synonyms.
The whole difference between Olympic and amateur sports lies in the “clothing” for the rackets. Table tennis uses rubber-coated rackets, while ping-pong uses either uncoated or cork-and-parchment-coated rackets.
The first set for the game was released by Jaques of London in 1891. Well, many modern home craftsmen know how to make a tennis table without resorting to the services of branded salons and stores and willingly share their knowledge on their own websites.
Table tennis table drawing and dimensions
Important : the dimensions of the standard playing field are 1525 mm by 2740 mm.
The height of the playing surface above the floor should be 760 mm . The thickness of the tabletop for an amateur tennis table varies in the range of 12-28 mm, but the average is 18 mm.
It is necessary to pay attention to the fact that the supports of the tennis table should not extend beyond the contour of the playing field. Ideally, the support structure is recessed into the playing field and lags behind the edge of the tabletop by approximately 200-300 mm.
For indoor play
According to the table manufacturing diagram, you will need:
- legs (8 pcs.);
- crossbars (4 pcs.);
- lateral ligaments and spacers (2 pcs.);
- clamps (8 pcs.);
- countertops (2 pcs.);
- hinge plate, brackets, axle (8 pcs. each) and lugs (16 pcs.).
On the World Wide Web it is not difficult to find photographs of a tennis table with a step-by-step explanation of how to assemble such a product.
Second option
Knowing the standard dimensions of a tennis table (2.74 by 1.52 and height 76 cm), you can make sports equipment in the simplest way.
Sheets of plywood and legs are purchased. Everything is held together with self-tapping screws, the product is painted, and in just a couple of hours the table is ready!
Note!
- DIY induction heater ♨️ - reviews of the best manufacturing options. Varieties of homemade device designs + step-by-step master class (160 photos)
Do-it-yourself Gauss cannon: TOP-130 photos of the best ways to create it yourself. Design features + master class for beginners
- DIY clamps - a step-by-step master class for beginners. Schemes for manufacturing different designs + 170 photos
Kitchen table: dimensions and standard
Before choosing a kitchen table, pay attention to the style of your room, what size it is, how much financial resources you have for the purchase, and how many people are in the family. Choose a model with standard sizes
Ease of use and operation is the most important thing.
In order to calculate the dimensions, use a certain rule. The width and depth should be calculated taking into account the use of the surface - 60-40 cm. The middle part of the table should have a free area of at least 20 cm - it is needed for serving. And therefore the minimum width is 80-85 cm. The length depends on the number of people and the size of your kitchen. Therefore, the length is selected individually. Rectangle is the standard shape. It can seat four people behind it. There are folding and sliding models. Their surface length and width may vary. The height of the transformer also changes. Sliding tables thus turn from a standard one into a large dining table, with a length of up to 3 meters.
What sizes are there:
- For 4-6 people – 150-90 cm;
- For 8 people – 110-200 cm;
- Up to 12 people – 110-320 cm.
The most convenient option for everyday use is rectangular. Your chairs should also move away without any problems. Consider the size of the kitchen and how your door is positioned.
Outdoor table
Making a folding table is more difficult, but such equipment is much more practical. The difficulty lies in the large number of connections and parts that must be carefully adjusted to each other.
You shouldn’t get hung up on exact measurements – a couple of millimeters or even centimeters are not decisive. The most important condition for a normal product suitable for playing is a flat and smooth table surface.
Particular attention should be paid to the material - if the product will be constantly outdoors, materials such as fiberboard or chipboard cannot be used. Even covered with several layers of paint, playgrounds made from these materials will very quickly lose their shape and bend.
Getting to know the battlefield
All sports equipment has standard sizes. “International classic” for a tennis table:
- height - 760 mm (600, 680, 700 - for schoolchildren);
- length - 2740 mm (2440);
- width - 1525 mm (1220);
- mesh height - 152 mm.
There are also mini tables for children, equipped with adjustable legs. Their dimensions are 110x610x650 mm. Professional equipment has a tabletop thickness of 25-28 mm, for clubs the standard is different - 22-23 mm, amateur tennis has its own numbers - 16-19 mm. Outdoor equipment can be even thinner - 12-19 mm, but a certain value is still more popular - 18 mm. To avoid possible injuries to players, the persistent structure of the tennis table is always deepened inward: the distance from the edges of the tabletop is about 200-300 mm. This is a necessity, not a recommendation.
The tabletop must be perfectly level, otherwise the game will turn into torture. Before serious competitions, tables of only two colors are allowed - green (calming) and blue (more aggressive). Table tennis fans have a richer palette, including green, brown (usually made from waterproof plywood), gray and blue. The optimal surface is matte, giving less glare. Glossy tables have their own, not entirely sporty, “specialization”: they are used for exhibitions and presentations.
You also need to take into account the requirements for the sports ground. To guarantee a comfortable game, sufficient space is necessary. For amateurs, a tennis “court” must be at least 3500x7000 mm (5000x8000)
Another important condition is a perfectly flat surface, since homemade amateur tables are usually not equipped with height-adjustable legs
If the table is installed outdoors, then more attention will have to be paid to the site. It should not generate dust, and the sun should not interfere with rivals
The optimal place is one that is reliably protected from both sunlight and gusts of wind, because they can easily change the trajectory of an almost weightless ball.
You can also compare prices for tennis tables:
Necessary materials
In order for the table to “tolerate” any weather conditions (heat, direct sunlight, cold, rain, snow), it must be made of either plastic or laminated, water-repellent birch plywood.
This is the material that is best used when making a do-it-yourself tennis table for the outdoors. The thickness of the material used should be in the range of 16-20 mm.
The traditional color for gaming tables is green. If you purchased plywood of a different shade, you should paint the playground in the desired color, this will only enhance the “capabilities” of the playing surface to withstand precipitation.
Note!
- Do-it-yourself electric scooter - a master class with step-by-step instructions for doing it yourself. Tips and simple patterns for beginners + the best photo reviews
DIY rocking chair: TOP-120 photos of the best manufacturing options. Master class on creating a rocking chair at home
- Smokehouse from a gas cylinder - the best master class on making a homemade smokehouse with step-by-step photo diagrams for beginners
Since transporting a standard sheet of laminated plywood is extremely difficult, you can purchase a couple of sheets of a smaller size, and on the spot, during work, fasten them together using a beam of a suitable size.
Important! Complete moisture resistance will be provided by edging the edges of the table top with an aluminum profile.
Desk for schoolchildren
Let's look at an unusual table with A-shaped legs (goats) and a durable long work surface.
You can use an old door leaf with a flat surface as a tabletop. You can install a computer on such a table: Place the monitor on the table top and place the system unit in one of the legs.
The height of the table is 75 cm. In our case, the width of the tabletop is 70 cm, length - 180 cm, thickness - 4 cm. The length of the boards to which the legs are attached corresponds to the width of the tabletop - 70 cm.
Materials and tools
- The board is cut - 14 pieces…………………………………………………………………………………………………………………… ………………….;
- Bolt - 5-6 pcs;
- The scale consists of 6 parts………………………………………………………………………………………………………….;
- self-tapping screws;
- Furniture screws for attaching legs (6 x 75);
- Desktop equipment;
- medium-grit sanding paper;
- PVA glue ;
- Waterproof impregnation for woodworking, varnishing or painting.
- ruler, meter;
- pencil, marker;
- puzzle, saw;
- milling machine;
- exercise;
- screwdriver or screwdriver;
- Brushes.
Stages of work
Step one. Draw and cut the tabletop. Sand it down with sandpaper or a sander. Side by side edges can be made with a special finishing edge that can be purchased from any construction company.
Step 2: Cut 8 boards at least 75cm long (you may need to cut the edges with a power saw) and sand them.
Step 3: The angle of the goat boards should be chosen so that the total height of the legs for a tabletop thickness of 75 cm. To do this, cut out small sticks located between the upper parts of the supports. The width between the lower parts should be 22 cm.
Please note: The screw size is 6mm and the hole diameter is 9mm! This is necessary since the table legs are mounted at an angle. Step 5: Attach two 19cm long rods to the underside of the goat. The height of the rods must be at least 3 cm from the ground
Place two shelves on posts and secure them with screws
The height of the rods should be at least 3 cm from the ground. Place two shelves on posts and secure them with screws
Step 5: Attach two 19cm long rods to the underside of the goat. The height of the rods should be at least 3 cm from the ground. Place the two shelves on the posts and secure them with screws.
Please note: the table can be decorated upon request. Decoupage is the best technique for decorating children's tables. Just choose a cheerful drawing or decorate the tabletop with pictures of your child’s favorite figures
Just choose a cheerful drawing or decorate the tabletop with pictures of your child’s favorite figures.
Legs
The table must be strong and stable, because... During game battles, opponents may accidentally lean on or push him. It is better to make the supporting base of the platform from a metal frame. For this you will need:
- four pipes measuring one and a half meters;
- squares - four one meter long and the same number two meters long;
- eight half-meter squares.
What about the little ones?
Children's tennis table
As for the cost of ready-made tennis tables, a story similar to folding ones is repeated with children's tables of reduced size. Branded children's tennis tables look elegant, no doubt about it, see fig. on right. But their prices, as they say, don’t even smell close to liberal-democratic values. But of course, all the best goes to children! And for the best there should be nothing to be sorry for. Principles are principles, and marketing is marketing.
Well, here too you can get out of the situation by making a children’s tennis table with your own hands, see fig. The design is simple, you don’t even need a commercial mesh. You can place this sports equipment on a regular table, on stools, a children's table, and in general on any stand. Or just on the floor. There are such fruits of the joint efforts of parents that he himself is little more than a racket, and already, puffing, he throws.
Drawings of a children's tennis table
About metal in a tennis table
Hobbyists who prefer plumbing rather than carpentry often make their own tennis tables from simple lengths of wooden beams connected by shaped steel fasteners, like those in Fig. Even a seasoned professional will not feel the difference in the oblique rebound from the same tabletop on such a table compared to a purely wooden one.
The design of the base of a tennis table on steel connectors
However, oddly enough at first glance, a wooden-steel table turns out to be less durable than a completely wooden one. Nobody plays while yawning and scratching themselves. And if you throw yourself into the table in excitement, the sharp edges of the connectors little by little cut the wood over and over again, and the table becomes loose. Round through steel fasteners do not give this effect, because... in a table of correct design, concentrated loads do not fall on the sharp edge of the metal or there is none at all.
"Oak" tables
It is also undesirable to make the base of the tennis table overly strong and massive, as in Fig. This is where the risk of injury comes into play. It’s better that the table moves from a player’s accidental “impact” and you have to correct it (which is also provided for by the rules of professional competitions), than to run into your belly on the edge of the tabletop, or worse, that below your stomach on its corner, and end up in the care of a traumatologist.
Overly strong and massive tennis tables
Frame assembly
Let's look at the instructions on how to make a frame for a tennis table at home.
Step No. 1. Using two-meter squares, we connect a couple of pipe sections and weld them together. The first crossbar is located twenty centimeters from the top edge, the second seventy centimeters lower.
Note!
- Do-it-yourself compressor: TOP-130 photo reviews of finished compressors. Step-by-step instructions + diagrams and drawings
- Do-it-yourself wind generator: TOP-170 photo reviews of finished devices. Detailed DIY instructions for beginners
- Do-it-yourself spot welding - the best master class on making homemade spot welding with step-by-step photo diagrams of do-it-yourself work
Step No. 2. Align the assembled frame and weld it.
Step No. 3. A similar operation is carried out to design the second pair of table legs.
Step No. 4. In the place where the table is installed, holes more than half a meter deep are dug, sand is poured in and the legs of the tennis table are dug in.
Step No. 5. The table legs are fixed in the ground with cross-shaped mortgages. Using a spirit level, it is necessary to achieve the most uniform height of the table legs.
Step No. 6. The holes are filled with bitumen or cement.
What you need to know
The tennis table can be made collapsible, that is, folding, or solid (stationary).
You need to make your own choice and decide which option is more suitable.
See also
DIY stepladder: top 3 simplest designs
From the standpoint of practicality and ease of use, the second option wins. But such structures have the disadvantage of lower structural strength. Although much still depends on what materials it will be made of. If we are talking about low-quality tables made of OSB or plastic, you should not count on a long service life. If you take stronger materials as a basis, assemble a table from a profile and a wooden beam, then you will definitely be able to enjoy playing table tennis for at least 5-10 years.
A free-standing stationary table will require room. Moreover, it was allocated specifically for this design. The optimal minimum area is 5x8 meters.
Otherwise, the table itself will fit, but it will be inconvenient to play.
There is also an increased requirement for the evenness of the base, that is, the floor. If the floor turns out to be crooked, you are unlikely to be able to play normally.
There are several standards. Moreover, they must correspond not only to a professional one, but also to an ordinary tennis table intended for playing at home. This will give you more opportunities and pleasure from the process.
[adv1]
- The optimal standard length of the structure is 274 centimeters;
- The width should be kept to 152.5 centimeters;
- When choosing a height, focus on the value 76 cm. As you can see, this indicator differs from the height of the table, since here we are talking about playing while standing;
- The mesh also has its own standardized height. It is 15.25 cm;
- For professionals, it is better to make a table with a thickness of 28 mm;
- Amateur designs start from 12 mm in thickness.
I am sure that adhering to the established standards will not be so difficult.
But if they comply, it will be possible to assemble a table correctly, which will ensure a comfortable and enjoyable game of table tennis.
Drawing game lines
In order for the table to be ready for play, markings must be applied to it. A white line 3-5 mm wide is drawn in the middle of the table. Before applying paint, you should use masking tape to mark the boundaries of the center line, this way you can clearly draw the boundary without getting dirty.
Stepping back from the edges along the entire perimeter of the site by 15-20 mm and also marking the boundaries with tape, we apply white paint to indicate the playing area of the table.
Useful tips
It is best to place a tennis machine indoors. But if you still play outside, then you should take into account that there is no wind or sun.
It is better to choose a folding product; there is not always somewhere to put a stationary one.
The site should be large and spacious. The players do not stand still, they move slightly away from the playing surface.
The floor covering around it should be smooth, continuous, without potholes or holes, and should not slip.
Assembly
The last stage of work on making the table will be attaching the playground to the metal base. This can be done in two ways.
First option. Three or four holes are drilled in each table leg plate and the tabletop is secured with screws.
Second way. Through holes are drilled in the table legs, as close to the surface as possible. The playground can be fixed motionlessly either with pieces of reinforcement or with massive wooden splinters inserted into the holes. This option allows you to remove the platform and store it in a dry room during the winter.
What can it be made from?
The materials that can be used to create a tennis table can be very diverse. For example, plywood, chipboard, laminated chipboard and fiberboard, OSB, ordinary wooden boards, metal pipes, slate (flat) and even concrete. All this depends only on your goal and on the conditions in which your tennis table will be placed: indoors or outdoors.
A tennis table, if you plan to install it outdoors, must be very stable. In this case, it is better to replace wooden legs with metal ones (using, for example, profile pipes). And in order for such legs to hold up perfectly, the support structure also needs to be made of metal. The basis of such a table - a metal frame - must be made conscientiously.
And for your table to be all-weather, it is best to build it as a folding one. This is done so that it is not very bulky and can be comfortably hidden in case of bad weather. Unfortunately, some materials may be susceptible to rotting. To prevent this from happening, you need the right material, which must withstand temperature changes, as well as high humidity.
The disadvantages of this material are that during the game the ball begins to stick to the surface a little before bouncing off the table, losing some of its energy. However, this can be easily fixed by painting the countertop with water-based paint (acrylic). This needs to be done in 2-3 layers, which will simultaneously increase the degree of plywood’s resistance to water. Another problem with plywood is that the countertop can begin to sag over time.
Let's consider the advantages of laminated chipboard and DSP.
- The materials are produced in slabs, which makes it possible to create a solid tabletop, and this, without a doubt, increases its fundamentality.
- They are non-flammable and can be easily repaired. Regular potholes can be filled without much difficulty.
- Laminated chipboard is produced and produced already painted in various colors, which will allow everyone to choose an option to suit their taste. At the same time, the DSP will have to be painted, because it comes off the assembly line unpainted, unlike laminated chipboard.
It has many advantages over other materials described earlier.
- First of all, this material is made on the basis of waterproof birch plywood, which is also non-flammable and will not crumble.
- It has a standard sheet size, like laminated chipboard. You can design a tabletop - either a solid one or one that can be disassembled.
- It comes in all the colors of the rainbow, has shades to choose from, and acrylic paint on melamine adheres tightly, so the edging and demarcation line will not be erased for quite a long time.
Using scraps
When making a folding tennis table with your own hands, a certain amount of scraps remains. From these, as a bonus, you can make several rackets for the game. Markings are applied to a piece of plywood:
- draw a rectangle with dimensions 2x16 centimeters;
- semicircles with radii of eight centimeters are drawn on the wide sides;
- from the center of the picture we draw a rectangle with dimensions of 3.5x18 centimeters;
- cut out the racket with a jigsaw;
- use glue to thicken the handle;
- We clean the glued parts with clamps.
All that remains is to glue the shock-absorbing material to the shock part of the product and you can start playing in the fresh air.
How to make parts yourself?
According to the drawings, markings are applied to all workpieces using a square, pencil and tape measure. Before doing this, it makes sense to treat the wood with a special solution for moisture protection.
The cheapest option is stain. Boards and beams are sanded to make them smooth and even. Then, with a hacksaw, all excess is removed so that each part corresponds to the dimensions specified in the specification for the drawing. To ensure fit doesn't become an issue, it's vital to measure to the nearest millimeter.
First, the supporting frame is assembled. If the slab is loosened on a machine, the dimensions will be ideal. Otherwise, you will have to use a jigsaw and sand the cut ends with sandpaper. The frame from the boards is assembled using self-tapping screws. It is then secured to the base with brackets. This fastener is reliable and durable.
The main thing is that the cross-sectional dimensions of the legs are ideal. Then the table will not wobble. After this, the tabletop is laid on the assembled and leveled frame, secured from below and the mesh is pulled. You can purchase it at a sporting goods store or make it yourself.
Folding option
The dimensions of plywood sheets sold on the market are perfect for making a folding table. In general, this material has the disadvantage that it sags over time, so it is better to make the tabletop from two sheets.
The joint and possible minimal gap at the location of the mesh are quite acceptable. When choosing a material, special attention must be paid to its quality. The surface must provide the necessary quality of rebound of the ping pong ball.
Important! Choose first or second grade material. One side of the plywood must be sanded. Use the cutting service when purchasing material so as not to have to do this work on site.
Looking at the pictures of the tennis table, you will notice that the tabletop is made of a maximum of two sheets. A larger number of pieces sharply reduces the quality of the playground and it is not recommended to make it from more than a couple of pieces of material.
How to make a ping pong table with your own hands
Currently, there is a wide range of ping pong table models on the market, however, a homemade table can compete with most of them. The designs of such products are simple and do not require the use of complex technological techniques. And the preliminary purchase of high-quality materials will allow us to produce a product suitable for use both at home and outdoors.
Ping pong table
Before you start making such a table, you need to decide which design will be more acceptable for you. Ping-pong tables can be folding or stationary. The latter option is best suited for outdoor installation.
Stationary table
And folding models allow you to save useful space when the game becomes irrelevant. When deciding in advance where the table will be installed, you should remember that there should be enough space around it for players to move freely. The area of such space should be 5x8 m.
Folding table
The flooring deserves special attention. It is advisable to give preference to a solid and smooth anti-slip option. A floor made of bitumen or concrete is excellent for this purpose. Wooden flooring installed on a level and hard surface is no less effective.
Tabletop dimensions
In accordance with standards accepted throughout the world, a classic ping pong table should be 2740 mm long and 1525 mm wide, with a standard height from the floor of 760 mm. However, it is possible to make a table with other dimensional characteristics, taking into account individual requirements and the area of the space expected for its installation. For teenagers, the height of such a product can be from 600 to 700 mm. The dimensions of the mini-table are 2440x12200 mm, and in some cases even 110x61 mm. The thickness of the tabletop of such a product used within a club, according to generally accepted standards, should be 22 mm, while for a professional game you will need a tabletop with a thickness of 25 to 28 mm. And for amateur tennis, a slab with a thickness of 16–19 mm is quite suitable.
Tabletop dimensions and height of a ping pong table
Details
Work begins with preparing the largest part - the gaming table. If the pieces of material are not cut at the place of purchase, then they should be brought to standard sizes.
In order to increase the service life of the tabletop, its ends should be treated. The edge is cleaned with sandpaper. Even more reliable protection is edging the edges with squares.
The supporting frame is made of half-meter bars and longitudinal beams. Height-adjustable furniture legs can be used as supports.
How to make it yourself at home?
How to make parts?
You should start by making the components:
- Preparing the tabletop. If the sheets were not cut to the specified dimensions upon purchase, then you should make two halves of the tabletop yourself or a whole tabletop . They are cut from sheets of plywood/chipboard measuring 1525x1370 (two parts) or 2740x1525 (solid tabletop) using a stationary circular saw or a hand-held circular saw , it is highly not recommended to use a manual electric jigsaw for this.
The cut area should be sealed with construction tape to improve the quality of the cut. After cutting, the tape is removed and the edges are cleaned with sandpaper. - Processing the ends of the tabletop. The easiest way to increase the life of a countertop is to paint or paper the ends. A more reliable way is edging with an aluminum corner .
- Preparation of supporting frame elements. It is necessary to cut 50x50 mm timber into beams: longitudinal contour beams 2140 mm long - 2 pcs.; transverse contour beams length 1025 – 2 pcs.; contour crossbar length 1025 – 1 pc.; legs 742 mm long – 4 pcs. (the length of the legs is taken with a margin of 50 mm for subsequent adjustment and taking into account the thickness of the tabletop 18 mm). The length of the legs should be calculated based on the thickness of the table top and the height of the playing field above the floor, equal to 760 mm. Each beam should be carefully sanded with emery and treated with an antiseptic, which will increase its service life. You can also use ready-made furniture legs as legs, the height of which is adjustable . If you plan to install a tennis table outside (on the ground or on the lawn), then the wooden legs should be replaced with metal ones (for example, using a profile pipe).
How to assemble?
Assembly is not difficult:
- Assembly of the support contour in the form of a rectangular frame with a crossbar in the middle. The beams are fastened together and additionally fixed using steel angles and self-tapping screws. It is preferable to join beams with a half-timber overlay or a tenon joint . It is also recommended to make reinforcements in the places where the legs are installed in the form of metal plates, which are attached to the beams with self-tapping screws.
- Assembling the support frame. It consists of installing legs, which can be removable or non-removable. For removable ones, additional brackets are installed. In this case, it is necessary to check that the legs fit easily, but at the same time fit snugly against the walls of the bracket. To distribute the load from the fixing bolts, metal plates are installed on the legs .
- Installing the tabletop on the assembled frame. To do this, the tabletop halves (or the whole tabletop) are laid with the playing surface down. First, you need to mark the installation locations of the circuit, and then fix the position of the tabletop relative to the support frame using glue, and then carry out the main fastening. The elements of the support circuit are fastened using metal corners and self-tapping screws. The length of the screws should be selected so as not to disturb the playing surface of the tabletop . The corners are located evenly along the internal and external perimeters of the frame with a pitch of no more than 300 mm.
- The final stage of assembly. The tabletop with the supporting frame is turned over, and the legs are trimmed according to the actual condition (at the place of further use). It is necessary to ensure the stability of the table. Trimming the legs is done with a hand hacksaw or a saw. If you plan to use the table indoors, then after trimming it is recommended to stick thin rubber on the cut legs to avoid slipping .
Tip: to increase the stability of the tennis table, you can install intermediate supports (legs).
Final design
The assembly process is not difficult. It is advisable to make reinforcements in the places where the legs are attached. Load distribution is achieved by installing metal plates at the points of fastening with bolts or screws.
All that remains is to carefully secure both sides of the tabletop to the frame and make the necessary markings.
Exploitation
Each model is created either for indoor use or for outdoor installation. Indoor equipment deforms when exposed to moisture, sun and temperature. Wear and tear reduces playing quality and is dangerous.
The moment of assembly and dismantling is one of the most important in operation. Instructions are included with each product. Compliance with it will save time and protect players from injury, and parts from damage. Caution is also necessary during transportation.
Tennis tables are not suitable for other purposes (unless the instructions provide for transformation into a picnic or lunch table).
They are designed for play by two or four participants or for independent training. They cannot be used for sitting, lying or storing objects. The structure may not support the weight.
If the rollers are not equipped with a special braking system, the model can only be installed on flat surfaces: where spontaneous movement and sliding will not occur.
To prevent injury and equipment damage, inspect fasteners, screws, and clips. They need to be tightened and secured as necessary.
Another important point is caring for the surface of the countertop. It ensures proper play, so you want to prevent scratches, scuffs and discoloration.
Wipe it with a soft sponge without detergents: standard powders and gels leave marks and damage. There are special surface care products - they will not harm the coating.
It is recommended to store the assembled table in the same conditions in which it is used. If you use the case during breaks between games, the service life will increase.
Country competitions
Active recreation in an ecologically clean place is a great option to strengthen your health and boost your immunity before the long cold months of the year. Building a tennis table for a summer cottage is not difficult.
The main condition is the availability of free space of 5x7 meters. Having the necessary materials - sheets of plywood, a couple of three-meter boards, self-tapping screws, you can safely get to work.
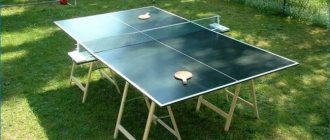
Build process
The simplest construction trestles of the required height are made from available materials. Then:
- trestles are installed at the same level;
- the boards are laid and screwed with screws to the length of the tennis table;
- sheets of plywood are laid over and secured with slats;
- The table top is sanded and several layers of antiseptic are applied to it.
If, when leaving your summer cottage, you do not have time to disassemble the table and insulate it from the effects of precipitation, it is recommended to sew a cover from waterproof fabric. This way you can protect the product from damage, and during your next visit to the dacha you can again organize a family ping-pong tournament.
Types of tennis tables
The popularity of table tennis is due to several factors. There is no need to spend money on paying for a gym and a trainer. It is enough to have one like-minded person. This is a great way to get your kids and family involved in sports. The small size of the tennis table allows you to store it in the country and display it in the garden during leisure time with friends. A healthy vacation is always good and beneficial. This means healthy sleep, good appetite, and a toned figure. The rules are simple, and you don't need to be a professional athlete.
The main thing is to choose the right type of ping pong table:
- Stationary. It is most often placed on a personal plot in an open area or under a canopy. Of course, if there is a room of adequate size, it can be easily placed in the hall. You can still move it, but only without dismantling or folding it. But the design is lightweight and two people can easily handle the task after the game.
- Folding.
This modification is convenient because when there is no one to play with, it can be folded in half and hidden. It is often equipped with wheels for ease of transportation. By the way, by lifting one side, you can train on your own, train your hand, throw a shot, practice serving. - Adjustable. This design, when the height of the legs is adjusted at the request of the players, is convenient for small people, teenagers, and children. For example, you are relaxing in the country with children. When they have played enough, in a minute you will raise the tabletop to the level of an adult, and you will play sports yourself.
- Mini tables. The small size of the table tennis table is necessary for the youngest children. However, if you “cut” it lengthwise and make it foldable, such a table will fit into a car without any problems, and you can take it with you on a fishing trip or a picnic. Then it is enough to find a flat area and level the surface.
- Street made of concrete. If you want to install a tennis table in the courtyard of an apartment building or in a park, you need to make sure that the structure is massive, durable and non-transportable. Therefore, the top panel and supporting supports are cast from reinforced concrete. Then the coating and markings are applied.
- Glass decorative. This model is more of a designer one. The convenience and advantage is that the surface of the glass always remains smooth. It is not deformable, which means there will be no dents, chips, etc. Moisture also does not cause any harm to this material. Therefore, even in an open area of a personal plot, the table will last a long time.
From the above it is clear that an outdoor tennis table must have a number of special characteristics. He should not be “afraid” of atmospheric phenomena. Rain water and direct sunlight should also not cause harm. Therefore, before starting work, determine where and how often you will play table tennis.