To create a lighting device, they use almost everything that can be found at hand: wooden sticks, pieces of plinth, containers, wood cuts, metal sticks and pipes, glass items, fabrics. Homemade lamps are made futuristic, classic, glamorous, minimalist. For each type, several step-by-step master classes have been created. Designer rooms are usually decorated with unusual lamps. These can be products with slots, many individual fragments, in the form of a large ball or cube. The same lamps can be made with your own hands, from any material. This is done not only by craftsmen who sell their products, but also by ordinary owners of apartments and houses. Homemade chandeliers can be similar to store-bought ones or made in an unusual way: from graters, tin cans, etc. The shape depends on the characteristics of the material and the imagination of the performer.
Chandelier from a bottle
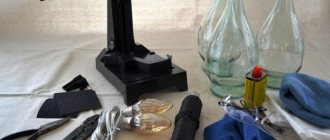
To make an original lighting fixture from a bottle, you need the following items:
- Lamp;
- Glass bottle;
- Glue;
- Bulgarian;
- Masking tape;
- Sandpaper;
- Cable.
First, all materials are selected according to size. The bottom is cut with a grinder. Before cutting the lower part, you need to wrap the intended area with masking tape so that the cut is smooth and without chips. Then sandpaper is moistened with water and the edges of the cut are processed.
The next step is to assemble the entire structure together. A cord is threaded through the bottom of the bottle until it stops at the neck, but the switch remains outside. It is better to lubricate the cartridge with glue in advance or come up with a rubber clamp so that the structure is motionless.
Afterwards, the light bulb is placed in the socket, and the cord is connected to electricity.
Lightweight and elegant cardboard lampshade
For a paper lampshade, paper or thin cardboard is suitable. Such a lampshade can be either rectangular or square. First you need to think about the size of the lampshade; the larger the room, the wider the structure can be.
In a small nursery or hallway, a lampshade with a diameter of 30–35 centimeters will look good.
The frame can be made of wire; it will consist of an upper and lower part; consider making a lampshade in the shape of a cylinder.
- You need to make two circles of wire of the required diameter. They are connected to each other using a fishing line, the distance between the lower and upper frames is 12 - 15 cm, the hoops are fastened with fishing line in three or four places. The larger the diameter of the base, the more connecting elements need to be made.
- On a piece of paper you can draw circles of different diameters and figures of cartoon characters. Outline drawings can be taken from the Internet and printed, then redrawn using carbon paper.
- A special ruler is suitable for drawing circles, or you can outline lids or buttons of different diameters. Some designs are cut out completely with a stationery knife, others are cut along the contour.
- The paper is tried on the base and glued with an overlap. Then glued to the wire; it can also be secured with thin wire.
- To do this, first make a hole in the paper with a thick needle or awl, then thread the wire and carefully tie it to the frame. It is advisable to glue thin paper, as it can easily be damaged.
Bottle night light with LEDs
Instructions on how to make a lamp with your own hands using an ordinary glass bottle. For this idea you will need:
- Bottle;
- Garland;
- Glue;
- Pencil;
- Sandpaper;
- Drill with drill;
- Double-sided tape;
- Water;
- Clay.
Once you have prepared the necessary items, you can begin making the night light. Take a washed bottle and mark the hole where the garland will go. A clay ring is placed on the mark to prevent chips and cracks.
When drilling, it is necessary to add water, as the drill and bottle will heat up. All uneven elements are cleaned with sandpaper moistened with water.
After receiving the hole, the garland is threaded, but only the lighting part. It is also necessary to take into account that the light bulbs get very hot, so a garland with LED lamps is used. The regulator remains outside and is installed on the bottle with double-sided tape for convenience.
Corrugated paper model
For the lampshade you need a sheet that is folded like an accordion. Be sure to mark all the elements to get identical parts of the product. The accordion is carefully folded diagonally using a knitting needle. The element is returned to its original state, and then the operation is repeated.
This time you need to get a second diagonal on the accordion. Afterwards, the sheet is given a spherical shape, secured at the top with a thread. The corrugated paper lampshade is ready; its creation requires a minimum of time and effort.
Ball-shaped lamp
Master class on how to make a spherical lamp. To make such an unusual lighting device, you will need:
- Base;
- Balloon;
- Thick threads;
- Glue.
Note!
DIY furniture decor - 145 photos of exclusive and modern design ideas
- DIY pot decor step by step: simple decorations and decor options for pots made from different materials
To begin with, prepare a place for work; all work is done on oilcloth so as not to stain the surface. You need to inflate several round balloons, mark a hole for a stand with a lamp and dilute the adhesive solution.
When the solution is infused, the threads are soaked and applied one at a time in a chaotic manner. Each thread will need to be tied to the tail of the balloon, and excess glue will need to be collected so as not to spoil the appearance.
Once a uniform ball of thread is achieved, the entire structure is suspended until completely dry. Afterwards, the ball will need to burst, and the tail of the ball will need to be cut off and everything removed through the hole. The lamp is ready, all that remains is to thread the light bulb and place it in the center.
How to make a frame for a lampshade
Typically, a lampshade consists of two metal rings connected by jumpers (from 3 pieces). The shape of the frame can be trapezoidal, cylindrical or curly.
For the frame, wire made of any metal is suitable: copper, aluminum, steel. Using wire cutters, you need to cut two pieces of wire and make two circles out of them - one larger, the other smaller.
It should be noted that the design for the lampshade of a pendant chandelier is slightly different from the design of the lampshade of a table lamp, but in any case there is always another inner ring through which either the socket or the cord from the chandelier is threaded.
To work with wire, you will need wire cutters and round nose pliers (in order to make a neat loop to hold the wire together.
But, nevertheless, the most correct thing would be to buy a ready-made frame for the lampshade - fortunately, construction hypermarkets are full of them.
You can make a pattern for a lampshade like this:
So, the frame for the future lamp is ready and the most important thing to choose is the decor of the lamp and the material with which to work. We offer several options for making a lampshade with your own hands.
Lampshade made from scraps of fabric
To make such a lampshade you will need the following materials and tools:
- two pieces of fabric of different colors;
- lampshade frame (purchased or made yourself);
- threads with a needle;
- scissors.
Lamp made of metal pipes
Schemes for DIY lamps in the loft style are very simple. To create such unusual lighting you need:
- Non-functioning water pipes;
- Incandescent lamps;
- Connecting elements;
- Cable for connecting lamps.
To begin with, a cable is passed through each sample and connecting element, thereby creating a single structure. Next, all the elements are screwed in, and a light bulb with a socket is inserted into each end. It is better to use brass pipes.
Adviсe
To complete the work of making a lamp successfully, we have collected the most practical tips that will definitely come in handy:
The use of energy-saving lamps is recommended for the product. Why is it undesirable to use conventional ones? They increase the risk of overheating and fire, so if you want to use incandescent lamps, you will have to constantly monitor the condition of the lamp and also buy a fire extinguisher.
You can use old garlands left over from the New Year as decoration. The lighting they create will add coziness to the room.
To create new lighting items, you can modify old lampshades and lamps that everyone probably has lying around.
Lamps can be used to diffuse light and correct the interior, but we strongly recommend avoiding the opposite effect: hiding the light.
Lighting device made from CDs
The idea of such a lamp is very simple, because it will require:
- CDs;
- Aluminum or copper wire;
- Hole puncher;
- A tube suitable for the diameter of the hole in the center of the disk;
- Bulb;
- Cable with cartridge.
To create such a unique lamp, you need to pierce each disc along the edges using a hole punch. Upon completion, connect each element with wire and get a round structure.
Leave one CD unattached. Pass a tube with a cable through the hole and place a light bulb inside, and only after that fasten the last disk.,
This lamp will go well in a room designed in the style of computer games or just on a computer desk.
Chandelier / lamp in shabby chic style
Beautiful decorative items are created from beads and fabric, including lamps characteristic of this style. Decorating in the shabby chic style means that the room is designed to accommodate a girl or woman. You will need beads, beads, threads, chains, a socket with a lamp, a finished wooden or metal frame. The first step is to paint the base in one of the soft shades. After this, it can be wrapped with decorative elements or fabric. The top of the lampshade is wrapped with smaller beads, but in larger quantities - up to 40 beads need to be strung on one thread, while on the lower threads - about 20. This is an approximate proportion, it, like the tension of the threads, can be changed depending on the size of the structure. The lamp is usually covered with pink fabric. All decorations are hung so that they flow down.
Lighting fixture made from cupcake tins
A chandelier made from cupcake tins is no less attractive.
To create it you need:
- Paper cupcake tins;
- Frame base;
- Glue;
- Bulb.
A round base is made; wire works well. The first molds are glued to the rods with their bottoms; they are the foundation. Next, in a circle, they are glued with edges, always with the bottom inward. Upon completion, a small hole is left at the top to allow the cable with socket and light bulb to pass through.
Children's lamp: soft toy
The fabric should not be too dense and allow light to pass through. Therefore, you can use flax. When choosing a pattern, it is important to take into account the wishes of the child. Cut the fabric and connect all the parts except the bottom. Fill with sealant.
The fabric is impregnated with any composition that makes it dense (starch, gelatin).
The improvised lampshade should dry well. A small hole is made at the bottom for the cord to exit. The seal is removed. A prepared LED cord is laid inside the structure. You can use a New Year's garland. The bottom is sewn up: the lamp is ready.
Cloud lamp
This kind of lighting device will fit perfectly into a child’s room, and to create it you will need to prepare:
- A small wooden block;
- Cardboard;
- Dye;
- Wall Light;
- Sandpaper;
- Jigsaw.
A cloud-shaped structure is cut out of the block and processed with sandpaper, and the remaining complementary elements are created from cardboard. Then the finished cloud and other structures must be painted with the appropriate color and allowed to dry.
After drying, the wooden cloud is mounted opposite the wall lamp, and the remaining elements are not far from each other, complementing the picture.
Interesting ideas for crafts
Anything can be used as a material for a chandelier or wall lamp. Interesting shapes are obtained from wood, concrete, water pipes, paper and glass. You can also use old items - kitchen graters, children's toys, dishes, gas cylinder.
Finally, a video selection of 19 ideas for homemade lamps.
Chain-link chandelier
To make lighting from this mesh, you need:
- Rabitz";
- Frame base;
- Cable with cartridge;
- Bulb.
To create this type of chandelier, you just need to attach a mesh in a circle to the frame base and lower it to the desired size. At the end, secure with wire in color to make it look beautiful. You can also add decorative elements in the form of flowers.
Plastic spoons
In the style of plastic spoons, ordinary utilitarian objects give an interesting opportunity to create an exclusive lampshade. To do this, take a plastic vessel of the required size and a large number of plastic spoons. It is impossible to indicate the exact quantity, it all depends on the size of the lampshade.
Handles are cut off from spoons. After this, they are sequentially connected to each other using a decorative gun and special glue.
In order for the structure to have the correct shape, the basis is plastic vessels for water or drinks. After the entire structure has acquired the required shape, the glue has dried, and a cartridge with wires is attached to the upper part.
Clothespin lamp
It’s a great idea to use clothespins not only for their intended purpose, but also to create an unusual lamp. To do this you need to prepare:
- Wooden clothespins;
- Glue;
- Plastic tube;
- LED strip.
To begin, the clothespins are freed from the springs and taken apart. Next, each individual element is glued, creating a square. Then, each structure is glued together, and, if desired, each of them is rotated 90 degrees.
While the product is drying, a diode strip is wound around a plastic tube and inserted inside the structure after it has dried.
Textiles and threads
For an original lampshade, denim material is suitable. You can use any item of clothing that for some reason is no longer needed. Ready-made crafts are decorated with ribbons, beads, and bows.
The structure uses a frame on which the fabric is stretched. It is made of metal or wood. The basis of a new piece of furniture can be old appliances. An interesting solution would be a product made from threads that are wound on cans or other bases.
Night light made from tin lids
If someone has a large number of tin cans, then you should not throw them away, because the lids from these cans can be used to make an excellent lighting device. To build such an unusual lamp you will need:
- Tin can lids;
- Old night light;
- Wire frame base;
- Wire cutters;
- Bulb.
First, the lids are removed from the jars. A wire frame base in the form of a circle is attached to the old night light at the top and bottom. Then the first caps go around the upper base of the wire, with the ends facing down.
Next, a cut is made at each cap to hook it to the previous one. When the structure reaches the bottom, the same procedure is done as at the top, the lid bends around the wire, thereby ending the chain.
Now we can say with confidence that from almost every available material you can make a lamp that will please the eye, or will simply suit the design.
This article contains only a small part of what lighting fixtures can be made from, but there are many groups on the Internet where there are not only photos of homemade lamps, but also a detailed description of each of them.
Ideas
Looking at the photos of beautiful homemade lamps, you can’t help but be surprised at how developed the imagination of the designers is. To create lamps, different materials are used, from plastic to glass and fabric.
We invite you to consider the most creative ideas and figure out how to bring them to life by reading the instructions for decorating and designing lamps.
Photos of DIY lamps
Materials that can be used to create chandeliers
What can a chandelier be made from? The answer to this question is: “Yes, from anything.” You can make a pendant lamp from:
- paper;
- thread;
- CDs;
- plastic bottles"
- cardboard;
- natural materials;
- kebab sticks, etc.
Your imagination will help you choose the material. She will also help you choose the right model. To create a chandelier, you can use techniques such as origami, carving, and embossing. In addition, it is appropriate to use knitting and weaving techniques.
Important points when modeling chandeliers
Before you start making a chandelier with your own hands, you need to consider some points:
- It is better to choose LED bulbs rather than the usual incandescent ones. This is due to the fact that they heat up less and therefore become safer during operation.
- Choose materials that are not easily flammable. A mandatory safety requirement.
- Select reliable fasteners that can support the structure in a given shape.