Nowadays, not only ultra-modern designs are in trend, but also old or artificially aged furniture. Sometimes in some interiors objects that have scratches, peeling paint, faded color, or frayed edges .
Moreover, the sets or cabinets themselves may be completely new - they are simply made in this particular style. And a special technology helps to make them so – patination. What is patina on furniture? We'll figure it out by reading this material.
What is patina on furniture
You can create amazing beauty with your own hands
Popularity of aged furniture
Whatever one may say, everything new is well forgotten old. From time to time, things that look similar to those once used by our great-grandmothers come back into fashion. Moreover, despite the apparent antiquity, they look very stylish and organic. This also applies to furniture, and not just clothes or souvenirs, equipment or a number of other items. Moreover, it is not necessary to use exactly old things - in some cases they can be completely new, just artificially aged.
Patina and its types
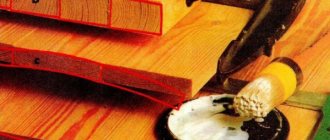
Stain is often used to restore furniture
The effect of artificial aging can be achieved using a number of simple techniques. For this purpose, various chemicals, as well as mechanical or thermal methods can be used. Artificial aging is a technology of antique imitation . Moreover, it is possible to decorate not only furniture in this way, but also doors or windows, etc. Nowadays, aged furniture is considered quite prestigious and beautiful, it seems very reliable and often, contrary to the opinion that a person simply does not have the money to buy a new one, can be considered luxury item.
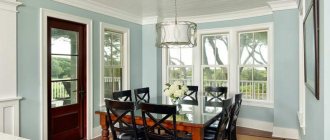
Classic white kitchen with gilding
Table. Methods for aging furniture.
| Methodology | Description |
| Chemical | This is the best way to age wooden furniture. Moreover, this is the easiest option that can be implemented at home. As a rule, it is simply enough to treat the furniture with some kind of chemical (for example, ammonia, if we are talking about hardwood) and that’s it. With coniferous facades you will have to tinker a little. However, the chemical method in any case involves the use of various chemical compounds, including paint. This technique also includes the so-called patination. |
| Mechanical | This option is suitable if you want to realize the effect that insects create during their life. That is, furniture treated in this way will appear to be eaten away by them. To do this, you will need to use an awl and nails, and use them to make small paths or depressions. The main thing is not to forget to clean the damaged surface from the resulting debris and cover it with a protective agent. |
| Thermal | This option is also quite simple and consists in burning out a number of elements using the same soldering iron or special devices. Its natural pattern will appear on the tree. It is enough to remove the accumulated carbon deposits with a brush and cover the surface with stain, and the furniture will turn into a real rarity. |
An impressive duet of craquelure and patina
Dear "Mr. Chest of Drawers"
On a note! The easiest way to artificially age objects made of wood is when it comes to doing it yourself.
Classic aging with acrylic paints
Varieties of patina, composition and consistency
Depending on the idea, using patination you can give different effects to surfaces:
- fragmentary aging,
- full coverage,
- craquelure.
By consistency, working compositions for patina are as follows:
- thick - reminiscent of a paste that is used when processing wood to color it in yellowish or reddish shades, close to gold,
- liquid – made on a water or polymer basis, they give the product shine and improve its appearance,
- faceted varnishes - allow you to create an aged surface by forming a network of cracks.
To process wood, metal or other materials, compositions are used on a variety of bases, which differ in the durability of the finished coating and the degree of adhesion to the base. The most popular are stain, wax, acrylic paint, bitumen, oil, shellac.
stain
The use of stains is the easiest way to artificially age a wooden surface, which is why it is the most popular. Stain enhances wood products, gives them a sophisticated look, and helps “make” cheaper wood into more expensive ones. Products in this group help protect wood from rotting, colonization by fungi and mold, and enhance moisture-repellent properties.
Typically, staining products involves preliminary brushing - removing soft wood fibers with a strong brush, while hard longitudinal fibers remain in place. Brushing is required to provide a more pronounced patina effect. After staining, products are often coated with wax or shellac primer. The range of colors when using stain is limited to dark wood shades, and it will not be possible to use gilding, silvering or other metallic tones.
Wax
Wax patinas in the form of a water-based paste are often used as a finishing coating. They are prepared by combining natural wax and metal dust. There are also colorless compositions on sale, after application of which a beautiful pearlescent sheen remains.
The properties of wax patina are as follows:
- helps to simultaneously emphasize the structure of the wood and tint it,
- easy to apply, dries slowly, easy to rub, so you can work with it in a comfortable mode for the master,
- most often used for small areas, ideal for oak, ash,
- has different shades - silver, brass, bronze, gold, iridescent tones,
- beautifully highlights carvings, patterns, drawings, suitable for relief and textured slabs, cracks using the craquelure technique,
- has high adhesion to wood, plastic, which covers MDF,
- applied with a rag or sponge, polished and dries within 24 hours.
Acrylic
Acrylic patina is a universal composition for wood, plaster, and metal. This material is water-based, but allows you to create a very durable coating that has excellent adhesion to surfaces. After application, the resulting film protects the material from rotting, proliferation of microbes and fungi.
The acrylic patination technology is very simple, even a beginner can handle it. Acrylic patina can be used to treat the entire surface or part of it, or individual protruding elements. To give the base an original look, you can combine compositions of different shades. There is also the option of applying different tones of patina in several layers to obtain a unique effect, a complex color pattern. The choice of acrylic shades is very rich - there are both metallic and classic tones. If necessary, this type of patination goes well with varnishing, decoupage, and regular painting.
Bitumen
The structure of this building material helps give the wood a special look, blackening out the carvings, recesses and relief protrusions and edges. After applying bitumen to wood, the excess is removed with a solvent, and the absorbed composition creates an antique effect (the product will have a dark color).
Bitumen patina is made on the basis of concrete polymer, turpentine, white spirit and is not considered a finishing material. After drying, patinated surfaces must be coated with shellac to consolidate the result, otherwise it will not last long.
Oil
Oil patina is suitable for wood and metal. It does not hide the natural shade of the material and favorably emphasizes the pattern on wooden surfaces. The properties of the oil resemble a waxy patina - it is easy to apply and dries slowly. You cannot use such compositions in the decoupage technique, as they dissolve the paper.
Shellac
The material itself has a yellowish or brownish-red tone, which will become darker as the number of layers increases. It can be used alone or in combination with decoupage, becoming an intermediate or finishing coat. When working with shellac, use a brush or sponge.
What is patina?
What is patination and what does the word “patina” mean? Previously, patina was the name given to an oxide film that forms on metal products and has a certain color. So, she tints copper with a malachite or bluish tint. Brass and bronze also boast the ability to develop a patina. More often, only antiquarians and collectors knew this word; it was rarely used in ordinary speech.
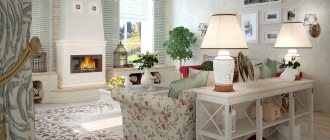
Patinated furniture in the interior
Patina is a little bit of a fairy tale in the house...
On a note! Interestingly, the presence of patina was not considered some kind of defect or something bad. On the contrary, its appearance is a sign of the quality of the product, which could last for many years and not collapse.
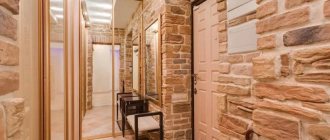
Aged items go very well with deliberately untreated walls.
Over time, the concept of “patina” has become more extensive - this is the name given to any plaque that appears during the aging process of a wooden or metal product. At the moment, the effect of artificial aging is also called patina, and the process of giving furniture an antique look is called patination.
Today patina is the effect of artificial aging
So we can distinguish three types of patina:
- natural or natural , which appears on its own after some time on metal products. The reason is the contact of the object with air, only the oxidation process occurs;
- artificial , which is also formed due to an oxidation reaction, but appears due to the effect of special substances on objects;
- decorative , which allows you to very quickly age an object and give it a special charm. It is this option that will be discussed in this material.
Metal old objects are a frequent design nuance in styles with patina
Country charm
What is patination wax for?
The waxy patina helps bring out the grain of the wood. It hardens for a long time, so it is easy to work with for beginners. The most common use for this type of patina is on small pieces of oak or ash. There is also an oil patina, which is similar in properties to wax, but is more versatile.
Patination is quite popular today, as it allows you to achieve a significant effect with minimal effort. Another advantage of the procedure is that it is easy to learn. Often even amateurs engage in patination.
If earlier the “old” style was given more to the interior of country houses, now it is becoming more and more in demand in apartments. Of course, to be able to implement this finishing method, you will need furniture made from natural wood.
Patination
Nowadays, patination is actively used in the production and restoration of furniture, and both natural wood and the more common MDF panels can be aged. Furniture with a patina can look very rich without actually being expensive. Looking at such interior items, many people think that they see in front of them an ancient set that served some noble family for many years. But in fact, these cabinets were made at the factory just yesterday.
Furniture with patina can look very rich
On a note! It is easy to distinguish artificially aged furniture from furniture that has aged on its own. Just look at the inside of the headset. For artificially aged items, patination is performed only on the outside.
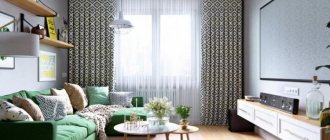
Creamy caramel color scheme with bright splashes
The option with patinated furniture is suitable for those who really love antiquity, but cannot afford to spend fabulous money on good and high-quality antique furniture. Most often, the patina option is used to decorate rooms in the Provence style.
The mirror takes center stage here, but check out the stunning triple table
By the way, some owners of new furniture can age the interior items themselves by patination themselves at home. This technology is not complicated, but it is labor-intensive, but if you want, you can do everything yourself.
Scandinavian style patina
Patination technology involves applying acrylic or other paint to the furniture façade and then grouting it. After that, it is enough to coat the furniture with a special composition (varnish) so that it acquires a matte shine and remains protected from external influences.
Looking at this authentic bureau, it is unclear whether it has aged naturally or artificially
On a note! The patination technique is often used to decorate chests of drawers, armrests of upholstered furniture, cabinet doors, kitchen units, and stools. In short, everything where there are wooden elements.
Boudoir bathroom in a country house
Patina on metal: step-by-step instructions
Patination is often carried out on parts that are exposed to heat during operation - the external parts of the barbecue, fireplace elements, as well as furniture fittings, various corners and linings. In addition to increasing attractiveness, such actions help protect surfaces from damage and rust. The most popular colors for metal patination are gold, silver and white.
To work you will need:
- acrylic paint,
- a set of pieces of gold leaf,
- synthetic brush,
- alcohol,
- glue for gold leaf,
- finishing varnish for gold leaf.
First, you need to degrease the metal part with alcohol and wipe it with a rag. Using a brush, you should paint the surface with acrylic paint, applying it in 2 layers, and after drying, lubricate the base with glue and randomly arrange the pieces of gold leaf, carefully press them with a brush. Then you need to remove the excess from the edges of the product. It is important that the material does not completely cover the surface, and areas of paint are visible in different places. At the end of the work, the part must be coated with finishing varnish.
Patina for wood and metal will serve as an excellent design technique, giving simple products nobility and special charm. Patination is easy and very exciting - everyone should try it!
Types of patina
An artificially created patina appears many times faster than a natural one. This is all explained by the rapid occurrence of chemical reactions that result from the action of certain chemicals on the surface of an object. In this way, you can imitate various shades - from golden to black, and sometimes you even manage to create a unique unnatural color combination.
Patination of furniture
Now there are 4 main types of patina. Let's take a closer look at them.
Table. Types of patina.
| View | Description |
| Liquid | This patina can be achieved using a special varnish called “patina”. It gives the product a yellowish tint. As a rule, it is used by artists who want to give their canvas a little aged look. When working with wood, this varnish is used at the completion stage. |
| Thick | The compositions that are used in this case have the consistency of a paste, usually two-component. Often sold as a set with a finishing patina and base. You can achieve the effects of gilding, rust, etc. A very common look. |
| Water based | This is something akin to paint, which is applied in various ways to the surface of the product. Suitable for many materials, including wood and metal, also used for aging ceramics. The work must be completed before the patina dries. As a rule, only 4 color options are produced - black, white, rust and green. |
| Faceted varnish | When dried, this substance can crack beautifully, creating a craquelure effect. The more layers of varnish applied to a product, the more cracks will form on it. The color range of the varnish is very rich. |
Artificially aged furniture in Provence style
Methods of applying patina. Patination
Patination is the artificial aging of interior items and materials to give them exquisite decorativeness, antiqueness and increased protective properties. Various products made of copper, bronze, brass, iron, wood, gypsum and even polyurethane foam are subjected to patination.
To achieve a patina effect, you can use ordinary acrylic paints, creatively combining them with each other in color. These paints are sold in art stores. The main color is first applied to the item to be decorated. Then the product is allowed to dry and important areas and protruding parts on the surface are worked on with a semi-dry brush with the desired paint. You can use special chemical compounds to imitate the effect of antiquity. They allow you to quickly reproduce the process of oxidation of metals, producing a blue, green or brown patina on the surface of the decorated object.
Craftsmen working with non-ferrous metals have long been able to use chemical and thermal treatment and, with its help, obtain various color shades on the surface of the metal. In addition, the film formed on the surface of a metal product during patination reliably protects it from corrosion. But working with chemical ingredients requires precautions. Many of the chemicals are poisonous and explosive. Working with acids requires knowledge of patination technology and personal protective equipment.
Before patination, the metal product is cleaned, polished, degreased and bleached. Wash in clean water and dry in air or in sawdust of deciduous trees. Small items are patinated by being completely immersed in the solution; large ones - using a brush or swab. When the desired color is achieved, the product is washed in water and dried again.
Patina
The word “ patina ” came to us from the Italian language (patina) and today has two meanings: 1 - a natural coating on the surface of metals (mainly copper and copper-containing alloys), stone (for example, marble) and wood products; 2 - artificial film used in the manufacture of products from the above materials to give them an antique look.
There are many shades of natural copper patina - from green to olive, blue, earthy, red and finally black. All this diversity is produced by copper and its two main alloys - bronze and brass - under the influence of the external environment for a long time. For example, it will take from 5 to 25 years for the surface of a copper roofing sheet to develop a green patina. The time of formation of such a deposit will depend on natural conditions - climate, chemical composition of the atmosphere and precipitation. In the first 3-6 months, copper will only tarnish, over the next 1-3 years it will turn dark brown and only then green. Increased climate humidity can speed up this process. Natural, noble patina is very decorative and, moreover, helps preserve copper products from corrosion, so there is a great demand for it. This forced the craftsmen to think about the problem of artificial aging of products as a way to accelerate the formation of patina.
Today there is a huge selection of special paints and chemicals for creating patina technologically. Patina products differ in the type of material for which they are intended, for example, metal, plaster, wood, as well as in the effect of the appearance of the product (copper, antique gold, abrasions). With their help, it became possible to give an ordinary thing a respectable antique look, transform out-of-fashion and boring furniture, improve the quality of the roof and protect it from corrosion. There would be desire and imagination.
After recovering dug coins, etc. I want to apply an artificial patina. Here are some recipes:
Patination of silver: Boil a couple of chicken eggs into a hard boil. Clean them from the shell while hot. Place a silver coin on the edge in the middle of a tea saucer. Place eggs (peeled) on the sides, cover it all with a glass or jar, and watch through the glass how wonderful it is This way the color of the silver changes. We take it out at the desired color. The spectrum ranges from golden to blue-black.
Paints
To achieve a patina effect, you can use ordinary finishing paints in various color combinations with each other. In artists' stores you can easily find acrylic paints of various colors, coverage levels, and in various packaging. It is worth paying attention to a series of paints containing a metallic tint. First, the main color is applied to the object to be decorated - this is the base layer in the patination process. After the base coat is applied, it must be allowed to dry. Then, with a semi-dry brush with gold or other paint suitable for the occasion (silver, patina, copper, etc.), important areas and protruding details are worked out to achieve the patina effect. Such work requires a certain creative approach, and the result will certainly bring satisfaction, since it is extremely difficult to make a mistake in this process.
Lucky
You can age a decorative item using special patina varnishes. Typically, such varnishes are included in a two-component system for creating the crackle effect. But unlike the second component (craquelure varnish), they can be used independently. Patina varnish is a clear, bold, amber-colored varnish with a purple-burgundy tint. It gives the work a dark golden hue and creates a strong, thick and smooth film, protecting well from mechanical and atmospheric influences. To add the effect of antique cracking of the varnish layer to your work, you can use the second component - craquelure varnish of the same brand and series. After filling the cracks with a contrasting composition, the finished work is covered with a new layer of patina varnish. This will protect fragile cracks and give the work a finished look.
Special formulations
On the modern market there are special compositions to imitate the effect of antiquity. They are sold under the general series “Patina” and can be called: “Patina gold”, “Patina bitum”, “Patina verde green”, “Metallic paint for patina” in various colors, etc. These compositions allow you to reproduce the process of metal oxidation in a matter of minutes, producing a blue, green or rusty patina on the surface of the decorated object. The purpose and methods of using patination materials vary greatly. Before using them, be sure to check the instructions for use and use formulations of the same brand and series. Special patination compositions are equally suitable for surfaces such as wood, metal, plaster, etc.
Patination of coins
Patination of coins is a necessary attribute of numismatics, since any numismatist pays special attention to the patina of a coin - artificial or natural, or there is none at all. In general, it is better not to bring a coin to such a state that you have to give it an artificial patina. However, in some cases, a coin can only be cleaned to remove all dirt and deposits, including patina. It is in such cases that one has to resort to patination. I will describe the methods that I use myself, and most numismatists use similar ones.
Patination of copper . There are two good ways here. The first method is to take five grams of simple manganese and twenty grams of copper sulfate. Mix them in water and bring the water to a temperature of 90 degrees and release the coins there. How long to keep the coins there depends on your desire and the accepted color. On average, in 10 minutes the coin takes on a beautiful brown color. Although sometimes it takes much longer, and the color can vary from reddish to dark brown. video patination of copper coins with potassium permanganate and copper sulfate
The other way is also good. It requires sulfur ointment (sold at the pharmacy). Cover the coin, spoiled to pink, with a thin, even layer of ointment and set it aside for literally five minutes. After this, wash off the ointment and look at the color. As a rule, during this time the coin will turn dark brown, and most likely black. Clean it very thoroughly from any remaining sulfur ointment and let it dry. After this, use a cloth soaked in Vaseline to gently wipe it until it turns brown (and it definitely will). Although, if you like black, you can do without it.
Patination of Soviet coins 1, 2, 3, 5 kopecks . Personally, I try to simply wash such coins in soap and that’s it, without removing any patina or plaque. However, you can try and patent it. There are a couple of ways. The same sulfur ointment, but the patina is very uneven and often ugly. Laundry soap - the patina is similar to natural, but the process is long. You just need to hold the coin in the damp laundry soap, turning the coin over periodically. Patination by the sun. Fuck knows why, but if a coin is kept for five months in the open sun, wind and rain, then when cleaned to a shine it takes on a very natural appearance. The patina sets on it perfectly, making it look a little dull and a little brown.
Liver Sulfur Applicable on: Copper, sterling silver, and bronze or brass (light tint). Does not work on nickel silver.
Colors: On copper and silver - a range of shades from purple/blue (difficult to obtain) to brown-gray, gray, black. On brass and bronze - only soft golden. Patina is a very thin layer of sulfide and is suitable for treating textured surfaces. Because the solution acts differently on brass and bronze compared to copper and silver, it can be used for spot (contrast) coloring of silver-brass or copper-brass alloys.
Instructions: Add a pea-sized piece of sulfur liver to 2-4 mugs of hot water. Dissolve completely, check and adjust the strength of the solution. It will depend on whether you are using an old or new chemical and what color you want to achieve. Make sure that the metal you are going to paint is completely clean and free of grease. Wear gloves and grasp the product by the edges or hang it on a wire and immerse it in a warm solution until the desired color is achieved. The dark color is best achieved gradually, alternating between immersion in the solution and rinsing with warm running water. If the surface is stained slightly unevenly, try lightly rubbing it, rinsing it and immersing it in the solution again. This works especially on textured metal surfaces. The solution can be applied to small areas with a brush. But be careful when you start washing it off, make sure there are no streaks.
To paint brass and bronze, use a very, very, very weak solution and repeat the process as above. The result will be light coloring. If no color change occurs, continue diluting the solution with warm water. No matter how illogical it may sound, it often works.
Notes: If the solution is too strong, the color will change almost instantly and a layer will form on the surface that will easily rub off and leave behind an uneven surface. If the metal has not been cleaned well, there may be some patchy staining.
I prefer to use lump sulfur liver rather than concentrated solutions. But this is my personal preference. In both forms, sulfur liver quickly decomposes after unsealing and should be stored in a dry, dark place at all times. The prepared solution is only good for a very short time, so it's best to get rid of it unless you plan to use it in the next day or two. Store in a light-proof container in a dark place. If you notice a white powdery crust on the surface of the liver sulfur piece, this means that the chemical is old and losing its effectiveness. Use more of this chemical to prepare the solution.
Related chemicals, such as barium sulfide and ammonium sulfide, work on the same principle, but the treated surfaces will have different shades.
Patination in ammonia vapor
Used on: Copper works best, brass and bronze can also be painted Colors: Dark brown, olive if using salt, mottled bright blue with flecks of pure metal color (less noticeable on brass and bronze)
Instructions: Secure the wire in a plastic container with a lid that is only slightly larger than the item you are painting. This can be done by drilling small holes near its top edge and passing a thick wire through them. Hang the item to be painted on the wire so that it does not touch the bottom of the container. The metal must be thoroughly cleaned and its surface must have a rough texture (the rougher the better). Pour a small puddle of non-soapy household ammonia into the bottom of the container and close the lid tightly. The ammonia vapor itself will color the copper a dark olive color. You can get splashes of bright and dark blue color by wetting the surface of the product and sprinkling it with salt before painting. After a couple of hours, check how the process is going, rinse and “salt” again. Carry out the final treatment with ammonia alone if it is necessary to obtain a darker background. Rinse, dry completely and wax.
If the item you want to paint cannot be hung, place it on a stand of some kind so that it does not sit in a puddle of ammonia (an upside-down plastic lid works well for this) or place the ammonia in a low container.
Notes: The true bright blue color will only become visible after the product has completely dried. Therefore, to check what color you get, you may need to dry the item before putting it back in the container. The results of using this type of patina largely depend on the processing time and method of applying salt and may vary. You can achieve truly wonderful results that will be worth your time.
Patination in sawdust
Applicable on: Brass or copper. Also, a light shade can be obtained on bronze and nickel, each of them is painted differently.
Colors: Mottled gold, green/blue, brown and black - on brass. Mottled light pink, bright blue and black - on copper. Lightly mottled on bronze and very faint mottled on nickel. An etching effect may occur on products made of brass and copper. Note: This is just one of many solutions that can be used with sawdust.
Instructions: 16 grams ammonium chloride (optional) 16 grams table salt 300 ml non-soap household ammonia (double the amount if staining copper) 700 ml water Mix all ingredients until completely dissolved. The solution can be stored in a hermetically sealed container in a cool, dark place for as long as desired.
The solution can be used not only with sawdust, but also with many other media. I can offer dried leaves, shredded grass, and cat litter. It is worth trying to use anything that can retain moisture and will not dissolve during patination. The results can be very different and surprisingly unpredictable, so take some time to experiment. When using sawdust, remember that it is the degree of roughness that determines the pattern of the resulting patina. Do not use sawdust from plywood or pressboard; the adhesive they contain may affect the coloring.
Treat the sawdust with the solution so that it is damp but not damp. Place them in an airtight plastic container and completely immerse the item to be painted in them. Place several pieces of the same metal that you are painting there, but shallowly, so that you can use them to control the progress of the process without disturbing the product itself. As a rule, the finer the sawdust, the less you want to disturb the product during painting. Painting time varies greatly depending on what metal is being painted and with what medium. For brass, it takes from 12 to 24 hours (the finer the sawdust, the longer). Copper stains faster, usually 4 to 6 hours is enough, but you can leave the product for a longer period. Finely chopped grass or leaves do not absorb moisture as well as sawdust. Therefore, painting with them requires more solution. To ensure a supply of moisture in the depths of the container, prepare a large amount of such media. Place the product closer to the surface. This way it will color better and it will be more convenient to check it and turn it over every hour so that the coloring is more uniform.
When dyeing is finished, rinse and leave to dry overnight. Finish with wax or matte acrylic spray. The solution mixed with sawdust is only good for a few days. It is best to prepare a fresh mixture each time.
Notes: This is a very flexible patination method, so don't be afraid to experiment by adding different amounts of ammonia or salt and leaving the piece in the sawdust for different times. If the sawdust is not sufficiently moistened, the coloring will be weak. If the sawdust is too damp, the mottled color will not work, and the surface of the metal will simply be etched. And remember: finer textured materials should not be disturbed, while a piece embedded in coarser materials such as leaves will need to be turned more often to ensure even coloring. EXPERIMENT!
Patination of brass
Brown and black colors.
Make a solution of 1 liter of water and 60 g of sodium sulphate salt, which is more often called sodium thio-sulfite, or hyposulfite. In everyday life, hyposulfite is known as a fixer for photographic paper and film. Add about 5 g of acid (nitric, sulfuric or hydrochloric) to the solution. A violent reaction will immediately occur, releasing sulfur dioxide. The solution will take on a cloudy milky color. Dip the brass product into it and after a few seconds, remove it and inspect it. Patina forms very quickly. If the desired color is achieved, rinse the product and dry. The solution has a patination power for about 20 minutes, then it becomes unusable. True, an aqueous solution of hyposulfite can be stored for a long time, but only if no acid is added to it.
Do not overexpose the metal in the solution. Inexperienced craftsmen, wanting to achieve a more intense black color, keep the product in the solution until a thick black coating forms. This patina is very weak and can be easily washed off with a stream of water. It is also not worth achieving an absolutely black color because the natural shine of the metal is lost under a thick film. Whatever color the patina has, the metal should still be slightly visible from underneath it.
If instead of strong acids you add about one tablespoon of vinegar to the hyposulfite solution, the same reaction will occur with the release of sulfur dioxide, but it will proceed much more slowly. To get an almost black color, brass will have to be kept in the solution for at least half an hour.
Olive, brown and black colors
Make a solution of four parts ammonia, five parts water and two parts copper oxychloride. Copper chloride and ammonia fumes are poisonous, so follow the safety rules we talked about. Stir the solution with a glass rod.
It will take on a deep dark blue color. A brass object with a coin in it quickly turns olive green, then dark brown and black. After removing the item from the solution at the desired stage, rinse it with water and wipe with a dry cloth. The patina is so durable that it can only be erased with abrasive materials. You should not wipe it with oil - the film already has a beautiful metallic sheen.
Orange-red color Dissolve 5 g of potassium sulfite (potassium sulfite) in a liter of water. coin in solution, the brass object will be covered with an orange-red coating in a few minutes. After washing, wipe the metal with oil.
Gray and black colors A durable and beautiful patina is formed on the surface of brass and copper treated in an aqueous solution of sulfur liver. To prepare sulfur liver, you need to mix one part of powdered sulfur with two parts of potash in a tin can and put it on fire. After a few minutes, the powder will melt, darken and begin to sinter, gradually acquiring a dark brown color. (By the way, sintering of the patination mass gave the name “liver” in the old days - from the word “furnace”, “sinter”.) During sintering, sulfur vapors can ignite with a weak blue-green flame. Do not knock down the flame - it will not deteriorate the quality of the sulfur liver. After about 15 minutes, stop sintering. For long-term storage, crush the sulfur liver into powder and place it in a glass jar with a tight lid. When making a solution in one liter of water, add 10-20 g of liver sulfur powder. The patina obtained on metal in a solution of sulfur liver is durable and beautiful.
Copper patination
Black and gray colors Copper, like brass, patinas well in an aqueous solution of sulfur liver, acquiring a thick black color. But such intense coloring is not always necessary. Sometimes, to give an antique look to a copper product, it is enough to apply a light gray tint. Pour 2-3 g of liver sulfur and 2-3 g of table salt into a liter of water. After the gray color appears, wipe the product and dry it.
Red-brown color An aqueous solution of zinc chloride and copper sulfate colors copper red-brown. Mix one part copper sulfate with one part zinc chloride and dilute in two parts water. A few minutes are enough for the copper to acquire a red-brown color. After washing and drying, wipe the metal surface with oil. source
Patination options Option 1 Only coins minted using non-proof technology are considered. For gold - platinum - palladium - no way. This is not required. For iron - zinc - aluminum - not worth it. She'll lie down on her own. For nickel - I haven’t encountered the need. For copper and bronze. Sodium sulfide, or sulfur ointment, or sulfur liver is taken, the coin is smeared and rubbed to the desired shade of patina. Only for copper. A hot solution of potassium permanganate and copper sulfate (I don’t remember the proportion) and a coin is dropped into the solution. For silver. In principle, the same as for copper and bronze (sodium sulfide, or sulfur ointment, or sulfur liver). You can bury it in a flower pot, having previously fertilized the soil. Alternatively, just put it in a pile of manure. I haven’t tried it, but they say that after six months it develops a stunning patina.
Option 2 After cleaning copper coins, you can create an artificial patina on them by placing 50 g of copper sulfate and 5 g of potassium permanganate per 1 liter of water in a solution, heating it to a temperature of 70-80 C and holding it there until the desired color is obtained. From the book “Chemistry in Restoration” in this case a golden brown patina with a crimson tarnish and moderate shine is obtained
Option 3 Copper can be treated with sulfur ointment, it doesn’t seem to be sold, but pharmacies make it to order. Sulfur ointment is applied in a small portion to a thin rubber glove (on two fingers), and then to a coin. Attention, the procedure for rubbing the ointment onto the coin is carried out under water (a small bath was used that allowed the coin to be completely immersed and left freedom for the hands).
The coin is gently rubbed between your fingers until all the shiny areas are hidden (don’t forget about the edge). Then, under a stream of running, warm water, wash off the excess ointment from the coin and the coin is wiped with a napkin and dried. Usually I stopped at this stage, but the result did not always suit me. Yesterday I moved on. Leave the coin for about forty minutes. Then we polish the surface with a soft napkin (if light areas appear during the polishing process, it’s okay - the most interesting thing is yet to come).
Now wash the coin with soap and a soft toothbrush (don't overdo it). All the blackness disappears and a pleasant light brown patina remains (which does not leave marks on the fingers). We dry the coin.
Recipes for solutions:
Light brown patina. g/l sodium dichromate - 124 nitric acid (density 1.40 g/cm3) - 15.5 hydrochloric acid (1.192) - 4.65 ammonium sulfide 18% solution - 3-5 applied with a brush immediately after preparation, rinse off after 4-5 hours and repeat after drying 2 times, polish with a dry cloth.
From dark brown to warm black patina g\l ammonium persulfate - 9.35 caustic soda - 50.0 for 5-25 minutes in a bath with a solution heated to 90 -95 degrees. rinse, dry, repeat 2-3 times
From olive to brown color, Berthollet salt - 50*70 copper nitrate - 40*50 ammonium chloride - 80*100 for 10-15 minutes in a bath with a heated solution to 60-70 degrees. the resulting films have mechanical strength and corrosion resistance
Brown-black patina ammonium molybdate - 10 ammonia 25% aqueous solution - 7 solution must be heated to 60 - 70 degrees
Stable golden-colored patina copper sulfide - 0.6 caustic soda - 180 milk sugar - 180 alkali and lactose solution are prepared separately and only then drained
If you find an error or typo, please select a piece of text and press Ctrl+Enter.
0 0 votes
Article rating
What is needed for patination?
Having mastered the patination technique, you can, within a few hours, beautifully and harmoniously age furniture. Moreover, it will look really advantageous if the interior style suits it. Usually paints are used at home, but you will also need brushes, primer, varnish, sandpaper or a special sponge for sanding. As a rule, everything you need can be bought in office departments and partly in hardware stores.
Bed for a titled person
It is best to take two types of paints, for the bottom layer and for the top. The bottom layer can be anything, but the top layer is better made to look like metal (ideal options are gold or bronze).
Advice! Before starting to patina furniture, it is recommended to practice on some unnecessary piece of furniture. Even though the technology is simple, you still need to have some skills to make sure everything works out as it should. For example, you can try to patent a wooden box or an ordinary board.
First, it is better to practice on some unnecessary objects.
It is important to understand that you should not apply too much paint, otherwise you can ruin the texture of the wood and it will simply seem dirty. The coloring composition should be applied to flat surfaces that do not have any special protrusions. Also, you should not apply it where there is constant contact with surfaces (for example, on furniture handles) - the paint will not stick anyway.
DIY wooden chest
In our new article, we look at the best options for making chests with your own hands. Ideas, step-by-step instructions and tips can all be found in this article!
Tools and materials
Before work, you need to prepare all the necessary consumables - paint with an aging effect (with elements of bronze, silver, gilding), regular paintwork if you plan to repaint the product. Instead of paint, you can use wax, stain, shellac or mastic, depending on the chosen patination option.
Other process components that may be required:
- brushes of different sizes,
- roller (for large surfaces),
- sandpaper,
- primer,
- furniture or metal varnish,
- a rag to remove excess paint,
- cotton and foam swabs.
Some craftsmen additionally purchase metal powder if the effect of the paint seems insufficient: it is usually used to artificially age metal fittings. There are also ready-made kits for sale for patination and antique restoration - “Patina Verde Green”, “Patina Gold”, “Idea Patina”. Most of the products included in the kits are suitable for various materials - plaster, metal, wood.
How does patination occur?
Let's see how to patent an ordinary furniture box with your own hands, creating a scuffed effect on it.
Step 1. First of all, the box needs to be sanded using sandpaper. This procedure will get rid of unevenness and roughness. After the box has been sanded, dust should be wiped off with a cloth.
First, the box is sanded with sandpaper.
Step 2. Next, the places that should ultimately appear shabby should be treated with regular candle wax. These can be the sides of the box, as well as some places on its flat surface. The pre-treated surface can also be coated with wood primer. If primer is used, it should be applied in a thin layer.
The necessary areas are treated with candle wax
Step 3. Then the box needs to be coated with paint of the main color. In this case, white acrylic paint is used. It must be applied carefully with a brush to the entire surface of the box. This paint dries quickly, and you must wait for it to dry before carrying out further work.
Application of white acrylic paint
Step 4. Next, the box needs to be sanded again. The procedure will allow you to get rid of some of the paint, so you need to sand the surface in those places where the paint needs to be removed. It can be easily removed in areas that have been waxed. You need to work along the grain of the wood.
Repeated sanding Sand only those areas where paint needs to be removed
Important! There is no need to use paper that is too rough. Otherwise, there is a risk of damaging the surface of the box.
Step 5. Next, the furniture needs to be given a dirty effect. It is created in the area of the corners of the drawer. And for this purpose a composition will be used, which is called patina. In this case, it is better to take a water-based one. A small amount should be applied to a palette or any plastic surface that you don’t mind getting dirty.
A small amount of patina is taken
Step 6. The best way to apply the patina is with a piece of sponge. It is necessary to lightly moisten the sponge with the patination compound and apply this composition to the surface of the furniture with gentle, gentle movements.
The sponge is moistened with a patination compound
Patina is carefully applied
Step 7. Next, after all the compounds have dried, you need to coat the surface of the box with varnish, preferably not glossy, but matte. The work is completed. All that remains is to dry the surface of the box, screw the fittings to it and you can use it.
Applying varnish
This is what the finished aged box will look like
By the way, patina can be applied in two layers. Then the colors will be more saturated. But you shouldn’t be overzealous, otherwise the furniture will look unnatural.
Video - Patination of furniture facade
Patinating wax luxwax
Patina based on water-soluble wax. It is used for decoration using patination techniques, tinting relief elements, highlighting cracks. On untreated wood it reveals its structure and also creates a protective water-repellent layer. Dries slowly and does not smear. Does not require fixing with varnish, it is a finishing coating.
General characteristics:
- Type wax
- Water base
- Surface type wood
- Volume 40 ml
Additionally
- Shelf life 365 days.
- Country of origin: Russia.
Patinating wax price buy
You can find out the price and buy luxwax patination wax on Yandex.Market.
Find out the price on Yandex. Market
Patinating wax luxwax reviews
Tatyana, December 30, 2022, blue
Cool wax. I took four colors. Good quality. Satisfied. I recommend
****
Nina, December 04, 2022, green, golden
soft wax. patinas well...liked it
****
Sergienko Tatyana, December 15, 2020
Luxart Wax is an excellent decorative coating. This is not a thick paint, it is a modern water based wax. Dries in approximately 24-48 hours at normal temperatures. After drying, it can be coated with varnish, or acrylic. As a decorator, I have something to compare with. In addition, the wax in the jar does not dry out after a month, like, for example, Cadence, no matter how you close it. A very soft product rich in pigment, I am very pleased.
Where is the best place to put such furniture?
Aged furniture can look great in any part of the house, be it a living room, bedroom, kitchen or hallway. The main thing is that it matches the style of the interior as a whole.
Don't you think Jane Eyre lived in this room?
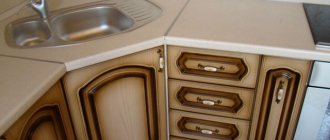
Aged kitchen sets look very good . They seem very cozy and are conducive to spending pleasant evenings with the family around the table. Patinated facades go well with countertops that imitate stone, and on the walls to complete the overall picture in the kitchen, you can hang paintings in antique frames in silver or gold. It is best to patina white or brown kitchen sets.
Kitchen in the style of an old bar - very cozy!
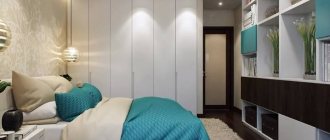
Patinated bedroom sets look very luxurious. Moreover, it is good if not only the bed and nightstands are aged, but also wardrobes and other furniture in the bedroom. Ideally, the doors between rooms will also have an antique effect.
Stylish nursery for an “adult” child
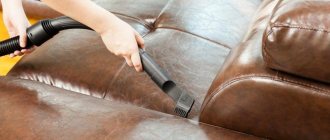
It is important to understand that products with patina, despite the fact that they have an aged appearance, require care and attention. They need to be regularly cleaned of dust, but no abrasives or aggressive chemicals should be used. The latter can cause irreparable harm to products that will lose their beauty.
It is important to properly care for aged furniture
In general, patinated furniture is unlikely to lose popularity anytime soon. So you can either buy a ready-made version, or age the one that is already in the house. It’s not difficult to create an antique effect, especially since everything you need can be found in the store. And doing it yourself, although it will take a lot of time, will cost much less than buying a new headset. The main thing is to master all the skills and practice before you take on finishing all the furniture at once.