Successful busy people must have hobbies. This relieves stress and reduces the risk of a heart attack. You can collect candy wrappers and coins, or you can take up a serious craft. For example, glue a furniture panel with your own hands. The process is not as complicated as it might seem, but it requires at least minimal knowledge of the tool.
Tools and materials for making furniture panels
- Circular Saw.
- Milling machine.
- Drill.
- Hammer.
- Electric planer.
- Belt and surface grinders. You can clean the wood with emery cloth, screwing it onto the block. True, it will take a little longer.
- Reismus.
- Clamps or homemade devices for tightening boards.
- Long metal ruler, pencil, tape measure.
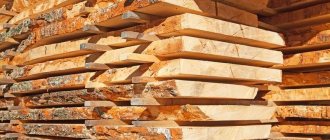
- Lumber.
- Plywood and thin slats for holding the shield together.
- Glue.
WHAT YOU NEED TO GLUE WOODEN BOARDS INTO A SHIELD
- Plane;
- A circular saw;
- Clamps;
- Hammer;
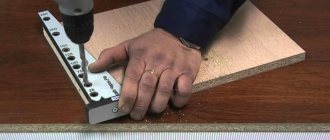
- Gauge for marking;
- Measuring and drawing instruments;
- Equipment for wood processing (surface grinding and belt units). If they are not available, then you can use sandpaper, but then leveling will take longer;
- Wood material;
- Wood glue;
- Electric planer.
IMPORTANT: You need to use good glue to ensure that the boards are joined together well.
- Impeccable high-quality wood glue Kleiberit 303.2. It has excellent moisture resistance and is characterized by powerful fixation. Suitable for both indoor and outdoor use, for gluing various types of wood. Product price starts from 6,600 rubles per unit of 28 kg.
- Kleiberit pur-glue 501. Excellent quality glue suitable for all types of wood, slabs, and ceramics.
Preparatory work
First, let's decide what size furniture panel we need in order to stock up on enough material. In any case, the blanks should be longer and thicker than the final parameters of the shield. We select boards from wood of the same species, dry and smooth, with a minimum of knots. It is also necessary to know the basic properties of wood. We offer a small carpenter’s dictionary so as not to get confused in the concepts:
- Faces are the wide longitudinal sides of the boards.
- Plots are separate bars, planks, cut from a wide board.
- The lamellas are solid, unjointed pieces. Actually the same as plots.
- Looseness is a random arrangement of wood fibers in a workpiece. It occurs when a board is cut from the butt of a tree.
- Sapwood is the outer layer of wood located just below the bark.
According to the advice of old masters on how to make good quality furniture panels, plots are taken that have a width to thickness ratio of 3x1. This lamella is stable because the internal tension of the wood is not enough to split the lath. We've all seen boards that are cracked at the ends. This is the case when the stress of the material caused by improper drying splits the workpiece. This means that we first cut the lumber into slats no more than 15 cm wide. During the cutting process, we also remove all defective sections of the boards.
Before assembling the panel, take into account that wood warps in different directions when dried. It is strongest in the direction of the growth rings (tangential direction), and twice as weak in the direction of the core lines (radial direction). We glue the sawn blanks in the order indicated in the very first photo:
Panels a and b: core to core, sapwood to sapwood. This will avoid warping when the board shrinks, which reduces the strength of the adhesive joints.
Shields c and d: we orient blanks with pronounced curling along the lines of annual rings, then the deformation of the finished shield will be much less.
Wood selection
To prevent the furniture board from bending when drying, buy dried boards. If for some reason, for example for financial reasons, you are using green wood, then use one that has a radial or intermediate cut - such boards give minimal distortion when drying.
The type of wood is also important. Since the furniture panel consists of many bars, it is important that each of them is as strong as possible and resistant to any destructive influences.
That is why we give preference to Siberian larch - practically the only tree in nature that is as strong as it is durable. At the same time, larch is almost not subject to rotting
And don’t forget about the price - compared to other equally durable species, larch is much cheaper.
Step-by-step instructions for making furniture panels
- We lay the boards in the desired position, achieving the optimal location of the annual rings. Before disassembling the structure, we mark the material in a way that we understand (for example, by drawing a triangle). The markings will help you quickly find the desired lamella in the future. The ends of the boards must be sanded before gluing.
- To make making furniture panels with your own hands faster, we put the boards in a pack and coat the ends with glue. If you put the plots in a plastic bag, the glue will set more slowly, and we will have time to assemble the workpieces into a shield.
- If the farm has large clamps, we tighten the glued wood with them. Many craftsmen use such a device as a clamp assembled from scraps of boards. The tightening moment is ensured by driving wedges between the stop and the end of the board. You can squeeze the boards between the brackets of metal shelving. The principle is the same - the edges are joined together using wedges and wooden blocks.
- Carefully, sparing no time, dry the glued board. To obtain a flat and smooth surface, we plan and sand the wood, while simultaneously removing traces of glue.
Element gluing technology
After all the bars have been prepared, you can begin gluing them directly, which will ensure a high-quality shield. This procedure is also divided into successive stages:
- a device is selected that makes it possible to glue the bars together, and it must be even, and usually a regular sheet of chipboard is used for this;
- strips are fixed along the edges of the sheet, and their height depends on the parameters of the prepared bars;
- bars are laid between these slats, and they should fit tightly to each other and an attractive pattern should be formed from them;
- if there are cracks, they can be easily eliminated with a standard jointer;
- then the bars are glued together, for which different types of glue intended for wood are used, but the use of PVA glue is considered optimal;
- the entire surface consisting of bars is completely spread with glue, and it is important that the product is evenly distributed over the surface;
- the lubricated elements are pressed tightly against each other;
- two more such planks are laid on the slats, fixed to the chipboard sheet, after which these elements are connected with self-tapping screws, and this is necessary to prevent the resulting shield from bending;
- the resulting blank is left for about an hour, after which the shield is released and left for a day.
Thus, having figured out how to glue elements to obtain a furniture panel, this process will not require significant effort. The procedure is easily carried out on your own, and the result is structures that are effectively used to create numerous furniture, doors or even full-fledged coatings, characterized not only by high strength, but also reliability, as well as an attractive appearance.
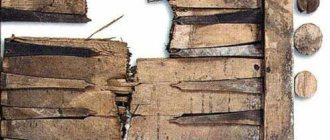
Fastening the slats
Lay out the bars
Gluing the bars
We lay two more planks
Leave to dry
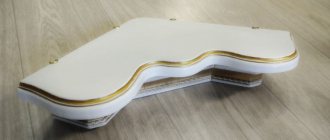
Soft armrest
up
When installing an armrest, you are limited only by the size of the space for the platform and belts, the size of the back panel of the shield, your own dimensions, and simply personal preferences. To give you instructions, I've drawn a drawing above that shows the measurements I used on my personal shields. The angle of the armrest is about 30 degrees, but you can have someone hold the shield while you move your arm around to get the angle that suits you best. Please note that all dimensions are approximate and may be subject to change at your discretion.
Next we want to make our armrest. I use chamois for the top cover as it is durable but flexible. You can use other materials, just make sure they are strong enough. You could use canvas, just make sure you fold the edge down slightly a few times to keep it from unraveling. I use a 1.9cm (3/4″) thick piece of padding from a fabric store. Just make sure you get padding polyester, not polystyrene foam. Your hand will thank you later.
Read also: Programs for calculating cutting angles
I use small nails to attach the chamois to the back of the shield. Before attaching, you need to try and figure out where your hand will be on the backboard. You can use my photos as examples. Once I figured out where I want it, I nail the suede from top to bottom, and to the sides. I use 1 cm (3/8″) cloves. You don't want the studs sticking out of the front panel - so they are shorter than the thickness of the shield. After I attach the suede to the top and sides, I place the filling underneath the suede. The filler is trimmed so that it is slightly smaller than a piece of suede. And then we nail the remaining sides of the suede.
Pine
| Thickness: 18 mm Category: “ Extra ” - spliced along the length (“ Natur ”) Material: pine | |||||||
| Length, mm | Width, mm | ||||||
| 200 | 250 | 300 | 400 | 500 | 600 | 800 | |
| 2000 | — | — | 918 | 1 224 | — | 1 836 | 2 448 |
| 2500 | — | — | — | 1 530 | 1 913 | 2 295 | 3 060 |
| 3000 | — | — | 1 377 | 1 836 | 2 295 | 2 754 | 3 672 |