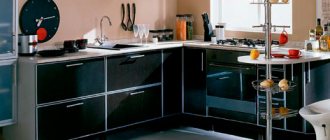
Today, kitchen furniture manufacturers produce a whole arsenal of various products. However, this abundance does not always satisfy the consumer. In this case, a do-it-yourself wooden kitchen set will be an excellent alternative to purchasing ready-made kits.
DIY wooden kitchen in a modern style
The kitchen is one of the most functional corners of the house, which means that increased operational requirements are placed on its furniture. When making kitchen furniture yourself, you should consider the following nuances.
– Small area. In old-built apartments, all the rooms are quite compact, and therefore it is important to carefully plan the rational organization of the workspace.
– Exposure to temperature changes and high humidity. Resistance to these factors is mandatory.
– High degree of exploitation. All coatings must be wear-resistant.
Do-it-yourself compact corner kitchen made of light wood
The benefits of making it yourself
DIY wooden kitchen for a country house
Personal participation in the furniture business provides a number of significant advantages.
– Personal quality control of products at each stage of production. Employees of furniture companies do not always show proper responsibility, and therefore their products often contain various defects. This can be avoided if you do the kitchen yourself.
– Freedom in choosing shapes, models and designs. You can design a kitchen set taking into account all your wishes.
– Selection of quality materials and fittings. The owner is interested in purchasing high-quality components for his future furniture.
– Cost savings. Labor costs are excluded;
– Pleasure from the process. Creating a kitchen out of wood with your own hands is a creative and exciting process.
Unusual kitchen in rustic style, made by yourself
We take measurements of the premises
To make a kitchen set, you need to check the quality of the surfaces: evaluate how smooth they are, in which areas there are depressions, curvatures, and bumps. For this reason, measurements are taken at three points: under the ceiling, at shoulder level, above the floor surface (5-10 cm). It is necessary to correlate the actual dimensions of the room with those determined from the documents. Based on these data, a decision is made on what type of set should be made (corner, straight), how many cabinets will fit.
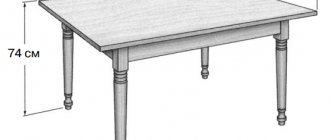
In addition, you need to decide on the height of the headset. When choosing a suitable option, be sure to take into account the average height of the residents of the apartment/house. A set of small height looks inorganic. The structure almost always occupies a significant part of the wall; free space is left under the ceiling in case a suspended, suspended ceiling is installed. In the case when the choice is made on a corner headset, measurements are taken using a laser rangefinder. Otherwise, a simple roulette will be enough.
Deciding on design and construction
Simple and reliable wooden kitchen frame
Particular attention should be paid to the design of the kitchen frame. Kitchen cabinets come in frame and frameless varieties. In frame ones, the frame serves as the basis, making the structure quite stable and durable. It should be noted that the frame is not the most common type of facade for wooden furniture. For a DIY kitchen set, a frameless façade is more suitable. In this design there is no base frame, and the doors are fixed directly to the frame. The absence of a frame significantly expands the cabinet space, making it more convenient and functional. It is important to remember that the appearance of such a kitchen set will be a little unusual. Therefore, adherents of traditional forms are better off opting for frame furniture.
The process of assembling a frame kitchen on site
As for the frames themselves, they also have different variations. The most common are prefabricated and glued. Prefabricated frames are cheaper, but lower quality. A responsible master will not skimp on quality and will opt for a glued frame.
DIY installation of a finished kitchen frame
Choosing the right design is also very important. It must be carefully considered, taking into account the placement of the stove, oven, sink, dishwasher and washing machine. The main design highlight of DIY wooden items is the emphasis on naturalness, simplicity and environmental friendliness. By embodying this idea, the product acquires its true meaning, uniqueness and character. Since the entire composition is a complex and intricate system, it is better not to overload its individual parts with decorative delights. The cozy texture of wood more than compensates for such minimalism.
Original DIY wooden kitchen in rustic style
Kitchen equipment for a summer residence
There is no need to equip the kitchen in your country house with the latest technology, but creating comfortable conditions is quite acceptable. Kitchen equipment should at a minimum include:
- Gas or electric stove.
- Sink.
- Small refrigerator.
- Lighting device.
- A dining group consisting of a table and chairs. Moreover, one table can be used both for its intended purpose and as a work surface.
- The kitchen, organized directly in the house, is complemented by shelves, simple cabinets for storing dishes and bulk products.
Required Tools
Tools for assembling a kitchen set with your own hands
To work independently on an array, you will need the following equipment:
– hacksaw for cutting;
– tape measure for taking measurements;
– confirmations;
– screwdriver, emery sheet, hexagon, primer;
– a manual router – you will need it in order to efficiently profile the edges and holes for fittings;
– Forstner drill;
– level for accuracy of placement of parts;
– iron – it helps to glue edge tapes well;
- electric drill;
– jigsaw;
– plane (preferably electric).
Material selection
Almost everyone can make furniture for the garden and dacha with their own hands, because after building and finishing a house, as a rule, a lot of different materials remain. Even country houses made from block containers or frame structures, which are installed ready-made, require additional devices during installation.
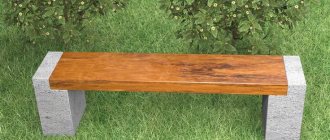
Bench based on wooden logs.
Natural wood is deservedly considered the leader in this area. After all, its processing is simple and accessible. It does not require in-depth professional training or specialized expensive tools.
In the most economical option, you will need a hacksaw, drill, hammer and screwdriver or screwdriver. It’s even better if you have a gasoline or electric saw.
Any items of this type can be made either in a stationary version or collapsible. For example, in a garden or barbecue area, stationary tables and benches on a metal frame or rough log structures stylized in a rustic theme are more often installed.
Magazine set made of logs.
As for the interior decoration of the house or portable, dismountable structures, here, in addition to wood and metal, plywood, chipboard and fiberboard can also be used.
Important: despite the fact that most country furniture is assembled with your own hands from scrap materials, the quality of these materials must be high. No matter how you treat an old board, log or chipboard, they will not last long.
Furniture made from plastic bottles.
Manufacturing process: step-by-step instructions
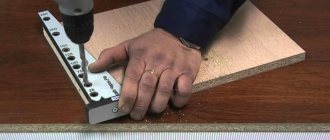
- Preliminary preparation
Before you begin assembling it yourself, you need to prepare all the components and parts of the future array. They are cut out from the selected material using a jigsaw. Their saw cuts need to be sanded. Sandpaper works well for this purpose. To prevent moisture and mold from entering, a melamine edging tape is placed on each of the cuts. In order for the dimensions of all elements to be clearly verified, it is advisable to create a cutting map. There are special services for this on the Internet. This preliminary work will allow you to avoid errors in cutting. In addition, this diagram will take into account the size of the saw cut.
The initial stage of the kitchen furniture manufacturing process
- Assembly of elements
Assembling upper cabinets in the kitchen
After taking into account all the measurements, individual parts and elements have been prepared, they need to be laid out in order of assembly. This will make the assembly process more streamlined.
Kitchen cabinets are assembled according to the following algorithm:
- If there are drawers, then the guides are installed first. In this case, be sure to use a level.
- If shelves are provided, you need to drill holes to attach them.
- Separate holes are drilled for inter-wall fastening.
- Its side walls are attached to the bottom of the cabinet.
- The top part is attached.
- The legs are attached.
Once all the products are assembled, you can begin their installation.
Kitchen furniture assembly
- Installation
If the kitchen assembly process coincides with the renovation, then all construction work should be completed before installation begins. The walls and floor of the room must be prepared for fastening furniture. You can take a piece of MDF as an apron. Installation usually begins with the lower elements. To do this, use a level. After all the products are connected to each other (Euro-ties are used for this), a common wall is fixed behind the entire array.
DIY kitchen installation and assembly
In the countertop you need to mark the location of the stove, work surface and sink. At each section, corresponding holes are cut out and treated with construction sealant. The tabletop itself is attached with self-tapping screws to the finished cabinets.
Installing a countertop is a responsible process
After this, the upper elements are installed. The most optimal distance between the tabletop and the bottom of the upper cabinets is 650 mm. In order to determine the height of the canvas for fastening the upper elements, it is necessary to add to the indicated distance the height of the cabinets and 10 mm occupied by the fastening structure. The upper tiers are secured with special canopies installed on the rear walls.
At the end of the kitchen installation, you fix the doors in the open position with your own hands. To do this, the door hinge is fixed on the door, and then mounted in the wall.
Installed doors in open position
After installing the headset itself, electronics, built-in elements and various accessories (handles, rails, dryers, etc.) are installed.
Installation of an oven and built-in hob
How to make a kitchen
The most compact solution to the problem is the location of the kitchen in the house. But if it is possible to allocate some free space on a summer cottage, the owners prefer to build a separate structure - a summer kitchen. Moreover, it can be either a small light building or an open canopy structure consisting of two or three walls with a roof.
Open summer kitchens allow you to cook and eat food in a comfortable environment, while remaining in close proximity to nature. Often such structures have a barbecue, and the eating area is located in a gazebo or under a canopy.
To build a summer kitchen, choose a cozy place, one of the main wishes for which is the presence or possibility of supplying communications. They create a construction project taking into account the necessary equipment. To build a durable structure, the foundation must be properly prepared. If the soil on the site is quite dense, there is no groundwater nearby, and there is no provision for the construction of an oven or barbecue in the kitchen, a lightweight type of foundation without concrete supports will suit you. Follow the steps in the following sequence:
- Clear the area of vegetation and debris.
- Remove the top layer of soil.
- Mark the contours of the future structure on the selected site. Drive wooden pegs or metal rods into the ground along the contours. Stretch string or fishing line over them.
- Deepen the entire area by approximately 30-40 cm.
- Compact and level the bottom.
- Pour a layer of sand 10-15 cm thick. Level and compact the surface. To do this efficiently, water the area little by little.
- Next, cover the prepared area in the same way with layers of crushed stone, a second sand layer, and a dry mixture.
- Perform final leveling (use a level to check surface quality).
- Lay paving slabs or other finishing material intended for the street on dry cement mortar.
- At the corners of the site, dig holes about 50 cm deep each. Install the formwork.
- Next, make a lathing from the reinforcement. Fill it with solution. Compact the mixture.
- Insert 2 metal plates into the concrete that has not yet hardened. We will attach wooden poles to them - supports for the walls and roof of the summer kitchen.
A few words about garden furniture
For stationary garden options, drawings of do-it-yourself summer cottage furniture, as a rule, are not made. This is due to the fact that mostly coarse, heavy materials are used for these purposes. Special precision during installation is not required here, so a simple sketch is enough.
Metal products are rarely used, with the exception of a concrete table in a barbecue area or gazebo. As a rule, it is made on one support pipe; a support frame from an angle or a metal sheet with a thickness of 5 mm is welded horizontally to it on top.
Swing for the garden.
The top plate is most often assembled from wooden planks and rigidly fixed to the support frame. A wooden tabletop is beautiful, but in this case it is impractical. Outside, it will need to be cleaned and re-varnished every year. From experience, we can recommend using an asbestos-cement slab for the countertop; it is less attractive, but will last for more than 20–30 years.
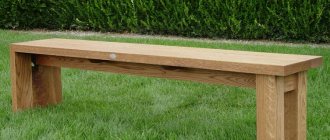
Logs are often used to assemble stationary benches and tables. They are cleared of bark, sanded and varnished. The installation technique is quite simple, the difficulty lies in the volume. It is difficult to process and collect thick logs alone.
The simplest set of pallets.
Advice: in country dacha communities, especially recently created ones, electricity is not always available. Building a house or assembling furniture without electricity now is, to put it mildly, difficult. Renting a diesel generator for your dacha can help out.
The video in this article shows several assembly options.