Interest in handmade products is growing day by day. And it’s not just about savings: mass-produced products lack something ephemeral that gives things a special charm. Usually this elusive substance is called the Soul of the Master.
And even though the master is not yet very experienced, and his creations are far from perfect, they still have soul and individuality. Every time you open a jewelry box made by yourself, you will receive a charge of positive energy that will help you get through another difficult day and make the holiday even more joyful.
Required materials and tools
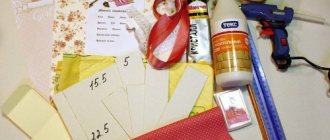
Components for manufacturing:
- Cardboard with a density of 260-280 g/m3.
- Several pieces of different materials.
- Glue (the more the better).
- Lots of fleece.
- Decoration materials (beads, seed beads, etc.).
- Paper tape.
- Office tools.
Necessary tools for creating a casket
Before you start making the casket, you need to prepare the basic tools. Below is a list of what must be at hand, since sometimes during the work there is no time to be distracted by searching for available tools.
- Scissors
- Paper
- Clear adhesive tape
- Glue
- Ruler
- Pencil
- Eraser
- Penknife
Materials for decorating the chest:
- rhinestones,
- clothespins,
- laces,
- ice cream sticks,
- threads,
- postcards, etc.
Regarding the last point, you can look for materials for decoration after the casket is ready, since it will take some time for the glue to dry well.
Also, if necessary, you can add to the above list, because making crafts is a purely individual process and each person’s imagination works differently, so other improvised means can be added.
Simple rectangular or square box
A product of this shape is made of high-density cardboard.
Additional Information! This is necessary to ensure that the final product holds its chosen shape well.
As a base, choose a shoebox. Next, tubes are formed from paper. To do this, take a regular A4 sheet.
You can decorate the boxes with anything.
After the tubes are twisted, they begin to be glued along the perimeter of the base at a distance of 3-4 cm from each other. Do it vertically.
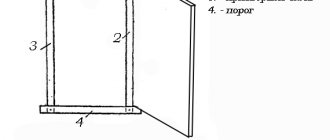
The remaining part of the tubes is glued inside the base, bending them. Inside, the places where the paper guides are glued are covered with thick cardboard. The lid of the box is glued using the same principle. This is a clear diagram of how to make a cardboard box.
Such a box is in no way inferior in beauty and elegance to one bought in a store.
Interesting ideas for decorating a product
The structure of the tree is beautiful in itself. You can simply varnish the product, but it will become truly original after creative decoration, for example, using the technique of relief carving. Using different techniques, you can create unique patterns or compositions on the surface:
- using a semicircular chisel you can make small dimples on the wood;
- An angle chisel will help make the grooves.
Advice! A wooden box must be coated with protective compounds. For light wood, any oil, for example, linseed, is best; for dark wood, wax. You can experiment with the color palette using water-based stains with different pigments.
Round box
The dense part of a roll of tape is used as the basis for a round casket. It may be different in diameter, but in any case it can be beautifully decorated and decorated.
To begin, take thick cardboard and draw 3 circles on it along the outer edge of the roll of tape and 2 along the outer edge. Those that turn out to be smaller in diameter are glued together. This creates the bottom of the box.
The box is a wonderful thing in which you can store various little things.
Those circles that are larger in diameter are also glued together. Cut a strip 4-5 cm wide and a length equal to the diameter of the large circle. This strip along the inner edge is glued to the circle, having first made a small cut along the perimeter. The lid is ready.
Important! This is necessary to ensure that the strip does not deform during the gluing process.
The finished layout is decorated to your liking. This version of a do-it-yourself box for a girl will be a wonderful present.
Not only is it functional, but it also brings a certain charm to the design of your room.
Features of the tea box
The purpose of a tea box is to store exquisite raw materials for preparing your favorite drink. But she has one more important task. By choosing a box that matches the style of your kitchen, you can get an important element that complements and decorates your kitchen interior.
When tea drinking culture was just beginning to develop in England, similar things began to appear in every home. The box, which more often resembled a beautiful box, was a mandatory attribute of tea drinking. It was forgotten for a while, but now the tradition is returning.
A tea storage box can be made of any material. The most popular are:
Wooden. Wood is an excellent material, it is durable and does not allow foreign odors to pass through. The naturalness of the breed allows you to maintain a natural microclimate in the box. Such a box can be decorated to your liking, painted with any designs and patterns.
Tin. Most often, tea is already sold in such a box. When the tea runs out, you can fill the box with new tea bags. Metal does not allow foreign odors or moisture to pass through. It allows you to store tea bags for a long time. But it is better not to store loose tea in a metal box; it will change its taste after contact with metal.
Box made from scotch tape
What can you make a jewelry box from? From completely different items that have the right texture and size! For example, from the remaining base from adhesive tape. The manufacturing process is very simple!
To work you will need:
- bobbin as a base;
- PVA glue;
- scissors;
- cardboard;
- pencil;
- Materials for decoration to choose from (fabric, felt, colored paper, napkins).
Instructions for making boxes:
- First of all, you need to draw two round parts on thick cardboard that match the size of the base. We outline one of them with an additional outer circle, 2 cm larger in diameter. This is the bottom of the future box. We cut out both blanks.
- We make cuts along a larger circle, without going beyond the line of the inner circle. This is necessary in order to bend the edges and glue the bottom to the base.
- We fix the lid with a thick strip of cardboard and tape.
- Next we move on to decoration. You can decorate with colored paper, fabric, felt, decoupage. There are many options! The result is a charming round box that you would not be ashamed to present as a gift to your mother, sister or friend.
Out of boredom
Have you done a home inspection and found a pile of unnecessary shoe boxes? Some of them simply need to be sent to a landfill. But we will need some for creativity. What can you make from shoe boxes with your own hands? Do you know how many interesting things there are!
Article on the topic: What shoes to wear with a cocktail dress
With the right approach and imagination, you can make an interesting box to store your jewelry or costume jewelry. Needlewomen never throw away such boxes. They store their creative tools in them.
Here are a few more ideas for your repertoire of what you can make from shoe boxes:
- desktop organizer;
- pen stand;
- a box for storing chargers and gadgets;
- original chest of drawers for storing clothes and personal items;
- Toy storage box.
If you want, a shoe box can become a full-fledged, and most importantly, exclusive designer decoration for your interior. Most often, craftswomen decoupage shoe boxes. But before we move from words to action, I would like to give novice masters some advice:
- to decorate boxes you can use colored paper, foil, fabric, ribbons, lace, and paint painting;
- before work, you need to think through the design in detail and prepare the necessary tools;
- for decoupage you will have to purchase a special primer and varnish;
- the workplace should be well lit;
- no foreign objects should distract you;
- We work with paints and decorative varnish carefully, protecting our hands with gloves;
- To create the illusion of a smooth transition of colors using the ombre technique, use a regular sponge.
Decoupage is done using ordinary paper napkins. You can choose any design and place it on the box. Both the box and the lid need to be finished so that the product is complete and complete.
Before use, do not forget to dry the box thoroughly so as not to stain things with varnish or paint. Fabric and paper can be fixed not only with glue. It is very convenient to use double-sided adhesive tape. Pay special attention to the corners - they must be perfectly even.
New life for an old book
Another interesting way is to create a box from a book or an old diary. Such a thing is suitable not only for decorations. You will become the owner of a secret cache to store your deepest secrets.
For the manufacturing process you will need the following:
- A book or thick diary;
- Stationery knife and glue;
- Pencil;
- Materials for decoration (fabric, napkins for decoupage, colored paper - optional).
Let's look at the main features and stages of work!
- The cover of the book will act as the lid and bottom.
- The pages need to be cut out, leaving indentations from the edges.
- First, on the first page we draw the shape of the future box. It can be round or rectangular.
- Then, using a stationery knife, we cut through all the pages at once so that the cut line is even.
- We remove the pages; they will no longer be useful.
- Next, glue all the sheets together to form the walls.
- The final stage is decorating the box. Here everything depends on your desire. You can leave the appearance unchanged so that no one will guess about the new hiding place on the shelf. You can decorate the box using decoupage, paints, colored paper or fabric.
Which form should I choose?
First of all, you need to decide on the shape of the future casket. Here you can put various nuances at the forefront: your own taste, the type of things to store, available materials.
The box can have the following forms:
- rectangle - can be made from a shoe box;
- heart-shaped - you will have to purchase it specially, although if you have saved a candy or gift box of this shape, it will do;
- circle - a candy or flower box will do;
- square - a phone box will come in handy here.
Cardboard box in the shape of a heart
This easy-to-make item will help you express your feelings without words and will be a great gift for any occasion.
To make a heart you will need a very small list of materials:
- thick cardboard, scissors;
- glue,
- decorative accessories to choose from.
The box is assembled very simply, in a few steps:
- Draw a heart shape on cardboard and cut out 2 such details. One of them (the future lid) should be a little larger. We select the size of the box individually.
- Cut out a cardboard strip 10-15 cm wide for the sides. On the long side of one of them we cut out triangular teeth.
- We evenly bend the part of the strip with the cuts and glue it to the bottom. If the part is too long, carefully cut off the remaining part.
- In the same way we prepare a second, narrower (4-5 cm) strip for the lid. We make cuts and glue it to the second part.
- The result is a blank that can be decorated according to your taste and desire.
What is needed?
If you're wondering how to make a box with a lid from a box, the most important thing you already have is a cardboard container.
This will serve as the basis. In addition to this, you need to prepare the following:
- pencil;
- ruler;
- eraser;
- a stationery knife or scissors (the second option is less convenient);
- a knitting needle, toothpick or non-writing rod (for making guides along which the cardboard will be bent);
- glue;
- decor (designer paper, fabric, stickers, satin ribbons, beads, flowers, feathers, butterflies, lace).
As you can see, with the help of available materials you can easily turn an ordinary box into gift wrapping or interior decoration.
Dresser made from boxes
From the most ordinary matchboxes you can make an original mini chest of drawers for various small things. Small boxes will turn into charming boxes, their number may vary.
The most important thing is to glue the parts together several at a time and prepare a cardboard frame. Next, the boxes are glued to the main part so that the drawers can slide out.
You can arrange them in different ways, this requires a design approach! If you need a ready-made solution, you can find various schemes on the Internet for making a box with your own hands.
The last stage is decoration! A decoration made from napkins in the decoupage style will look great. You can glue miniature handles (for example, from buttons or beads) onto the retractable parts.
Design ideas
This eye-catching jewelry box will look great on your dressing table.
A matchbox chest of drawers is an original and beautiful interior element.
A recipe storage box will perfectly complement your kitchen design.
It's hard to imagine that this elegant box was once just a package for a phone.
A decoupage box will add coziness to your apartment, and it is also perfect as a gift.
Creating a suitcase box requires quite a lot of time, but the result will exceed all expectations.
The following video shows one of the options for making a do-it-yourself box from a cardboard box.
Casket of greeting cards
From the most ordinary postcards, using thread and a hook, you can make a wonderful casket!
- To do this, you need to prepare and cut out all the parts for a rectangular box: the bottom, the lid and four side parts.
- The density of the blanks must be strengthened by duplicating them with several layers of cardboard.
- At the same time, all parts must have postcards on the front and inside sides.
- The subjects of the pictures are selected at will.
- The layers can be lightly fixed with glue to each other.
- Next, using a hole punch or an awl, carefully make holes along the edges of all rectangles at an equal distance from each other.
- Using a hook and thread we connect the fragments together.
- We tie the lid of the box on all sides and attach it to the base in two places.
How to decorate?
For a homemade box, it is important to think about beautiful decor so that it looks more interesting, brighter and richer. There are many ways to decorate this accessory. The most popular solution is to decorate the product with carvings. Carved caskets look very beautiful and solid.
It is not recommended for a novice craftsman to immediately begin applying intricate and complex carved patterns to structures. You should start with simple shapes or large lines. A master with minimal experience can handle such work, but you need to be very careful and patient to avoid mistakes.
To add carvings to a product, you should apply a certain design/pattern to its surface with a pencil. Each line must be drawn as accurately and noticeably as possible. Next, you need to take a special knife or chisel.
These tools carefully cut out lines and patterns in accordance with the applied design. Small imperfections and defects can be removed with a file or sandpaper.
If you don’t want to waste time carving the product, you can turn to a simpler solution - paint the casket or coat it with a special varnish. The color of the accessory can be absolutely any - it all depends on the ideas of the home craftsman. Caskets decorated using the decoupage technique look interesting and stylish.
The final design of the box can be anything:
- products are often complemented with precious/semi-precious stones and beads;
- the design can be effectively painted;
- attach a flower arrangement to the lid;
- create an aging effect using the craquelure technique;
- attach pearls (natural or imitation) to the lid.
Crafts from candy containers
No less original and attractive will be a box modeled from an old cardboard box left over from sweets. Such containers can have a variety of shapes. There are square, round, oval, multifaceted and many other interesting variations of such boxes. From each copy you can make a chic box.
To make an attractive box from the above box, you will need:
- the box itself;
- multi-colored paper;
- plain paper;
- glue;
- acrylic paint;
- scissors.
Let's consider step by step how you can model an elegant box using these components.
- First you need to prepare a candy box. It must be clean, without candy wrappers and chocolate chips.
- The cleaned container will need to be very carefully covered with paper around the entire perimeter. The entire base should be completely designed in this way. At the same time, it is very important to leave a small supply of paper “finishing” at the edges.
- In order to decorate the lid and bottom of such a box as neatly and aesthetically as possible, you will first need to glue the side areas. The corners must be carefully trimmed, and then also carefully bent inward. At all stages, paper must be taken with a small margin.
- Using sheets of plain paper you will need to decorate the inner cavity of the future attractive box.
- When the interior design is completed, the box must be put aside and not touched until it is completely dry.
“Candy” boxes make especially attractive and elegant boxes. Almost any type of container in question is suitable for carrying out such manufacturing work.
Very beautiful boxes are made from Raffaello candy boxes. After that, you can store a variety of things in them, for example, jewelry and hairpins for girls.
How to decorate with carvings
Carved boxes look much more original and interesting, but such work requires certain skills and knowledge. For beginners who decide to try their hand at wood carving, experienced craftsmen recommend starting with simple geometric shapes and large patterns. With a certain amount of patience, even a novice master will be able to cope with such a task.
The drawing is applied to the surface with a pencil, each line is well drawn. After this, the pattern is carefully cut out with an oblique knife or chisel in strict accordance with the applied markings. Small flaws and irregularities can be corrected with a file or fine sandpaper.
How to make a box from a milk carton?
This method is suitable for those who are just starting to master the design of boxes; it is very simple.
You will need:
- milk carton (you can use a juice carton);
- fabric, paper - the choice depends on capabilities or desires;
- decorative elements;
- scotch;
- scissors and glue.
Algorithm of actions:
- cut the box to form a lid;
- step back 3 cm from the edge that is smaller;
- glue the edges with adhesive tape or thin cloth;
- the base is ready, can be decorated with paper or fabric;
- the outside and inside of the box is glued with the selected material;
- To secure the lid, a braid or ribbon is glued to its edges so that a bow can be formed.
Jewelry box
This elegant thing can be made by anyone; any cardboard box, for example, from a cell phone, is suitable for making.
This is a very easy and inexpensive option.
You will need:
- cardboard base;
- fabric, paper - for decoration;
- scissors, ruler, glue;
- thick cardboard;
- decorative elements.
Algorithm of actions:
- first of all, select the material (paper or fabric) and decorate the box with it using glue;
- you can combine both materials, for example, fabric on the inside, paper on the outside and vice versa;
- three strips of cardboard are formed, their length is measured so that 2 strips are 1 cm longer than the base, and one is also 2 cm wider - sections are made from them;
- the strips are glued inside at the same distance from each other;
- on the strip dividing the width, cuts are formed into which strips for dividing are inserted;
- after this, the sections are decorated with fabric or paper;
- The outside of the box is covered with material and decorated as desired.
How to decorate a box using decoupage technique: ideas, design style, photos
Decoupage is a popular direction in decorative and artistic design. You can master this technique from scratch yourself.
We will tell you what the decoupage technique includes.
Decoupage is a decoration technique that involves gluing a picture and then fixing it with varnish. The varnish helps to fix the picture so that it does not deteriorate over time.
In decoupage, as in other design techniques, there are styles. Let's look at what styles there are in the decoupage technique:
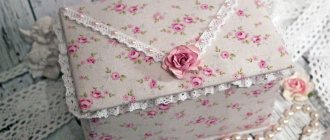
- Shabby Chic . The color scheme is dominated by delicate shades, small or medium-sized flowers, and romantic elements.
- Simplicity . In this style, newspaper clippings, magazines, and elements with printed text are used for design.
- Provence . Picture in the spirit of France, flowers, plants. The style uses pink, beige, pastel shades.
- Victorian style . Products are decorated with gilding; paintings and postcards are also used.
- Ethnic style . Pictures with African, Asian ornaments, exotic animals and birds are used.
- Vintage . Products with an “aging” effect, with scuffs.
The decoupage technique can be used on any materials - leather, metal, cardboard, plastic. But decoupage combines with wood better than all other materials.
You can purchase a set for decoupage, which will contain special napkins with drawings. It is not always possible to buy decoupage napkins. You can print ready-made pictures and successfully use them in this technique.
Plain paper, tracing paper or office paper are suitable for this. Print any design you like on a color printer. Now the paper needs to be thinned. This can be done in the following ways:
- Using tape. Apply varnish to the outside of the picture. You can use regular hairspray. When the varnish is dry, apply tape to the inside of the picture. There should be no folds or cracks. Now carefully tear off the strip of tape. Thus, you need to make the picture very thin so that later it can be used using the decoupage technique.
- With the help of water. Apply several layers of varnish to the picture. Each subsequent layer must be applied when the previous one has dried. Then place the picture in a container of water. After a while, take it out and start rolling the inner layer of paper with your fingers. If the paper is not yet sufficiently wet, leave the picture in the water for a while longer.
The next step is to work with the box. It should be painted, you may have to apply several layers of paint. If you want to get the effect of an old box, you need to apply two layers of paint:
- The first layer is dark.
- The second layer is light.
Then the top layer is rubbed down with sandpaper to dark spots. This creates the effect of scuffs on the box.
Decoupage boxes
At the next stage, paste the picture and open the product with varnish. As you can see, at first glance there is nothing complicated about the decoupage technique. Decorating the product will take time, since the varnish takes a long time to dry. It may take you 1-2 evenings to make a beautiful box. Decoupage is a great idea for those who don’t know how to draw, but want to make a box with a beautiful design. This technique is simple and at the same time looks luxurious if done carefully.
Painting the box
Below are options for beautiful boxes using the decoupage technique.
DIY decoupage box Beautiful handmade box Vintage style box
Making a beautiful box with your own hands is not as difficult as you might imagine. Now you know that you can make an original decorative box literally from nothing. If you have a well-developed imagination, if you like to create and do handicrafts, you will like this activity. Try to do the work carefully, then your box will look very presentable. We invite you to watch a detailed master class in which you will learn how to decorate a box with an aging effect using the decoupage technique.
Paper decor
The design of the boxes can be extremely varied. We offer you a very simple and interesting option. This way you can design any product.
Decoration algorithm:
- tubes are formed from A-format paper;
- twisted tubes are glued to the box around the perimeter, maintaining a distance of 3 to 4 cm;
- the decor is glued in a vertical direction;
- the tubes are glued, bending towards the base;
- the places inside where the paper guides are glued are hidden with thick cardboard;
- The lid and sides of the box are decorated in a similar way.
Master class on creating a box with drawers
You can make an excellent box with retractable drawers with your own hands from available resources, such as cardboard or matchboxes. Regular matchboxes will only hold tiny rings, but if you buy travel or fireplace matches, you can make a full-fledged box.
Required items to create a box:
- thick cardboard - for the frame;
- matchboxes for boxes;
- decorative buttons for handles;
- for decoration, adhesive-based film, wallpaper or leftover leather.
Formation will take very little time:
- matchboxes, without a layer of sulfur, glued together;
- Glue thick cardboard on the outside;
- surfaces that are visible to decorate with wallpaper or film;
- Secure decorative buttons onto fishing line or wire using an awl.
If desired, decorate with beads, drawings, bows.
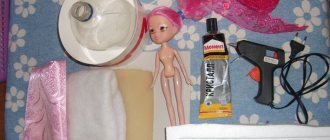
Box in the shape of a doll sofa
Instructions for making a box in the form of a doll sofa:
- cut out the parts in the form of a parallelepiped approximately 7 by 15 cm;
- make an identical element 2-2.5 cm high;
- in a larger box, leave an open hole at the top, fill it with filler and compact it well;
- assembly: place the smaller closed element on the end (this will be the back), and need to be glued from the back to the soft seat;
- form upholstery with beautiful fabric. Completely cover doll furniture and measure to make a cover;
- cut a piece of fabric and sew it, the seam should be at the bottom;
- For better fastening at the bottom of the cardboard, you can make small holes through which you can pass ties or staple the fabric.
The most common materials for crafts
As for materials for creating a box, there are many options. It all depends on the ideas and available tools of the master. Below are the materials from which caskets are usually made, as well as master classes on the intricacies of making caskets from different materials. So, basically, boxes are made from:
- Cardboard
- Postcards
- Newspaper sticks
- Popsicle sticks
- Shoe box
- Plywood
- Matchboxes
Of course, the materials can be completely different, depending on what a person has at hand, but the above are the most common.
From newspaper sticks
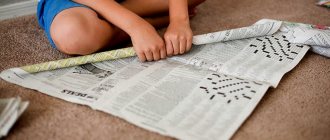
In addition to newspaper, pages of old books or glossy magazines are suitable for twisting “straws”. First, you need to cut the material used into strips about 5 cm wide. Then you need to take a knitting needle and wind a sheet on it diagonally. In this case, the tip of the sheet must be glued with glue. You should have about 18-24 sticks on hand.
The sticks are painted with paint according to the needleworker's taste, and time is given for the paint to dry. Then you need to take a piece of cardboard of the shape that the casket is supposed to be and glue the painted tubes to it. After this, the entire contour of the bottom is first braided with one longer stick and the remaining tubes are glued onto it until the desired height is reached.
When the box reaches the desired height, you can bend and trim the ends of the tubes. Then you can start making a lid for the casket by gluing a textile bow or other decor onto it.
From popsicle sticks
Another idea is to make a box using popsicle sticks. In this case, you need about 30 of them. You will also need hot glue, a little corrugated cardboard, acrylic paints of two colors, scissors, a ruler, a pencil and satin ribbons.
It will look interesting if you paint 14 sticks one color and 15 another. From corrugated cardboard you need to cut 2 rectangular fragments with parameters 5.5 by 7 cm, 2 semicircular fragments with parameters 7 by 3 cm, then all these pieces must be painted.
To assemble the bottom you will need 7 sticks. Cardboard sides are glued to the bottom in a vertical position. The other two sides are lined up with 6 sticks each and attached to the sides of the cardboard sides. The semicircular fragments are connected to each other with 10 sticks, thus completing the lid. Tape is glued to the ends, and the lid is attached with two tapes.
From shoe boxes
One of the easiest options to make a beautiful and useful box is to use a shoe box. To create a casket, just cover the box with fabric or colored paper.
If you need a smaller box, you can use a box of tea, milk, etc. as a basis.
In the case of a milk carton, it will be enough to tip it on its side, make a slot in the shape of the letter “C” on top and bend this piece of cardboard. This will be the lid. Then the box needs to be covered with a beautiful fabric, after which the lid and bottom should be covered with two satin ribbon ties.
From plywood
Another fairly simple way to create a casket at home is to make an object from plywood. The only difficulty that may arise in the first step is preparing the required size plywood bars.
If you take a lid and a bottom of 10x10 cm, then the sides should be 10x8 cm. The sides of the casket are glued together at an angle of 45 degrees. The sides are pre-cut properly. Then the bottom is glued. To secure the lid, you need to install hinges using self-tapping screws. It is very important to chamfer the hinges on one of the sides and on the lid of the box. The outer part of the resulting box is decorated based on the imagination of the master.
From matchboxes
When making a chest from matchboxes, the craftsman expects some minor work. The crafter will need 10 boxes, thick cardboard, glue and various things for decoration: beautiful photos and fabrics for pasting, artificial flowers. First of all, you need to cut out a square frame from cardboard. Then you need to glue the matchboxes together. Usually they are glued together in 2 or 5 boxes, but the quantity can be absolutely any. The boxes in this case will serve as retractable chest of drawers.
The resulting chest of drawers must be glued to the frame so that the cardboard inserts are on all sides. The next step is decorating the box. You can use nails, small hooks, and decorative stones as handles for drawers.
In conclusion, it is worth noting that there are many options for making and decorating caskets at home.
The article provided listed the basic materials at hand and step-by-step instructions with the necessary actions for gluing the boxes. In addition to the above materials, boxes can be made from bamboo napkins, vinyl wallpaper, salt dough, sewer pipe, etc. There are many options and it all depends on the means at hand and the skill of the craftsman. Also, boxes can have unusual shapes and be decorated as much as your imagination and creativity allow.
Other ideas
Of course, the methods of modeling creative boxes do not end at the master classes listed above. A lot of attractive and functional products can be made from matchboxes, from tea leaves, and also from leftover cigar boxes. It is the latter basis that we will talk about below.
If you plan to make an elegant box from a cigar box, then you will need to prepare not only the box itself, but also other components, namely:
- fabric (corduroy or velvet work best);
- foam rubber with a thickness of 1.25 cm;
- thin cardboard sheets;
- stationery knife with sharp blades;
- scissors;
- ruler;
- hot glue gun.
Let's take a look at step-by-step instructions on how to create an impressive cigar box yourself.
- You will need to cut out a rectangular piece from thin cardboard, which will be 3 mm smaller than the bottom of the base box. Use a pencil to mark where the foam pad will end. At this point the cardboard needs to be cut.
- Next, take a cardboard base for a soft pad. It is lined.
- Then take a piece of foam rubber, the width of which corresponds to the size of the cardboard part, but the length should be twice as long. The piece should also be lined into strips 5 cm wide. Next, you need to cut the part along these lines.
- At the next stage you will need to take the adhesive composition. It will need to be applied in moderate quantities to one of the areas on the cardboard. A foam piece should be glued there, having first folded it in half lengthwise. In the same way, you will need to glue all the remaining pieces of soft material.
- Now you need to take a woven piece. Its width should correspond to the size of the resulting base, but the length should be much greater.
- One end of the woven piece will need to be carefully glued to the back of the cardboard base. The material is wrapped, and then they are engaged in pasting the foam pads. The fabric will need to be inserted into the gaps that are present between these soft parts.
- You will need to wrap the cardboard again with the remains of the woven piece and then glue it.
- At the next stage, you will need cardboard, the width of which is 1 cm greater than the height of the resulting pad. It will need to be carefully folded, making an indent of 1 cm from the edge. Make sure that the bent cardboard covers the foam parts.
- You will need to take a couple more woven pieces. They should be 2.5 cm larger than the cardboard base of the structure itself. Be sure to carefully cut off the existing corners. After this, the resulting blanks will need to be pasted over the cardboard bases. The finished walls of the box should be securely but carefully glued to the side bases of the pad.
- The sheet of cardboard that you planned to attach to the remaining section of the bottom of the box should also be carefully covered with the same fabric as all the other parts. The remaining elements are attached to the bottom of the box. The original craft is ready!
- From several matchboxes it is possible to make a very original and creative box, which is a miniature chest of drawers with several drawers. In this design you can store a lot of small things.
- To make a mini-chest of drawers at home, you need to securely glue several matchboxes together. You should also prepare a cardboard base frame. It is necessary to glue the boxes to it in such a way that the “drawers” of the structure can move freely.
- You can arrange matchboxes in such boxes in different ways. Here you can resort to a design approach. At the last stage, the creative homemade product will need to be effectively decorated and decorated.
- Design using decoupage techniques, pasting with colored paper, and attaching miniature accessories in the form of beads, buttons and other similar details are suitable. The design of the finished product can be absolutely anything.
Milk packaging box
A small box is an excellent solution for various small items. That's why girls like her so much.
To work you will need the following:
- packaging for dairy products;
- textile;
- double-sided tape;
- scissors;
- ruler;
- ribbon;
- knife.
We cut out two identical containers from the packaging to create compartments for the box.
We connect them together with double-sided tape and cover the box with fabric. Don't forget to treat the bottom.
Cut out a rectangle from the packaging that will serve as the lid. We cover it with fabric using tape. Glue a ribbon so that you can tie the box.
We connect the base and lid with double-sided tape. A cute box for small items is ready!
Eggshell box
Anyone can make an unusual box with eggshell decor. It looks quite interesting, so it will definitely attract attention.
We will prepare the following materials:
- cardboard box;
- eggshell;
- paints;
- napkins;
- PVA glue;
- manicure sticks;
- brush.
Clean and smooth the box using sandpaper.
We coat a small area of the box with PVA glue and apply the shell to the surface.
Use a stick to poke it a little so that the shell cracks. Then we move the fragments apart to the required distance to form a mosaic.
When all the shells are laid out, treat the surface with PVA glue.
We cover the box with acrylic paint in several layers.
Let's start decorating. To do this, separate two layers from the napkin, leaving the one with the design on it. We coat the surface with a layer of PVA and immediately apply a napkin, after which we apply another layer of glue.
Let the box dry for several hours.
Designer box - a great gift
You don't know what to give your friend for her birthday? The ideal option is a DIY box made from a shoe box. The decoupage master class will captivate you so much that this box will not be your only creation.
To get started, walk to the nearest art supply store and buy acrylic paints. They are ideal for decoupage. You also need to purchase finishing and finishing varnish.
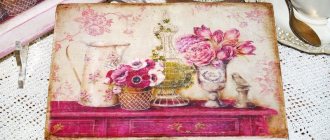
Necessary materials:
- shoe cardboard box;
- paper napkins;
- iron;
- multi-colored acrylic paints;
- latex gloves;
- decorative varnish;
- soil mixture for decoupage;
- a piece of foam rubber;
- pencil;
- scissors;
- sandpaper;
- brushes
Article on the topic: How to stretch leatherette shoes at home
Step-by-step description of the creative process:
- At the initial stage there is nothing interesting, since we will simply prime the box.
- We do the same with the lid.
- There is no need to treat the inside of the box with acrylic primer.
- Shoe boxes are not durable. To prevent our box from falling apart in the future like a house of cards, we will fix the corners with glue or double-sided adhesive tape.
- We will also thoroughly treat them with soil.
- The rough work is over, you can wash your hands and relax. We need to wait for the soil to dry completely.
- To make the surface as smooth as possible, take sandpaper in your hands and rub every millimeter.
- Now let's arm ourselves with masking tape and tape all the corner joints of the box with it.
- We cover the box again with the soil mixture, wait until it dries and sand again.
- We will perform this algorithm of actions until the surface of the box becomes perfectly smooth. Yes, the masking tape should not be visible. After finishing it will be level with the ground.
- Now you can paint the outside of the box with the colors of your choice. To do this, take a brush and try to make the coloring uniform.
- Let the box dry. It’s better to continue the creative process the next day.
- Then we need to treat the box and lid with acrylic glue.
- Apply it with a narrow brush. In order for the brush to serve us as long as possible, we immediately rinse it with water, removing any remaining glue.
- We continue decorating the box after the glue has dried.
- We apply the napkin to one side and smooth it out so that there are no wrinkles or roughness.
- We set the iron to the maximum temperature and carefully smooth the napkin.
- Under the influence of high temperature, the napkin will be firmly fixed to the box.
- Tip: place a sheet of offset paper on top of the napkin. The cloth should not come into contact with the base of the iron.
- We remove all irregularities with scissors. Trim the napkin along the edges of the box.
- We decorate the other sides of the box and the lid in the same way.
- After this, you need to apply a thin layer of decorative transparent varnish.
- Decorate the box lid. We suggest you cut out individual elements from a napkin and glue them using an iron.
- Now let's make the original background. To do this, pour a little acrylic paint onto a palette or into a plastic plate.
- Take a piece of foam sponge.
- We stamp the surface of the box with paint.
- Let's get creative and try mixing shades of colors. It will be interesting and exciting.
- Excess acrylic paint can be easily removed using a paper napkin.
- Paint the corners with dark paint. Playing with contrasts will add mystery to your product.
- Finally, we will coat the box with colorless decorative varnish. This will give it shine.