Any house is filled with things that residents use constantly. However, their presence on the shelves spoils the entire design of the room. They can be hidden, but after a while they will still appear in a visible place. Salvation is in boxes.
After shopping and giving gifts, what remains is an aesthetic and convenient container that is a pity to throw away due to its spaciousness and practicality.
There is no point in leaving them in their original form. In this case, various decor for boxes will come in handy. The article contains ideas that will help you decorate the box yourself beyond recognition.
Purpose of boxes in the interior
Decorative boxes created with your own hands will not only serve as a piece of furniture, but will also help organize the space. This is especially important if the square footage of the house is small. Having placed things in chests, a person can easily find the desired item.
To distinguish the purpose of the box, it can be marked with a distinctive sign or a specific color scheme.
This storage method will teach an adult and a child to be in order. This means that this is not only an excellent design solution, but also a good assistant in the development of accuracy.
Important! You cannot leave the box in its original unattractive state; you need to decorate each box with your own hands in the chosen style.
There are many options for using the resulting chest.
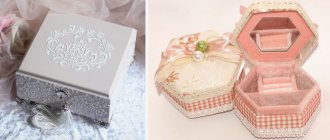
You can put rings, bracelets, and necklaces in it. Handicraft lovers will be delighted with the convenient cookie jar, which holds all the accessories (buttons, scissors, sets of threads, etc.).
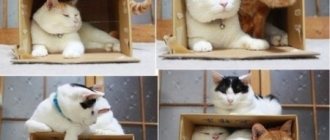
For children, boxes serve as storage places for pencils, markers, and cardboard.
Everyone has chargers that lie in the middle of the table and ruin the whole look. It is better to put them in a special decorative box. And if you find large boxes, then they will fit the baby’s toys or personal belongings of the residents.
Convenient use of cardboard box for chargers.
Decor
The decor of finished products should be based on the following basic principles:
- the style of the room for which the box is intended;
- purpose of the box;
- container manufacturing material.
Decor helps complete the box design and increases its appeal. A variety of materials can be used for decoration - cardboard, ribbons, fabric, beads, etc.
Simple budget options for decorating cardboard boxes - in the video:
Chic design of a craft box literally “out of nothing” - in the video:
Application in different rooms and interior styles
From the bedroom to the bathroom, decorated drawers will be indispensable. The living room is often filled with friends, with whom it is a pleasure to play. This way the chest will store decks of cards, board games, and other entertainment toys. In another place there will be sets of dishes and stacks of photographs.
Transformed with your own hands and beautifully decorated, the box will serve for many months as a “storage” for all kinds of little things.
Note! By sorting everything into specific boxes, the problem of constantly searching for something specific will disappear.
Entering the kitchen, one begs for an arrangement of created “helpers.” All rackets and jars of seasonings are placed in one box, cereals in another, and teas and various types of coffee in a third. An attractive basket filled with fruit can be displayed in a prominent place.
Sometimes masters approach their work so creatively, the degree of transformation is simply impressive.
If you are equipping a children's room, you should use bright colors of cardboard or fabric. Storage containers of different sizes can be used to store books, educational toys, shoes or clothes. If necessary, each box is signed, so the child will understand where the place of a certain item is.
Creative people are able to decorate an ordinary box with their own hands in such a way that it will compete with antique boxes.
For the bathroom, storage for all tubes, jars, and towels will be an excellent helper. You can select a separate container that will contain cleaning products so that if necessary they are at hand.
Due to the high humidity, it is better to use boxes in the interior of this room without cardboard.
The chest of drawers in the hallway is constantly cluttered. To get rid of this, you need to come up with a beautiful container for keys, an umbrella, small items and other accessories that are in constant use. The mounting method will give the room a special touch.
Such storage units can not only stand on the floor, inside a closet, on a shelf, but also hang on the wall.
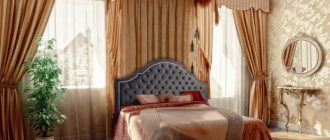
For the bedroom, baskets are used for laundry, evening care items, and other personal items. If the room is combined with a dressing room, then it is quite appropriate to put a separate box for jewelry, a collection of hats or scarves.
The layout will make any space look neat.
Boxes add a decorative touch to any room design.
- Delicate colors emphasize femininity and lightness.
- Plastic (transparent) will complement the design of high-tech, minimalism.
- A classic would be a harmonica with voluminous chest decorations.
- Baskets with weaving will fit into a fashionable ecological style or a country house.
The main thing is to correctly choose the appropriate pattern, shape, shade, and additional components.
Note! The design of rooms in a certain style (Africa, Japan) can be supported by thematic drawings and correct tones. By arranging material, shape, and decorations, any interior is supported.
Decoupage technique
One of the most popular decoration methods is decoupage technique. The base is primed twice, each layer must dry thoroughly. The surface is cleaned with sandpaper, covered with acrylic paint and impregnated with glue, all compounds must dry.
Straightened napkins are applied to the prepared box and ironed through parchment paper. The excess is cut off with scissors, and the box is coated with clear varnish.
Materials and tools
Important! Creating a product is more comfortable if you have a convenient workplace. To do this, you should adhere to several criteria.
- Thinking about the appearance of the container.
- Selection of necessary materials.
- Remove everything unnecessary from the table.
Filling a shoebox with DIY decor depends on many factors, including lifestyle, hobbies, and the overall number of small items in the home.
The following should be on the work surface:
- Scissors.
- Pins.
- PVA glue.
- Scotch tape (regular, double-sided).
- Pencil (preferably special for drawings).
- Thin knife (stationery).
- Paper clips.
The original design of the boxes with your own hands can eloquently remind you of what is inside.
For visual effect and strength, the following materials should be selected:
- New fabric or scraps from clothing (pants, sweater, blouse).
- Wallpaper.
- Sackcloth.
- Packaging type paper.
- Jute.
How to decorate with rope: master class
There are different ways to design a storage box. From ordinary cardboard containers you can create an original basket for threads, socks, toys or cosmetics. An interesting solution is a product with rope decor.
To make it you will need a regular cardboard box, rope, and a glue gun. Then we proceed to making a decorative container:
Take the box.
Use scissors to cut the flaps off the box.
Then wrap the rope around the box. As you work, you need to glue each part of the harness.
- The rope must be glued to the very edge of the box.
- In order for the product to acquire a complete look, it is necessary to make an insert from a light material. The lining is placed inside and the fabric is folded outward.
A beautiful homemade basket can be used for various interior solutions.
DIY storage box decor
Decorations are the most creative stage of production. Various techniques and raw materials are used for it. The main thing here is imagination and experience. Here are some beautiful ways to decorate.
Decor using decoupage technique
You will need the following.
- The basis.
- PVA.
- Washcloth.
- Brush.
- Paints (oil, acrylic).
- Special napkins with a picture.
- Scissors.
Think bigger, use other people's ideas, maybe you have a more interesting scrap, wallpaper or wrapping paper than in the example samples.
After preparing the materials, the following steps are performed.
- Sanding the box.
- Applying paint.
- Cutting out a picture.
- Attach the drawing to the plane, then mark its location with a pencil.
- Spread the paint over the remaining edge with a sponge (do not touch the image area).
- Drying.
- Gluing an image.
Decoration with fabrics
Any type of fabric will do (from guipure to velor).
You can buy anything as a gift to people dear to your heart, but when the work of your own hands is attached to it, it is doubly pleasant.
Stages of work.
- Size correction (you need to take into account 2 cm allowance).
- Fastening with transparent adhesive or tape (double-sided).
Cardboard box decor with wallpaper
To decorate a cardboard box, pasting with any wallpaper using PVA or a special solution is suitable.
You need to wrap the box and lid with background material, but so that there are fewer bends.
- Place the box on the piece of paper and trace it with a pencil.
- Wrapping the base taking into account the bend inward.
- Trimming excess paper.
- Pasting the bottom, sides, inside (in that order).
- Additions in the form of beads, rhinestones, ribbons, lace are optional.
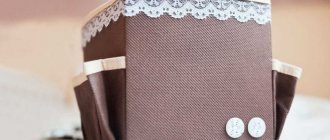
Cardboard box decor with buttons
Tools and materials.
- Varnish spray.
- Tassels.
- "Moment".
- Pencil.
- The basis.
- Ruler.
- Acrylic paint.
- Buttons (various, up to 150 pcs.)
- Pattern.
The decoration of the lid can be varied depending on what will be stored inside.
Manufacturing path.
- Painting the box.
- Drying.
- Select a pattern (heart, horseshoe, flowers or random placement).
- Smooth application of the picture using a compass or pattern.
- Gluing buttons with a small amount of glue.
- Opening with varnish.
Important! Tape each side as it dries.
Box decor using sophisticated techniques
You can be creative and come up with your own way of designing the storage unit. So, the following are popular.
- Decoupage.
- Three-dimensional origami or planar applique.
- Quilling.
If desired, you can master any technique yourself from scratch.
But for the first craft it is better to take something familiar or easy.
Weaving from newspapers
First you need a base - a strong box, a corrugated box, of a suitable size. Next, long thin tubes are twisted from newspapers, which are attached to the bottom of the box at the same distance from each other. These tubes will become racks - they should be made thicker and denser than the rest. The stands are attached to the box with clothespins so that it comes out smooth. Then they are wrapped in thin tubes, using any weaving method, to the very top. The tops of the base tubes are carefully hidden, the edges of the box are smeared with glue, the newspaper layer is pressed to the base with clothespins. The lid is made in the same way, the entire structure is covered with paint and varnish. The interior is lined with fabric or paper.
It is not necessary to leave a thick cardboard base, but this will make the structure stronger.
Decoration methods
As already mentioned, different materials are used for decoration. The most commonly used and available are fabric and paper.
Knitted boxes and baskets
With a little effort, you can create stunning crocheted storage boxes. Such products are suitable for the interior of any room. The original solution is boxes for the dressing room. Such items will not only decorate the interior, but also make it more functional and practical. They are used to place all kinds of things. You can make stylish decor with your own hands.
Detailed lessons on how to weave a basket yourself, as in the photo, follow the link!
Compact and spacious baskets will help create coziness in the kitchen. To make them you will need a hook and ribbon knitted yarn. Such products can be used for storing nuts, eggs or baked goods.
Additional storage containers will also come in handy in the bathroom. With their help, you can correctly place all the items. Original baskets can be fixed in one of the corners of the room.
The elegant decor is also suitable for decorating the living room. You can store blankets, books, firewood or TV bullets in it. A similar basket is especially appropriate in the hallway. Changes, bank cards, wallet or keys will fit inside.
This knitted item looks perfect as a flower pot. Bright decorative elements will create original accents in the room.
Crocheted boxes are best made using a crochet hook. There are a large number of schemes with which you can create an original product.
Baskets made from Ribbon or Spaghetti yarn, braid, rope or knitted yarn are popular. To create decor, you can choose synthetic or cotton yarn. This material is a continuous narrow strip. Products made from yarn are knitted in a short time and hold their shape remarkably well. The original box is ideal for the garden. The basket can be made with or without handles. You can also create a knitted item from old T-shirts, cut into ribbons. The knitted strips should be pulled in different directions so that the edges are rounded. A 10 mm hook is used for this work. Knitting a basket begins with an amigurami ring. For this you will need a special circuit. Then knitting is done in a circle.
Using cloth or paper
An existing or home-made laundry box can be covered with any type of fabric. To do this, you need to take a flap of suitable size. In addition, you need to stock up:
- glue (PVA or special glue for fabric or paper is suitable);
- braid or tape;
- small decorative elements (optional).
First you need to take measurements of all sides of the box. In this case, you need to add 1-1.5 cm to the hem on each side. The easiest way is to take one piece of paper to cover the bottom and sides, and cut off separate rectangles for the front and back walls. Then they need to be glued to the box. When applying glue to the surface, you need to make sure that it is all coated evenly. Otherwise, bubbles may appear later.
Before applying the sticker, the wrapping paper can be moistened in water, then it will lie better on the surface.
After the box is covered with fabric, it must be covered with a thin layer of acrylic varnish and decorated with ribbons, bows, buttons, appliques - whatever your heart desires!
Fabric
The fabric trim is interesting, the choice is unlimited. Subsequence:
- adjust sizes;
- attached with glue, double-sided tape.
Measurements are made by adding 2 centimeters of indentation to the main one. Needed for gluing inside the fabric. The finishing is carried out carefully from the outside, then from the inside. The lid is decorated with a handle, lace, and beads.
Wallpaper
Wallpaper can be purchased in any type. Glue with PVA using a special solution. Finish with varnish. Protects from external damage and moisture.
For decoration, you can use any wallpaper with a pattern you like.
Decor:
- use a utility knife to cut out parts of the wallpaper;
- start gluing from the bottom;
- process the sides of the box;
- the fabric is based inside.
Decorating a box with wallpaper is not at all difficult.
Decorate with stickers, inscriptions, and soft elements.
Newspaper tubes
This is a very simple, but at the same time quite effective way to decorate a drawer or storage box. First you need to take a newspaper and cut it into strips. After this, take a knitting needle and wrap the strip tightly around it. Then the tubes can be painted in the desired color. Now they are simply glued to the box, or you can make an imitation of weaving. But for this option, the base of the tube must be flexible. At the end of the process, the surface can be varnished.
Cigarette paper
This material is characterized by fragility. But this paper makes a beautiful floral decor. The gift can be placed in the center of the paper and the envelope folded, then tied with ribbon.
How to decorate a table for a birthday
Gift paper
This type of paper has low cost and availability. In the store you can choose any material option.
A wonderful option is bright coated paper in a checkered pattern. The smooth coating can be complemented with original forest decor.
The box wrapped in bright paper looks unusual. A wonderful addition would be the red braid.
An original solution: paper wrapper with prints in oriental style.
To wrap gifts, you can use paper with different patterns and in different color palettes. Colorful paper itself is an excellent decorative option.
Even ordinary packaging can be given a little originality. The use of Japanese origami techniques will come in handy for this. An element such as plaiting is performed simply and quickly.
Black paper with golden decoration will give the gift a solid look.
The design made from combined paper looks festive.
Ribbons
Ribbons are often used to decorate the box. The product can be made of organza, satin or paper.
You can use different types of ribbons for decoration. This can be a thin braid, corrugated decor, a foil element or even a woolen thread
You can use bright ribbons to create original flower arrangements. The ornament in the form of roses looks great.
Narrow ribbons can be an excellent addition to the main decor. A good option is to use double elements of different colors. Homemade lambs made from small pompoms also look original.
Satin ribbons combine perfectly with thin lace and openwork braid.
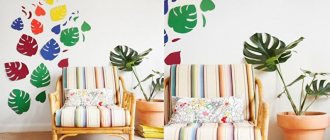
Greenery
Green twigs and leaves can be used to decorate holiday packaging. Plant elements will help give a festive look to even simple packaging. You don’t need to spend a lot of money to create light and stylish decor.
For decoration, you can use not only regular wrapping paper, but also white. You can use it to create frames. Instead of ribbons, plain white twine will do.
You can use any decor for brown paper bags.
Gray and white twine is used for decoration. For larger packages, double threads can be used.
White and brown labels are used for greeting inscriptions.
Leaves and spruce branches are placed under each bow.
Flowers, which can be placed on the surface of the box, are also used to decorate gifts. If the plant itself is used as a gift, it must be beautifully packaged. Decorative baskets and beautiful paper are used for this.
You can also use beautiful branches with flowers, which can be attached with adhesive tape.
Greenery can be attached framed by a beautiful paper napkin.
Plant-style packaging can be complemented with satin ribbons and live plant branches.
White and black boxes decorated with ribbons and plant elements look elegant.
Pompom decor
You can decorate the box interestingly with the help of unusual accents in the form of pompoms. Similar elements can be used as a bow or used instead of the main decoration. A colorful bow made of satin ribbon or even a simple twine is suitable for decoration.
A pompom can be the centerpiece of box decor. This element looks unusual in the form of a flamingo figurine.
Plain packaging can be decorated with multi-colored pompoms. Small parts are glued over the entire surface of the gift.
A fluffy white pompom with a silver ribbon is suitable for decorating packaging in a delicate color palette.
A light pompom goes well with an abstract ornament.
Buttons
An original solution is the ornament with buttons. Required tools:
- patterns;
- different buttons;
- acrylic paints;
- pencils;
- brush;
- quick drying glue.
An original solution is decor with buttons.
The box is painted and dried. Distribute the pattern, draw the expected location. A pattern is used for a uniform pattern. Use a small amount of glue to glue the buttons. Finish by applying a protective varnish.
Important! You can place the buttons when the previous side is dry.
Decoupage technique
This method is more complicated. It will require more time and materials. In addition, it is better to make it not on a cardboard base, but on a wooden, harder one. For decoupage you will need:
- special glue;
- acrylic varnish;
- sandpaper;
- baking paper;
- iron;
- primer;
- acrylic paint;
- paper drawing or decorative napkin.
The first step is to clean the surface to be decorated, sand it with sandpaper and prime it. After this, paint is applied. When it dries, the selected design is taken and applied to the surface using glue. To make it lie flat, you need to cover it with baking paper and iron it with a warm iron. The last stage is applying acrylic varnish. A beautiful storage box is ready!
You can make a lid with a “window”
To do this, in addition to cardboard and decorative elements, you will also need transparent plastic sheets.
When forming a lid in this case, the steps become more complicated:
- To form a window, you need to mark a space in the lid according to its width and height. As a rule, it is enough to step back from the edges a couple of centimeters to make the “window” look organic and stylish.
- Cut out the “glass” for the lid. Please note - it should be 5-6 mm wider than the marked place on the lid itself.
- We glue the “glass” from plastic. It is better to take glue for these purposes with strong fixation. After gluing, you can cover the edges with tape or adhesive tape with a pattern that matches the overall design of the package.
- At this stage, you can start decorating the packaging itself. Any materials that you deem appropriate are suitable for this.
In such packaging, the gift will look bright and impressive.
Templates
In some cases, it is convenient to use ready-made printouts of templates made on a color printer.
But to add gloss and sophistication, experienced craftsmen recommend the use of decorative elements.
Algorithm for working with templates
To create a designer box using a template, you need to perform a series of sequential steps. It is not necessary to carefully adhere to the list, but it is worth studying carefully - even such a seemingly simple job has its secrets and subtleties.
The first thing to do is print out the version you like. Please note: there are several tricks that will help your packaging acquire a signature style.
- One of them reflects the well-known saying: “Measure seven times, cut once.” The fact is that it is very important to carefully measure the distances of the sides of the future packaging and carefully check them with the existing dimensions in the figure.
- If necessary, you can slightly increase or decrease the proportions of the template photo to change the length and width of the box. Once you cut and discover an error, nothing can be changed.
- The second little trick is to use already colored templates. All that remains is to cut and glue, and the packaging will be ready in the best possible way. But there is a nuance here - it is best to print such a template on a color inkjet printer.
- This will ensure your drawing is as crisp and clear as a photograph, regardless of the print size.
The second step is cutting out the template. This must be done slowly and carefully, with sharp scissors, so that the edges of the cut remain smooth and do not bend to the sides.
- The next stage is gluing. Any glue that is convenient to work with will be suitable for these purposes.
- It is important to carefully coat the edges of the box so that when they touch tightly, they grip tightly.
- As a rule, fold lines and seam taping lines are indicated by dotted lines.
The final step is decorating the box.
- You can use ribbons and braid to create a flirty or formal bow.
- It is good to use additional materials - beads or rhinestones can be placed in the center of the bow or glued to the corners of the package.
- Then it will become truly original and unique.
Gift for a man
The decor of a gift box for a man will additionally emphasize a good attitude towards a person. To create a romantic gift, the box is decorated with photographs of them together, a note with wishes is attached, and the product itself is complemented with a dark bow.
To congratulate a colleague, you can choose your favorite alcoholic drink and place it in a box of a suitable size; the box is decorated with coins and complemented by a postcard with congratulations.
Those with a sweet tooth will appreciate a box of chocolates, the set is wrapped in dark wrapping paper. On top, you can create the look of an evening suit from a glued bowtie and a couple of buttons.
The cardboard case for the stylish pen is decorated with a mustache and hat cut out from a template. For bulky and heavy gifts, you can create the image of a suitcase or sports bag.
Boxes for linen (MK)
Such decorative boxes for storing books, shoes, linen and various small items can be made in large quantities; there are many different options for this. One of the practical options for the dressing room is a whole set of boxes with inscriptions or photos of shoes, so as not to search for the right pair every time. Here we use standard packaging boxes for shoes, preferably the same size.
A very necessary thing in a woman’s wardrobe is a laundry organizer box with different compartments for each item of clothing. Such an organizer can again be made from cardboard:
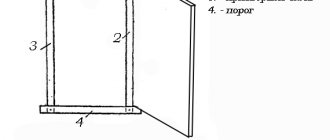
1. It is necessary to measure exactly all the dimensions inside the box: the frame of the box with the cells must exactly match the dimensions so as not to move in the future.
2. Strips of cardboard are cut out, covered with paper or fabric on both sides, the frame must be carefully fastened, pasting all the corners inside and out.
Related article: Homemade chandelier for the kitchen - an exclusive component of the interior (MK)
3. For the cells, strips are cut for partitions; the easiest way is to make cells of the same size.
4. Similarly, we glue the strips of cells on both sides, leaving 1 cm on each edge (ear) for later gluing to the frame.
5. To fasten them together, slots are made in the strips at the required distance: in longitudinal parts from below, and in transverse parts from above; the strips are inserted into each other through the slots - a lattice is obtained.
6. The grille is inserted inside the frame and secured with “ears” into the frame (glued or stapled).
Making a laundry storage box
Boxes with cells made in this way can be decorated by covering them with colored paper and any decorative details (lace, ribbons, etc.).
Using the same principle, a container for sewing supplies is made using a ready-made shoe box. Only it is better to make the cells of different sizes (for scissors, pin cushions, coils). It is better to make the lid of such a box hinged and fasten it with a button.
The easiest way is to buy a ready-made box in a store. But a thing made with your own hands is always unique and inimitable. Therefore, any housewife would prefer, using her labor and imagination, to create the necessary boxes for storing all sorts of small items in her household on her own, saving money.